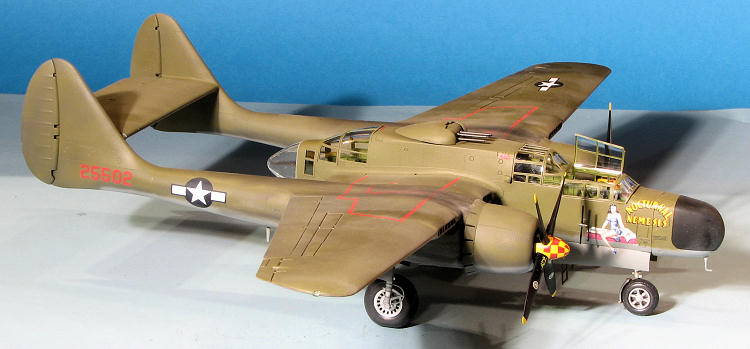
Great Wall Hobby 1/48 P-61A Black Widow
| KIT #: | L4802 |
| PRICE: | $95.00 SRP |
| DECALS: | Two options |
| REVIEWER: | Scott Van Aken |
| NOTES: | New tool kit |

| HISTORY |
The Northrop P-61 Black Widow was the first operational U.S. military aircraft designed specifically for night interception of aircraft, and was the first aircraft specifically designed to use radar. It was an all-metal, twin-engine, twin-boom design developed during World War II. The first test flight was made on 26 May 1942, with the first production aircraft rolling off the assembly line in October 1943. The last aircraft was retired from government service in 1954.
Although not produced in the large numbers of its
contemporaries, the Black Widow was effectively operated as a night-fighter
 by
United States Army Air Forces squadrons in the European Theater, the Pacific
Theater, the China Burma India Theater and the Mediterranean Theater during
World War II. It replaced earlier British-designed night-fighter aircraft that
had been updated to incorporate radar when it became available. After the war,
the F-61 served in the United States Air Force as a long-range, all weather,
day/night interceptor for Air Defense Command until 1948, and Far East Air Force
until 1950.
On the night of 14 August 1945, a P-61B of the 548th Night Fight Squadron named "Lady in the Dark" was unofficially credited with the last Allied air victory before VJ Day. The P-61 was also modified to create the F-15 Reporter photo-reconnaissance aircraft for the United States Air Force.
I found it interesting when reading the rest of the history at the reference link that it was thought that the aircraft was not fast enough!
| THE KIT |
No mass of
sunken rivets/fasteners on this and what few are there are quite understated.
Detailing is crisp and clear, just what we'd expect from Great Wall. The few
parts I've test fit have gone together beautifully. The interior and gun package
areas are fully detailed with decals for the separate instruments and for
placards on the side walls.
 I
particularly liked that Great Wall packaged the clear nose cone separately in
its own sturdy package. You get a full radar to view through that clear nose. As
many of you know, these were not completely clear, but a spray of a matte clear
should make it closer to the opaque it should be. Of course, this all makes
finding room for nose weight to be rather difficult, but those who want to find
the room will. There seems to be a bit of room between the back of the radar
antenna bulkhead and the back of the instrument panel. But I'm sure more will be
needed than what can fit there. One other thing I should mention at
this time is
that the wings are reinforced on the inside. This should take care of any issues
when it comes to warping and should make the wing stronger as well. Fortunately,
none of the reinforcements results in a sunken area on the opposite side, an
issue one often runs into with thick moldings.
There is a photo etch fret that has things like seat harnesses,
entrance door detailing, air brakes, engine harness, rudder pedals and a few
other bits. The kit has separate control surfaces and flaps so you can pose them
as you wish. Speaking of the air brakes, these can be modeled open or closed.
There are indentations in the upper wing to accept these items. The kit also
includes a set of drop tanks but the early P-61A was not plumbed for tanks so
they are not appropriate. Great Wall has already opened slots in the lower wing
for two per side so you'll have to fill them. Those hoping that this boxing also includes
the upper 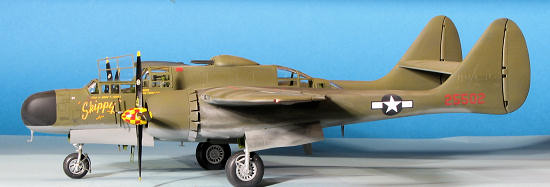 turret will be disappointed
as it is missing from the sprues but will be included in the B model kit.
Actually, only the first few P-61As had the turret. It wasn't fully incorporated back
into the airframe until P-61B production was well underway. Another feature is that the wheels have a flat spot on the bottom so no need for
aftermarket in this regard.
You get full engine detail as well as open and closed cowl flap options. All of
the entrance hatches can be left open should one desire and this includes
leaving off the radome to show the radar array. Options are for two planes, one
is 'Lady Gen' in Belgium, December 1944 in OD/Neutral Grey with D-Day stripes on
the booms. This is the box art plane. I'm not sure why there is an addendum
decal for this marking as they both look OK to me. The other is in black as 'Sweatin
Wally' at Myikyina Burma in 1944. This one is in overall black. Now I have to
admit that I thought the serials on OD planes were yellow, but you get red ones
for both. I'm sure a P-61 fan can chime in on this. The instruction book is the
same superbly drawn type we have come to expect from Great Wall, complete with
color references using Gunze paints. Probably the only thing one could wish for
would be masks for the canopies, but based on all the trimming I had to do with
the FW-189 set, perhaps that is not such a bad thing.
| CONSTRUCTION |
Always a tough choice on a kit this complex, but I figured I'd do as usual and start looking for subassemblies. Things like the wheels and the wings and the horizontal stab were the first. The wings needed those slots filled so I inserted some plastic card, after which they were sanded smooth and super glue used to fill the inevitable holes. This invariably looses detail so that needs to be scribed back in once done. I find that doing it right away means I do not forget and later discover my glitch when applying paint.
 Next, I tackled the interior. This meant the seats. Each of them are made up
of several sections with the gunner and radar operator's seat being no fewer
than seven pieces. This level of detail was to be the norm for much of the
build.
I also glued together as many parts that were the same color as I could. The interior and wheel wells and inner gear doors were all painted interior green using Testors Model Master enamels. The interior green should be a bit darker if you want to get things more correct. There are several inserts to be placed along the inner fuselage walls. These fit fairly well, though I found that a somewhat square piece on the right side needed to have the lower 1/4 cut away to get the forward floor section to fit. It seems that if one turned it 90 degrees to the left that perhaps that would improve the fit. Naturally, I did not find out about this until much later in the build.
Once the interior bits were together, along with the various bulkheads they were painted with the detail work being done prior to gluing in the seats. Every time a piece was attached, I test fit the interior piece into the left side (should have done the right as that was where the above mentioned piece was located). The nose gear well was installed and the main gear wells were assembled as well.
Back at the wings, I glued together the flap sections and then trapped the
long one in between the wing halves along with the small ailerons. P-61s has
their controls locked when on the ground so you will not see these planes with
drooping elevators or f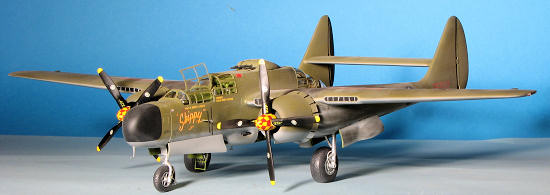 laps. You also will not see them with the air brakes
raised unless undergoing maintenance so the folding sections were nipped away
and these were glued into the recesses supplied in the wings. I found that I had
to glue the flaps in place as they wanted to droop from side to side a bit.
Back at the interior bits, I painted the guns and then glued the pieces for the gun bay. The openings where the barrels protrude on the bay interior section are too small and need to be drilled out to get the barrels to fit. Even then they are tight. During all of this build, I went quite slowly to try to eliminate any fit issues as I met them. There really are not all that many, but one must assemble carefully.
With the seats painted, I installed and painted the etched belts. GWH provides the belts in two major sections and expects you to thread one through the other. Right. I cut off the rear buckle from the forward belt section and then threaded it through, gluing it once in place as I found it impossible to thread as the instructions showed. Once the belts were in place, then were painted then folded down into the seat.
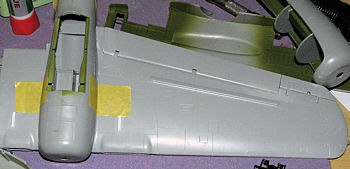 I then moved back to the wings.
Assembling the main gear wells, these were then trapped between the engine
booms. The fit here is actually very good. One thing I did notice is that GWH
has molded antenna onto the lower boom and onto the lower fuselage. While this
does reduce the parts count, it also makes these easy to knock off. Much care
must be taken. With the booms cemented and what filler needed used, I then glued
them to the wings. The fit is really very good. The only place where I had a bit
of a step was in the front. The rear and sides needed a bit of filler, but
nothing like what I expected. This was done to both wings. A bit later, I
attached the rudders and even later on, painted the wheel well.
Back at the fuselage, I glued in the now completed forward interior, and this is when I discovered the problem with the insert mentioned several paragraphs before. When installing this and the other interior section, I taped the fuselage halves together to get the best fit. Let me back up a bit and talk about the instrument panel. GWH provides individual instruments for this panel. It took days to get them all in place as I had to install a few, let them dry, then apply setting solution and repeat. I feel a single decal as provided by Tamiya or Hasegawa might be a better option. There are also placard decals for various areas around the interior. Some are so tiny that I couldn't get them in place. I did install the instrument panel after the forward interior was glued in. There are p.e. rudder pedals and they fit well. I broke the very thin attachment points getting the panel free from the sprue. This was also an issue with the main ladder when it was freed from the sprue, so be VERY careful.
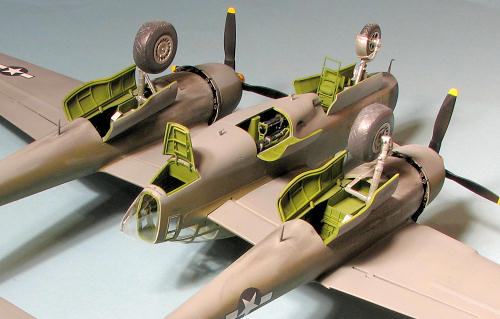
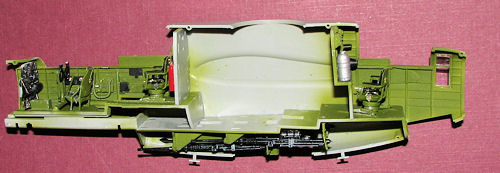 Once the interiors were in
place (and they are a fussy fit), I glued in a pair of windows in the rear as
you won't be able to do so once the halves are together. No frame masking is
required as the lone frame is part of the fuselage half. The windows will have
to be masked prior to painting, however. Generally, the fuselage halves were a
very tight fit. I had to use super glue on the area around the nose gear well
while I squeezed the fuselage together and then applied accelerator.
Meanwhile, I assembled the engines. It isn't difficult to do, but be very cautious as I managed to glue one of the cylinder sections in backwards. These need to face each other. I also broke a couple of intake pipes while removing them from the sprue. The engines were painted dark aluminum and the exhaust stub section was painted manifold color. The stub section was then set aside. Insides of the cowling and cowl flaps were painted aluminum. Judging from the instructions, if one is using the closed cowl flaps, the stub section will not be used. I still need to paint the gearbox section and then paint and bend the p.e. wiring harness, so that will happen later.
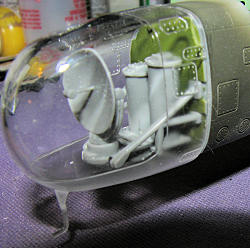 Keeping this one on its nose
gear will be a challenge. I've chosen a scheme using aftermarket decals that
will have a black radome so you will not see the radar system. This gives me
(hopefully) enough room for nose weight as there really is not anywhere else. I
did build up the radar so you can see what it is like when finished and
installed with the radome. One of the
support brackets had a short shot attachment pin on it, but I was still able to
build it up successfully.
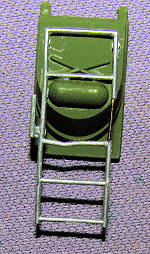
Back at the fuselage, I sanded the seams after filling them with super glue and attached one of the gun bay doors. I knew I didn't want them both open but then couldn't totally hide the work that went into them. Next was the nose gear splash guard. This has a fender attached by photo etch. I hated this method on the FW-189 and wasn't thrilled about it on this kit, but managed to cobble it together. For the nose gear entrance door, I cut away the ladder pieces, managing not only to break one of them, but lose a section as well. If GWH can do this in fine plastic, then they should do the previous bit in plastic as well. Anyway, I managed to repair the missing section with a section of wire as I wanted this door down.
Now I should have installed this door when I put in the forward cockpit floor, but knew I'd trash it if I did. It is a simple matter to cut the hinges and attach. As a note, if you do this and want the door closed, you will have to install it from the inside or it will not fit. Keep that in mind.
There seem to be a myriad of bits to attach to this. One was the gun turret. Now this kit does not come with a turret, but thanks to Terry Dean, I was able to get one from one of his many unfinished Monogram P-61 kits. Terry was kind enough to send the sighting mechanism as well. The turret is just a tiny bit too small but does fit if you cement it far forward in the opening. I then painted and glued in the sight mechanism in the gunner's position. While working on the fuselage, I attached the side radar posts and the small intake on the right side.
Back at the tail booms, I got the engines ready to mount. The kit provided etched wiring harnesses for the two engines but after a very long and futile attempt to attach one of these I gave up in disgust. GWH's instructions are minimal on how these are threaded in there and I have little skill with photo etch. Painting the cowling and cowl flaps takes some thought as the cowl flaps are sandwiched in between the exhaust and the back of the engine. Not an issue if one used closed cowl flaps, but I wanted them open. The engines were then glued to the tail booms.
 The
opportunity was taken to attach the landing gear at this time. Fit is good with
the nose gear, but somewhat weak on the main gear. Frankly, the main gear looks
like it needs something a bit more positive in terms of gluing than just two
small pins, but we will see how it turns out. I also took the time to build up
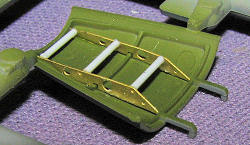
the rear entrance ladder. Two etched pieces with the rungs made from the
enclosed section of rod. You get enough rod to make many, many mistakes!
After this, the clear parts were masked and those not going to be displayed open were glued into place. Those that would be open were tacked in place with a small bit of Future. Other openings were masked shut.
| COLORS & MARKINGS |
Simple Olive Drab and Neutral Grey for colors. Due to
the size of the kit and its rather unusual shape, I did a lot of pre painting.
The booms and wings, elevator, and most of the fuselage were painted before
these sections were attached together. Same with the cowlings and flaps. In
order to assure that the demarcation line would line up, I tacked them together
and tacked them onto the boom assembly for painting. They were then broken apart
for assembly with the engine and exhaust stubs. I also painted
 Interior Green
over the clear bits before applying another coat of Olive Drab.
Once all the sub assemblies were painted, I then started to glue them together. Fitting the first wing/boom assembly was pretty easy. The fit is really excellent. It was the second that made me wish I had four hands. It became quite a handful, but eventually I got it glued on tight enough to where I could insert the horizontal stabilizer. I'll admit that I used a tough of super glue to help out as I had to squeeze the tail assemblies together a bit to get the best fit.
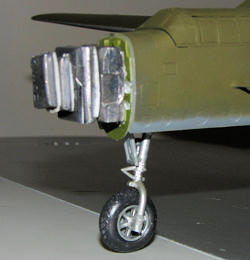
I glued on the nose wheel and pressed the main wheels in place as it was now time to get the nose weighted. I cut off the radar set that I'd tacked into place to see how it fit and started putting on the weight. I used Tape-a-Weight that was given to me by a friendly Dobbs tire dealer. With one full ounce installed, it was a borderline nose sitter. I added another 1/4 ounce just to make sure and then glued the radome in place. Fortunately, this all fit with perhaps a bit to spare, but I'll be switched if I would be able to find room for enough weight were to have not used the nose. We'll see what the 'weight wizard', Terry Dean, is able to come up with.
 The radome was glued on and the kit was given a final
camouflage touch up. I did not fair in the nose piece as I was on a bit of a
time table and wanted to get the model finished. It also did not help that I got
it on a bit cocked and didn't realize it until after the cement had fully cured. With that dry, the airframe was
provided with a gloss clear in preparation for the decals.
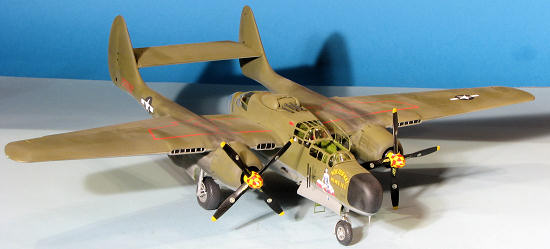
For decals, I used Pyn-Up sheet 48-014: Black Widow Babes part 1, and in particular the P-61A-1 "Skippy/Nocturnal Nemesis". Mainly because the other was a B model. Kit decals were used for all but the unique markings. I had little trouble with these though they do need to have setting solution put on them for them to settle in well. I also recommend attaching one or two decals at the most during any one time as there is very little time between when the decal comes free and the glue goes away. Any delay in applying the marking will mean having to peel it from the backing. I also discovered once the Pyn-up markings were in place that GWH's idea of red and Pyn-Up's were not the same with the GWH markings being a rather bright red. Unfortunately, there were not enough different numbers in the GWH serials to let me cobble together "Skippy"s serial from the GWH markings. I also had considerable difficulty with the spinner markings. The Pyn-Up sheet is designed for the Monogram kit and it is rather obvious that the two spinners are different. As a final note on decals, since I had issues with an earlier Pyn-Up sheet's ALPS nose art breaking up, I coated these with Testors Metalizer Sealer. Up side is no tearing, no chipping; down side is that it makes the decal a bit thicker.
| FINAL CONSTRUCTION |
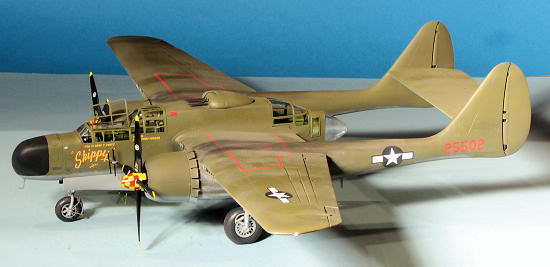 With the decals in place, the kit was given an
overall coat of matte clear. I then started attaching what are quite a few
additional pieces. This included the radar aerials on the side of the fuselage,
the wing tip formation lights, the nose gear shield (attached for what has to be
the fourth or fifth time), gear doors, and the clear tail cone. As a note,
references show this as being a two piece affair that should have a seam between
the upper and lower halves that is not duplicated on the CWH part. A reference
implies that there is one that is split vertically and it may well be that
eventually they did a one-piece tail cone. Just thought you should know. The
boarding ladders were glue in place, pastels used for some staining, a bit of
retouch painting, and the masking taken from the clear bits. I then glued the
separate upper canopy piece open using clear paint and pressed on the props.
Though the gunner's and radar operator's canopy comes separately, these were
almost never opened unless they needed to get out of the plane in a hurry. It
was then that I noticed that the pitot tube had once again broken away (it
arrived like that), so it was glued back on.
| CONCLUSIONS |
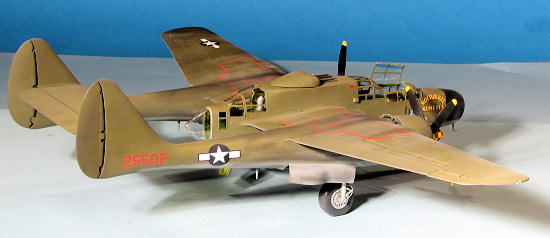 In all, this took me about a month. Not bad for what
is admittedly a rather complex kit. Probably less time than it would have taken
for the Monogram kit as the fit on this one is vastly better. Now I admit that
the paint should be highly faded and probably chipped and generally grungy, but
I don't build many models like that as I'm not good at weathering. So we will
have to put on our 'pretend hats' and pretend that this was the CO's plane and
kept in immaculate condition.....or something like that. I did bow to convention
and used a Tamiya weathering kit to do exhaust stains. The kit really is
superb and aside from a few glitches, mostly self-inflicted, makes into a
superlative model.
Not for beginners but for those with experience building complex kits and working with P.E. If you have the patience to handle the small parts, you will be greatly rewarded. Most highly recommended.
| REFERENCES |
Warbird Tech #15; P-61 Black Widow, by Warren E Thompson, Specialty Press, 1997, ISBN 0-933424-80-9
Combat Chronicles of the Black Widow, by Warren E Thompson, Squadron/Signal Publications, 2011, ISBM 978-0-89747-638-6
September 2011 Thanks to Great Wall Hobby for sending in
the review kit. Pick yours up at your local shop next month when they are
delivered to the USA. A big Thank You to Terry Dean for providing advice and
the turret. If you would like your product reviewed fairly and fairly quickly, please contact the editor or see other details in the Note to
Contributors.