Hasegawa 1/48 P-40K Warhawk
| KIT #: | 09715 |
| PRICE: | $32.00 MSRP |
| DECALS: | Two options |
| REVIEWER: | Scott Van Aken |
| NOTES: | 2006 release |
| HISTORY |
The P-40, while not really an outstanding fighter, was an aircraft that could hold its own at low altitude with most Western fighters of the time. It was also quite rugged and most of all, it was easy to maintain. There were not a lot of complex systems in the aircraft outside of those that helped to keep the big Allison engine running properly. It was also currently being produced when the war got underway so was a natural for widespread use.
 In capable hands, the aircraft was an excellent bomber
interceptor and a very good fighter bomber, despite the liquid cooled engine
that was more prone to damage from light ground fire than a radial. As such, it
was used widely in the Mediterranean theater as well as in the Southwest Pacific
and CBI. these areas were not really considered to be that main thrust in the
war so were not the first areas to get Mustangs, Thunderbolts and upgraded
Spitfires. Those were saved for the UK and that part of the war.
In capable hands, the aircraft was an excellent bomber
interceptor and a very good fighter bomber, despite the liquid cooled engine
that was more prone to damage from light ground fire than a radial. As such, it
was used widely in the Mediterranean theater as well as in the Southwest Pacific
and CBI. these areas were not really considered to be that main thrust in the
war so were not the first areas to get Mustangs, Thunderbolts and upgraded
Spitfires. Those were saved for the UK and that part of the war.
This particular kit has the ability to build what the RAF called the Kittyhawk III. This actually took into account two different airframes; the P-40M and P-40K. The M was a long tailed aircraft, similar to late F and the N series, though with the earlier canopy of the F and an Allison engine. The K was like an E but had an additional fin fillet. Both the longer tail and the fin fillet were attempts to help cure the rather pronounced swing of the airframe from the torque of the engine during take-off.
The Kittyhawk III was mostly used by the RAF and Commonwealth air forces in North Africa and the Pacific, until replaced by more modern types near the end of the war.
| THE KIT |
Normally, I'd have passed on this kit as I already have quite a few P-40s in my stash, but since the shop owner owed me money and this was a new kit with quite a few additional bits, I fell for it. Wasn't thrilled about the $31.95 price tag, but that's world economies for you. The kit sells for 2400 yen in Japan, which is about $22 or so.
There is nothing new in this kit as it is the same
basic airframe as found in the P-40E, but there are quite a few additional bits
and pieces including two different windscreens, three different instrument
panels and two different tails. One is the longer version and t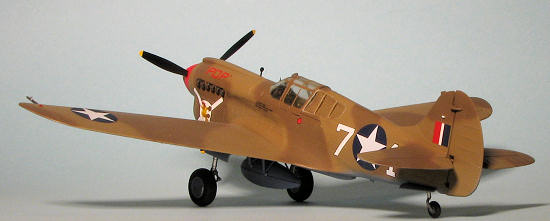 he other is the
type with the fin fillet used in later Es and most of what we call the K model.
The kit also provides both styles of forward cowling engine inserts; one with
the later cooling holes and one without. You could also probably do an L
with this kit if you had the F style nose.
he other is the
type with the fin fillet used in later Es and most of what we call the K model.
The kit also provides both styles of forward cowling engine inserts; one with
the later cooling holes and one without. You could also probably do an L
with this kit if you had the F style nose.
Other stuff is that you get both spoked and covered wheels, though the spoked wheels are for the N and should use smaller tires. You also get the choice of a bomb or drop tank for under the fuselage. The usual inserts are provided for the guns and ejector chutes. I assume that an early two gunned N is in the planning for sometime in the future otherwise, why have these bits as inserts? You are also to fill and sand the small side lights under the cockpit for the M, but not for the K. I still don't know what those are. I don't recall seeing them on any warbirds or museum P-40s.
The instructions are the usual fare from Hasegawa with Gunze color references. There are notes throughout about what parts to use for what version so you don't get those mixed up. One also has to drill out the holes for the ring and bead site. Another option is to be able to use separate clear bits for the formation lights. We who are lazy will simply paint the one already molded in place, and save the clear thingies for spares for our Mauve kits.
Markings are for two planes. One is the P-40M version as shown on the box art for Geoff Fiskin of the RNZAF in mid 1943. All the white stripes are part of the sheet as are the correctly colored roundels. the aircraft is in OD over Neutral Grey according to the instructions. The other is for a P-40K of DB Hauptfleisch of 2 Sq SAAF in North Africa during 1942. This one is in the desert scheme of Dark Earth/Middlestone over Azure Blue with the required Red spinner. The decals are quite well done and seem to be the proper colors. They also seem a tad thicker than aftermarket, but should work well. You get bomb stripes as well as those for the instrument panels.
| CONSTRUCTION |
I chose this kit as I wanted to do a scheme on an Eagle Strike decal sheet.
However, the more I read, the more it seemed I couldn't do the version on the
sheet. Time to switch to plan B and that was also not able to be done with this
boxing. Plan C did have a
 standard P-40K (though many say that late P-40Es have
the broader fin as well). So that is what I decided to do.
standard P-40K (though many say that late P-40Es have
the broader fin as well). So that is what I decided to do.
Step one was to attach the K model rear fuselage halves to each of the forward halves. This is apparently THE way to do this sort of thing as it allows one to be sure there is no major step between the fuselage and tail section. It works very well, but does not alleviate the need for filler on this join. In fact, this plane was not filler free, but much of that was due to the various inserts. None were super tight and for some reason, the depressions into which some of them fit were considerably deeper than the thickness of the part.
I like the separate main wheel well inserts as they fit quite well with no hassles. The kit interior was painted, detailed a bit and built up. I have an Aries cockpit set I was going to use on this, but looking at the detail in the kit and the detail on the Aries set, I noticed there wasn't that much difference. To be sure, the Aries set was a bit nicer in crispness, but isn't the quantum jump in detail one usually expects from resin sets. Rather than hassle with the resin, I decided to save it for a future project and went with the kit bits. Hasegawa provides multiple instrument panels and one is specifically for the K version so that was used when building up the cockpit.
 This time was taken to build up the radiator section and glue together
the drop tank as I'd decided not to use the bomb that was included. I also glued
the wing section together. I knew that the gun insert was not going to be a good
fit, at least based on the P-40E I did years ago. They were not bad, but did
require filler as they see
This time was taken to build up the radiator section and glue together
the drop tank as I'd decided not to use the bomb that was included. I also glued
the wing section together. I knew that the gun insert was not going to be a good
fit, at least based on the P-40E I did years ago. They were not bad, but did
require filler as they see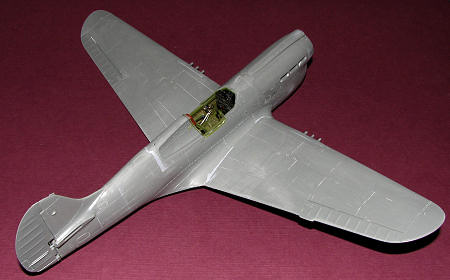 m
to be a tad bit too small for the opening.
m
to be a tad bit too small for the opening.
The kit's cockpit section fits from below so I continued on the
fuselage was cemented together with the nose inserts added. Then the usual
filler and sanding, though not a whole lot, to get it all to fit properly. The
next step was to glue in the cockpit from the underside. I then fit on the wing.
There is a considerable gap in the wings when you first start gluing them, but
by using super glue to tack them up against the roots, you get the proper
dihedral and can then go ahead with standard cement for the rest. Still not a
perfect join so more filler and sanding. The rudder halves were glued together
and after dry and seam work, it was cemented in place. I next tackled the insert
behind the cockpit. As I found out with the P-40E kit, this isn't a terribly
good fit, being a bit small in the rear if
 you get the width right in the front
of it. More filler.
you get the width right in the front
of it. More filler.
Next bits were the little 'knees' in the wheel well area. Best to install these after you do all the sanding on the wing root. This, like the fuselage halves, have a clear bit to install and then sand over. Apparently this was for the gun camera at one time. It is a good idea to fill in the antenna mast hole at this time as well for the plane I'm modeling as well as the K option in the kit did not use it. Tailplanes are next and no hassle. On the underside, I started attaching little bits like the lower cowl flaps and actuator rods as well as the braces and such for the drop tank.
While this was drying, the prop and hub were painted and assembled, ready to push on in the final step. I used Insignia Red for the spinner from the Testors enamel line. I then masked and installed the clear bits minus the rear quarter windows. I just tacked the sliding hood with clear paint so I could remove it later after the kit was painted.
| COLORS AND MARKINGS |
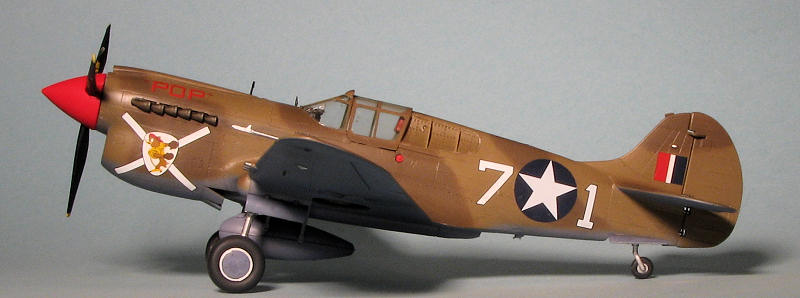
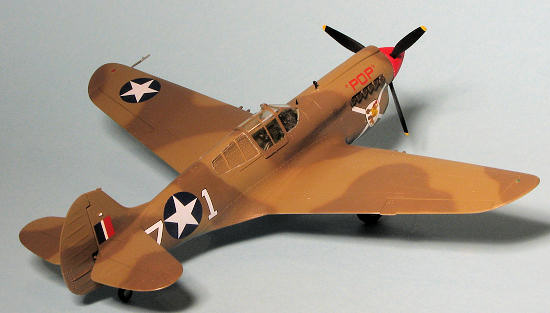
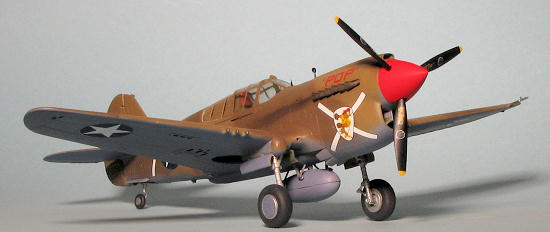
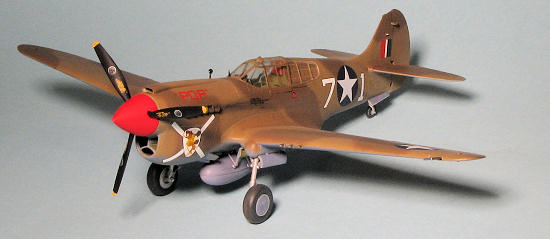
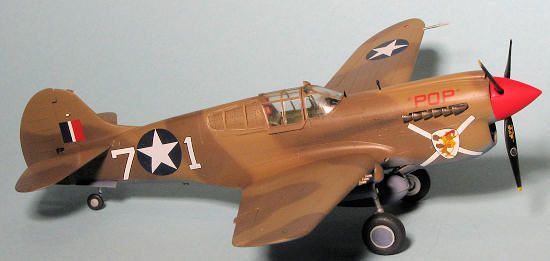
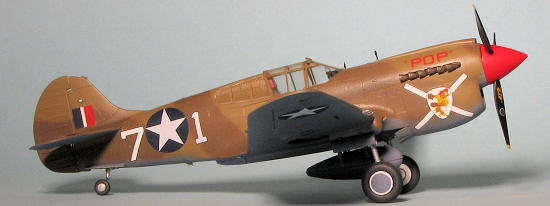
I chose to do a desert scheme for this one and picked
the P-40K-1 'POP' as flown by George Long, 66 FS/57 FG in Tunisia during 1943.
This was in RAF shades of Dark Earth/Middlestone over Azure Blue. For paints, I
used AGAMA acrylics which are among the most accurate shades you can get. I have
to confess that I am less than thrilled to use acrylics as they clog my airbrush
tip 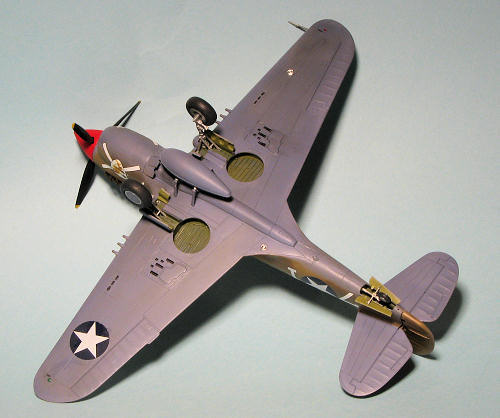 when
doing fine line stuff. They are fine for big areas. AGAMA paint needs thinned
only a teeny amount and really, you can spray it right from the bottle if you so
wish. I also like that when you have to do brush touch-up, it dries exactly the
same shade as the sprayed paint.
when
doing fine line stuff. They are fine for big areas. AGAMA paint needs thinned
only a teeny amount and really, you can spray it right from the bottle if you so
wish. I also like that when you have to do brush touch-up, it dries exactly the
same shade as the sprayed paint.
Anyway, there was the usual fussing back and forth to get the proper camo pattern. I have to say that the painting guide in the Eagle Strike sheet (48-191; Birds of Prey-Warhawks & Kittyhawks pt IV) was not very helpful. If one stuck with the upper view then the left side profile didn't match. There was no guide for the right side. The aircraft was returned to the work bench to have the landing gear installed. This included the various struts for the main gear. The fit is a bit loose so you do need to keep an eye on it until all has dried.
Back to have some painting done and in this case it was the gloss clear coat (Future). The decal sheet is from 2005, but provided absolutely no problems with help from some Solvaset. What was interesting is that apparently the white in the number 7 and the nose badges was double printed as the other white bits darkened up a bit when put in place. I went light on the data markings just because I could.
| FINAL BITS |
 A coat of
clear matte (Polly Scale this time) was then applied once I glued on the gear
doors, wheels, drop tank, tail wheel doors and such. There were still a few bits
to attach, even after all this. I drilled holes with a #77 drill bit for the
ring and bead sights. The forward sight is flat on one side (not very
prototypical). I'm sure there are etched bits that can be used, but I did not
have any. The exhaust was painted 'Exhaust' from the Alclad II line and glued in
place. I then removed the masking from the clear bits, hoping this would pull
the sliding canopy section away. Well, it didn't and even after a bit of 'oomph'
work, it was there to stay, so I left it as is. This stickiness only justifies
my use of clear paint for attaching clear bits and I used it for the smaller
pieces such as the rear-view mirror on the top of the canopy. This piece was
brush painted and matches the surround perfectly. On the underside, I replaced
the two large lights with MV Productions lenses. For the small one, a #29 and
for the larger one a #128. A tad bit of soot and rust pastel for the exhaust and
some black paint in the shell ejector chutes and I was done. No radio mast on
this one.
A coat of
clear matte (Polly Scale this time) was then applied once I glued on the gear
doors, wheels, drop tank, tail wheel doors and such. There were still a few bits
to attach, even after all this. I drilled holes with a #77 drill bit for the
ring and bead sights. The forward sight is flat on one side (not very
prototypical). I'm sure there are etched bits that can be used, but I did not
have any. The exhaust was painted 'Exhaust' from the Alclad II line and glued in
place. I then removed the masking from the clear bits, hoping this would pull
the sliding canopy section away. Well, it didn't and even after a bit of 'oomph'
work, it was there to stay, so I left it as is. This stickiness only justifies
my use of clear paint for attaching clear bits and I used it for the smaller
pieces such as the rear-view mirror on the top of the canopy. This piece was
brush painted and matches the surround perfectly. On the underside, I replaced
the two large lights with MV Productions lenses. For the small one, a #29 and
for the larger one a #128. A tad bit of soot and rust pastel for the exhaust and
some black paint in the shell ejector chutes and I was done. No radio mast on
this one.
| CONCLUSIONS |
I have always enjoyed building Hasegawa kits. They are not shake and bake as you can see from this build article, but they do provide minimal hassles as everything is easy to fix. They are also easy to find and often discounted so the complaints about price are just that as few actually pay retail. Aside from the MV lenses and the aftermarket decals, this one is pretty much out of the box. Recommended for a fun time and a nice result.
February 2010
Copyright ModelingMadness.com. All rights reserved. No reproduction in part or in whole without express permission from the editor.
If you would like your product reviewed fairly and quickly, please contact the editor or see other details in the Note to Contributors.