Hobby Boss 1/72 P-38L-5 Lightning
| KIT #: | 80284 |
| PRICE: | $15.99 SRP |
| DECALS: | Two options |
| REVIEWER: | Scott Van Aken |
| NOTES: | Easy Assembly Authentic Kit |
| HISTORY |
The Lockheed P-38 Lightning was a World War II American
fighter aircraft built by Lockheed. Developed to a United States Army Air Corps
requirement, the P-38 had distinctive twin booms and a single, central nacelle
containing the cockpit and armament. Named "fork-tailed devil" (der
Gabelschwanz-Teufel) by the Luftwaffe and "two
planes, one pilot" (2飛行機、1パイロット
Ni hikōki, ippairotto)
by the Japanese, the P-38 was used in a number of roles, including dive bombing,
level bombing, ground-attack, night fighting, ph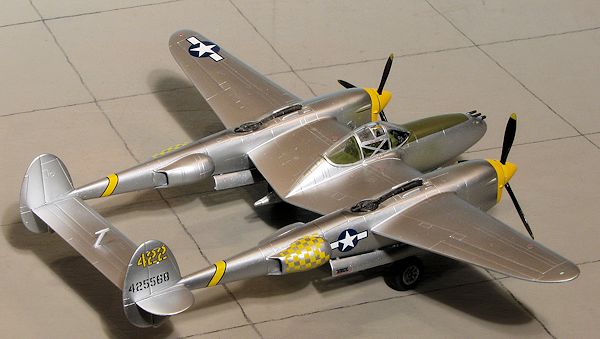 oto-reconnaissance missions, and
extensively as a long-range escort fighter when equipped with drop tanks under
its wings.
oto-reconnaissance missions, and
extensively as a long-range escort fighter when equipped with drop tanks under
its wings.
The P-38 was used most successfully in the Pacific Theater of Operations and the China-Burma-India Theater of Operations as the mount of America's top aces, Richard Bong (40 victories) and Thomas McGuire (38 victories). In the South West Pacific theater, the P-38 was the primary long-range fighter of United States Army Air Forces until the appearance of large numbers of P-51D Mustangs toward the end of the war.
The P-38 was unusually quiet for a fighter, the exhaust muffled by the turbo-superchargers. It was extremely forgiving, and could be mishandled in many ways, but the rate of roll in the early versions was too slow for it to excel as a dogfighter. The P-38 was the only American fighter aircraft in production throughout American involvement in the war, from Pearl Harbor to Victory over Japan Day.
| THE KIT |
After the sub-type misidentification found with the earlier Thunderbolt, I first looked up the serial of one of the two options (the other had no visible serial) and verified that it was a -5. The kit has the anti-compressibility brakes on the underside of the wing, the fairings for the four fuel pumps, and the larger, more bulged boom radiator housings that are major clues to the subtype.
 With that out of the way, it was time to look things over. No
worries about boom alignment on this one as the only major fuselage bits not in
one mold are the fins, lower fuselage and lower forward boom area. This one has
a separate interior but is still pretty Spartan when it comes to details. There
is a two piece control wheel assembly, a seat and an instrument panel to instal, so perhaps this is one of their 'high tech' snaps! The
nose gear well is the underside of the cockpit tub.
With that out of the way, it was time to look things over. No
worries about boom alignment on this one as the only major fuselage bits not in
one mold are the fins, lower fuselage and lower forward boom area. This one has
a separate interior but is still pretty Spartan when it comes to details. There
is a two piece control wheel assembly, a seat and an instrument panel to instal, so perhaps this is one of their 'high tech' snaps! The
nose gear well is the underside of the cockpit tub.
Landing gear both fore and aft have separate wheels, oleo
scissors and retraction struts. The main gear doors, often an issue on P-38s,
are a single construct along with the main gear wells. Boom intakes are separate
as are the fin sections. Turbocharger bits are also separate and the kit
provides a one piece canopy. For things under wings you have a pair of drop
tanks. The nose is separate as are the forward engine nacelles. It is here that
one will load in the 6 grams of weight to keep it on its main gear. This is
actually a goodly a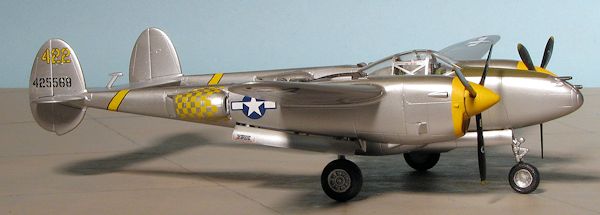 mount of weight for a kit of this size, but there is room.
An odd omission is there are no bullet shaped intakes on the sides of the booms. These are quite prominent so how they were missed is unknown.
mount of weight for a kit of this size, but there is room.
An odd omission is there are no bullet shaped intakes on the sides of the booms. These are quite prominent so how they were missed is unknown.
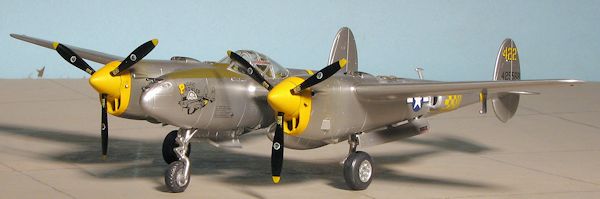
Markings are for two unpainted metal planes. One is the box art plane of then-Major George Lavin Jr and his 'Itsy Bitsy II' with the 54th FS/343rd FG at the end of the war. Nose, upper and lower fin tips, anti-glare panel and upper forward engine nacelles are black and will need to be painted. The other is 'Bowlegs/Pecky II' of the 431FS/475 FG, also at the end of the war. The red markings on the fin are decals, but not the aft part of the propeller spinners or the black areas below the anti-glare panel. Instructions are well drawn and the decals look to be quite good. Like the previous kit, this one was also not enclosed in a plastic tray, but that was really not needed as any fragile parts are wrapped in foam wrap.
| CONSTRUCTION |
I have always liked the P-38, but have not really build
all that many of them. The last one was the very nicely done Academy 1/72 P-38J
and having this L model will make a nice addition. The first step is to build up
the cockpit. This also is the roof of the nose well. I brush painted the
Interior Green using PollyScale acryick paint with the black parts being done
with Tamiya XF-1 Matte Black. I then attached the instrument decal and
 made
belts for the seat out of tape. This was then drybrushed a bit before
installation.
made
belts for the seat out of tape. This was then drybrushed a bit before
installation.
I then glued together the drop tanks and decided now would be a good time for some preliminary painting so I sprayed a lot of the parts, including the wheel wells and inner gear doors with Alclad II Aluminum. The instructions call for 'interior green' for the wells, but research and inquiries have led me to believe that by the time the L-5s were produced, these areas were left unpainted. Of course, this added some ease to painting as it means I can pretty much get just about the entire kit built before having to paint it.
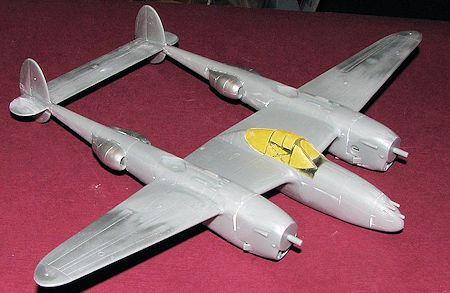
Anyway the upper and lower fuselage halves were assembled and as expected, there was need for filler. This was most obvious along the long cockpit pod section and at the very back up against the tailplanes. I also took the time to cram as much weight as I could into the nose section before gluing. Even with this weight, I also put weight into the engine nacelles and then glued those one. These had to be taped in place while the cement dried as they kept slipping off the booms.
When dry, filler was required for the seams. Next step was to
add the boom cooler pods. These fit fairly well, but are not as tight to the
fuselage as what I would have liked. Masking the canopy was next and this
 was a bit of fun thanks to the X
bracing on the side windows. The fit of this was excellent and it was quickly
glued on after masking. Something a few might miss is that there are ejector pin
markings on the large fuselage sections. There is one on each upper wing, one on
the center of the upper tail plane and one on the lower, forward engine nacelle.
These need to be sanded and a drop of filler put in them if one doesn't want
them to be very obvious once the metallic scheme is applied.
was a bit of fun thanks to the X
bracing on the side windows. The fit of this was excellent and it was quickly
glued on after masking. Something a few might miss is that there are ejector pin
markings on the large fuselage sections. There is one on each upper wing, one on
the center of the upper tail plane and one on the lower, forward engine nacelle.
These need to be sanded and a drop of filler put in them if one doesn't want
them to be very obvious once the metallic scheme is applied.
I next installed the main gear doors. These are a single assembly and fit very well. A note of caution in that there are some parts that have to go in the main gear wells first. One is a curved tube that attaches to, I guess, the outer gear wall from the well bottom. The other is a piece that fits in the very back of the well. This is probably to ensure that you do not push the rear of the door assembly too far. I missed this one and had to cut off the tab on top of it to get it installed after the doors.
The landing gear, both main and nose were then cleaned up and glued in place. The fit is good in both cases, but they are both quite 'wiggly' so one has to adjust them before the cement fully dries.
| COLORS & MARKINGS |
At this time, I felt it was time to do some painting as I had pretty much
everything but the props and wheels already attached. I first gave the overall
airframe a coating of Tamiya extra fine grey primer to see if I missed anything
egregious and to provide a nice base for the metallic finish. Once that was
done, the spinners and
 forward engine cowlings were painted white and since I
was already holding the kit, I painted a goodly portion of the rest of the
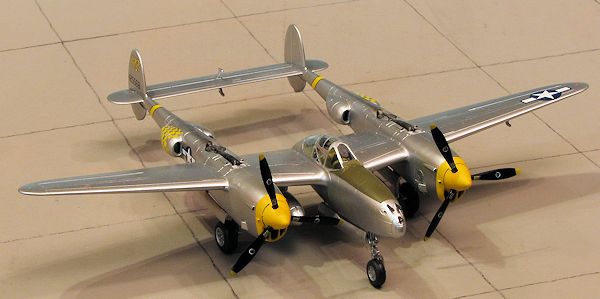
airframe with Alclad II Aluminum. Testors Insignia Yellow was used on the
spinners and the forward engine cowlings. This was then masked off and I
finished painting on the rest of the Aluminum.
forward engine cowlings were painted white and since I
was already holding the kit, I painted a goodly portion of the rest of the
airframe with Alclad II Aluminum. Testors Insignia Yellow was used on the
spinners and the forward engine cowlings. This was then masked off and I
finished painting on the rest of the Aluminum.
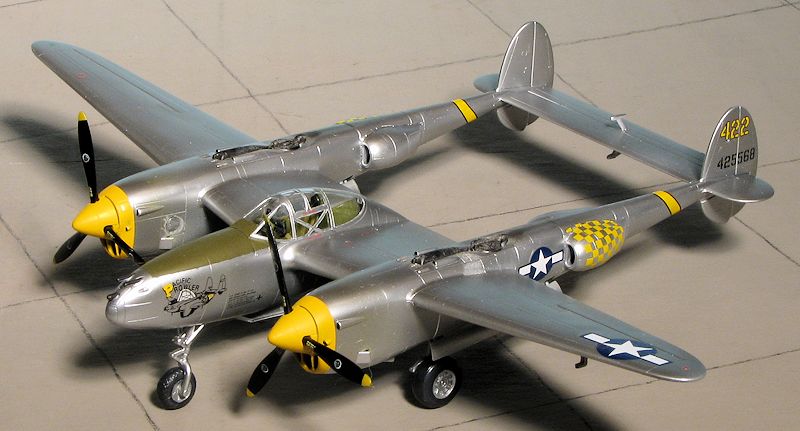
When that was done, I took a few photos of the plane. I have discovered that flash photos will show up areas where the paint is a bit patchy, something that may be nearly invisible otherwise. I then masked off the nose and sprayed that with Olive Drab.
For markings, I used Superscale Sheet 72-865 and the 44FS/18 FG scheme. This sheet is designed for the Academy kit and I expected the radiator decals to not fit. They did not. They are too short in the fore and aft as well as too long in the top and bottom. However, they don't look all that bad when all is done. The few kit decals I used were for a few stencils and they worked out just great. Nothing wrong with the kit markings, I just wanted something a bit different. I used Microsol setting solution as it is the most benign around.
| FINAL CONSTRUCTION |
 Since the vast
majority of the kit was already together prior to painting, that did not leave
much. The small inserts on the inside of the engine, the pitot tube, the wheels
and finally the drop tanks were glued on. This left the props. They were
assembled, decals put in place (BTW, the mfgs data markings on the kit decals
need to be cut apart as they have a complete coat of clear over them all), and
they were pushed in place. I had installed the identification lights and did not
bother masking them. These were painted, from the front, red, green and amber
using Vallejo acrylics. I also found the gun barrels to be a challenge to paint
on the underside so use a fine brush for this. No clear coat was used, though I
did use some pastels to do the exhaust along the upper side of the tailbooms.
Since the vast
majority of the kit was already together prior to painting, that did not leave
much. The small inserts on the inside of the engine, the pitot tube, the wheels
and finally the drop tanks were glued on. This left the props. They were
assembled, decals put in place (BTW, the mfgs data markings on the kit decals
need to be cut apart as they have a complete coat of clear over them all), and
they were pushed in place. I had installed the identification lights and did not
bother masking them. These were painted, from the front, red, green and amber
using Vallejo acrylics. I also found the gun barrels to be a challenge to paint
on the underside so use a fine brush for this. No clear coat was used, though I
did use some pastels to do the exhaust along the upper side of the tailbooms.
| CONCLUSIONS |
 To show how
little I am a P-38 enthusiast, I had to have a reader point out that Hobby Boss
missed what are rather prominent cooler scoops on the left side of the engine
booms. I guess all of the inexpensive HB kits have some sort of major
malfunction. Attaching those from an old parts kit will take care of that or you
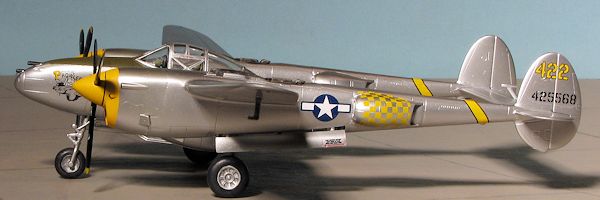
can do as did I and do nothing. Even with this omission, the kit goes together
well and despite needing filler for most joins, it looks very nice when one is
done.
To show how
little I am a P-38 enthusiast, I had to have a reader point out that Hobby Boss
missed what are rather prominent cooler scoops on the left side of the engine
booms. I guess all of the inexpensive HB kits have some sort of major
malfunction. Attaching those from an old parts kit will take care of that or you
can do as did I and do nothing. Even with this omission, the kit goes together
well and despite needing filler for most joins, it looks very nice when one is
done.
| REFERENCES |
February 2013
Copyright ModelingMadness.com. All rights reserved. No reproduction in part or in whole without express permission from the editor.
If you would like your product reviewed fairly and fairly quickly, please contact the editor or see other details in the Note to Contributors.