
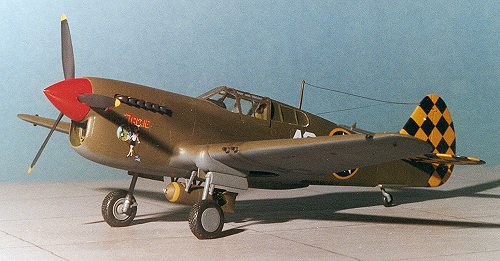
AMT 1/48 P-40L Warhawk
|
KIT # |
8795 |
|
PRICE: |
$13.50 |
|
DECALS: |
Two Aircraft in North Africa; 1943 |
|
REVIEW : |
|
|
NOTES: |
Kit makes short tailed F |
|
HISTORY |
Undoubtedly the most important fighter type of the USAAC/F in the first year and a half of WWII. Though outclassed in some respects by aircraft of Japan and Germany, it was a very capable performer at low altitudes. It's rugged construction was also responsible for bringing back many a pilot who would have otherwise been shot down. The initial versions were all powered by Allison engines which were not noted for their high altitude performance as were Merlins of the Spitfires and the Daimler Benz engines of the 109s.
 In
an attempt to remedy that situation and to offer a common engine to that of
British allies, a Merlin engined P-40 was developed. This was the P-40F.
Unfortunately, putting this engine into the heavier P-40 did not give the
anticipated performance boost that was expected. Nonetheless, 1361 P-40Fs were
built. Out of these 699 were the initial run of short tailed aircraft, while the
rest were built with longer fuselages.
In
an attempt to remedy that situation and to offer a common engine to that of
British allies, a Merlin engined P-40 was developed. This was the P-40F.
Unfortunately, putting this engine into the heavier P-40 did not give the
anticipated performance boost that was expected. Nonetheless, 1361 P-40Fs were
built. Out of these 699 were the initial run of short tailed aircraft, while the
rest were built with longer fuselages.
Why do I bring up the fuselage issue? Well, like many modelers, I had thought that almost all P-40Fs had the stretched fuselage. This just isn't the case. Of the 1361 F airframes, only 662, or slightly less than half were the long tailed version. What probably confuses a lot of people is that the P-40L, also Merlin powered, looks very similar to the P-40F. Of the 700 P-40Ls built, only the first 50, the L-1, were short tailed. The P-40L can be distinguished from the P-40F in that the L only has two guns per wing vice the three on the F. And that brings us to the kit.
|
THE KIT |
AMT embarked on a program of new tool 1/48 aircraft kits back about 1996. They were eagerly anticipated as they offered the F7F Tigercat, A-20 Havoc and P-40 Warhawk series of aircraft. Frankly, I was one of those who bought a number of each type. They were well molded, of interesting aircraft, and were competitively priced. In the P-40 series, there is a P-40F, P-40K and P-40N. While the N has been kitted by Mauve (and frankly, it is just a bit nicer than the AMT kit, but at twice the price), neither the F or the K have been previously done. It is odd that the E wasn't also done, but that really isn't a big deal.
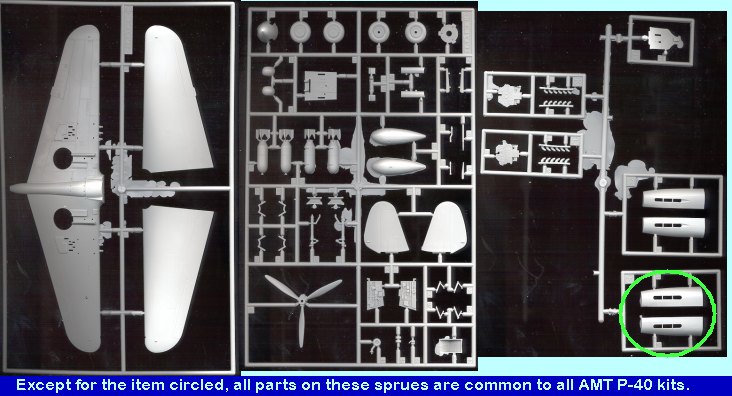
AMT has done what most kit makers do nowadays and that is to make common sprues and just change those items specific to the subtype being modeled. It is quite easy to tell which sprues are the common ones. In this case, it is those items with the most flash on them!! As you can see from the image, there is quite a bit of flash on these sprues. This is probably because of the lower quality control in the Mexican factories where these kits were made (the factory has since moved to China where AMT's quality control seems much better. Those items specific to the F kit have minimal flash.
 As one expects from a modern
kit, the parts are in medium grey plastic with nicely engraved panel lines.
There is sufficient detail for most modelers. There is a complete interior with
detailed sidewalls, a nice seat with belts molded on it, instrument panel with
rudder pedals, and a control stick. The ordnance available are two 500 lb bombs
to be fit on outer wing racks. The holes in the wing for these racks are already
made for you. To be honest, I wish they wouldn't do this as I generally like
semi-clean aircraft without all that stuff hanging from the wings. In addition,
doing research on this aircraft, I found no pictures of P-40Fs with wing racks
and only one photo of a RNZAF P-40N with these mounted. I did find a number of
photos with bombs on the centerline rack however. You get a drop tank for that,
though you could easily mount a bomb there.
As one expects from a modern
kit, the parts are in medium grey plastic with nicely engraved panel lines.
There is sufficient detail for most modelers. There is a complete interior with
detailed sidewalls, a nice seat with belts molded on it, instrument panel with
rudder pedals, and a control stick. The ordnance available are two 500 lb bombs
to be fit on outer wing racks. The holes in the wing for these racks are already
made for you. To be honest, I wish they wouldn't do this as I generally like
semi-clean aircraft without all that stuff hanging from the wings. In addition,
doing research on this aircraft, I found no pictures of P-40Fs with wing racks
and only one photo of a RNZAF P-40N with these mounted. I did find a number of
photos with bombs on the centerline rack however. You get a drop tank for that,
though you could easily mount a bomb there.
You also get two different
exhaust systems, one of which is 'fishtailed'. Save this for your other P-40
kits that may be missing them. The prop on this kit is a single piece so you
don't have to sweat gluing on separate blades, a feature that I like. The wheels
are not the best I have seen and don't have the diamond pattern that is so
commonly 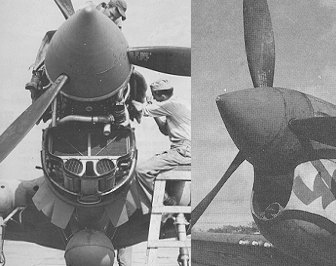 seen so you may want to get aftermarket wheels for this one to replace
them. The clear bits are very well done and free of flash. One part that is not
right for a complete Merlin powered P-40 is the radiator intake. What AMT did
was mold the radiator as it looks with all the ducting and lower nose access
removed. There should be a single inlet leading back to the carb and oil cooler
radiator inlets. You can see from the pictures to the right where AMT made their
error. The left photo has the lower cowling removed as well as the plumbing to
the radiators. The right photo shows how your kit should look.
seen so you may want to get aftermarket wheels for this one to replace
them. The clear bits are very well done and free of flash. One part that is not
right for a complete Merlin powered P-40 is the radiator intake. What AMT did
was mold the radiator as it looks with all the ducting and lower nose access
removed. There should be a single inlet leading back to the carb and oil cooler
radiator inlets. You can see from the pictures to the right where AMT made their
error. The left photo has the lower cowling removed as well as the plumbing to
the radiators. The right photo shows how your kit should look.
The instructions are typical of AMT. They give no history, have a paint reference giving FS numbers where applicable, and are totally pictorial. Color callouts for all the parts are given in each of the 8 steps. The sequence is logical and it looks to be a relatively easy and painless build.
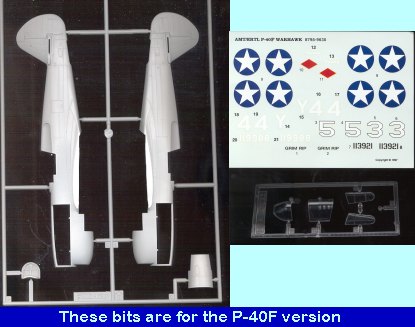
You get decals for two very similar P-40Fs, one from the 57th FG and the other from the 324th FG in North Africa. Unfortunately, only one set can be used. The short tailed P-40F serial range is 41-3600 to 41-14299, which is fine for the 57th FG aircraft. However the 324th FG aircraft is serialed 41-19988, which is for a long-tailed P-40F-20 so you'll have to find another fuselage or use one of the many resin tails available.
Overall, it looks like a painless build, and crosskitting with the other AMT P-40 kits will give you a large selection of versions not otherwise available in kit form.
|
CONSTRUCTION |
First thing I did was to start getting together subassemblies. In this case it was the drop tank, interior parts and wings. The drop tank and interior bits had a lot of flash on them. Combine that with soft plastic and one needs to be careful not to take away too much. The interior bits fit OK, but the seat has a very odd-looking forward incline to it.
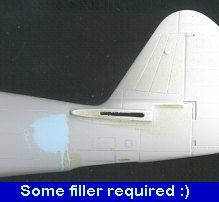
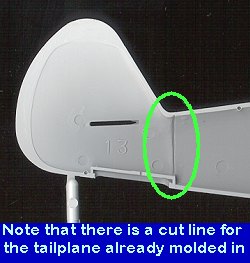 I needed the tail
from this kit for the P-40K in order to make it into an E model. Not a problem
as I wanted to do a long tailed L with this kit. Looking at the inside of
the fuselage, I noted a nice cut line already engraved. Apparently, AMT was
covering it's bets and had planned on doing a long-tailed F before giving up on
airplane models.
I needed the tail
from this kit for the P-40K in order to make it into an E model. Not a problem
as I wanted to do a long tailed L with this kit. Looking at the inside of
the fuselage, I noted a nice cut line already engraved. Apparently, AMT was
covering it's bets and had planned on doing a long-tailed F before giving up on
airplane models.
 After cutting that
off, the aft fuselage has some pieces of card glued in to offer up a bit of
extra reinforcement for the long tail that would be coming from the P-40K kit. I
had decided that the best way to attach the new tail was as a whole piece rather
than gluing one tail half to one fuselage half first and then gluing the
fuselage halves together. Gives me more room to fiddle around in case there is a
problem. Having decided that, the tail halves from the K it were glued together
and I returned to doing some work on the rest of the kit.
After cutting that
off, the aft fuselage has some pieces of card glued in to offer up a bit of
extra reinforcement for the long tail that would be coming from the P-40K kit. I
had decided that the best way to attach the new tail was as a whole piece rather
than gluing one tail half to one fuselage half first and then gluing the
fuselage halves together. Gives me more room to fiddle around in case there is a
problem. Having decided that, the tail halves from the K it were glued together
and I returned to doing some work on the rest of the kit.
Much of that work involved removing a lot of flash from the cockpit pieces. The seat, instrument panel and armor backing had a lot of it and much careful trimming is required. After removing the flash, the cockpit parts were glued together (except the side panels and instrument panel) and all the interior bits were then painted US Interior Green, an Aeromaster acrylic color.
 While
that was drying, the engine covers were glued onto the front fuselage. These
items do not fit particularly well. With some careful fitting and a bit of
trimming, a reasonable match can be made. The result is that there is a bit of a
step back on the very front where the panel does not line up with the front of
the fuselage. This area was filled and sanded flat so it wouldn't look strange
when the prop and spinner were attached. Once that was done, the appropriate
'fish tail' exhausts were glued in behind the engine panels.
While
that was drying, the engine covers were glued onto the front fuselage. These
items do not fit particularly well. With some careful fitting and a bit of
trimming, a reasonable match can be made. The result is that there is a bit of a
step back on the very front where the panel does not line up with the front of
the fuselage. This area was filled and sanded flat so it wouldn't look strange
when the prop and spinner were attached. Once that was done, the appropriate
'fish tail' exhausts were glued in behind the engine panels.
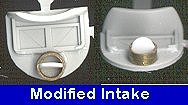 The
next item for concern is the cooler intake. The kit supplies one with two
carb intakes whereas the real aircraft only has one. The modeler has two
choices. Either don't sweat it or remove the two intakes and replace it with one
made from tubing. That is what I did and it really isn't that difficult to do.
The most time consuming part was shaping the butterfly valve. A downside is that
this new carb intake interferes with the chin alignment pin and socket. However,
it is worth it and really improves the look of the aircraft. Unfortunately for
me, I made the intake too large and it should lead all the way to the lip of the
intake, which it does not. However, in my own defense, I didn't know this until
after I had made it and glued the fuselage together! Apparently this duct sort
of snakes down to the twin circular radiators (which I cut off). You can see
from the photo up in the kit description how this duct should look.
The
next item for concern is the cooler intake. The kit supplies one with two
carb intakes whereas the real aircraft only has one. The modeler has two
choices. Either don't sweat it or remove the two intakes and replace it with one
made from tubing. That is what I did and it really isn't that difficult to do.
The most time consuming part was shaping the butterfly valve. A downside is that
this new carb intake interferes with the chin alignment pin and socket. However,
it is worth it and really improves the look of the aircraft. Unfortunately for
me, I made the intake too large and it should lead all the way to the lip of the
intake, which it does not. However, in my own defense, I didn't know this until
after I had made it and glued the fuselage together! Apparently this duct sort
of snakes down to the twin circular radiators (which I cut off). You can see
from the photo up in the kit description how this duct should look.
 Now
that I had all the pieces for the fuselage, I glued the two halves together,
trapping the intake section and the prop shaft. The interior isn't installed
until the next step. Good thing, too, as not having it in the way makes it
easier to glue the fuselage. Fit isn't too good and I can see that all the seams
will need filler. Thankfully, the soft plastic is easy to glue. Once the
fuselage was glued and the first filler application was sanded down, the new
tail section was attached. This is where the reinforcing strips come in very
handy. I aligned the new tail at the top of the fuselage and used superglue to
hold the tail in place. The gaps are quite large so more superglue was used to
fill the gaps. Then a coat of filler was used to smooth things out. It took
quite a bit of work to get things nice a smooth and included several sessions
with the filler.
Now
that I had all the pieces for the fuselage, I glued the two halves together,
trapping the intake section and the prop shaft. The interior isn't installed
until the next step. Good thing, too, as not having it in the way makes it
easier to glue the fuselage. Fit isn't too good and I can see that all the seams
will need filler. Thankfully, the soft plastic is easy to glue. Once the
fuselage was glued and the first filler application was sanded down, the new
tail section was attached. This is where the reinforcing strips come in very
handy. I aligned the new tail at the top of the fuselage and used superglue to
hold the tail in place. The gaps are quite large so more superglue was used to
fill the gaps. Then a coat of filler was used to smooth things out. It took
quite a bit of work to get things nice a smooth and included several sessions
with the filler.
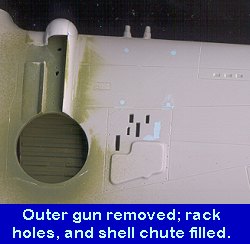 While all that fuselage work was going on, I
worked on the wings. First thing that was done was to glued the upper and lower
halves together. Fit is quite good. Next, the outer guns were removed. This is
one of the things done to lighten the airframe. I wasn't sure if the shell
ejector chutes were also filled, but did it anyway just in case. I also filled
the holed for
While all that fuselage work was going on, I
worked on the wings. First thing that was done was to glued the upper and lower
halves together. Fit is quite good. Next, the outer guns were removed. This is
one of the things done to lighten the airframe. I wasn't sure if the shell
ejector chutes were also filled, but did it anyway just in case. I also filled
the holed for 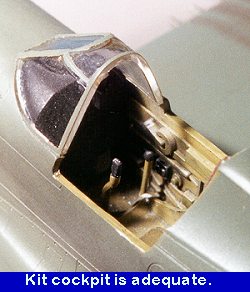 the outer bomb racks as I wasn't going to use them. At this time,
the 'knee' fittings were glued onto the leading edges of the wings as per the
instruction. Fit was OK, but I still needed filler to take care of some gaps.
the outer bomb racks as I wasn't going to use them. At this time,
the 'knee' fittings were glued onto the leading edges of the wings as per the
instruction. Fit was OK, but I still needed filler to take care of some gaps.
Next was the installation of the interior. It really was easy and the thing fit well. Again, thanks to the soft plastic, I was able to get it to get a really good join. Then the wings were glued in place. As you might expect, the fit was OK, but not great. There was need for filler and some filing, especially at the front section near the radiator outlet, which was the worst. Filler was also needed at the upper wing/fuselage root. Then the radiator outlet piece was glued in and a bit of filler was needed on this. This is a rather odd looking piece, but since I have no images of the underside of a Merlin P-40, I'll leave it as it is. When that was taken care of, the tailplanes were glued in place. One of mine had a lot of flash on the back and it was also quite a bit thicker at that point than on the other tailplane, which was in good shape. Some sanding took care of that. Fit here was also quite good and no filler was used.
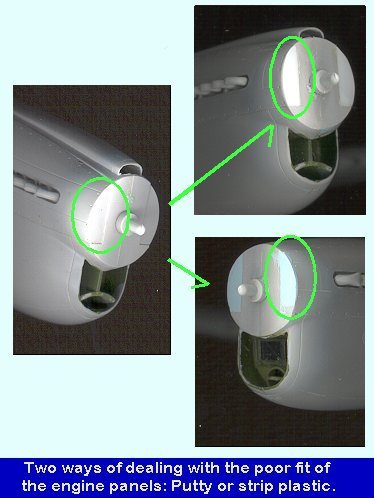
It was at this time that I decided to do something about the indentations on either side of the nose caused by the slightly short and poor-fitting engine exhaust panels. There are two ways of taking care of this situation. One is to build up several layers of filler and sand the area flat and smooth using sanding sticks. The other option is to use plastic strip to fill in the indentations and then sand the strip flush with the rest of the nose. Since I was building two P-40s at once, I used both these methods. Take a look at the image to the left showing the results of these methods. Both work well and give acceptable results, so the choice is yours as to which to use. Of course, you could also shim the aft section of the exhaust panel to make the front area flush as well, so there are really a lot of options available for this one! At this time, the gun barrels were drilled out.
Next thing to do was to prepare the
transparencies. They are commendably clear, crisply detailed, have flash on
them, and have sprue attachment points that are a pain to clean off without
marring the clear part. They are also thicker on one side than the other
by a wide margin. Not sure how to explain that one, but since the canopy will be
closed, it isn't going to be a 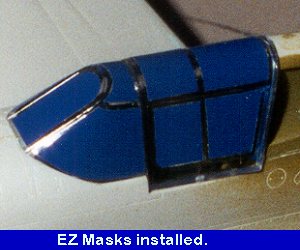 factor
though it is obvious when looking from the rear!
factor
though it is obvious when looking from the rear!
I had a chance to get some EZ Masks at a discount for this aircraft so picked them up. The fit is very good, however, for those of us who are very experienced at masking transparencies, for an aircraft as simple as the P-40, they really are no faster or easier to do than using tape. Where sets like this really shine are on those aircraft that have extensive greenhouse canopies or lots of compound curves in them (like B-29s or He-111s). Now that most of the bits and pieces were there to make a complete airframe, it was off to the paint shop!
|
PAINT |
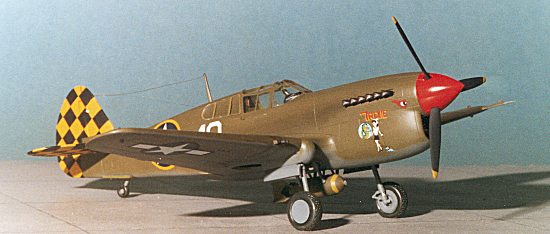
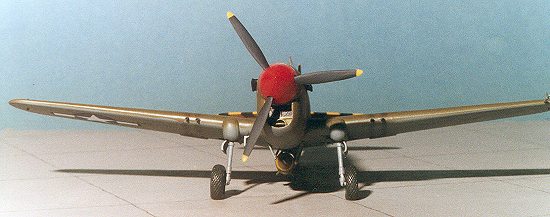
The first thing I painted on the airframe was the spinner. This is supposed to be red, so after a coat of Model Master enamel flat white, I sprayed on some Gunze gloss red. The spinner and backing plate both had flash that needed to be removed before painting began.
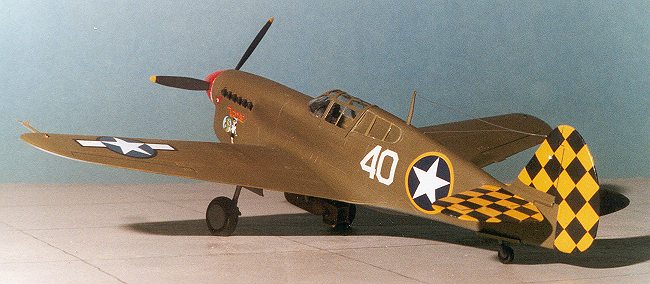
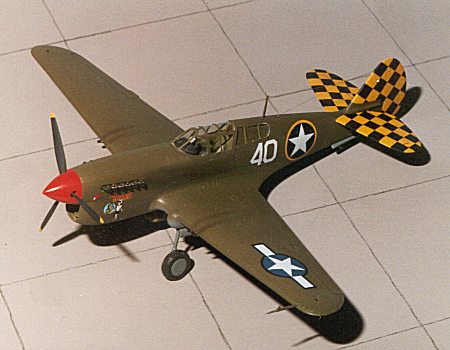
The next thing was to paint the underside of the airframe Neutral Grey. I was doing a scheme from the Aeromaster sheet "Checkertail Clan part 2". The one I chose is a P-40L of the 318th Fighter Squadron in olive drab over neutral grey. I know what you are thinking. "Geez, the fellow goes through all that trouble to do a P-40L and then doesn't put it into a desert paint scheme". Well shoot me, for as neat as the desert camouflaged aircraft are, I really wanted to the one with the mis-mash of insignia and the neat nose art. That happened to be the OD/grey one. I used Aeromaster paints for this one.
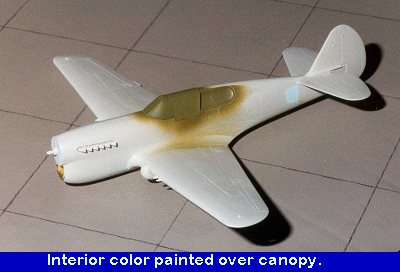 Before I painted the underside color, the
already masked canopy area was painted with Interior Green as that is what will
be visible on the inside of the canopy. Then I mixed and sprayed the Neutral
grey. The paint went on quite well, but oddly for a flat, took quite a while to
eventually dry. I will blame it on the rainy weather and high humidity that was
prevalent during the painting of this kit.
Before I painted the underside color, the
already masked canopy area was painted with Interior Green as that is what will
be visible on the inside of the canopy. Then I mixed and sprayed the Neutral
grey. The paint went on quite well, but oddly for a flat, took quite a while to
eventually dry. I will blame it on the rainy weather and high humidity that was
prevalent during the painting of this kit.
After it dried, the underside of the tailplanes were masked and the upper surface painted with Olive Drab, again from the Aeromaster line. I had quite a decision to make concerning this color. The desert will bleach a dark color like this rather quickly, so that in a few months it is visibly lighter. However, the one (rather poor) picture in the P-40 in Action book of this plane, shows a relatively dark aircraft, so I used the darker OD, assuming it was a recent replacement, hence the OD/grey paint scheme. The OD was sprayed on with no problems. The demarcation line was freehanded instead of using a mask, though the drawing shows it as a hard edge in the decal sheet. At this time, the gear doors were also painted.
|
DECALS |
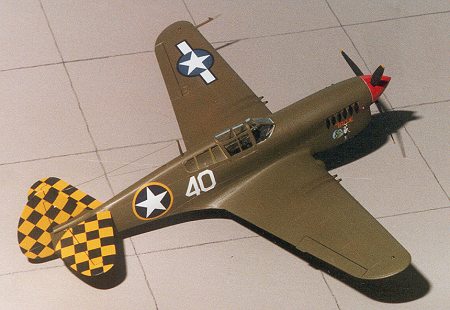
 Once that was dry, the wheelwells were
repainted interior green and the aircraft sprayed with Future clear acrylic in
preparation for the decals. The decals are typical of what one expects from
Aeromaster and that is high quality. The first thing I put on were the
checkertails for the underside of the stabilizers and the left tail. These
decals are NOT designed for the AMT kit and so are a bit small. Not a major
problem, but it means that the edges will need touched up with paint. The gloss
black isn't a problem and Testor's Model Master Insignia Yellow matched the
yellow very well. You may want to use Chrome Yellow instead as it is gloss
whereas the Insignia Yellow is matte. Your choice as it is the same FS number.
Once that was dry, the wheelwells were
repainted interior green and the aircraft sprayed with Future clear acrylic in
preparation for the decals. The decals are typical of what one expects from
Aeromaster and that is high quality. The first thing I put on were the
checkertails for the underside of the stabilizers and the left tail. These
decals are NOT designed for the AMT kit and so are a bit small. Not a major
problem, but it means that the edges will need touched up with paint. The gloss
black isn't a problem and Testor's Model Master Insignia Yellow matched the
yellow very well. You may want to use Chrome Yellow instead as it is gloss
whereas the Insignia Yellow is matte. Your choice as it is the same FS number.
Those decals, when nearly dry, were treated with Champ setting solution. I have always had good luck with Champ and Aeromaster decals and these were no exception. When they were dry, the upper checkers and those for the other side of the tail were put on, and again, treated with Champ when nearly dry. The fuselage insignia is a two part affair. Each part was treated with Champ as were the other decals. When they were completely dry the next day, the model was wiped down with water to remove any excess setting solution. The decaling took a bit over two days, about normal for me when few decals are involved and I'm not in a rush! Then it was back to more construction and a bit more painting.
|
CONSTRUCTION |
I usually leave off easily broken bits until the final stages of construction. These were the drop tank/bomb mounts, the pitot tube and the radio antenna. Be careful with the drop tank mounts as they are not the same, despite the instructions leaving you to believe they are. They should be wider in the front than the rear for the drop tank. You can only tell by mounting them and then shuffling them around before the glue dries. Once these bits were glued on, the area around them was touched up with a few squirts from the airbrush in the respective colors.
 Then
the gear doors were installed. Be especially careful around the tail wheel
doors. These are supposed to be mounted horizontal to the ground, not vertical
as the door hinges suggest. Often they were left off entirely. It was then that any touch-ups there taken care
of, not an easy job considering I had to try to keep the spray off the decals!! The prop
was painted black with yellow tips and installed in the spinner. This was left
off until the very last. Then the main wheels were added. These were True
Details resin replacements. All I had to do was drill out the attachment point
and glue them on. They are the nice diamond tread version and look quite nice.
There is also a smooth tread version, but I have not seen any images of later
P-40s using them.
Then
the gear doors were installed. Be especially careful around the tail wheel
doors. These are supposed to be mounted horizontal to the ground, not vertical
as the door hinges suggest. Often they were left off entirely. It was then that any touch-ups there taken care
of, not an easy job considering I had to try to keep the spray off the decals!! The prop
was painted black with yellow tips and installed in the spinner. This was left
off until the very last. Then the main wheels were added. These were True
Details resin replacements. All I had to do was drill out the attachment point
and glue them on. They are the nice diamond tread version and look quite nice.
There is also a smooth tread version, but I have not seen any images of later
P-40s using them.
At this time, the kit was sprayed with clear semi-matte. This was to give the pastels something to bite onto and to seal the decals in. The exhaust and guns were treated to some pastel staining and then the airframe was resprayed with more semi-matte to seal them in. The only other part to be glued on was the bomb. Now this was a bit of a problem as the belly rack was designed for the drop tank not a bomb. It wouldn't touch the bomb in the front as the mounts were too wide apart. This was solved by simply supergluing the bomb to the forward rack and leaving the aft one with a small gap. No way is this going to be a contest model so doing a few shortcuts is acceptable for one that will be spending most of its life behind glass!
The EZ Masks were then taken off. They came of easily and there was only a tiny bit of leakage at one area. Probably the nicest thing about them is that there was NO residue to clean up. However, I did notice that somehow I managed to get glue on the inside of the windscreen between it and the glare shield. Just part of the many disasters that accompany most of my models! The aft windows were installed at this time using white glue. There is a landing light that goes under the wing. This part proved to be poorly molded in that it was about twice as thick as the slot it was designed for. Rather than go through the tedious method of sanding it down, the area was filled with white glue, which gave an acceptable representation of the light. The various formation lights were painted, the radio wire was attached using stretched sprue and the kit was done.
|
CONCLUSIONS |
 This kit took more work than I had originally thought. Most of
it was due to my desire to have a long-tailed L and those modifications
needed to achieve that goal. The generally dodgy fit of many of the parts was
also something that I had not fully expected. The only other AMT 1/48 aircraft
kit I had built up to this time was the F7F-3 and the A-20G. Both of those kits
fit reasonably well and gave me no real problems. This P-40 kit was not up to
the same standards. Not sure if it was the move to Mexico that was to blame or
what, but there it is.
This kit took more work than I had originally thought. Most of
it was due to my desire to have a long-tailed L and those modifications
needed to achieve that goal. The generally dodgy fit of many of the parts was
also something that I had not fully expected. The only other AMT 1/48 aircraft
kit I had built up to this time was the F7F-3 and the A-20G. Both of those kits
fit reasonably well and gave me no real problems. This P-40 kit was not up to
the same standards. Not sure if it was the move to Mexico that was to blame or
what, but there it is.
If all you want is a nice P-40 kit, then I can recommend the Hasegawa, or the Eduard/Mauve kits. If price is a deciding factor (and the AMT kits can currently be found for under $10), then go with the AMT version and expect to do some work to get it right. A saving grace for the AMT kit is that no one else does a Merlin-engined version in this scale. There is also the factor that you can kitbash between the various AMT P-40s and do all the variants from P-40D to P-40N.
What all that leads to is that I can recommend these kits, but with reservations due to the fit of parts.
|
REFERENCES |
P-40 Hawks at War by Joe Christy and Jeff Ethell, Scribner's and Sons, 1980, $15.95
Curtiss P-40 in Action, by Ernest R McDowell, Squadron Signal Publications, 1976
June 2000
Copyright ModelingMadness.com. All rights reserved. No reproduction in part or in whole without express permission from the editor.
If you would like your product reviewed fairly and quickly, please contact the editor or see other details in the Note to Contributors. 2024