
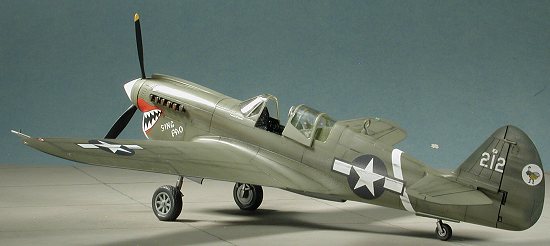
Mauve 1/48 P-40N Warhawk
| KIT #: | 1 |
| PRICE: | $20 when new back in 1994 |
| DECALS: | One option and the decals are terrible. |
| REVIEWER: | Scott Van Aken |
| NOTES: | True Details resin interior and wheels used |
| HISTORY |
 The N variant of the P-40 was
probably the most built and the last production Curtiss fighter ever done.
Thanks to some mismanagement and failed projects, Curtiss was no longer the
fighter king it was in the 20s and 30s. Eventually the company folded
completely in the early 1950s
The N variant of the P-40 was
probably the most built and the last production Curtiss fighter ever done.
Thanks to some mismanagement and failed projects, Curtiss was no longer the
fighter king it was in the 20s and 30s. Eventually the company folded
completely in the early 1950s
The reason for the P-40N was to reduce the growing weight and return the kind of performance that pilots wanted. The biggest visual change to the N was the change in the design of the aft canopy section to provide greater rearward vision. Early Ns also reduced the number of guns to four, but this didn't last long and the 6 gun armament was soon restored.
While few P-40Ns saw action in the Med or Europe, there were a lot of them spread around the Pacific theater with a lot of them going to units in the CBI as well as the Southwest Pacific. This includes Australian and New Zealand squadrons, who spent much of their war in New Guinea or the Solomons rooting out stubborn Japanese units. Other large users of the type were US training units and some Canadian squadrons who used them for home guard.
| THE KIT |
The Mauve kit is probably the best 1/48 P-40 kit of any type around. Yes, the AMT and AMtech kits are nice, but they are not in the same category as the Mauve kit. Only down-side of the Mauve kit is that it really needs a better interior and better wheels. This is taken care of by True Details, who offer a super interior and wheel set for this kit that completely transposes it. It will add about another $10 to your kit, but it is really necessary to bring it up to specs.
 The kit itself is molded in darkish
brown plastic that is somewhat brittle so you need to take care when
removing parts. I managed to break one or two during the build. The kit
offers a multi-piece canopy so you can display your nice interior. It also
comes with optional centerline tank. The formation lights are separate
pieces, which adds a lot to it. There are the required engraved panel lines
and the fin is off-set to the left, just like on the real aircraft. The kit
also has individual exhaust stacks though I suppose that with some grinding
you can cut away the backing to use aftermarket exhaust. The kit also has
separate prop blades. This will help with painting any complicated spinner
designs.
The kit itself is molded in darkish
brown plastic that is somewhat brittle so you need to take care when
removing parts. I managed to break one or two during the build. The kit
offers a multi-piece canopy so you can display your nice interior. It also
comes with optional centerline tank. The formation lights are separate
pieces, which adds a lot to it. There are the required engraved panel lines
and the fin is off-set to the left, just like on the real aircraft. The kit
also has individual exhaust stacks though I suppose that with some grinding
you can cut away the backing to use aftermarket exhaust. The kit also has
separate prop blades. This will help with painting any complicated spinner
designs.
Instructions are OK, but not really great and completely in Japanese. Decals are provided for one very flamboyant parrot nosed aircraft flown by a US training unit. However, they are junk and have to be replaced by an aftermarket set. Fortunately, Cutting Edge has reproduced these markings in sheet 48-209 so you can still do this version should you wish.
| CONSTRUCTION |
This started with the cockpit. Digging around in a pile of stuff I came across two True Detail sets, both painted but still on the resin backing. I had no instructions, but a request in the forum soon found a set in my e-mail and I was able to use those for the painting info. Thanks!
 All the interior areas were painted
with US Interior Green, a Testors enamel. I also used this for the wheel
well primer color. I'm sure there is some special Curtiss Green that I
should have used, but it really isn't that important to most of us so the
Testors color it was. While I was doing some detail painting on the
interior bits, I assembled the nose radiator pieces and also glued in the
wheel well parts. Each well has three separate pieces that box things in
nicely. These are the parts that I broke when taking them off the sprues so
be careful as the plastic is a bit more brittle that you are probably used
to.
All the interior areas were painted
with US Interior Green, a Testors enamel. I also used this for the wheel
well primer color. I'm sure there is some special Curtiss Green that I
should have used, but it really isn't that important to most of us so the
Testors color it was. While I was doing some detail painting on the
interior bits, I assembled the nose radiator pieces and also glued in the
wheel well parts. Each well has three separate pieces that box things in
nicely. These are the parts that I broke when taking them off the sprues so
be careful as the plastic is a bit more brittle that you are probably used
to.
When that was done, the wings were assembled as was the fuselage half, trapping the nose radiator section. The interior fits from underneath in this kit. I also glued the area behind the pilot in at this time as well. Once dry, the seams were sanded down and any filler needed was then applied. I also cleaned up the wings and sanded down the seam that was there.
 The resin cockpit parts were then
sawn off the resin plugs and the holes for the control stick and flap
actuator handle were drilled out. The various bits were then glued in place
in preparation for installation. The kit instrument panel has to be used
and this is actually too large for the cockpit opening. Some sanding is
needed on the sides to get it to fit into place. Once there, I applied
superglue to the inside of the fuselage halves and inserted the resin tub.
Fit is actually quite good with only a bit of accelerator needed to keep
the side panels in line. I then test fit the wings. The resin cockpit is
wider than the kit one so about a 1/4 inch has to be snipped from the
protruding wheel well sections to get things in place.
The resin cockpit parts were then
sawn off the resin plugs and the holes for the control stick and flap
actuator handle were drilled out. The various bits were then glued in place
in preparation for installation. The kit instrument panel has to be used
and this is actually too large for the cockpit opening. Some sanding is
needed on the sides to get it to fit into place. Once there, I applied
superglue to the inside of the fuselage halves and inserted the resin tub.
Fit is actually quite good with only a bit of accelerator needed to keep
the side panels in line. I then test fit the wings. The resin cockpit is
wider than the kit one so about a 1/4 inch has to be snipped from the
protruding wheel well sections to get things in place.
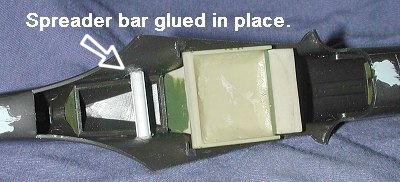 I also discovered that the fuselage
was too narrow and so I made a spreader bar to put into the fuselage to
widen things a bit. It is nothing more than a chunk of sprue glued in
place. You need to be very careful when doing spreader bars as ones that
are too tight will cause the fuselage to bulge out at the glue points and
you certainly don't want that to happen. Thanks to the hard plastic of the
Mauve kit, that isn't so much of a problem, but a kit with softer plastic
will require additional care. Even with this care, there were some gaps
near the front that were filled. I then attached the tail planes, which are
keyed to prevent putting them on the wrong side. Fit is excellent.
I also discovered that the fuselage
was too narrow and so I made a spreader bar to put into the fuselage to
widen things a bit. It is nothing more than a chunk of sprue glued in
place. You need to be very careful when doing spreader bars as ones that
are too tight will cause the fuselage to bulge out at the glue points and
you certainly don't want that to happen. Thanks to the hard plastic of the
Mauve kit, that isn't so much of a problem, but a kit with softer plastic
will require additional care. Even with this care, there were some gaps
near the front that were filled. I then attached the tail planes, which are
keyed to prevent putting them on the wrong side. Fit is excellent.
 After the usual filler work (which
really wasn't that intensive), I glued on the cowl flap section and then
went to work with the canopy. First I installed the resin gun sight and
made a reflector glass with a small sliver of clear plastic sheet. The rear
canopy section was masked and any glitches where the sprue attached were
filled and sanded. I found that the best way to glue this on was to do one
side at a time. A bit of filler was need in the back, but not much.
After the usual filler work (which
really wasn't that intensive), I glued on the cowl flap section and then
went to work with the canopy. First I installed the resin gun sight and
made a reflector glass with a small sliver of clear plastic sheet. The rear
canopy section was masked and any glitches where the sprue attached were
filled and sanded. I found that the best way to glue this on was to do one
side at a time. A bit of filler was need in the back, but not much.
While all that was happening, I started drilling out the guns. Well, I screwed one up royally and so removed all the gun barrels, drilled out the area and got them ready to accept some small diameter stainless tubing.
Going back to the kit itself, I glued on the windscreen and then tacked the canopy in place so that I could be ready to paint. I also glued in the pitot tube and the upper surface DF antenna. This aircraft did not have a radio mast so that hole was filled in.
| COLORS & MARKINGS |
Colors on this one are a no-brainer;
Olive Drab over Neutral Grey. First I painted the underside using Testors
enamels. When dry, I masked a few areas to prevent overspray and then used
faded OD for the upper surface, again using Testors Enamels. I painted a
large area of the fin with 'normal' OD to represent the area where the
serial nu mber was
over-painted, a practice typical of the CBI. I then got out the Medium
Green and did a few splotches on the tail surfaces. Then I returned to the
work bench and broke out the pastels. I scrubbed these into the panel lines
and must have done a good job as most of the pastel stayed on the airframe,
even after I wiped it down several times. It looked a bit much to me, but I
figured that a clear coat would fade things out a bit. Boy, was I wrong. If
anything it enhanced it even more! Well, it definitely looked grungy so
after the clear coat had dried, it was time for decals.
mber was
over-painted, a practice typical of the CBI. I then got out the Medium
Green and did a few splotches on the tail surfaces. Then I returned to the
work bench and broke out the pastels. I scrubbed these into the panel lines
and must have done a good job as most of the pastel stayed on the airframe,
even after I wiped it down several times. It looked a bit much to me, but I
figured that a clear coat would fade things out a bit. Boy, was I wrong. If
anything it enhanced it even more! Well, it definitely looked grungy so
after the clear coat had dried, it was time for decals.
One thing the P-40 looks good in, it is a shark mouth or other fearsome looking, toothy application. The 51 FG, a unit that operated in much of the same area as the famous Flying Tigers of the 23 FG, had some pretty wicked looking nose applications, so I went that route. Eagle Strike 48-076 has markings for one of these planes. I should mention that the 51FG also operated in India and some of their P-40s have that neat skull marking that one sees so often. Application of the markings was rather straight-forward as there isn't much to it other than the special markings and insignia. The nose markings required some cutting and fussing to fit. I also had to do some painting to fix a few problem areas on it, but overall, it went on without too much trouble. In addition, the white parts are not totally opaque and you can see where the white band is where it passes behind the fuselage insignia. Once dry, the airframe was given a coat of matte clear to seal things in place.
| FINAL CONSTRUCTION |
Final construction consisted of attaching all the little lights. These had been painted on the back with the appropriate color and then attached with white glue. White glue was also used to install the stainless steel gun barrels and to attach the prop. Once I pulled off the masking from the clear bits and used a bit more pastel for stains, the canopy was tacked in the open position, also using white glue. I also used an MV lens in place of the landing light. I did a bit of touch up painting where I missed some bits and that was it. I then went to photograph it before things started falling off as sometimes happens.
| CONCLUSIONS |
I really don't know of a better P-40N kit. With Hasegawa coming out with a P-40E, it wouldn't surprise me if they did the whole series of later Warhawks. However, adding the True Details interior and wheels gives you a superlative model when you are done.
October 2004
# 1333 in a series
Copyright ModelingMadness.com. All rights reserved. No reproduction in part or in whole without express permission from the editor.
Kit and detail sets courtesy of me!
If you would like your product reviewed fairly and fairly quickly, please contact the editor or see other details in the Note to Contributors.