Hasegawa 1/72 B-25J Mitchell
|
KIT # |
00546 (E 16) |
|
PRICE: |
3200 yen (about $27) |
|
DECALS: |
3 aircraft |
|
REVIEWER: |
|
|
NOTES: |
A real beauty |
|
HISTORY |
|
CONSTRUCTION |
First thing I did on this one was to start looking around for subassemblies. This meant gluing the wing halves, wheel halves and stabilizer halves together. Then I opened the various holes in the fuselage for the 'cheek' guns and started gluing interior bits into place on the sidewalls. Turning to the interior, the floor, seats, control column and bulkheads were assembled. The bombsight was glued to the bombardier's floor and I glued the main bits for the upper turret together. Finally, the bomb bay sections were glued together.
 Since most of these pieces were to be painted the same color, I then
started making some inquiries as to what color all these bits should be.
Now the Accurate Miniatures B-25Gs I did had interior green cockpit, bare
metal bomb bay and the rest of the wheel wells and such in yellow zinc
chromate. The instructions wants everything in chromate green except the
bomb bay which it agrees should be aluminum. An inquiry on the Reader's
Forum brought me many conflicting views. I chose to paint most of the
fuselage yellow zinc chromate along with the gear doors, entry doors,
and forward gear well. The bomb bay, main gear well and inside engine
cowlings were painted aluminum. Everything in the forward section of the
plane was done in FS 34092, which is a fairly good
match for 'interior bronze green'. OK. It is a bit dark, but will do.
Since most of these pieces were to be painted the same color, I then
started making some inquiries as to what color all these bits should be.
Now the Accurate Miniatures B-25Gs I did had interior green cockpit, bare
metal bomb bay and the rest of the wheel wells and such in yellow zinc
chromate. The instructions wants everything in chromate green except the
bomb bay which it agrees should be aluminum. An inquiry on the Reader's
Forum brought me many conflicting views. I chose to paint most of the
fuselage yellow zinc chromate along with the gear doors, entry doors,
and forward gear well. The bomb bay, main gear well and inside engine
cowlings were painted aluminum. Everything in the forward section of the
plane was done in FS 34092, which is a fairly good
match for 'interior bronze green'. OK. It is a bit dark, but will do.
The instrument panel is a decal, so once that part was dry, the decals were
put on. I bravely applied Solvaset, expecting a disaster, but none
occurred. Obviously waiting for farther into the construction! The panel
was glued into the cockpit. I glued the
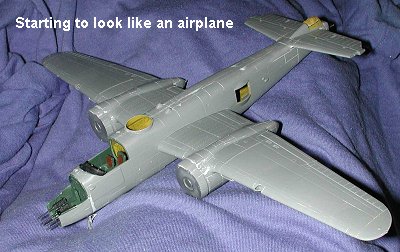
engine nacelles together and glued them into the appropriate wings. Fit is
excellent and unlike the AM kit, the upper engine intake is molded in to
the upper w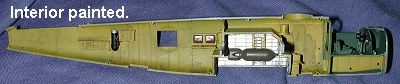 ing so no unsightly gaps. In fact, there are several other areas
where Hasegawa simplified things a bit and the upper turret assembly is one
of them. That construct is no where near as fiddly as on the AM kit.
ing so no unsightly gaps. In fact, there are several other areas
where Hasegawa simplified things a bit and the upper turret assembly is one
of them. That construct is no where near as fiddly as on the AM kit.
Before closing up the fuselage halves, I did the usual additional paint
work on various interior bits, mostly with silver and black. There is no
cockpit sidewall detail, which is a bit of a shame, but probably done
because of an exterior panel that needs inserted on the co-pilots side. Not
sure if it is supposed to be armor plating or what, but it doesn't fit very
well, leaving a rather large gap around it. I also glued the bombs in to
the bomb bay. There is one on each side and some very nice mounting lugs
are provided to fit into holes in the bomb. The bomb has mounting holes on
both sides, but these will be invisible when one looks into the bay. These
assure positive mounting, unlike the AM kit where one basically had to wing
it and hope for the best.  While all this paint was
drying, the engine cylinders were painted aluminum and given several black
washes to bring out a bit of detail and darken up the aluminum a bit. The
nose gear well won't be seen when the model is finished so this was filled
with as much weight as I could put in there.
While all this paint was
drying, the engine cylinders were painted aluminum and given several black
washes to bring out a bit of detail and darken up the aluminum a bit. The
nose gear well won't be seen when the model is finished so this was filled
with as much weight as I could put in there.
The fit of the fuselage halves was fairly good. I nearly forgot to install the tail gun and armor so make a note to yourself so you don't forget this part! I did have to use some filler to take care of the sink marks opposite the alignment pins. These were most noticeable on the upper surface.
While all that was going on, I cleaned up the engine cowlings and the cowl flap parts. I fear that the cowlings are probably just as inaccurate in form as the Accurate Miniature ones, though they don't look too bad to me. Undoubtedly an aftermarket replacement will be produced to remedy any errors in shape. The cowl flap assemblies were glued to the nacelles. I needed filler on the upper intake as the gap there was rather pronounced.
 Returning to the fuselage, the upper gun blocks (which keep the upper
turret gunner from shooting off the tails) were glued on as was a low bulge
on the bottom. I'll leave the ADF antenna off until near the end. At this
time I glued the tail gunners greenhouse to the horizontal stabilizers and
masked it off. Then the wings were glued to the fuselage. Fit is excellent
though a touch loose. Be sure that the wing spars fit into the slots in the
wing or you'll have problems. Meanwhile I glued the guns into the nose
section. These did not fit well. The bombardiers seat obstructs the one
side and the bomb sight makes it impossible to mount the other at all. I
snapped off the bomb sight and glued in the guns as best I could, though
they seem a bit too far forward. All that matters is if the nose piece
fits. The sight was glued a bit farther to the center. Then this assembly
was glued onto the the nose section. It took a bit of filler.
Returning to the fuselage, the upper gun blocks (which keep the upper
turret gunner from shooting off the tails) were glued on as was a low bulge
on the bottom. I'll leave the ADF antenna off until near the end. At this
time I glued the tail gunners greenhouse to the horizontal stabilizers and
masked it off. Then the wings were glued to the fuselage. Fit is excellent
though a touch loose. Be sure that the wing spars fit into the slots in the
wing or you'll have problems. Meanwhile I glued the guns into the nose
section. These did not fit well. The bombardiers seat obstructs the one
side and the bomb sight makes it impossible to mount the other at all. I
snapped off the bomb sight and glued in the guns as best I could, though
they seem a bit too far forward. All that matters is if the nose piece
fits. The sight was glued a bit farther to the center. Then this assembly
was glued onto the the nose section. It took a bit of filler.
The tailplane assembly was then glued into place minus the rudders. There
is an odd 'strake' under the nose that was glued in place along with a
lower bulge. I later found out that this strake was some sort of intake,
though what for is beyond me and must have been a very late war addition. A
reader later told me that this was to remove gun gasses and he only found it on
late war planes operating in Italy. Means it probably isn't germane to my
Pacific Mitchell.
The gunners greenhouse was masked prior to installation. Only a bit of
filler 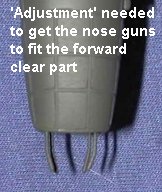 was needed on this part.
Then the fins were glued on. I masked the upper bombardier's greenhouse and
the cockpit transparency. These were glued in place after a bit of
adjustment to the surrounding area to get a good fit. The upper turret dome
was also masked as were the side gun windows. I then sanded off the upper
wing formation lights as those were only applicable to early B-25s (B/C/D).
All the openings were stuffed with tissue. The kit was then taken to the
paint shop where the initial coats of OD and Neutral grey were applied. I
used Aeromaster acrylic Neutral Grey and Testors enamel Olive drab. Again,
this was just preliminary painting and the masked clear bits were painted
at this time as well. When dry, I test fit the forward clear part to make
sure all fit well. It didn't. I had to bend the guns into a rather odd
shape to get them to be straight when they came out of the nose section as
they were too far inboard to fit into the holes. Once that was done, the
nose section transparency was masked and painted OD.
was needed on this part.
Then the fins were glued on. I masked the upper bombardier's greenhouse and
the cockpit transparency. These were glued in place after a bit of
adjustment to the surrounding area to get a good fit. The upper turret dome
was also masked as were the side gun windows. I then sanded off the upper
wing formation lights as those were only applicable to early B-25s (B/C/D).
All the openings were stuffed with tissue. The kit was then taken to the
paint shop where the initial coats of OD and Neutral grey were applied. I
used Aeromaster acrylic Neutral Grey and Testors enamel Olive drab. Again,
this was just preliminary painting and the masked clear bits were painted
at this time as well. When dry, I test fit the forward clear part to make
sure all fit well. It didn't. I had to bend the guns into a rather odd
shape to get them to be straight when they came out of the nose section as
they were too far inboard to fit into the holes. Once that was done, the
nose section transparency was masked and painted OD.
|
CAMOUFLAGE & MARKINGS |
 Then it was an odd case of hurry up and wait. Roger Jackson had offered a
scheme from the Albatross B-25 sheet and I figured I'd put the kit on hold
to see if the markings would be appropriate to the aircraft I was building.
This meant that I didn't know if there would be other areas of the kit that
would need some color added. Meanwhile, I completed the general OD/Neutral
Grey camouflage, figuring that what I added to it could be easily done
later.
Then it was an odd case of hurry up and wait. Roger Jackson had offered a
scheme from the Albatross B-25 sheet and I figured I'd put the kit on hold
to see if the markings would be appropriate to the aircraft I was building.
This meant that I didn't know if there would be other areas of the kit that
would need some color added. Meanwhile, I completed the general OD/Neutral
Grey camouflage, figuring that what I added to it could be easily done
later.
Some construction continued at this time when I added the myriad ejector stacks to each engine cowling. I also then painted the forward cowling with Floquil Reefer White in anticipation of possible color to be added to that portion of the airframe. The engines were completed with minimal fuss. These do not include the pushrods and electrical wiring that were provided on the Accurate Miniatures 1/48 kit, but are good enough. I also painted the props keeping the hub aluminum. The gear doors and bomb bay doors had Neutral Grey painted on the outer sides.
 Finally (well, it wasn't that long, but seemed like it), Roger's decals
arrived and I broke out the reference to see how far off the decals were.
Actually, the drawings should be used for placement purposes and not as
solid historical accuracy. The kit, with its four additional nose guns and
the extra intake is correct for the two B-25J glass nose aircraft shown
(which has only two guns and no
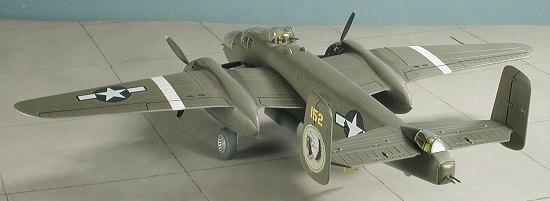
extra intake on the drawing). The decal instructions also missed that 501
BS aircraft at this time had white stripes on each wing outboard of the
engines. I couldn't find an exact measurement for them, but a photo did
show them so I did a best guess sort of thing.
Finally (well, it wasn't that long, but seemed like it), Roger's decals
arrived and I broke out the reference to see how far off the decals were.
Actually, the drawings should be used for placement purposes and not as
solid historical accuracy. The kit, with its four additional nose guns and
the extra intake is correct for the two B-25J glass nose aircraft shown
(which has only two guns and no
extra intake on the drawing). The decal instructions also missed that 501
BS aircraft at this time had white stripes on each wing outboard of the
engines. I couldn't find an exact measurement for them, but a photo did
show them so I did a best guess sort of thing.
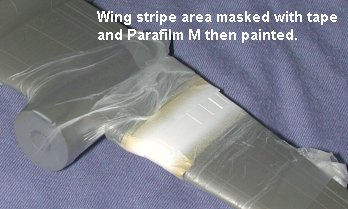
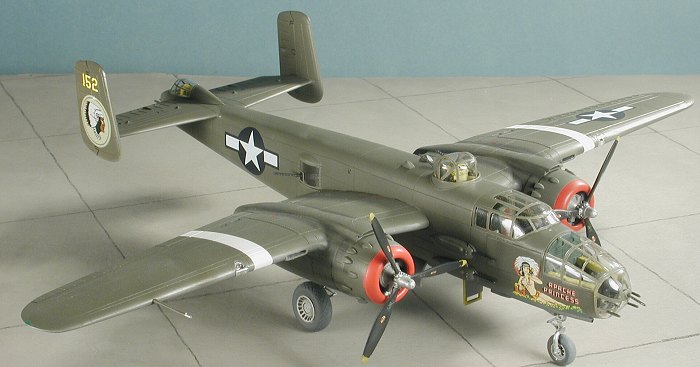
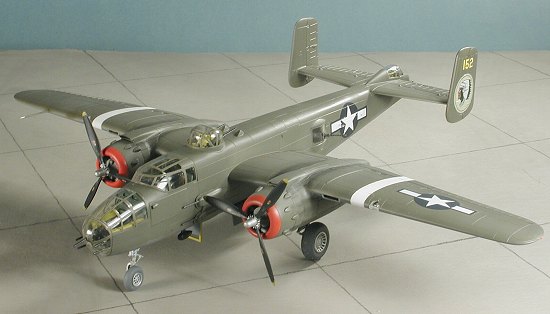
This required two things. One was that I had to paint the forward cowlings red, which I did using first a white undercoat and then Testors Insignia Red. Next, I took thin Tamiya tape and outlined the area on the wings to be painted white. Then I covered the rest of the wings with Parafilm M to prevent any overspray. This is a LOT easier to do than to heap on more masking tape and much better an idea than just hoping that I don't screw it up!
Once the stripes were painted, the cowlings, which had the red masked off, were tacked into place and the OD/Neutral Grey were then applied. This pretty well took care of the painting. The model was then returned to the work bench to have its main landing gear installed, after I forced some more weight into the nacelles. Then I drizzled some superglue in there and shook things around to be sure that the glue would attach itself to the weights. With that done, the kit was firmly on its gear and it was given a coat of Future in preparation for the decals.
 I used decals from a number of
sources. The tail markings and fuel filler markings came from the kit decal
sheet. These are very 'non-Hasegawa' decals as they are quite thin and
reacted well to the Solvaset I used. They are still a bit transparent and
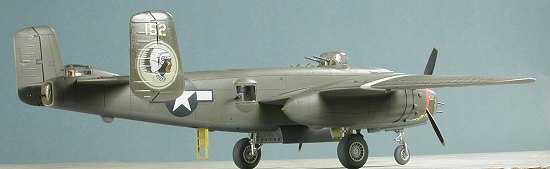
the white is still ivory. The nose art and tail numbers came from the
Albatros B-25 sheet, to do a late B-25J from the 501 BS/345 BG, otherwise
known as the 'Air Apaches'. The insignia came from a White Dog B-24
sheet and are a touch small, but I really couldn't find any the right size
in time to finish the model. The most difficult one to apply was the left
fuselage insignia as it had to conform to some rather large bumps on the
side. A good dosing with Solvaset (actually several doses were needed) got
them to snuggle down without tearing. After they were dry, I wiped them off
and gave the model a matte clear coat using a mixture of Gunze flat base
and Future. I also installed and painted the lower nose window and the
pitot tube.
I used decals from a number of
sources. The tail markings and fuel filler markings came from the kit decal
sheet. These are very 'non-Hasegawa' decals as they are quite thin and
reacted well to the Solvaset I used. They are still a bit transparent and
the white is still ivory. The nose art and tail numbers came from the
Albatros B-25 sheet, to do a late B-25J from the 501 BS/345 BG, otherwise
known as the 'Air Apaches'. The insignia came from a White Dog B-24
sheet and are a touch small, but I really couldn't find any the right size
in time to finish the model. The most difficult one to apply was the left
fuselage insignia as it had to conform to some rather large bumps on the
side. A good dosing with Solvaset (actually several doses were needed) got
them to snuggle down without tearing. After they were dry, I wiped them off
and gave the model a matte clear coat using a mixture of Gunze flat base
and Future. I also installed and painted the lower nose window and the
pitot tube.
|
FINAL CONSTRUCTION |
 With that done, the kit had
the wheels glued in place as well as the gear doors and bomb bay doors. The
aft gun cover was painted a lighter shade of OD and glued in place. It was
then that I noticed the model was still tail-heavy! I cut up a bunch more
weight and stuffed it loose into the engine nacelles. Sounds like a herd of
babies with all the rattling in there! The wheels, gear doors and bomb bay
doors were then attached. The gear doors are way over scale if you want to
thin them. The bay doors also attach a bit inside the door. The outer edge
should be flush with the fuselage where they attach. Both of these problems
are fixable if you want to do so.
With that done, the kit had
the wheels glued in place as well as the gear doors and bomb bay doors. The
aft gun cover was painted a lighter shade of OD and glued in place. It was
then that I noticed the model was still tail-heavy! I cut up a bunch more
weight and stuffed it loose into the engine nacelles. Sounds like a herd of
babies with all the rattling in there! The wheels, gear doors and bomb bay
doors were then attached. The gear doors are way over scale if you want to
thin them. The bay doors also attach a bit inside the door. The outer edge
should be flush with the fuselage where they attach. Both of these problems
are fixable if you want to do so.
The pitot tube was installed and I put MV lenses in where the landing
lights go. The exhaust was applied with pastels and then sealed in with
more matte clear. I then attached the DF 'football' to the underside and
slid the props into the engines. Some quality time was spent removing all
the little bits of masking from the transparencies and using another piece
of tape to pick up some smudges from where I slid the tape on the clear
bits. The nose section was 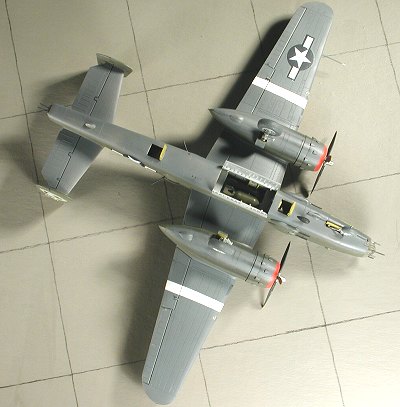 then
fit into place after gluing in the machine gun. The fit is very tight and I
could have left it alone, but I cemented it in place. The guns were glued
into the side windows and then the windows themselves were glued to the
fuselage. The upper turret was simply dropped into place. Landing light
covers were the last bits glued on and they did not fit very well at all,
despite some trimming. The various position lights were painted and I did a
bit of touchup here and there. The finished model was then taken to be
photographed before I broke anything on it! I should also point out, that
the kit is missing the lower ADF sense antenna posts that are generally
rather prominent on the underside of the nose. Builders may wish to add
those. I did not do so as I wanted to build the kit as close to out of the
box as possible.
then
fit into place after gluing in the machine gun. The fit is very tight and I
could have left it alone, but I cemented it in place. The guns were glued
into the side windows and then the windows themselves were glued to the
fuselage. The upper turret was simply dropped into place. Landing light
covers were the last bits glued on and they did not fit very well at all,
despite some trimming. The various position lights were painted and I did a
bit of touchup here and there. The finished model was then taken to be
photographed before I broke anything on it! I should also point out, that
the kit is missing the lower ADF sense antenna posts that are generally
rather prominent on the underside of the nose. Builders may wish to add
those. I did not do so as I wanted to build the kit as close to out of the
box as possible.
|
CONCLUSIONS |
I think Hasegawa has a winner with this one. Those who want a quality late B-25 will overlook the price tag for this one. By simplifying some of the constructs, several of the more frustrating parts of the Accurate Miniatures kit have been done away with and we are left with a very, very nice kit.
|
REFERENCES |
Warpath Across the Pacific, Lawrence J. Hickey, 1986, second edition (revised)
September 2003
#1282 in a series
Copyright ModelingMadness.com. All rights reserved.
If you would like your product reviewed fairly and fairly quickly, please contact the editor or see other details in the Note to Contributors.