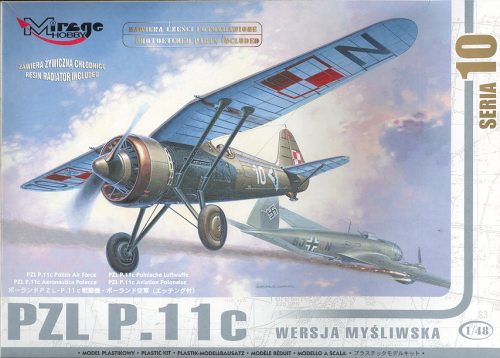
Mirage 1/48 PZL P.11c
|
KIT # |
48101 |
|
PRICE: |
$22.98 |
|
DECALS: |
Two aircraft |
|
REVIEWER: |
|
|
NOTES: |
Multi-media kit with etched brass and resin |
|
BACKGROUND |
For a look at what is in the box and some nice historical info, visit the preview.
|
CONSTRUCTION |
Not wanting to sound trite. But construction began with the
wings on this one. With this and all the parts, I made sure the mating surfaces
were smooth and flat. There is a touch of flash or mold seam on most parts so
this was mandatory. I also found that one of the sprues was not properly aligned
in the mold so all the pieces were off-set from side to side. Not a problem with
the bigger pieces, but a real headache for the small bits.
Once the interior was in place, I did the usual filler and
sanding routine, though it really didn't need much. I then attached all the
etched metal bits to the outside of the fuselage. I suggest removing the old
plastic bits that are to be replaced. I didn't on most of the pieces and they
stick out more than I think they should. I also found that the etched fret was
shy one circular access panel, so you need to make up your mind where you won't
be putting one.
With the fuselage done, the wing then had its etched bits
installed and then I glued the wing braces and the shell ejector chutes to the
lower wing. I did this on the braces so they'd be solidly glued down prior to
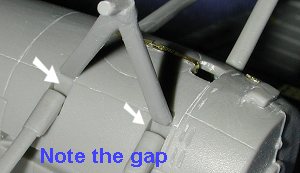
attaching to the fuselage. Meanwhile the wheel struts were glued in place. Fit
It was here that I
ran into a problem. Either the struts are too short or I needed to mount them
closer to the fuselage. Really couldn't do the latter as there are ridges on the
wing that would need removed. What I did do was to bend the wing and then when
the struts were in place, I hit them both with super glue and accelerator. This
caused the wings to bend a bit, but at least the gap was no longer there. It
should hold as I'm using Acrabond super glue, which is the best I've ever used.
Once that was done, I moved to the rear of the plane and installed the tail
planes. This was not an easy task. For one thing, there is supposed to be a gap
in the tail so you have to sort of butt join the tail planes to each other. Then
gently glue just the front and back of them so there is a gap on the top
and bottom. It Meanwhile, I worked
on the engine section. The engine was painted steel with black rocker arm covers
and an aluminum crankcase. The molding here had slipped rather badly so I made
no attempt at any clean-up or things would have been worse. The exhaust
collector is one piece and it was painted light burnt metal with a misting of
jet exhaust, both paints from the Alclad II line. Then the exhaust collector was
to be glued to the exhaust stubs that come out of the front of the engine. A bit
of a problem was a large number of short shot engine exhaust stubs. Nothing to
do to fix it as I know of no one who does a 1/48 replacement engine. I just
glued as many as I could and then double glued them again to get as good a join
as possible. As this was drying, the cowling halves were painted
aluminum inside then glued together. The join was sanded down and the
engine/collector portion test fit. Fit was excellent. The cowling joined the
prop spinner and lower prop housing in the 'to be painted' box. The prop joined
it to be painted black as the instructions suggested. At this time I also sanded
down and glued on the exterior oil cooler. It was now
time for some paint. CAMOUFLAGE & MARKINGS
MORE BITS & DECALS
Now that I had most of the paint on it, I added a few more pieces to it. This
consisted of the windscreen, the etched brass wheel braces, gun sights and a
couple of small etched pieces that I'd missed earlier. This was all painted
again as I did above and when it was dry, I gave it a nice coat of clear gloss
acrylic. Then it was time for the decals.
FINAL CONSTRUCTION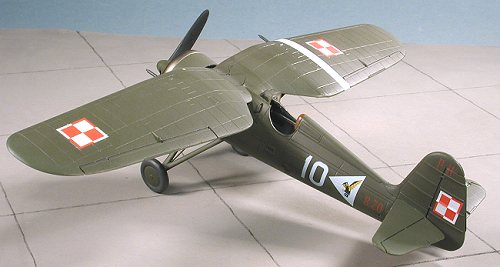 The interior is built up of a floor with a framework on either
side of it. Inside this frame fits the seat and the aft frame. Sounds easy, but
the fit is really fiddly and one has to really take one's time when assembling
this portion of the kit. The upper foot supports on the rudder pedals are to be
made from wire, but I blew it off, figuring most people would not realize they
are missing. Before installing the seat, I made sure that the harness (which is
etched brass) was installed and painted. Most of the interior of this aircraft
is natural metal or silver so all the parts were given a coat of Alclad II
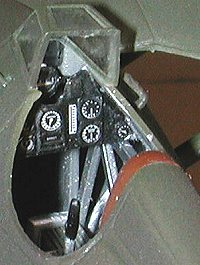
Aluminum and then any other colors painted over it. There is an auxiliary
instrument panel that goes on the right side. It is etched brass with film
instruments behind it. After careful painting and assembly, I attached some
superglue to the mounts and then heard the dreaded 'zing' as the piece went
flying away, never to be seen before. This didn't happen with the instrument
panel, thankfully. The instrument panel is made of several pieces and the
central instrument is set back on its own framework. Rather fussy for those of
us who aren't used to etched bits, but it can be done.
The interior is built up of a floor with a framework on either
side of it. Inside this frame fits the seat and the aft frame. Sounds easy, but
the fit is really fiddly and one has to really take one's time when assembling
this portion of the kit. The upper foot supports on the rudder pedals are to be
made from wire, but I blew it off, figuring most people would not realize they
are missing. Before installing the seat, I made sure that the harness (which is
etched brass) was installed and painted. Most of the interior of this aircraft
is natural metal or silver so all the parts were given a coat of Alclad II
Aluminum and then any other colors painted over it. There is an auxiliary
instrument panel that goes on the right side. It is etched brass with film
instruments behind it. After careful painting and assembly, I attached some
superglue to the mounts and then heard the dreaded 'zing' as the piece went
flying away, never to be seen before. This didn't happen with the instrument
panel, thankfully. The instrument panel is made of several pieces and the
central instrument is set back on its own framework. Rather fussy for those of
us who aren't used to etched bits, but it can be done.
 Eventually, the interior was done and then glued into the
fuselage. The attachment points are not very clear, but there is a good drawing
in the instructions that show how it should look when you get done. I found that
the framework was a bit too narrow at the top when it came time to glue the
other fuselage half. Either that or I didn't have the interior properly
centered. Something to be careful of when doing the installation.
Eventually, the interior was done and then glued into the
fuselage. The attachment points are not very clear, but there is a good drawing
in the instructions that show how it should look when you get done. I found that
the framework was a bit too narrow at the top when it came time to glue the
other fuselage half. Either that or I didn't have the interior properly
centered. Something to be careful of when doing the installation.
 is fairly good though I wasn't sure if I needed to trim back the insertion tabs
as they seemed a bit long. I also glued the tail skid support. The skid needed
quite a bit of filler to take care of a rather large gap. Next the wing was
glued to the upper fuselage deck. Fit was good, though I did need filler to fair
it in next to the cockpit. I let that dry before attending to attaching the
struts to the fuselage.
is fairly good though I wasn't sure if I needed to trim back the insertion tabs
as they seemed a bit long. I also glued the tail skid support. The skid needed
quite a bit of filler to take care of a rather large gap. Next the wing was
glued to the upper fuselage deck. Fit was good, though I did need filler to fair
it in next to the cockpit. I let that dry before attending to attaching the
struts to the fuselage.
 doesn't work. I ended up gluing them to one section and then
holding them up with the struts until they were sorta dry. Then I applied more
glue to give them a more solid bond. Then there are the struts. Folks, I cut
mine too short on one side. What I thought was just a sprue attachment was a
portion of the strut. You need to take real care and do some trimming on these
pieces or you'll make the same mistake I did.
doesn't work. I ended up gluing them to one section and then
holding them up with the struts until they were sorta dry. Then I applied more
glue to give them a more solid bond. Then there are the struts. Folks, I cut
mine too short on one side. What I thought was just a sprue attachment was a
portion of the strut. You need to take real care and do some trimming on these
pieces or you'll make the same mistake I did.
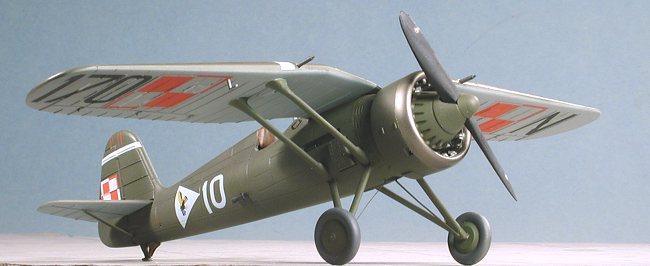
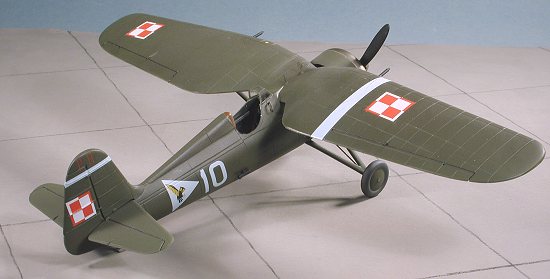
 The kit instructions suggest several Humbrol paints for the colors of this kit.
Several have to be mixed. I headed for my fave hobby shop to peruse the Humbrol
racks. They had one of the four colors I needed. Hmm. This was not good. Then
only thing to do was to wing it with paints at hand. The colors may not be
exact, but they look good. For the underside, I used RLM 65 from the Aeromaster
line. This was then masked as best I could for the other colors. You see, only
the underside of the wings and horizontal stabs are in the lower color. The
struts and the rest of the plane are in the upper color. For this I used
Aeromaster Kawasaki green, but when I was done, I thought it was too green so
misted some Polly S RLM 61 on the kit to brown it up a bit more. I think it
worked fairly well as the RLM 61 would have been way too dark by itself. With
the paint on it was time to add some more bits.
The kit instructions suggest several Humbrol paints for the colors of this kit.
Several have to be mixed. I headed for my fave hobby shop to peruse the Humbrol
racks. They had one of the four colors I needed. Hmm. This was not good. Then
only thing to do was to wing it with paints at hand. The colors may not be
exact, but they look good. For the underside, I used RLM 65 from the Aeromaster
line. This was then masked as best I could for the other colors. You see, only
the underside of the wings and horizontal stabs are in the lower color. The
struts and the rest of the plane are in the upper color. For this I used
Aeromaster Kawasaki green, but when I was done, I thought it was too green so
misted some Polly S RLM 61 on the kit to brown it up a bit more. I think it
worked fairly well as the RLM 61 would have been way too dark by itself. With
the paint on it was time to add some more bits.
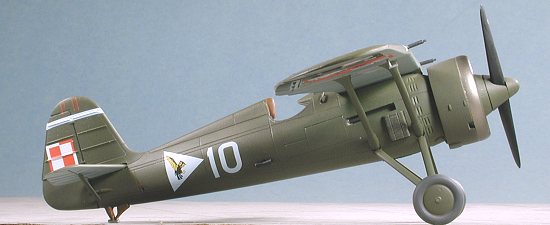
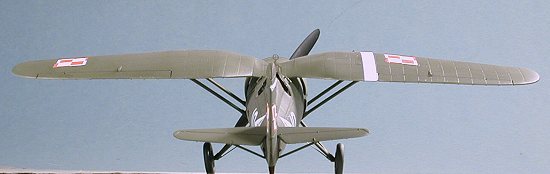
 The kit's decals are by Techmod. I
had a choice of either Skalski's plane (which probably everyone will do since he
was Poland's top WWII Ace) or the other offering which was flown by Hieronim
Dudwal, who was the second top scoring pilot of the 1939 campaign with 4
victories (Skalski had 4 1/2 during this time). His plane has an option of white
lower wing letters as used pre-war, and either white or light blue
aircraft number. I chose the wartime plane and the light blue numbers as they
matched the wing and tail stripes. Before you send me e-mails, the wing stripe
is only on the top and the tail stripe is only on the starboard side. I didn't
mess up (according to the instructions). The decals are quite thin and apt to be
torn. I had a great deal of difficulty getting them to conform to the large
ridges on the airframe, even after popping the many air bubbles. I used Solvaset
and the decals were relatively immune to it, though most did eventually succumb
after many applications. Had I any more Champ, I'd have tried it. The light
colors are totally opaque with no bleed-through. I understand that there are
several aftermarket sheets already out for this kit if you don't like what's in
the box.
The kit's decals are by Techmod. I
had a choice of either Skalski's plane (which probably everyone will do since he
was Poland's top WWII Ace) or the other offering which was flown by Hieronim
Dudwal, who was the second top scoring pilot of the 1939 campaign with 4
victories (Skalski had 4 1/2 during this time). His plane has an option of white
lower wing letters as used pre-war, and either white or light blue
aircraft number. I chose the wartime plane and the light blue numbers as they
matched the wing and tail stripes. Before you send me e-mails, the wing stripe
is only on the top and the tail stripe is only on the starboard side. I didn't
mess up (according to the instructions). The decals are quite thin and apt to be
torn. I had a great deal of difficulty getting them to conform to the large
ridges on the airframe, even after popping the many air bubbles. I used Solvaset
and the decals were relatively immune to it, though most did eventually succumb
after many applications. Had I any more Champ, I'd have tried it. The light
colors are totally opaque with no bleed-through. I understand that there are
several aftermarket sheets already out for this kit if you don't like what's in
the box.
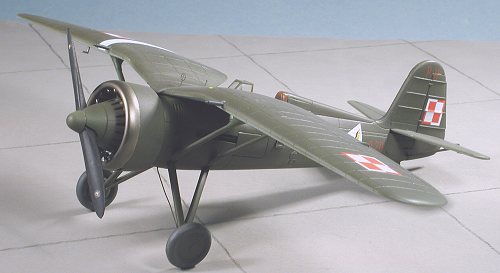 After all the decals were on
and dried, the model was sprayed with my usual Future and Tamiya Flat base mix.
I glued the various engine bits at this time. The engine/collector assembly fit
the cowling perfectly and I had nearly as good a fit with the prop and spinner
assembly. The shaft went through the engine and I glued the prop to it.
The control surfaces had their hinge lines accentuated as I usually do. Then the
wheels were glued on, the prop and engine assembly glued in place and the
masking taken off the windscreen. I also glued in the guns, headrest, venturi,
and the pitot tube (which suffered greatly from mold mismatch). A bit of touch
up painting and I was done. I didn't add any pastels to this one as I didn't
think it would show up on the dark surface and I was a bit lazy on this one. I
can add it later.
After all the decals were on
and dried, the model was sprayed with my usual Future and Tamiya Flat base mix.
I glued the various engine bits at this time. The engine/collector assembly fit
the cowling perfectly and I had nearly as good a fit with the prop and spinner
assembly. The shaft went through the engine and I glued the prop to it.
The control surfaces had their hinge lines accentuated as I usually do. Then the
wheels were glued on, the prop and engine assembly glued in place and the
masking taken off the windscreen. I also glued in the guns, headrest, venturi,
and the pitot tube (which suffered greatly from mold mismatch). A bit of touch
up painting and I was done. I didn't add any pastels to this one as I didn't
think it would show up on the dark surface and I was a bit lazy on this one. I
can add it later.
|
CONCLUSIONS |
I must honestly tell you that I am quite pleased with this kit. Despite my problems with photo etched bits (which is something I have to overcome), the kit went together quite well. I think Mirage should congratulate itself on doing a very nice kit. I can only hope that it will sell well as it would be quite nice to see some other PZL types (like the P.7 or P.24) which can be easily done using much of this same kit. If you'd like a nice kit for your first multi-media model, then this one would be an excellent choice.
December 2002
#1253 in a series
Copyright ModelngMadness.com. All rights reserved. No reproduction in part or in whole without express permission from the editor.
If you would like your product reviewed fairly and fairly quickly, please contact the editor or see other details in the Note to Contributors.