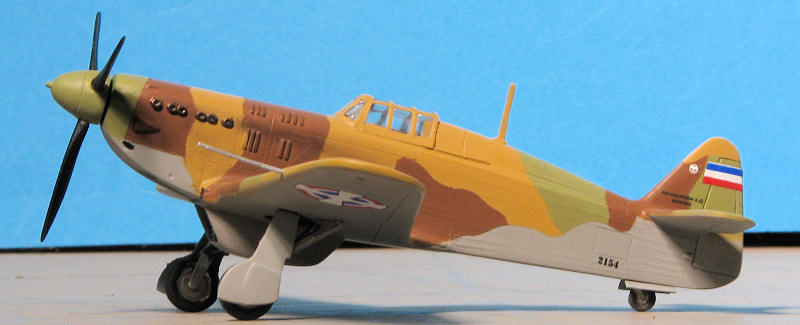
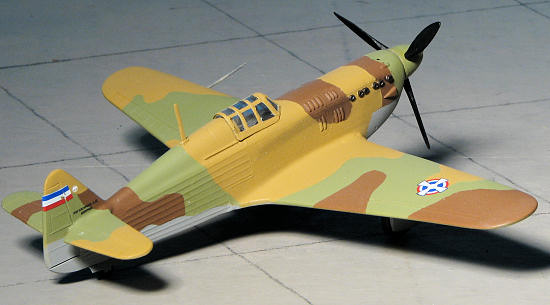
AZ Models 1/72 Rogozarski IK-3 (early)
| KIT #: | AZ 7297 |
| PRICE: | $27.30 |
| DECALS: | Three options |
| REVIEWER: | Scott Van Aken |
| NOTES: | Short run kit |
| HISTORY |
 At the beginning of the April war, only 6 out of 12 IK-3 from
the first production series were operational. One aircraft was lost in a fatal
accident before the war (it dived into the Danube River under power;
investigators concluded the pilot had blacked out), four were grounded for
scheduled services and repairs and one aircraft was undergoing modification to
Series II IK-3 standard in the Rogozarski airplane factory. The six remaining
IK-3s were assigned to 161st and 162nd fighter squadron (3 IK-3 each) of the
51st Fighter group. The 51st fighter group was part of the 6th fighter regiment
of Royal Yugoslav Air Force which was tasked to defend Yugoslav capital,
Belgrade. Both fighter squadrons were stationed at Zemun airport. One source
states: " . . the IK-3s put up a valiant resistance against the Luftwaffe,
scoring a number of "kills" before they were finally destroyed in combat."
Another source claims 11 victories for the IK-3, with Narednik (Flight Sergeant)
M. Semiz as most successful (4 victories).
At the beginning of the April war, only 6 out of 12 IK-3 from
the first production series were operational. One aircraft was lost in a fatal
accident before the war (it dived into the Danube River under power;
investigators concluded the pilot had blacked out), four were grounded for
scheduled services and repairs and one aircraft was undergoing modification to
Series II IK-3 standard in the Rogozarski airplane factory. The six remaining
IK-3s were assigned to 161st and 162nd fighter squadron (3 IK-3 each) of the
51st Fighter group. The 51st fighter group was part of the 6th fighter regiment
of Royal Yugoslav Air Force which was tasked to defend Yugoslav capital,
Belgrade. Both fighter squadrons were stationed at Zemun airport. One source
states: " . . the IK-3s put up a valiant resistance against the Luftwaffe,
scoring a number of "kills" before they were finally destroyed in combat."
Another source claims 11 victories for the IK-3, with Narednik (Flight Sergeant)
M. Semiz as most successful (4 victories).
| THE KIT |
Molded in AZ Model's usual tan plastic, there is a single injected plastic sprue with a rather thick one-piece canopy. The molding on the plastic parts is quite good with nicely engraved detail. The fabric representation is along the line of having thin raised detail which on the left fuselage side is of an inconsistent nature. The rest of the parts are typical of low pressure molding.
 Apparently this sprue is used for the later version as well
as there are two sets of gear doors provided, about the only external difference
between the two types. There are wheel well sections that are cemented into the
lower wing. Cockpit is the usual flat floor plate with separate seat, instrument
panel, rear bulkhead, stick. There is nice framework and box detail on the
inside of the fuselage halves. The prop has separate blades with only
depressions on the hub to show where the blades go. Those will need to be
drilled out. The kit also requires the builder to stretch some sprue for a few
minor items.
Apparently this sprue is used for the later version as well
as there are two sets of gear doors provided, about the only external difference
between the two types. There are wheel well sections that are cemented into the
lower wing. Cockpit is the usual flat floor plate with separate seat, instrument
panel, rear bulkhead, stick. There is nice framework and box detail on the
inside of the fuselage halves. The prop has separate blades with only
depressions on the hub to show where the blades go. Those will need to be
drilled out. The kit also requires the builder to stretch some sprue for a few
minor items.
Instructions are a single sheet of folded paper with 17 construction steps. There is also a short history and parts diagram on the other. Paint information is generic. These instructions are used for all the IK-3 boxings and those that pertain to each version are listed. Color and markings are shown on the back of the box in full color with FS 595 references as appropriate. There are three planes in similar camouflage, differing only in some detail markings. The small decal sheet looks to be well printed and includes the instrument panel decal.
| CONSTRUCTION |
As with all short run kits, one needs to look over
the various bits and do whatever clean-up is needed prior to attaching bits. I
started this one by assembling the wings, after installing the wheel wells, and
the interior. Since most of the inside is aluminum or grey it wasn't a difficult
task. I was expecting this kit to not fit well and I wasn't disappointed. The
trailing edge of the wings, for example, are quite thick. Those with more time
and skill than I will be spending quality time thinning these surfaces down. I
also found that the completed interior with the rear bulkhead attached didn 't
fit well into the inside of the fuselage. What I did was to remove the rear
bulkhead, and after gluing the fuselage halves together, it was inserted into
place. Then the interior itself was glued in place.
't
fit well into the inside of the fuselage. What I did was to remove the rear
bulkhead, and after gluing the fuselage halves together, it was inserted into
place. Then the interior itself was glued in place.
I then attended to all the seams using super glue as a filler. The tail planes were then butt joined to the rear. One thing I noticed in these and the wings is that the size of the control surfaces are not the same size from side to side. Those on the wings are noticeable with one side much deeper than the other.
Speaking of wings, the fit of the wings is quite poor. Even after much trimming, I had difficulty getting them to be level. A great deal of filler was needed to take care of the various gaps. This caused most of the engraved detailing to disappear, though it was rescribed later. It should be no surprise that the ventral radiator 'bath' did not fit well either. The lower surface of the wing is slightly curved while the bottom of the radiator part is flat. More filler. With that done, the canopy was masked and installed. It was then time to see about some paint.
| COLORS & MARKINGS |
Well, I didn't have a stash of Jugoslav AF colors handy and since the FS 595 reference colors were quite esoteric, I decided to use similar Italian WWII shades from my rarely used Aeromaster acrylic collection. Since this was to be masked, I figured acrylics would be adequate.
 I started by spraying the underside a light grey and
when done, it was properly masked off and the upper side painted a tan shade.
More masking and the green was applied followed by yet more masking and the
brown. Once all that was done (and we are talking about four days work in two
sentences), the usual touch up was done to the areas that had some leakage or
where the masking didn't reach.
I started by spraying the underside a light grey and
when done, it was properly masked off and the upper side painted a tan shade.
More masking and the green was applied followed by yet more masking and the
brown. Once all that was done (and we are talking about four days work in two
sentences), the usual touch up was done to the areas that had some leakage or
where the masking didn't reach.
Next was the addition of the base landing gear. This is a rather convoluted gear assembly and one also needs to drill out the holes for the main strut as on mine at least, there were only indications of where the mounting holes were to be placed. I also attached as best I could, the two long struts that went to another shorter stubby strut that fits behind the main gear. Naturally, the openings for the longer struts were pretty much closed up so rather than go through all the work of opening the wider channels in the bottom of the already painted wing, I trimmed the longer struts to where they fit as in the diagram. This was all left to dry.
Once dry, the entire airframe was gloss coated in preparation for decals. The kit decals went on well though are quite thin, tear easily and tend to stick where initially placed. I also found the white on the fin stripes to be off register. Once done, the airframe was clear matte coated using Polly Scale matte clear.
| FINAL CONSTRUCTION |
 With that out of the way, a hole was drilled in the
wing for the pitot tube. Four very short struts were cut from wire and attached
to the stubby strut that I mentioned earlier. This whole deal was then painted
silver. A more talented builder would be able to do a much better job of things,
I'm sure. I had drilled the holes in the spinner and after cleaning up and
painting the props, those were glued in place. Naturally, I broke one so had to
reattach it. The wheel
With that out of the way, a hole was drilled in the
wing for the pitot tube. Four very short struts were cut from wire and attached
to the stubby strut that I mentioned earlier. This whole deal was then painted
silver. A more talented builder would be able to do a much better job of things,
I'm sure. I had drilled the holes in the spinner and after cleaning up and
painting the props, those were glued in place. Naturally, I broke one so had to
reattach it. The wheel s were then installed and left to dry. During this time, I
painted some detail stuff like the radiator openings and the exhaust. The last
things to be attached were the various gear doors. Patience of Job required for
this one as there is no dedicated attachment point. One just sort of puts down
glue and then wiggles the piece into position.
s were then installed and left to dry. During this time, I
painted some detail stuff like the radiator openings and the exhaust. The last
things to be attached were the various gear doors. Patience of Job required for
this one as there is no dedicated attachment point. One just sort of puts down
glue and then wiggles the piece into position.
Once all of that was done, the masking was removed, exhaust stains applied and the prop put into place. Some additional touch up painting was needed (isn't it always?), and the model was done.
| CONCLUSIONS |
This was my first AZ models kit and I have to say that it lived up to all I'd heard about these kits. It was a difficult build and though it does fill a hole in my collection is not a kit I'd recommend unless, as Christopher Lloyd's Kruge in Star Trek III states, "I hope pain is something you enjoy".
| REFERENCES |
http://en.wikipedia.org/wiki/IK-3
January 2011 Copyright ModelingMadness.com. All rights reserved. No reproduction in any part without express permission from the editor.
If you would like your product reviewed fairly and quickly, please contact the editor or see other details in the Note to Contributors.