Tamiya/Pavla 1/48 Spitfire VI
| KIT #: | 61035 /C 48-17 |
| PRICE: | $26.95/ |
| DECALS: | Three/Two options |
| REVIEWER: | Scott Van Aken |
| NOTES: | Conversion |
| HISTORY |
In the normal course of Spitfire development, means were sought to increase the altitude performance, which was inferior to that of the Messerschmitt Bf 109E. It was also needed to be able to do something about the high flying Junkers Ju-86P reconnaissance aircraft. These planes had been flying over British military installations for quite some time and with relative impunity. It was frustrating for RAF pilots to see their quarry several thousand feet above them, but be unable to reach them.
 This called for two principal modifications to the current
Spitfire V; the introduction of a pressurized cabin and the use of an engine
suitably rated for higher altitude. The first version of the Spitfire so
equipped, was the Mark VI derived directly from the Mark Vb, as a result of work
on pressure cabins at the Royal Aircraft Establishment and Supermarine during
1940-41. At the R.A.E., R7120 was fitted with a Merlin 47 (the high rated
version of the Merlin 45) with a four-blade Rotol propeller with Jablo blades
and a pressure cabin. The same engine was employed by the 100 Spitfire VI (Type
350) fighters, built by Supermarine, the first two of these AB176 and X4942
serving as prototypes. The production Spitfire VI also had an increase in wing
area to improve controllability at high altitudes, the wing being of pointed
planform with a span of 40 ft. 2 in.
This called for two principal modifications to the current
Spitfire V; the introduction of a pressurized cabin and the use of an engine
suitably rated for higher altitude. The first version of the Spitfire so
equipped, was the Mark VI derived directly from the Mark Vb, as a result of work
on pressure cabins at the Royal Aircraft Establishment and Supermarine during
1940-41. At the R.A.E., R7120 was fitted with a Merlin 47 (the high rated
version of the Merlin 45) with a four-blade Rotol propeller with Jablo blades
and a pressure cabin. The same engine was employed by the 100 Spitfire VI (Type
350) fighters, built by Supermarine, the first two of these AB176 and X4942
serving as prototypes. The production Spitfire VI also had an increase in wing
area to improve controllability at high altitudes, the wing being of pointed
planform with a span of 40 ft. 2 in.
The pressure cabin was contained between the bulkheads fore and aft of the cockpit, and a special non-sliding hood was fitted to simplify the sealing problem. A Marshall blower provided a cabin differential of 2 lb./s. in., reducing apparent altitude from 40,000 feet to 28,000 feet. In other respects including armament the Spitfire VI was similar to the Mark Vb. Despite this, the aircraft was only marginally effective due to the inability of the engine to provide sufficient performance at altitude. The extended wings were also a bit of a worry as they were unable to handle the same stress loads as the standard aircraft. In December 1941 a two-speed, two-stage supercharger was fitted to the engine and it became the Spitfire F/HF Mk VII, a much more capable aircraft..
| THE KIT |
 This particular kit has some of the parts in common with the
earlier Spitfire I kit reviewed here some years
back. It includes a new wing sprue,
a smaller one with the various filters, ferry tank, and a pilot in tropical
garb. There is also a four bladed prop and spinner included, though I'm not
really sure just what that is for as none of the schemes use it and I don't
think the MkV ever used this kind of prop. It is also molded in a nice 'desert
tan' color. (I've been told that it is an MDC prop for making a Seafire III.
One of the benefits of buying kits at swap meets! ed)
This particular kit has some of the parts in common with the
earlier Spitfire I kit reviewed here some years
back. It includes a new wing sprue,
a smaller one with the various filters, ferry tank, and a pilot in tropical
garb. There is also a four bladed prop and spinner included, though I'm not
really sure just what that is for as none of the schemes use it and I don't
think the MkV ever used this kind of prop. It is also molded in a nice 'desert
tan' color. (I've been told that it is an MDC prop for making a Seafire III.
One of the benefits of buying kits at swap meets! ed)
No need to talk about the quality of the molding as it is superb and most typical of current Tamiya kits. One thing about the wings is that they not only have clearance bumps for the wheels, but also external stiffening strakes for the wings. Now apparently the B wing was weak in this area so after several wing failures, the strakes were added around early 1942. The C wing was made of thicker aluminum so didn't need these external reinforcements. If modeling an early Spit Vb, you need to remove these strakes. The instructions don't say anything about it, but those I've talked to with a later boxing of this kit says that Tamiya indicates their removal for at least one of the schemes. The wheel bumps are apparently standard, though in photos they are so slight as to be nearly invisible. Many think they were only post war additions, which makes me wonder how many Spit V's were in service in 1946.
The kit offers as options the choice of regular or 'clipped' wing tips. You also have a choice of two types of filter; the Vokes or Aboukir, depending again on the plane you are modeling. There is also a fuel tank for the lower fuselage, but to my understanding, this was basically a ferry tank and rarely used in operations because of the drag that it induced. Finally, the canopy is separate and can be built in the open position along with adding the pilot figure.
 Instructions are superb and except for Tamiya's irritating
tendency to not tell you colors and having you mix them from Tamiya paints, are
all one could want. Frankly, this lack of color information is inexcusable from
a company like Tamiya. Decals are for two aircraft, both in Dark Earth and Midstone over Azure Blue (or, as Tamiya calls it; 2 drops of X-16, 10 drops of
XF-2 and 5 drops of XF-18). One plane is a Vokes-filtered normal spanned plane
from 417 sq while the other has the Aboukir filter and clipped wings with 601
squadron. Actually, the instructions state that you can do either UF*X or UF*F
from this sheet, but gives no alternate serial number for UF*F. Apparently UF*F
had white code letters. All of the insignia have white background decals to
ensure no bleed-through of the paint and the proper density of the reds and
yellows, a nice touch. The decals themselves are typical Tamiya in that they are
a bit thick and should work fairly well. Use of setting solutions is at your own
risk!
Instructions are superb and except for Tamiya's irritating
tendency to not tell you colors and having you mix them from Tamiya paints, are
all one could want. Frankly, this lack of color information is inexcusable from
a company like Tamiya. Decals are for two aircraft, both in Dark Earth and Midstone over Azure Blue (or, as Tamiya calls it; 2 drops of X-16, 10 drops of
XF-2 and 5 drops of XF-18). One plane is a Vokes-filtered normal spanned plane
from 417 sq while the other has the Aboukir filter and clipped wings with 601
squadron. Actually, the instructions state that you can do either UF*X or UF*F
from this sheet, but gives no alternate serial number for UF*F. Apparently UF*F
had white code letters. All of the insignia have white background decals to
ensure no bleed-through of the paint and the proper density of the reds and
yellows, a nice touch. The decals themselves are typical Tamiya in that they are
a bit thick and should work fairly well. Use of setting solutions is at your own
risk!
| CONSTRUCTION |
First thing to do was to scope out all the bits and see what was needed and what wasn't. The Pavla set includes a new set of wing tips, some interior bits and a few smaller outside pieces. I started by building up the interior. Pavla's armor plating was installed and fits where the kit bits go. The upper portion includes a desiccant pack which I was directed to glue to the upper armor plate. Well, this meant that it wouldn't fit atop the lower section as the kit framework is in the way. I duly cut this framework off, wondering if perhaps I shouldn't have put the desiccant pack on the framework vice the armor plate.
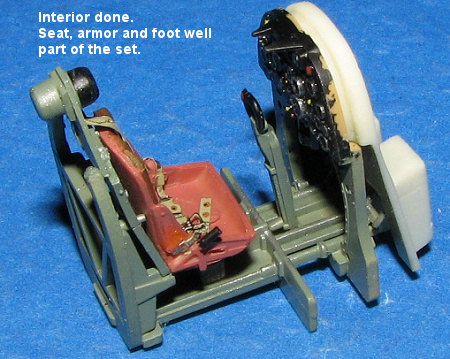 I
also painted the seat with a reddish brown to simulate the material used for
seats. The control stick and instrument panel and rudder pedals were glued to
the floor section and the forward pressure bulkhead glued to the back of the
instrument panel section. I then painted all the interior bits with British
Interior Green from the Testors Model Master enamel line. A set of Eduard
pre-painted seat belts were then glued to the seat and threaded through the
upper armor plate. I'm not positive I used the right one, but it was the
only set left on the sprue so it was installed. Fortunately, the belts molded on
the bottom of the seat have very little profile (they are pretty flat), so
easily hidden. The rear pressure bulkhead was glued in after I thinned down the
edges a bit to get a good fit. It is a good idea to test fit everything. I also
filled in the pilot's door access panel as photos showed this to be smoothed
over.
I
also painted the seat with a reddish brown to simulate the material used for
seats. The control stick and instrument panel and rudder pedals were glued to
the floor section and the forward pressure bulkhead glued to the back of the
instrument panel section. I then painted all the interior bits with British
Interior Green from the Testors Model Master enamel line. A set of Eduard
pre-painted seat belts were then glued to the seat and threaded through the
upper armor plate. I'm not positive I used the right one, but it was the
only set left on the sprue so it was installed. Fortunately, the belts molded on
the bottom of the seat have very little profile (they are pretty flat), so
easily hidden. The rear pressure bulkhead was glued in after I thinned down the
edges a bit to get a good fit. It is a good idea to test fit everything. I also
filled in the pilot's door access panel as photos showed this to be smoothed
over.
 Meanwhile,
I went to work on the wings. No holes to open up in the lower wing so I glued
the upper wing halves together and when dry, sanded all the mating surfaces. The
resin wing tips were then cleaned up after removal from their thin pour stubs.
These were glued on, lining them up with the leading edge. I did this as
Meanwhile,
I went to work on the wings. No holes to open up in the lower wing so I glued
the upper wing halves together and when dry, sanded all the mating surfaces. The
resin wing tips were then cleaned up after removal from their thin pour stubs.
These were glued on, lining them up with the leading edge. I did this as
![]() they
were both a bit narrow, leaving a bit of aileron sticking out. Much super glue
was used to fill any gaps, being immediately hit with accelerator and then
sanded. In a very short time, I had the two tips in place. After many inquiries
on the discussion group, I learned that the reinforcement strakes and wheel
bulges on the upper wing had to go. A bit of work with several grades of
sandpaper removed those and the appropriate panel lines were rescribed.
they
were both a bit narrow, leaving a bit of aileron sticking out. Much super glue
was used to fill any gaps, being immediately hit with accelerator and then
sanded. In a very short time, I had the two tips in place. After many inquiries
on the discussion group, I learned that the reinforcement strakes and wheel
bulges on the upper wing had to go. A bit of work with several grades of
sandpaper removed those and the appropriate panel lines were rescribed.
I then glued together the fuselage halves, trapping the
cockpit in there. The tail planes were then installed. There are little 'lips'
on the tail planes and the rear fuselage that will keep you from putting them on
the wrong side. This also helps to align things so that the wing can be glued in
place. Here I ran into my first problem. You see, the fuselage is a bit too wide
a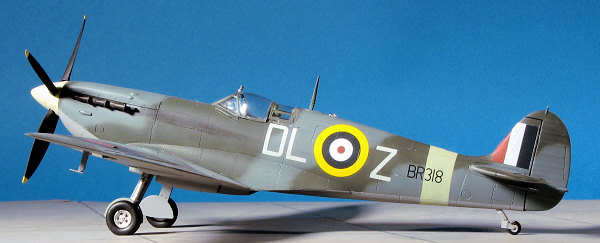 nd if installed as it comes from
the box, there is no wing dihedral at all. I sanded on the wing roots until
there was enough removed to allow some dihedral. Then I applied filler to all
the joins and when dry, sanded this down.
nd if installed as it comes from
the box, there is no wing dihedral at all. I sanded on the wing roots until
there was enough removed to allow some dihedral. Then I applied filler to all
the joins and when dry, sanded this down.
Meanwhile, I cut out the canopy that was provided. To my sadness, it does not fit. Not only does it not have the wide windscreen fairings that are needed, but it is too narrow and seems too short as well. If the rear portion is butted up against the back, then the notch in the fuselage that delineates where the canopy goes, intrudes about 1/16 inch. It could be that I did not cut it properly, but with no spare, it is a moot point. Fortunately, I do have the Falcon 'Spitfire Special' canopy set. In there is a Mk VI canopy for the Tamiya kit and it does fit. Were it not for the slightly different hood and back piece of the Mk VI, I'd use the kit canopy. I left that for a bit while I moved ahead and glued on the radiators and housings under the wing, as well as the lower intake and the two resin pieces on the nose. I'd have loved to have had a side view of the placement of these as I may well have not put them in the proper location. I then masked the cockpit and headed for some paint.
| COLORS & MARKINGS |
At this juncture, I decided to start painting. The
first thing was to paint the leading edges of the wing white, followed when dry,
with some yellow. Then the kit was returned to the bench to have these sections
masked off. Once that was done, I headed back to the paint shop to apply the
various colors. Underside is medium aircraft grey and that was all painted, then
when dry, some of the 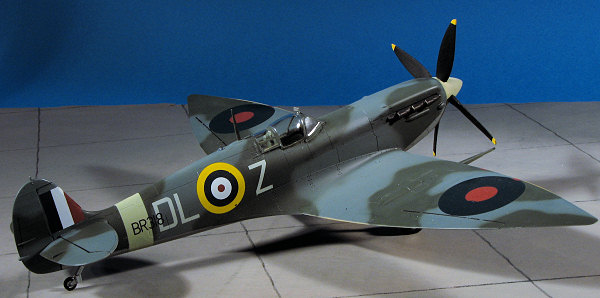 underside was masked off. The first upper side color of
ocean grey was applied, and when dry, I used my Skybow AB-100 detail airbrush
and carefully painted the dark green. I had the paint water thin and used about
5-7 psi to spray this. I can get away with it as I'd already painted the entire
upper surface so no worries about thin paint splattering on glossy bare plastic.
underside was masked off. The first upper side color of
ocean grey was applied, and when dry, I used my Skybow AB-100 detail airbrush
and carefully painted the dark green. I had the paint water thin and used about
5-7 psi to spray this. I can get away with it as I'd already painted the entire
upper surface so no worries about thin paint splattering on glossy bare plastic.
When that had dried, I returned to the bench to install the by now masked canopy. Well, this still wasn't a perfect fit. Guess I trimmed too much from the back as it was a tad short. I glued the canopy in place using super glue and tried to use the thick glue to bridge the gap in the back, but it was too much. I crammed a section of plastic strip in there, cleaned it up and returned to the paint shop after masking off the lower color. I then touched up what I'd missed. Then several coats of Future were applied in preparation for decals.
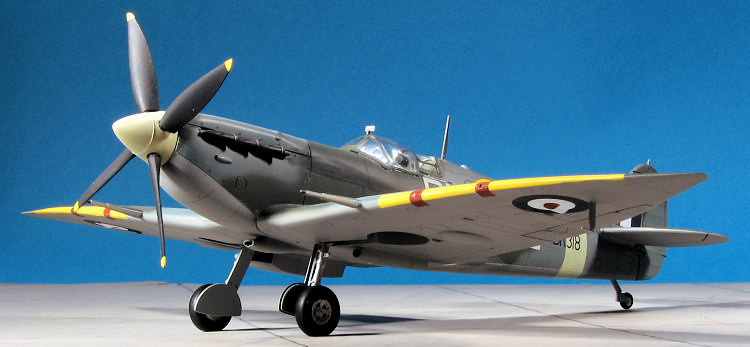
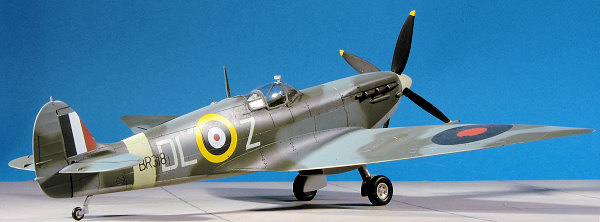
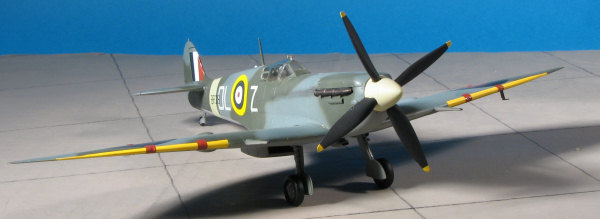
I realized that I forgot to do the Sky rear band so that area was masked and the band painted on. A coat of Future was later added on. Now I could get to the decals. I chose the 91 Squadron option as it had the ability to use a number of different serials. The Pavla decals are quite thin so I used the Microscale setting solutions on them so they'd snuggle over the lumps and bumps. All went well until I came to the serials that fit over the Sky tail band. I went through several serial number with them all sticking immediately when put down, despite copious saliva to slick things up. Not only that, but during this process, the Sky paint started peeling off. YIKES! Must not have let the Future dry enough. Fortunately, the scheme I chose gives five serial options so I only trashed two with several to go. I found an unused Sky band decal from the Hasegawa Spit IX and put that on. It was too short, but better than nothing and I'll brush paint the gap on the underside.
| FINAL CONSTRUCTION |
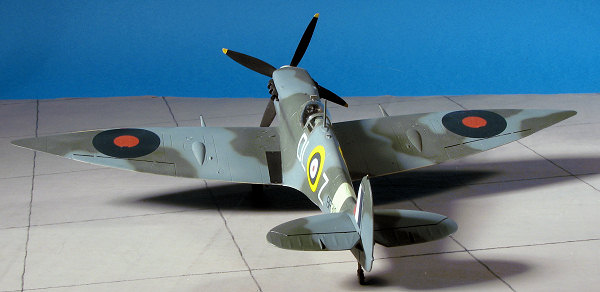
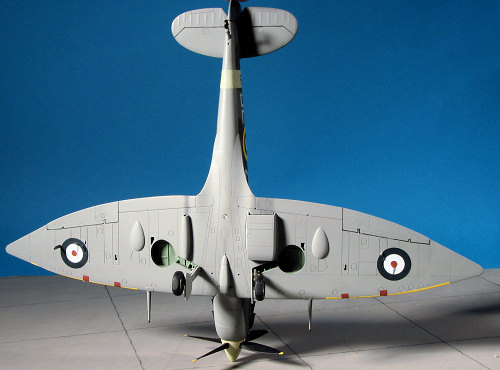 After finally getting all the decals on,
I repainted the wheel wells in British interior green. Now I know that there are
those of you who think that these areas as well as the inside of the gear doors
and landing gear legs should all be the same color as the underside, but I like
the contrast and few will really quibble about it. I then glued on the
tail wheel and main gear legs. The main gear had been painted dark aluminum and
had the oleos wrapped with Chrome Bare Metal Foil. These fit quite snugly in
their sockets. The gear doors were attached and I used a set of Ultracast five
spoke wheels (#48066) as the kit ones seemed too wide and have raised 'Dunlop'
lettering on them that I think is a bit lame. I painted the exhaust with Burnt
Iron Metallizer and then glued those in place. The wheels were then attached as
well as the gear doors. The lower light was replaced with an appropriately sized
MV lens and the rear view mirror was attached. I did some touch up stuff and
sprayed a coat of clear matte on it. Then the pastels were brought out for
exhaust work. Since I was running out of time, I did not do any panel line
accenting, leaving this one pretty much like most of my kits and unembellished
in that area. Removing the masking from the canopy showed no fogging, but it
still is not contest quality. Last thing was to have the prop glued in
place and I was done.
After finally getting all the decals on,
I repainted the wheel wells in British interior green. Now I know that there are
those of you who think that these areas as well as the inside of the gear doors
and landing gear legs should all be the same color as the underside, but I like
the contrast and few will really quibble about it. I then glued on the
tail wheel and main gear legs. The main gear had been painted dark aluminum and
had the oleos wrapped with Chrome Bare Metal Foil. These fit quite snugly in
their sockets. The gear doors were attached and I used a set of Ultracast five
spoke wheels (#48066) as the kit ones seemed too wide and have raised 'Dunlop'
lettering on them that I think is a bit lame. I painted the exhaust with Burnt
Iron Metallizer and then glued those in place. The wheels were then attached as
well as the gear doors. The lower light was replaced with an appropriately sized
MV lens and the rear view mirror was attached. I did some touch up stuff and
sprayed a coat of clear matte on it. Then the pastels were brought out for
exhaust work. Since I was running out of time, I did not do any panel line
accenting, leaving this one pretty much like most of my kits and unembellished
in that area. Removing the masking from the canopy showed no fogging, but it
still is not contest quality. Last thing was to have the prop glued in
place and I was done.
| CONCLUSIONS |
I really wasn't sure I'd have this one finished in time
as it was a backup to the scheduled build that ran into
difficulties at the last  minute (all self inflicted, I fear). The conversion is very
straight-forward and does make for a most interesting addition to my growing
1/48 Spitfire collection that has been slowly expanding over the years. The kit
itself is quite nice, but not completely trouble-free and having markings in the conversion
set is a stroke of genius and greatly appreciated. I only wish that everyone provided things like that.
minute (all self inflicted, I fear). The conversion is very
straight-forward and does make for a most interesting addition to my growing
1/48 Spitfire collection that has been slowly expanding over the years. The kit
itself is quite nice, but not completely trouble-free and having markings in the conversion
set is a stroke of genius and greatly appreciated. I only wish that everyone provided things like that.
Aside from the troubles I had with the vac canopy, this is both a kit and a conversion that would be perfect for those who want something a bit different.
February 2007
#1456 in a series
| REFERENCES |
Various internet sites and personal knowledge.
Thanks to me for the review kit and Pavla Models for the conversion set.
Copyright ModelingMadness.com. All rights reserved. No reproduction in any form without express permission from the editor.
If you would like your product reviewed fairly and fairly quickly, please contact the editor or see other details in the Note to Contributors.