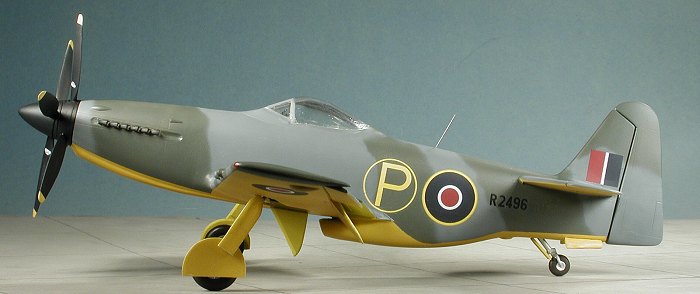
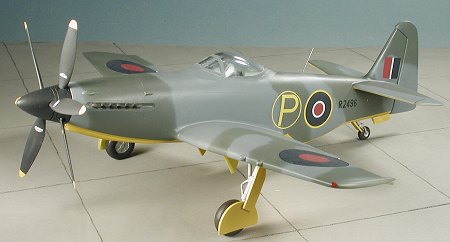
Silver Cloud 1/48 Martin Baker MB.5
|
KIT # |
SC4820 |
|
PRICE: |
$59.98 |
|
DECALS: |
The prototype |
|
REVIEWER: |
|
|
NOTES: |
Short run multimedia kit |
|
BACKGROUND |
Please visit the Preview for more information on the aircraft and what is in the box.
|
CONSTRUCTION |
Construction isn't really the first thing I did with this kit.
What I did was to make a very large pile of shavings by trimming all the flash
off the various parts and then sanding the mating surfaces as best I could. This
is a low-pressure mold, short run kit and doing all this work is pretty well the
norm for these kinds of kits. You may wonder why spend the money and do all the
work? Well, the truth is that if one wants a model of an unusual subject or
prototype, then often these types of kits are the
 only way to get it. The box
clearly states that this is for the experienced modeler and if you don't have
the skills or the patience required, then you need to forget about doing the
subject and go to something easier. No matter how difficult a model seems to be
or how much work it takes, there really is no such thing as an unbuildable kit.
Some are just a whole lot more work intensive than others. This one is somewhat
work intensive.
only way to get it. The box
clearly states that this is for the experienced modeler and if you don't have
the skills or the patience required, then you need to forget about doing the
subject and go to something easier. No matter how difficult a model seems to be
or how much work it takes, there really is no such thing as an unbuildable kit.
Some are just a whole lot more work intensive than others. This one is somewhat
work intensive.
I also need to mention that there was almost no part of the kit where filler wasn't needed. The only real exception to that was the contra-rotating prop. The metal parts in this kit are superb and fit with minimal clean-up. Anyway, after several hours of clean-up over a few days time (I'm not a 'sit down and do everything at once' type of builder), I started with some subassemblies. The first of these were the wings. Now the plastic on this kit is quite thick, but also quite soft. I use a 'hot' glue (one that melts the plastic and is rather quick drying) and on the wings, I had little trouble getting the parts to glue once the mating surfaces were sanded. I did have to file out the area around the gun nubs on the wing to get a good fit there. The leading edge required several filler applications.
 I then turned
my attention to the nose section. This required the usual cleaning and
preparation as well as test fitting. I test fit EVERYTHING prior to applying
cement. This needs to have the exhaust glued in from the inside prior to gluing
the halves together. Once that was done, I used superglue to fill in the rather
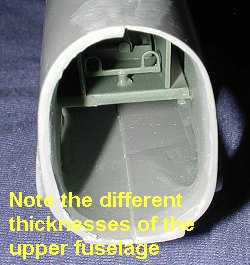
large seams. The two sides of the nose and fuselage where they join are not the
same thickness at the top and bottom of each side. Makes things interesting if
nothing else. I glued the metal intake to the forward lower nose and faired it
in place. This was then set aside.
I then turned
my attention to the nose section. This required the usual cleaning and
preparation as well as test fitting. I test fit EVERYTHING prior to applying
cement. This needs to have the exhaust glued in from the inside prior to gluing
the halves together. Once that was done, I used superglue to fill in the rather
large seams. The two sides of the nose and fuselage where they join are not the
same thickness at the top and bottom of each side. Makes things interesting if
nothing else. I glued the metal intake to the forward lower nose and faired it
in place. This was then set aside.
My next task was the interior. This is made up of a combination of plastic and metal parts. I found that I'd placed the seat too far forward or something as the control stick wasn't perfectly straight. However, gluing on the various bits and pieces was a simple enough task. There are no seat belts in the kit and most modelers will want to add them. I usually don't add extra parts to review kits other than perhaps decals as I don't feel it is really fair to those who send in the kits for review to do so. However, I also don't feel that there is anything wrong with a review to include aftermarket stuff, it just isn't how I do donated review kits. Once the interior was together, it was painted overall British Interior Green using Testors Model Master paints.
 While the paint was drying, I glued together the wheel halves,
the fin halves and the rudder halves. The wheels were short shot on one section
of the mold on all four halves while the fin needed the rather large sprue runs
sanded down prior to gluing.
While the paint was drying, I glued together the wheel halves,
the fin halves and the rudder halves. The wheels were short shot on one section
of the mold on all four halves while the fin needed the rather large sprue runs
sanded down prior to gluing.
At this time, I now had the main subassemblies done. I then started to fit those to the fuselage to see if any work needed done. Boy, did it. It seems as if the fuselage halves are about a 1/16 to 1/8 inch too wide. I got to work sanding down the mating surfaces. I should point out that one fuselage half was short shot on the underside so there will be a rather prominent gap to later fill. The parts that needed to fit were the nose, the canopy, the fin and the underside air scoop. I also found that the inside of the fuselage where the instrument panel/anti-glare shield was to fit was too thick. Grabbing my Dremel tool, I ground away and did much test fitting until this component fit properly. All of this took me about a week. Again, I'm not a fast builder and will work on something for a while and then go do something else (like write reviews) or move to another kit that is in work.
 Finally, all of the pieces looked as if they would fit with no fuss. At this
time, I carefully tacked in the interior and the instrument panel. They fit!
(Huzzah!). I then grabbed glue and clamps. The interior was fixed in place and
the fuselage halves glued together. Then the fin was glued in place and a litany
of filling and sanding took place.
Finally, all of the pieces looked as if they would fit with no fuss. At this
time, I carefully tacked in the interior and the instrument panel. They fit!
(Huzzah!). I then grabbed glue and clamps. The interior was fixed in place and
the fuselage halves glued together. Then the fin was glued in place and a litany
of filling and sanding took place.
Once the fuselage was pretty well smooth, I then attached the nose. Despite my care in ensuring that it would fit, it didn't quite match up. Not a problem as I have plenty of filler. While I'm talking filler, I should point out a couple of things. First of all, I use 3M Acryl Blue filler as I've found it to be better than most of what is around. I also use super glue as a filler. You see, almost all of your fillers will shrink; it is the nature of the beast. Unless you use a two part epoxy filler, which most of us don't. I also use superglue as it won't shrink, but I've not found it to be very useful for filling large areas. The key is to use them both and in that way, you get the benefit of both products. Truly, if one has a lot of seams to fill, the epoxy fillers are really the best, but since they have to be mixed, most of us are too lazy and don't use them that much.
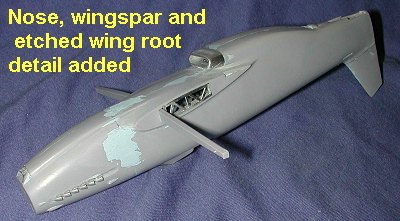 Anyway,
with the nose on as best as could be done and the initial filler coats applied,
I then attached the wing spar. A bit of adjustment was meant to get it in place,
but there are marks on it so you don't get it off center. The metal wing root
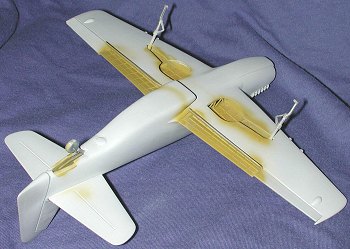
detail (mislabeled as etched in the picture) was a very tight fit and after
clean up of the flash, was cemented in place. I then turned my attention to the
wings. By the way, you can see from the image that the nose and fuselage intakes
are in metal and fit fairly well.
Anyway,
with the nose on as best as could be done and the initial filler coats applied,
I then attached the wing spar. A bit of adjustment was meant to get it in place,
but there are marks on it so you don't get it off center. The metal wing root
detail (mislabeled as etched in the picture) was a very tight fit and after
clean up of the flash, was cemented in place. I then turned my attention to the
wings. By the way, you can see from the image that the nose and fuselage intakes
are in metal and fit fairly well.
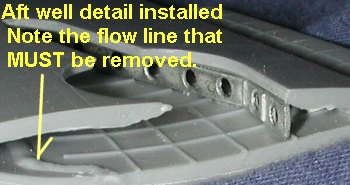
When test fitting the wings to the spar I realized I'd made a bit of a goof. You
see, the large mold flows inside the wing have to be removed for the spar to fit
and I didn't remove them. Fortunately, the plastic is soft so I got in there
with an Xacto chisel tip and removed as much as I
 could
reach. For what I couldn't get to, I sanded on the spar to allow for the proper
clearance. Not exactly the best way to do these things, so save yourself the
aggravation and remove the flow lines completely from inside the wing.
could
reach. For what I couldn't get to, I sanded on the spar to allow for the proper
clearance. Not exactly the best way to do these things, so save yourself the
aggravation and remove the flow lines completely from inside the wing.
OK, now that the spars were provided the room they needed, the two metal rear
wheel well inserts were put in place. There are small 'openings' in the wheel
well detail that show you where these parts are to fit. It took a bit of
straightening out to get them in place, but they did fit well and once in place,
were given a nice dose of superglue to keep them there.
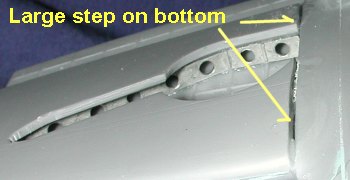
Next up was the wing attachment. Well, as luck would have it, the wings are MUCH
wider than the roots at the fuselage. This is a real poser for most of us as one
really cannot thin down the wing from the inside or the spar and aft well detail
bits won't fit. There just won't be the height needed. The only thing that one
can do is to get the wings on there the best that can be done and to sand off
the excess. Fortunately, the plastic is very thick and being soft, it isn't a
long time consuming job of removing the plastic needed. One can also build up
any problem areas with filler to make for a neat join. What I did, was to make
sure that the trailing edge of the wing matched with the trailing edge
 of the wing
root. This would be the thinnest part and one that would be least amenable to a
lot of sanding.
of the wing
root. This would be the thinnest part and one that would be least amenable to a
lot of sanding.
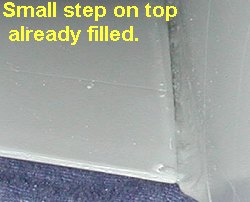
What I was left with was a HUGE step on the bottom and a smaller one on the top. Since the bottom is rather flat and easier to sand, this was the best recourse. As you can see from the images, it looks daunting, but really isn't that much of a problem as filler will take care of most of the problems once the sanding is done. If you don't already use sanding sticks, I would highly recommend them as they really cut down on the amount of time it takes when working on short run kits. I go through coarse sanding sticks at a rather prodigious rate and should buy them by the case!
Next I cleaned up the tail planes and cemented them in place, there are small indentations in the fuselage and large, oversize 'tabs' on the tail planes themselves. Though I trimmed them down quite a bit, I think that removing them completely would be the best way to go on these. Following the usual glue, superglue, filler routine on the tail planes, the tail wheel was installed. Now the instructions show this to be glued in with the large tab vertical. Well there isn't any real mating surface other than a tiny place where this big tab meets the lower fuselage. The tail wheel castor also looks backwards when glued this way. Having no really good close-up of this, I left it the way it was, though it does look a trifle odd.
 While all this was drying, I cleaned up the main gear legs and the flaps. These
were test fit and while the flaps were fine, the gear legs needed to have
the holes in the upper wing either opened up more or opened period. I should
have done this before gluing the wing halves together, but once again, missed a
good chance. These mounts are at what is supposed to be the proper angle,
however, if drilled at that angle, the forward wheel well opening will block
things a bit. As a result, I drilled them at a bit less of an angle than called
for to ensure a proper fit.
While all this was drying, I cleaned up the main gear legs and the flaps. These
were test fit and while the flaps were fine, the gear legs needed to have
the holes in the upper wing either opened up more or opened period. I should
have done this before gluing the wing halves together, but once again, missed a
good chance. These mounts are at what is supposed to be the proper angle,
however, if drilled at that angle, the forward wheel well opening will block
things a bit. As a result, I drilled them at a bit less of an angle than called
for to ensure a proper fit.
Then the aileron areas were cleaned up and this took quite a bit of scraping to get the ailerons to fit. I glued them in a bit off-set to add a touch of character. The flaps were then glued in place after a touch of filing to get them to fit as well. The rudder was attached a touch off center as well. Then I glued the oleo scissors to the main gear with superglue. After it had dried, the gear legs were glued into the holes that I had drilled out. My attention was then turned to the canopy. This beast is terribly thick and most of you will undoubtedly 'smash mold' a new one, but being the masochist that I am, I was determined to use the kit one. Well I grabbed my trusty Dremel tool and after a goodly session of grinding and test fitting, got it fairly good, though not perfect. I overdid one side and took too much off so when I straightened out the lower canopy framework, it was a tad too short. The canopy was then masked and it was off to the paint shop.
|
CAMOUFLAGE & MARKINGS |
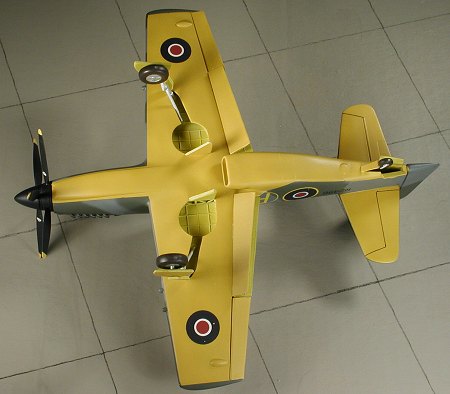
 First thing I did was to paint the
underside with Floquil Reefer White lacquer. This not only acts as a primer, but
shows any glitches. There were a few and those were smoothed out and the area
repainted. The next step was the inside of the flaps, wheel wells and gear
doors. The instructions state that this plane had these areas in Yellow Zinc
Chromate. The best around is in the small Testors bottle and it is an enamel.
This was then sprayed into those areas and when dry, it was taped off. Next, I
returned with the Reefer White to take care of overspray. Then I mixed up some
Xtracolor Trainer Yellow enamel and sprayed that over the lower surface. This is
a rather dark yellow, not at all as bright as the US or German yellows.
First thing I did was to paint the
underside with Floquil Reefer White lacquer. This not only acts as a primer, but
shows any glitches. There were a few and those were smoothed out and the area
repainted. The next step was the inside of the flaps, wheel wells and gear
doors. The instructions state that this plane had these areas in Yellow Zinc
Chromate. The best around is in the small Testors bottle and it is an enamel.
This was then sprayed into those areas and when dry, it was taped off. Next, I
returned with the Reefer White to take care of overspray. Then I mixed up some
Xtracolor Trainer Yellow enamel and sprayed that over the lower surface. This is
a rather dark yellow, not at all as bright as the US or German yellows.
Once that was on and dry, I brought the plane back to the work bench to have the canopy area cleaned up. I used Apopxie Sculpt epoxy filler for this area as my buddy Rick Brownlee had highly recommended it. Always willing to have more chemicals on my workbench, I gave it a try and found it to be better than the A+B Epoxy Putty that I've been using prior to this. It isn't as sticky as the A+B and seems to work better when very small amounts are used. Otherwise, they are quite similar. Anyway, that was applied to the area around the canopy and when dry, it was sanded smooth.
 After remasking a few spots on the canopy and the entire underside of the
plane, I returned to apply the upper colors. I first sprayed on the Dark Green
using Testors Modelmaster Enamels. Then I applied the Dark Sea Grey, also
using Testors enamels. This was thinned quite a bit more than normal as I wanted
a relatively fine line between the two colors. This is where I had a touch of
trouble. You see, no painting diagram was provided, though there were some black
and white images of the completed model. These are good, but not as good as a
nice painting drawing. Some areas were rather difficult to see so I just took a
best guess when doing this part. Don't forget that the camo wraps under the wing
leading edge and wing tip so you need to be careful to mask that area properly.
Once the paint had dried, I sprayed clear gloss acrylic (Future) over the upper
surfaces and when dry, it was ready for the decals.
After remasking a few spots on the canopy and the entire underside of the
plane, I returned to apply the upper colors. I first sprayed on the Dark Green
using Testors Modelmaster Enamels. Then I applied the Dark Sea Grey, also
using Testors enamels. This was thinned quite a bit more than normal as I wanted
a relatively fine line between the two colors. This is where I had a touch of
trouble. You see, no painting diagram was provided, though there were some black
and white images of the completed model. These are good, but not as good as a
nice painting drawing. Some areas were rather difficult to see so I just took a
best guess when doing this part. Don't forget that the camo wraps under the wing
leading edge and wing tip so you need to be careful to mask that area properly.
Once the paint had dried, I sprayed clear gloss acrylic (Future) over the upper
surfaces and when dry, it was ready for the decals.
The decals are superbly printed, very opaque and will tear if you look at them
too hard. I must confess that these are the thinnest I've ever used and because
of that, I ruined several of them in application. That includes a roundel, the
serial number on one side and the ID lights. I was able to replace the first two
from various decal sheets, but the ID lights I left alone. They say don't use
setting solution on them and they worked well without it. I also noticed that
there are instrument decals on the sheet. Needless to say, it was too late to
apply them as the cockpit was hermetically sealed! It was during decal
application that I had a last minute disaster. As I was reaching for a tool, I
knocked over my small vial of brush cleaner right onto the aft section of the
plane. It was successful in eating through the Future to the paint below. Some
very careful masking and quick respraying of the affected area got it to looking
nearly like it was before.
|
FINAL CONSTRUCTION |
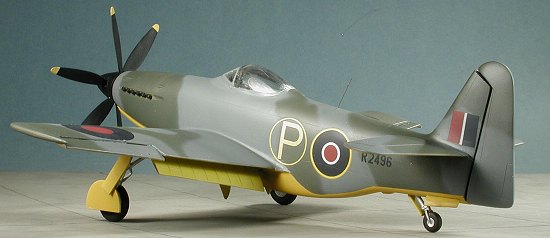
With the decals on and dry, the final construction/painting was done. First,
I painted all the landing gear with aluminum and wrapped the oleos with chrome
BareMetal Foil. Then the tires were painted using Testors Rubber. This is a sort
of brownish black that some folks tell me is quite accurate. OK, but it looks a
bit odd to one who has been using a very dark grey for so long. The main wheels
were glued onto the struts (after drilling out the attachment holes) and then it
was on to the gear 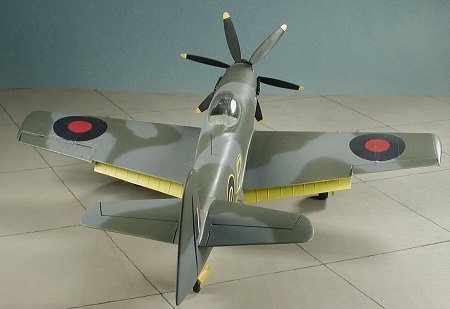 doors. These look
way too thick and many may want to sand them thinner. They have to be cut into
sections and once done were glued in place. There are no specific attachment
points so one just glues where they touch. The lower gear doors have a small
'tab' that is an extension of the door. Well, in order to get the upper main
doors to fit, this has to be removed. It also helped me as apparently I got the
gear struts at the wrong angle so they'd not have looked at all proper.
doors. These look
way too thick and many may want to sand them thinner. They have to be cut into
sections and once done were glued in place. There are no specific attachment
points so one just glues where they touch. The lower gear doors have a small
'tab' that is an extension of the door. Well, in order to get the upper main
doors to fit, this has to be removed. It also helped me as apparently I got the
gear struts at the wrong angle so they'd not have looked at all proper.
Next, the tubing included in the kit was cut to length and installed as retraction struts. No indication of where they fit or how long they are to be, but the model looks better with them. These were also painted aluminum. The props had been painted black as well as the spinner. Naturally, after I had done that, I found a photo of the MB.5 and it had a bare metal spinner! At least it didn't have guns installed so I wasn't off too much by not making some! The exhaust were painted Burnt Metal and the then the kit was given an overall coat of matte acrylic clear to seal things in. The masking was taken off the canopy to see what kind of mess I'd made of it, a hole drilled for a whip antenna (made of small piano wire), and final touchups were done. Judging from my lone photo, there were wing tip lights so areas of the tips were painted the appropriate colors and that was it.
|
CONCLUSIONS |
 OK, now I suppose you are all
ready for me to dump on the kit big time. I could. But that really wouldn't be
fair. The box clearly states that it is only for experienced modelers and
that generally means it takes a lot of work to build. It certainly was that, but
none of it was outside the realm of anyone who has had a few short run kits
under their belt. Sure, all the parts don't fit perfectly; sure, you have to use
filler and sandpaper; sure, you have to do a lot of cleanup and trimming , but
that is what is meant by experienced. None of the problems were
insurmountable and I always get a nice feeling of accomplishment when I manage
to make a nice model out of a difficult kit. Having said that, it is one that I
can recommend to those who have the experience to tackle it. If you don't have
the skills necessary, then you can buy it and stash it away until you do. If you
can't 'waste your time' on a challenging kit, then I guess you'll have to do
without a 1/48 MB.5 and go back to assembling your Tamiyagawas.
OK, now I suppose you are all
ready for me to dump on the kit big time. I could. But that really wouldn't be
fair. The box clearly states that it is only for experienced modelers and
that generally means it takes a lot of work to build. It certainly was that, but
none of it was outside the realm of anyone who has had a few short run kits
under their belt. Sure, all the parts don't fit perfectly; sure, you have to use
filler and sandpaper; sure, you have to do a lot of cleanup and trimming , but
that is what is meant by experienced. None of the problems were
insurmountable and I always get a nice feeling of accomplishment when I manage
to make a nice model out of a difficult kit. Having said that, it is one that I
can recommend to those who have the experience to tackle it. If you don't have
the skills necessary, then you can buy it and stash it away until you do. If you
can't 'waste your time' on a challenging kit, then I guess you'll have to do
without a 1/48 MB.5 and go back to assembling your Tamiyagawas.
April 2003
# 1263 in a series
Copyright ModelingMadness.com. All rights reserved. No reproduction in part or in whole without express permission from the editor.
If you would like your product reviewed fairly and fairly quickly, please contact the editor or see other details in the Note to Contributors.