Airfix 1/72 Spitfire Vb
| KIT #: | 02046 |
| PRICE: | $6.98 MSRP |
| DECALS: | Two options |
| REVIEWER: | Scott Van Aken |
| NOTES: | Originally molded in 1974 |
| HISTORY |
Many WWII enthusiasts know that
Bf-109s and FW-190s were often rebuilt into updated airframes when brought
back for repair. To my knowledge, the US never did this (probably due to
the distance involved), but many don't realize that this was quite normal
for Spitfires in the early years of the war. It was not uncommon for a Mk I
or Mk II to be re-engined to Mk V specs
 and for those same Mk Vs to be re-engined
to Mk IX specs! This means that is was possible for a Battle of Britain
veteran to have been modified twice and still flying combat at the end of
the war! Now, I don't know if this has ever happened, but it sure would
make a good story.
and for those same Mk Vs to be re-engined
to Mk IX specs! This means that is was possible for a Battle of Britain
veteran to have been modified twice and still flying combat at the end of
the war! Now, I don't know if this has ever happened, but it sure would
make a good story.
Nonetheless, the MkV was a major improvement over the early Mk I/II aircraft, while maintaining basically the same airframe. One major benefit, aside from the more powerful engine, was the ability to carry things under the wings and fuselage; in this case via bomb racks, allowing the Spit to operate as a fighter-bomber. The aircraft were sent to all theaters of operation and were used by a number of Allies, specifically the USAAF in the Mediterranean, where having commonality in supply was more important than operating US types. At least for a while!
It was also provided to neutral countries, such as Portugal and Turkey, the Portuguese Spits part of the payment for lease of the Azores. It is postulated that many of these Spitfire Vbs were previously used by the USAAF's
| THE KIT |
 This is by no means a new kit, having
been originally produced in 1974 (according to the side of the box). What
is inside are some lovely light blue plastic sprues that has been well
molded with few glitches. A clear sprue provided the lower light and
canopy. Not much in the way of detail with but a seat and pilot for the
interior as well as a gunsight. No instrument panel, no control stick, no
rudder pedals. Really, a very basic kit. You do get a stand and optional
raised wheels/gear doors (which have huge sink marks on them). No boxed in
wheel wells, either. Oh yeah, raised detailing as well, but you probably
knew that from the age of the kit.
This is by no means a new kit, having
been originally produced in 1974 (according to the side of the box). What
is inside are some lovely light blue plastic sprues that has been well
molded with few glitches. A clear sprue provided the lower light and
canopy. Not much in the way of detail with but a seat and pilot for the
interior as well as a gunsight. No instrument panel, no control stick, no
rudder pedals. Really, a very basic kit. You do get a stand and optional
raised wheels/gear doors (which have huge sink marks on them). No boxed in
wheel wells, either. Oh yeah, raised detailing as well, but you probably
knew that from the age of the kit.
So what this gives you is a very nice build with few hassles right from the box, or a basis for a very nice detail job. I'm sure that Eduard or someone does an etched detail set for this, or you could scratchbuild what you need.
| CONSTRUCTION |
So, on with the build. The first thing I did was to glue the wing sections together. The wing has the control surfaces molded as part of the upper wing sections. This means nicely done trailing edges. The only seam that needs filled is the one next to the wing tips, though I also had a gap or two on the leading edges that I filled.
 Moving to the interior, I glued
together the floor pan, seat and the back section with the head rest. These
were then painted RAF Interior Green using Testors Model Master enamel. The
inside of the fuselage received the same treatment. An interesting touch is
that the pilot entry doors are thinner than the rest of the fuselage so you
could cut those out if the cockpit detail level was improved.
Moving to the interior, I glued
together the floor pan, seat and the back section with the head rest. These
were then painted RAF Interior Green using Testors Model Master enamel. The
inside of the fuselage received the same treatment. An interesting touch is
that the pilot entry doors are thinner than the rest of the fuselage so you
could cut those out if the cockpit detail level was improved.
While that was drying, I assembled the fuselage halves. Fit is quite good, though the upper cowling did require some filler for the seam. The gun sight was installed to the instrument panel section at this time. It and the panel were later painted matte black, with the reflector part painted bright Aluminum using Humbrol colors.
Then I attached the interior and when that was in place, the wing. There was the usual issue of fit on the wing and I needed filler on all the seams. This was especially true on the roots where there was a bit of a step that needed to be smoothed out. The tail planes were glued in place with no trauma. I masked the very thick canopy and attached it to the upper fuselage. Then I glued on the antenna mast, cannon barrels, and tail wheel. When those had dried, it was time for paint.
| COLORS & MARKINGS |
 I chose to use one of my
old Carpena sheets for this aircraft and the markings were pretty well
standard RAF, but without the yellow leading edge ID stripes. One reason I
chose the scheme I did was so I could use some already mixed shades from
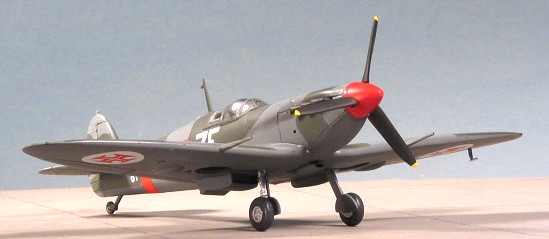
last week's Italeri Spit XVI. This meant Aircraft Grey undersides with
Ocean Grey and Dark Green upper surfaces. I used Testors Modelmaster paints
for the Aircraft Grey and Dark Green with Xtracolor for the Ocean Grey. I
had some issues with the Xtracolor pulling up after masking so I had to
re-do a few areas. While I don't recall this happening before, perhaps one
should primer before using this paint (I normally don't). Of course, in
this scale, the pattern was masked and all of this masking and painting
took several days. A clear gloss was sprayed over it once all the shades
had dried in preparation for decals.
I chose to use one of my
old Carpena sheets for this aircraft and the markings were pretty well
standard RAF, but without the yellow leading edge ID stripes. One reason I
chose the scheme I did was so I could use some already mixed shades from
last week's Italeri Spit XVI. This meant Aircraft Grey undersides with
Ocean Grey and Dark Green upper surfaces. I used Testors Modelmaster paints
for the Aircraft Grey and Dark Green with Xtracolor for the Ocean Grey. I
had some issues with the Xtracolor pulling up after masking so I had to
re-do a few areas. While I don't recall this happening before, perhaps one
should primer before using this paint (I normally don't). Of course, in
this scale, the pattern was masked and all of this masking and painting
took several days. A clear gloss was sprayed over it once all the shades
had dried in preparation for decals.
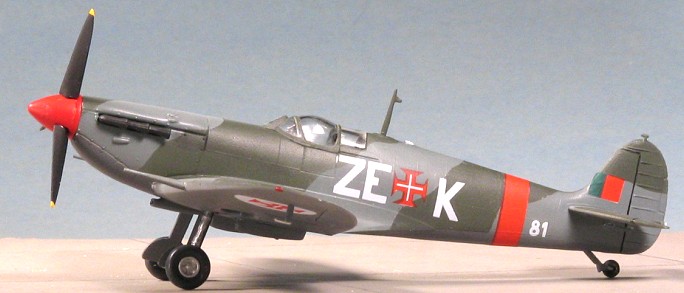
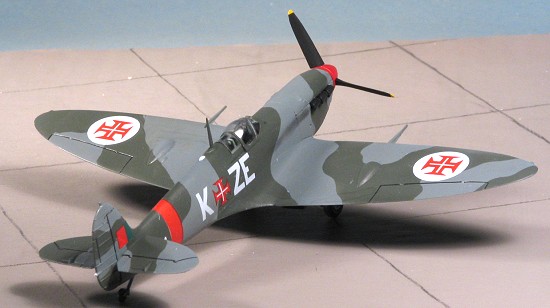
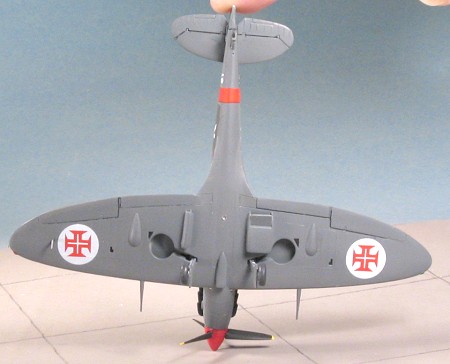
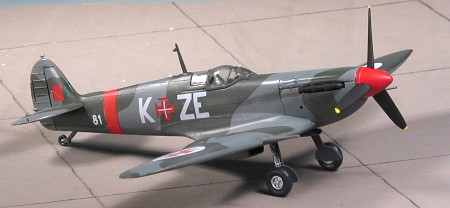
As mentioned above, I used Carpena decals for this; specifically, a nice set for the Portugese Air Force. The scheme on the sheet looked quite colorful with its red spinner and red fuselage band. The decals went on without any problem and succumbed to setting solutions. I did notice a few things about this old sheet. One is that there were registration problems with either the red or the white as the roundels are not perfectly centered. Two is that when white was used behind colors like red, it was not complete so that there are lighter and darker shades of this color on some of the decals. Regardless, it still looks quite nice when all are on there.
| FINAL CONSTRUCTION |
Not much left after the decals had
been put on. I glued in the main gear after painting them with Humbrol
Aluminum. The wheels were attached with no fuss as was the pitot tube. The
prop spinner had been painted white with Floquil Reefer White
 and then red with Badger
Freak Flex acrylic. There are two parts to the spinner and it neatly
trapped the blades between the halves. This was then glued onto the front
of the aircraft. I painted the exhaust with Burnt Iron Metallizer and glued
them in place. The small clear light was pushed into its hole on the
underside of the fuselage after the model had been given a clear matte
coat.
and then red with Badger
Freak Flex acrylic. There are two parts to the spinner and it neatly
trapped the blades between the halves. This was then glued onto the front
of the aircraft. I painted the exhaust with Burnt Iron Metallizer and glued
them in place. The small clear light was pushed into its hole on the
underside of the fuselage after the model had been given a clear matte
coat.
I did a bit of touch-up painting, outlined the control surfaces with a drafting pen, removed the tape from the clear bits, and added some pastel chalk exhaust. I forgot to drill out the wing machine guns or put any red bits over where they'd be to simulate doped dirt covers before I took photos. There also is no long wire antenna. I had read that by the time the Mk V was being produced, the RAF switched from high frequency radios that needed the long wire to very high frequency (VHF) radios that just ran a shorter wire inside the existing mast. In this case, perhaps I should have removed the rudder attachment area as well. However, since many Mk Vs used Mk I/II airframes, it is quite possible that these features were just left in place.
| CONCLUSIONS |
Review kit courtesy of me September 2005 Copyright Modeling Madness.com. All rights reserved. No reproduction in any form without express permission from the editor. If you would like your product reviewed fairly and fairly quickly, please contact the editor or see other details in the
Note to
Contributors.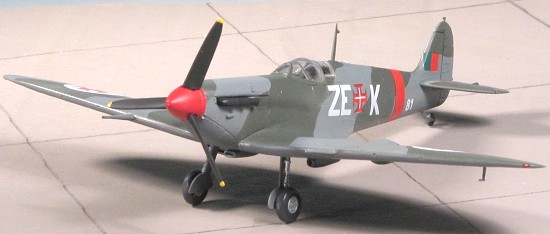 This isn't the first
Airfix Spit V kit I've built, but it has been a very long time since the
last one. Overall, it makes into a very nice model, as you can see. It does
take a bit of additional work and it is lacking in the refinements of
today's products. Then again, for a kit originally molded in 1974, it is
really quite accurate. These kits can be picked up for very little money
from vendors at shows so if you are looking for a pleasant build that is
not at all fiddly, then this would be one to seek.
This isn't the first
Airfix Spit V kit I've built, but it has been a very long time since the
last one. Overall, it makes into a very nice model, as you can see. It does
take a bit of additional work and it is lacking in the refinements of
today's products. Then again, for a kit originally molded in 1974, it is
really quite accurate. These kits can be picked up for very little money
from vendors at shows so if you are looking for a pleasant build that is
not at all fiddly, then this would be one to seek.
#1377 in a series