Hasegawa 1/48 Spitfire IXc
| KIT #: | 09079 (Jt 79) |
| PRICE: | $25.00 MSRP |
| DECALS: | Three options |
| REVIEWER: | Scott Van Aken |
| NOTES: |
| HISTORY |
The Supermarine Spitfire was one of those few aircraft that
were produced from the first day of WWII right until the end of hostilities. The
other that comes to mind is the Bf-109. Both of these aircraft underwent huge
transformations and in the 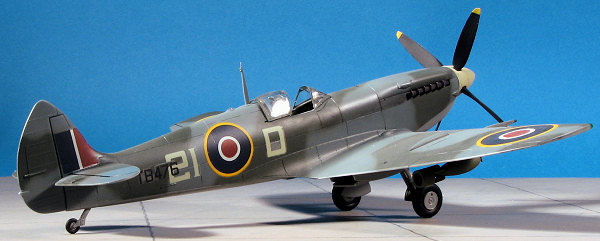 end,
there were few, if any, parts interchangeable from the first versions to the
last.
end,
there were few, if any, parts interchangeable from the first versions to the
last.
Along the way, a number of 'stop-gap' versions were developed, some of which were produced in greater numbers than the originally designed variant. One of those was the Spitfire IX. While awaiting the definitive Mk VIII airframes to be ready, the more powerful Merlin 60 series engines were attached to MkV airframes (some of which had previously been Mk II or Mk I airframes), and the Spitfire IX was born.
The inclusion of the Merlin 60 engines gave the Spitfire what it had been seeking; parity and even superiority over the German's FW-190A series. Such was the success of the Mk .IX that it saw action right until the end of the war; this despite even more powerful versions being produced.
| THE KIT |
This kit was initially produced in 2001 and raised a storm of controversy amongst the modeling community when it was discovered that the fuselage was some 4 or 8 scale inches short (depending on who was doing the measuring. This doesn't seem like much, but those in the know were incensed by the difference and much was the fussing and fuming. Apparently there were other differences as there are aftermarket bits to replace the prop and the cannon access covers among the usual plethora of 'post production' bits like wheels, elevators and so on.
 Acknowledging all of this, what is
the kit itself like? Well, if you have built a Hasegawa kit in the last
five years, this one will fall right into the same mold, so to speak. It is
superbly molded and provides inserts for a number of parts of the airframe.
This is to accommodate the usual variants that are so required for today's
mainstream kit makers. Inserts are provided for the cannon access covers
(only the skinny ones are provided), wing tips ( full span or 'clipped'),
and the lower cowling (a 'normal' carb intake is in the kit). The kit also
provides the late elevators, but does offer both the rounded and peaked
rudder. Both three and four spoked wheel inserts are included as well as
either round or 'flared' exhaust. Two different tail wheels are provided as
well as tail wheel doors, though these are not germane to the Mk IX.
Acknowledging all of this, what is
the kit itself like? Well, if you have built a Hasegawa kit in the last
five years, this one will fall right into the same mold, so to speak. It is
superbly molded and provides inserts for a number of parts of the airframe.
This is to accommodate the usual variants that are so required for today's
mainstream kit makers. Inserts are provided for the cannon access covers
(only the skinny ones are provided), wing tips ( full span or 'clipped'),
and the lower cowling (a 'normal' carb intake is in the kit). The kit also
provides the late elevators, but does offer both the rounded and peaked
rudder. Both three and four spoked wheel inserts are included as well as
either round or 'flared' exhaust. Two different tail wheels are provided as
well as tail wheel doors, though these are not germane to the Mk IX.
There is a very complete cockpit with all sorts of bits for the sidewalls and accessory compartment. Wing racks are included as are a pair of bombs. The canopy is a separate section, though I'm not sure if it can properly be posed open as these bits tend to be a bit thick in Hasegawa kits.
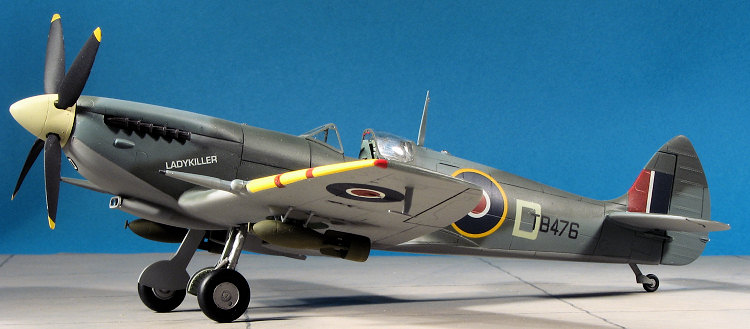
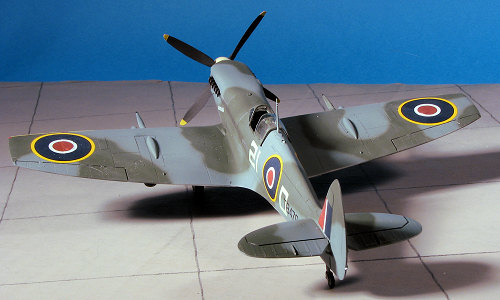
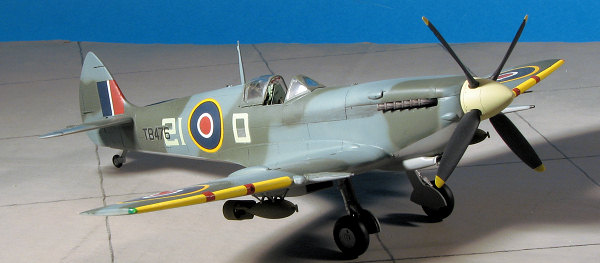
Instructions are excellent and use the normal (for Hasegawa) Gunze paint references as well as generic terms. Markings are included for two similarly painted aircraft in Dark Green/Ocean Grey over Medium Sea Grey. The box art aircraft is from 318 (Polish) Squadron while the other option is or 443 Sq, which I believe is Canadian. This latter aircraft has the peaked rudder and clipped wing tips. Decals are well printed and offer a full range of data markings. It also includes the yellow wing leading edge ID markings and Sky fuselage band for the 318 Sq aircraft. They are also a bit thick and I believe that care should be taken when using setting solutions. Best way to apply Hasegawa kit decals is with fairly hot water as that softens the decal for a good fit.
| CONSTRUCTION |
The first thing I did was to see what I had in the way
of 'fix it' stuff. Apparently the prop spinner is too large, but I have a nice
Ultracast replacement for it. I also looked for some different wing cannon bulge
replacements, but couldn't find any in the stash aside from the standard ones. This does
 limit things quite a
bit as the skinny bulges were pretty much a late Mk.IX deal. In fact, doing an
early or mid Mk IX with this kit is not entirely possible as it is boxed so one
must be careful about what to use, especially when it comes to aftermarket
markings. I decided to build this kit to use some nice Techmod Spit IX
decals, and of the six options spread over two sheets, I found that I could only
really do one of them with what is in the kit. Later I was to realize that even
this wasn't possible.
limit things quite a
bit as the skinny bulges were pretty much a late Mk.IX deal. In fact, doing an
early or mid Mk IX with this kit is not entirely possible as it is boxed so one
must be careful about what to use, especially when it comes to aftermarket
markings. I decided to build this kit to use some nice Techmod Spit IX
decals, and of the six options spread over two sheets, I found that I could only
really do one of them with what is in the kit. Later I was to realize that even
this wasn't possible.
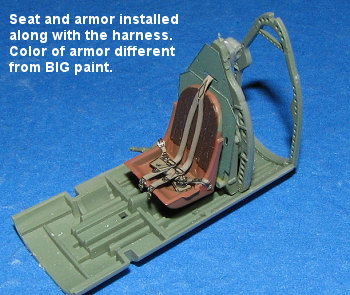
So I started with the cockpit. I had bought an Eduard color Zoom set for this back when these things first came out so did the usual prep in terms of removing some of the sidewall detail and trimming down other bits so I could use what's on the fret. Unlike other sets, most of this will be used. I also had to research the markings somewhat to see if the bomb racks were used. According to my 'The Squadrons of the Royal Air Force' book, 318 Squadron flew tactical reconnaissance and ground attack missions, having converted to the Mk IX in November 1944, so having the racks under the wings would be the norm. This meant that the holes for them in the wings needed opening up.
Applying all that photo etch is a rather fiddly job and I'm amazed that I didn't lose more bits that I did. The end result is one that really does enhance the interior and I'm pretty well hooked on these inexpensive sets as the do add a lot. Best of all, they are pre-painted! After doing quite a bit of this, for some reason, I got stuck on a part and lost interest in the kit. This meant about a 6 week lay-over while I worked on other stuff. It is odd the way that one is chugging along happily and then, for some reason, comes to a complete halt on a project. At least, that happens to me.
 Getting
back into it, I figured out how the part was supposed to fit and glued on more
bits and pieces. I also discovered that it would be a good ideal to put the
plastic bits that aren't being replaced into their spots as I had the radio too
low and had to pull it off to install the throttle quadrant. Eventually,
everything was a go and the interior was placed into the fuselage for a test
fit. Well, stupidly, I'd glued the instrument panel on t
Getting
back into it, I figured out how the part was supposed to fit and glued on more
bits and pieces. I also discovered that it would be a good ideal to put the
plastic bits that aren't being replaced into their spots as I had the radio too
low and had to pull it off to install the throttle quadrant. Eventually,
everything was a go and the interior was placed into the fuselage for a test
fit. Well, stupidly, I'd glued the instrument panel on t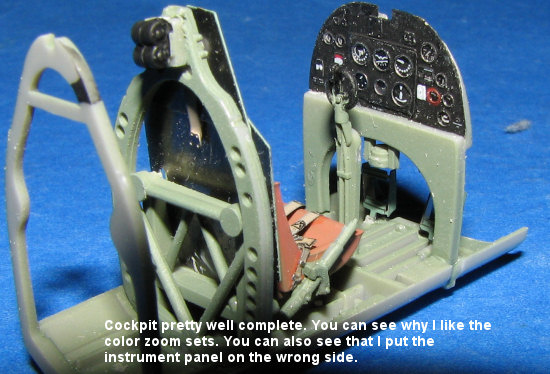 he
wrong side and so the etched one sat too high. Trying to remove the etched part
would have damaged it so I just left things as they were and trimmed things. You
might also notice that the color used by Eduard for the bits painted BIG
(British Interior Green) is different from the Model Master paint. I've heard
this complaint from other builders, so it isn't just me. I also note that things
are only painted on one side. However, the thickness of the photo etched bits is
probably a lot closer to scale than a resin or plastic piece.
he
wrong side and so the etched one sat too high. Trying to remove the etched part
would have damaged it so I just left things as they were and trimmed things. You
might also notice that the color used by Eduard for the bits painted BIG
(British Interior Green) is different from the Model Master paint. I've heard
this complaint from other builders, so it isn't just me. I also note that things
are only painted on one side. However, the thickness of the photo etched bits is
probably a lot closer to scale than a resin or plastic piece.
With the interior in place, I cemented the fuselage
halves and then glued on the tail planes so I could align the wings. The tail
planes fit fine, though t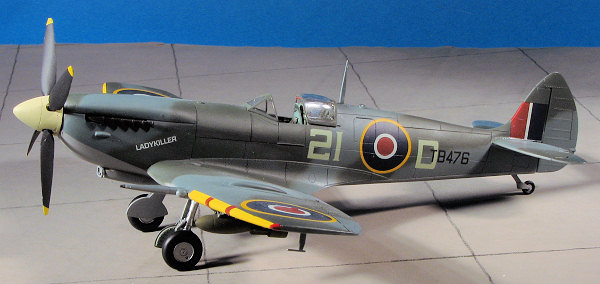 hey
are thicker than the surrounding root area on the front. Rather than fuss with
sanding, I left it as it was. I also glued in the Mk IX insert for the tail
wheel. I wish these didn't exist as it is just one more opportunity to mess
things up, but it does allow Hasegawa to do a Mk VIII from the same basic kit.
hey
are thicker than the surrounding root area on the front. Rather than fuss with
sanding, I left it as it was. I also glued in the Mk IX insert for the tail
wheel. I wish these didn't exist as it is just one more opportunity to mess
things up, but it does allow Hasegawa to do a Mk VIII from the same basic kit.
On the wings, I glued on the kit radiators, painting them black. Then the photo etch screens were glued in place. They really look nice when done. The radiator housings were next. Fit is fairly good for these. The wing tips I used on this kit were the clipped versions. I don't think those add anything aesthetically, but they were needed for the scheme I wanted to do. These are also thicker than the end of the wings, so all that lovely detail will be sanded off getting them to match the end of the wings.
With that done, the wing was cemented on the fuselage.
Fit isn't exactly great and when I do my next Hase Spit, I'll glue the upper
wings to the roots first as there is a step there that I didn't fully eradicate
in order to keep the little bumps on the root intact. Rear fit was fair, though
filler was needed as well. For the lower cowling and intake, I decided to use
the Ultracast replacement lower cowl (UC 48088) as it has a slightly longer scoop and is one piece.
However, this part seemed to be a bit shorter than the kit
 bit and there was a
gap at the front that needed filled with card. The rest of it was a bit off too
and so filler was the plan of the day for this. Most unusual as Ultracast parts
are among the best in the business and I've never had any with even a hint of
fit problems before. No fix but to apply the filler and go from there. I also
used the Ultracast upper wing cannon panels (UC 48091). These have the fairing a bit longer
than what is with the kit. Not only that, it has a correct panel line (the one
in the kit is angled and it should be straight). Fit was excellent. I also
tacked on the rudder. Then I went to attach the gun barrels. I looked at
the Techmod sheet I was going to use and much to my dismay, I noticed that the
cannon fairing was on the other side of the pane. This is because that
particular Spit IX had .50 cal machine guns inboard of the cannon. Hasegawa
provides these options, but not the reversed cannon bay cover. I dutifully
attached the cannon and blanking stub as shown in the instructions, putting away
the nice Techmod sheet for another project. I masked the cockpit section
and started painting.
bit and there was a
gap at the front that needed filled with card. The rest of it was a bit off too
and so filler was the plan of the day for this. Most unusual as Ultracast parts
are among the best in the business and I've never had any with even a hint of
fit problems before. No fix but to apply the filler and go from there. I also
used the Ultracast upper wing cannon panels (UC 48091). These have the fairing a bit longer
than what is with the kit. Not only that, it has a correct panel line (the one
in the kit is angled and it should be straight). Fit was excellent. I also
tacked on the rudder. Then I went to attach the gun barrels. I looked at
the Techmod sheet I was going to use and much to my dismay, I noticed that the
cannon fairing was on the other side of the pane. This is because that
particular Spit IX had .50 cal machine guns inboard of the cannon. Hasegawa
provides these options, but not the reversed cannon bay cover. I dutifully
attached the cannon and blanking stub as shown in the instructions, putting away
the nice Techmod sheet for another project. I masked the cockpit section
and started painting.
| COLORS & MARKINGS |
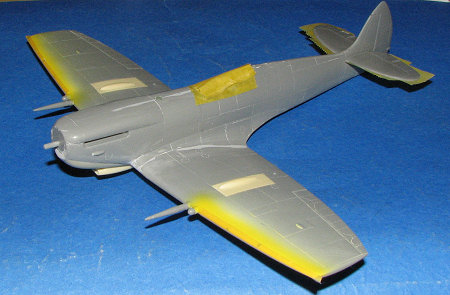 First
the wing leading edges got a treatment of Floquil Reefer White, followed by
yellow. This was then masked off and I used Testors Model Master enamels thinned
with lacquer thinner for the other colors. First was the underside Medium Sea
Grey. That quickly dried and was masked. Next was the Ocean Grey, and then,
using a very thin Dark Green and my Skybow AB-100 detail airbrush, I freehanded
the upper camouflage.
First
the wing leading edges got a treatment of Floquil Reefer White, followed by
yellow. This was then masked off and I used Testors Model Master enamels thinned
with lacquer thinner for the other colors. First was the underside Medium Sea
Grey. That quickly dried and was masked. Next was the Ocean Grey, and then,
using a very thin Dark Green and my Skybow AB-100 detail airbrush, I freehanded
the upper camouflage.
With all the colors roughly on, I went back to the work bench to add more stuff. This included the screen piece in front of the main intake and the rudder actuation linkage. I also painted and tried to install the gun sight. It went flying into oblivion during this process. Same happened to the other, older sight that is included in the kit. I may install something that just looks the part later, but for now, the area is blank. I also masked and installed the clear bits, the canopy being just tacked into place until the painting is done. I used Tamiya Tape to mask this as the Spitfire isn't exactly what one would call a difficult canopy to mask. Not like the Betty bomber!
With that done, I masked off the upper camo from the
lower and painted a hard line. Then several coats of Future (clear acrylic
gloss) was applied in preparation for decals. Before doing this, though, I put
the model on its landing gear. The fit of the tail wheel
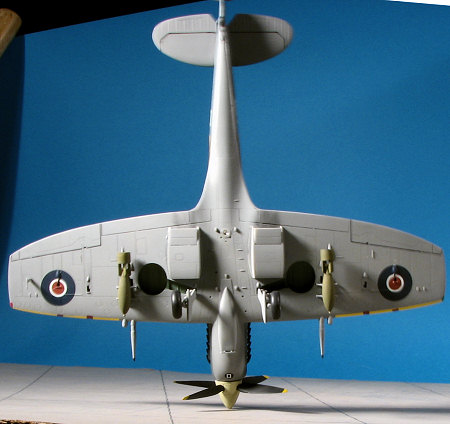 and main gear is good
as there are key ways on the MLG to help keep you from putting them on the wrong
side. Unlike the Tamiya kit recently done, the fit is a bit on the loose side so
there is quite a bit of wiggle room. Prior to installing the main gear legs,
they were painted aluminum and had the oleos wrapped with Chrome Bare Metal
Foil. This version of the Spifire actually has oleo scissors so those were glue
in place as well. I used the kit wheels and they provided three main inserts
without telling which was appropriate. I used the solid hub as I thought it may
be more appropriate to a late war aircraft. Fit is very good, as is the fit of
the gear doors. I'd previously painted the inside of these and the wells with
British Interior Green. Perhaps these were actually underside color, but this
bothers not me and adds some interest to the area.
and main gear is good
as there are key ways on the MLG to help keep you from putting them on the wrong
side. Unlike the Tamiya kit recently done, the fit is a bit on the loose side so
there is quite a bit of wiggle room. Prior to installing the main gear legs,
they were painted aluminum and had the oleos wrapped with Chrome Bare Metal
Foil. This version of the Spifire actually has oleo scissors so those were glue
in place as well. I used the kit wheels and they provided three main inserts
without telling which was appropriate. I used the solid hub as I thought it may
be more appropriate to a late war aircraft. Fit is very good, as is the fit of
the gear doors. I'd previously painted the inside of these and the wells with
British Interior Green. Perhaps these were actually underside color, but this
bothers not me and adds some interest to the area.
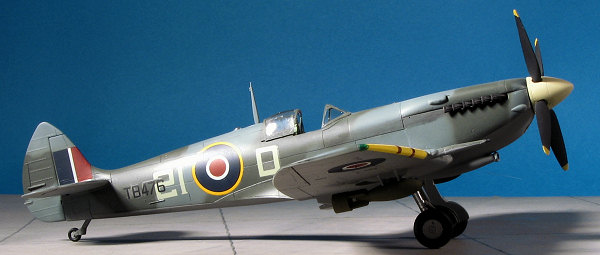
Having pretty well used up the option that I wanted to use, I was left with kit decals. So be it. I chose the 443 Sq ones as I'd already picked the clipped with with pointed rudder variant. I used hot water to apply these and even a bit of Microscale's setting solutions. Got pretty good results as there are a number of lumps and bumps on this aircraft for them to snuggle down over. The lower wing roundels are particularly susceptible to these variances in surface and the end result is good. I did, however, have some silvering that didn't want to go away. For me, this is a common occurrence with Hasegawa's standard kit decals and for that reason, I did not apply the myriad stencil decals that are included on the sheet.
| FINAL CONSTRUCTION |
Next was to add on the bits and pieces that would have
been broken off during the decaling process. I attached the bomb braces to the
racks and the pitot mount to the outer wing. Then I assembled the two bombs that
are included. I'm sure they could have done these in fewer than 6 pieces each,
but they didn't. These were painted Dark Green. I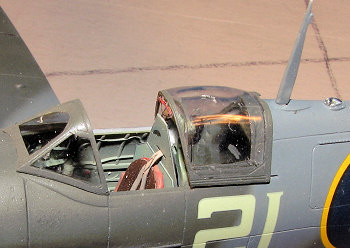 also assembled the Ultracast
prop (UC 48082), which has better detail than the kit version and probably has a better
shape as well. The kit exhaust were replaced with Ultracast flare exhaust (UC
48083) as again, they provided better detail. This was all followed by a coat of clear matte acrylic. I then
removed the masking from the clear bits, installed the canopy emergency release
handle and installed an MV lens in the underside light housing. A bit of light
pastel work for the exhaust and that was it.
also assembled the Ultracast
prop (UC 48082), which has better detail than the kit version and probably has a better
shape as well. The kit exhaust were replaced with Ultracast flare exhaust (UC
48083) as again, they provided better detail. This was all followed by a coat of clear matte acrylic. I then
removed the masking from the clear bits, installed the canopy emergency release
handle and installed an MV lens in the underside light housing. A bit of light
pastel work for the exhaust and that was it.
| CONCLUSIONS |
Well, I have to say that I liked this kit. I wasn't thrilled with all the inserts that are so common with today's kits, but things fit rather well and that is what counts. I have learned that the upper wing needs to be glued to the wing root to keep those darn gaps from ruining things and I do like all the options that are available. You know, I don't really notice that it is a bit shorter than others unless they are side by side. I'm sure this bothers some and so they can spend their money on fuselage conversions and struggle with the ICM kit. The rest of us can have a nice model from what Hasegawa offers.
| REFERENCES |
The Squadrons of the Royal Air Force, by James Halley, Air Britain, 1985 edition
Thanks to me for the kit and etched set, and to Ultracast for all the nice resin bits.
March 2007
#1457 in a series
Copyright ModelingMadness.com. ALl rights reserved. No reproduction in any form without express permission from the editor. If you would like your product reviewed fairly and fairly quickly, please contact the editor or see other details in the
Note to
Contributors.