| KIT #: | 9065 |
| PRICE: | $23.95 MSRP at the time, but probably higher now |
| DECALS: | Two Options |
| REVIEWER: | Scott Van Aken |
| NOTES: | Purchased 'used' at a swap meet |
| HISTORY |
The Hawker Hurricane can rightly be called Britain's first modern monoplane fighter. It had all the needed bits like a powerful V-12 Merlin engine, low wing monoplane design, retractable landing gear, enclosed canopy, and a respectable armament that would bring down any bomber then in service.
Hawker was not a company that would go out on a limb so the basic construction of the aircraft was initially very much like all its biplane fighters with tubular construction covered in fabric or metal panels as the needs saw fit. Initial production aircraft had a fixed, wooden propeller that also harkened to its predecessors.
 However, that is where the similarities
stopped as the Hurricane was the fastest fighter around when it it first entered
service. In fact, it was the first RAF fighter that could top 300 mph in a
straight line. Normal operating altitudes were up to 35,000 feet though it took
considerable time to reach that altitude. Normal climb rate to 20,000 feet was
about 9 minutes. A snail's pace by today's standards, but very much cutting edge
stuff for an armed warplane in the mid/late 1930s.
However, that is where the similarities
stopped as the Hurricane was the fastest fighter around when it it first entered
service. In fact, it was the first RAF fighter that could top 300 mph in a
straight line. Normal operating altitudes were up to 35,000 feet though it took
considerable time to reach that altitude. Normal climb rate to 20,000 feet was
about 9 minutes. A snail's pace by today's standards, but very much cutting edge
stuff for an armed warplane in the mid/late 1930s.
Such was the pace of aviation development, that the Spitfire, a plane developed less than two years later, while not initially that much superior, had a lot more growth in it than did the Hurricane. The Spitfire's top speed was only a couple of dozen MPH faster and its service ceiling was about the same. Where the Spit bested the Hurricane was in climb and in maneuverability. This was due to the Spitfire's labor-intensive wing and light weight monocoque construction.
However, the Hurricane could take considerably more damage and return with its pilot. For this reason as much as anything else, the Hurricane was chosen to go for the bombers while the Spitfire was used to hold off the escorting fighters. Even if engaging in a dog-fight, the Hurricane had at least equal maneuverability with the Bf-109, an aircraft that was smaller, faster and had higher wing loading than the Hurricane.
This ability to take damage and be easy to maintain also made the Hurricane an excellent fighter-bomber and most subsequent variants were built with this mission in mind.
| THE KIT |
It is in all respects a modern, multi-variant, Japanese engineered kit. There
are the plethora of different sprues, each used by Hasegawa to do a specific
version. Probably the only parts that are the same in all the ki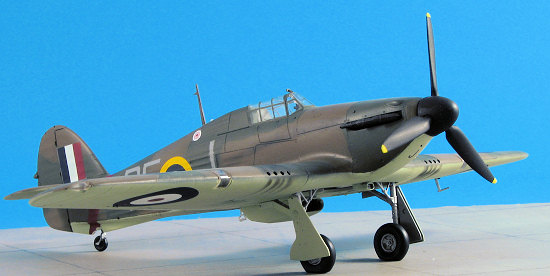 ts are the ones
for the wings, fuselage, undercarriage/cockpit and wheels. The others can be
swapped around to conform to the different types as need be. Well, this type is
the 'late' Mk I with the eight gun wing. It also has the Rotol prop and the
blunt spinner. If you want more information on the various subtypes, I'd
recommend visiting the Kit Research page as Tony Hodun is doing a remarkable job of cataloguing the
differences.
ts are the ones
for the wings, fuselage, undercarriage/cockpit and wheels. The others can be
swapped around to conform to the different types as need be. Well, this type is
the 'late' Mk I with the eight gun wing. It also has the Rotol prop and the
blunt spinner. If you want more information on the various subtypes, I'd
recommend visiting the Kit Research page as Tony Hodun is doing a remarkable job of cataloguing the
differences.
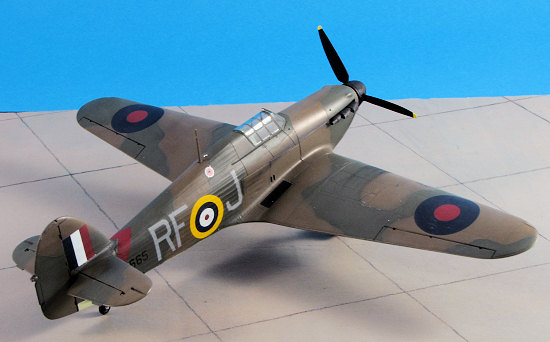
Instructions are just as superb as what you'll find in any modern Hasegawa kit. Markings are for two aircraft. For some odd reason, Hasegawa is enamored with I.R. Gleed. A goodly number of kits in both scales offer his aircraft's markings and some even tout it on the box. This one is no exception with the box art aircraft being one of his when with 87 Squadron. Perhaps it is the extra bits of color. The other plane is from 32 squadron. The decals look quite good, though the white is more of an ivory color that is typical of Hasegawa decals. The unit codes also seem to me to be a bit darker than what I think they should be, but perhaps I've been more accustomed to incorrect colors in this matter. The RAF camo enthusiasts can better tell on this one.
| CONSTRUCTION |
 The reason for building this kit is three-fold. One is
that I've never built a Hasegawa Hurricane in this scale. Two is that I wanted
to use Agama paints on it. Three is that I had some nice Techmod decals and
Ultracast resin bits I wanted to try out. More than enough good reasons for
building a model.
The reason for building this kit is three-fold. One is
that I've never built a Hasegawa Hurricane in this scale. Two is that I wanted
to use Agama paints on it. Three is that I had some nice Techmod decals and
Ultracast resin bits I wanted to try out. More than enough good reasons for
building a model.
As I'm a sub-assembly sort of guy, I started by pouring over the instructions to see what I could build. First I had to sand down a bunch of areas on the parts as the kit is a later Mk.I so has to be somewhat back-dated. This also meant that there were 'duplicates' of several parts on the sprue to make the kit more accurate as a metal-wing Battle of Britain variant.
The two major subassemblies were the cockpit and the
wings. Starting with the cockpit, I assembled all the bits that would be painted
the same shade (in this case Agama's British Interior Green acrylic), except for
the seat, and assembled them. I then painted these bits and the interior side
walls and the seat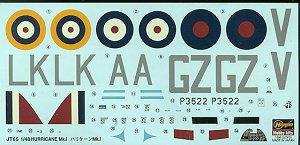 . Hasegawa gives you some
fine framework for this kit and provides some additional bits and pieces to
flesh things out. I used a set of Eduard color photo etch belts and harness on
this one to make the interior more believable. I also used the instrument
decal and it worked superbly once I doused some Solvaset on it. This was then
cemented to one side of the fuselage and glued in place. Then the other half was
glued on once I was sure the fit was all right and that was set aside to dry.
Agama's somewhat thick glue is perfect for large constructs like fuselages and
also allows sufficient fiddle time before setting, something the fast drying
liquid cements do not do.
. Hasegawa gives you some
fine framework for this kit and provides some additional bits and pieces to
flesh things out. I used a set of Eduard color photo etch belts and harness on
this one to make the interior more believable. I also used the instrument
decal and it worked superbly once I doused some Solvaset on it. This was then
cemented to one side of the fuselage and glued in place. Then the other half was
glued on once I was sure the fit was all right and that was set aside to dry.
Agama's somewhat thick glue is perfect for large constructs like fuselages and
also allows sufficient fiddle time before setting, something the fast drying
liquid cements do not do.
 Then I went with the wings. These have several inserts
in the leading edge. One is for the guns and while the fit is fairly good, it
isn't perfect and I needed filler. I was also missing one of the outer blanking
plates. Fortunately, the kit provided a
number of gun options that one won't be using so I modified one of them to fit
the rather large missing slot. Filler and sanding were enough to provide a
useful replacement, though it is by no means a drop in fit. I also used the
Ultracast wheel well as it has a lot more detail to it than the kit bits. once
the pour stub is removed, it is a drop in fit.
Then I went with the wings. These have several inserts
in the leading edge. One is for the guns and while the fit is fairly good, it
isn't perfect and I needed filler. I was also missing one of the outer blanking
plates. Fortunately, the kit provided a
number of gun options that one won't be using so I modified one of them to fit
the rather large missing slot. Filler and sanding were enough to provide a
useful replacement, though it is by no means a drop in fit. I also used the
Ultracast wheel well as it has a lot more detail to it than the kit bits. once
the pour stub is removed, it is a drop in fit.
 With the fuselage halves together, I found that the
general fit wasn't the greatest and needed quite a bit of filler. Attaching the
wings showed that the rear wing/fuselage join was actually rather poor and since
this is all supposed to be fabric, much detail is destroyed with the filling.
The rest of the wing fit wasn't great either. There was a step in the front on
the edges and installing the lower cowling section had that part sit somewhat
proud of the surrounding area needing more sanding. Whoever said this kit was a
shake and bake obviously hadn't built one!
With the fuselage halves together, I found that the
general fit wasn't the greatest and needed quite a bit of filler. Attaching the
wings showed that the rear wing/fuselage join was actually rather poor and since
this is all supposed to be fabric, much detail is destroyed with the filling.
The rest of the wing fit wasn't great either. There was a step in the front on
the edges and installing the lower cowling section had that part sit somewhat
proud of the surrounding area needing more sanding. Whoever said this kit was a
shake and bake obviously hadn't built one!
There were some more bits to attach to the underside, such as the two piece carb intake and the under wing radiator. The two radiator pieces fit well and I attached the exhaust door rods to the aft section before gluing it in place. The forward piece is separate and does not smoothly fit the aft piece, being a bit smaller. I lined up the lower panel lines, glued it in place, added filler around it and sanded it down when it dried. I then added the tail planes and the small plate on the tail gear mount. The canopy was masked off using Tamiya tape and a sharp scalpel. I then added the gun sight which was painted and then the canopy attached. Again, the Agama glue is quite helpful in this area as it stuck to the sills without drying before I was able to attach the canopy.
| COLORS & MARKINGS |
First painting was the wheel well and inside of the
gear doors. These got a coat or two of Alclad II Aluminum. Then the outsides of
the doors and the underside was given a couple of coats of Agama's Sky acrylic.
This paint goes on well and dries to the touch in
 a very short time. I used
Agama's thinner to mix this for air brushing and while the odor takes a bit of
getting used to, it is quite effective. The underside Sky areas were them masked
and the upper surface painted with Agama's Dark Green acrylic. Again, it dries
fast and was then masked. Here is where I had trouble. I applied the Agama Dark
Earth too thickly and it seeped under the masking. Much of this was because of
all the lumps, bumps and fabric detailing that makes masking so difficult. Face
it, I was in a hurry.
a very short time. I used
Agama's thinner to mix this for air brushing and while the odor takes a bit of
getting used to, it is quite effective. The underside Sky areas were them masked
and the upper surface painted with Agama's Dark Green acrylic. Again, it dries
fast and was then masked. Here is where I had trouble. I applied the Agama Dark
Earth too thickly and it seeped under the masking. Much of this was because of
all the lumps, bumps and fabric detailing that makes masking so difficult. Face
it, I was in a hurry.
No choice but to lightly sand the seepage and repaint. This time, I applied the upper colors freehand using my Skybow AB-100 airbrush. This had the unexpected result of making the camouflaged surface seem a lot more weathered than before and I rather like the effect. Of course, there was the usual back and forth to get good coverage.
I then returned to the work bench where I started
assembling the landing gear. It is quite detailed and requires the use of fine
tools 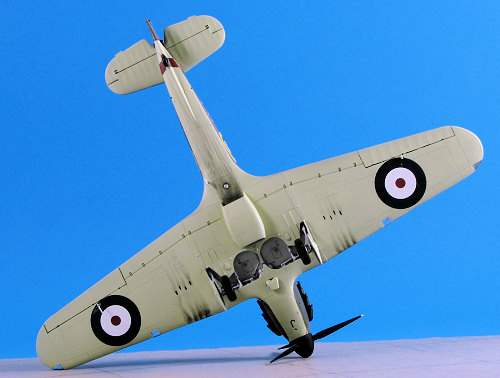 to get all the little
bits in place. My kit had one of the rear gear supports broken off, but it was
repaired enough to look good. I used the Ultracast replacement wheels and they
look great, not even needing to have the axle hole drilled out as with some
others. There are two tail wheels so be sure to use the one shown in the
instructions.
to get all the little
bits in place. My kit had one of the rear gear supports broken off, but it was
repaired enough to look good. I used the Ultracast replacement wheels and they
look great, not even needing to have the axle hole drilled out as with some
others. There are two tail wheels so be sure to use the one shown in the
instructions.
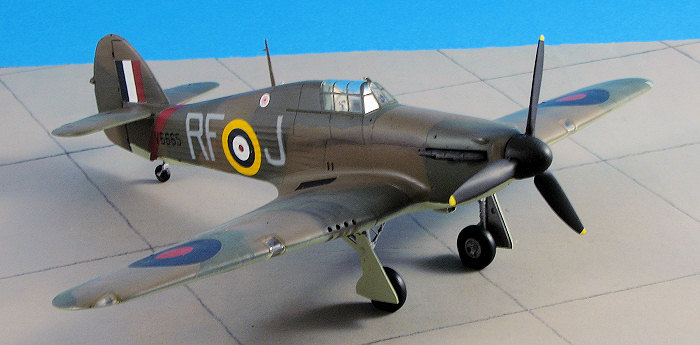
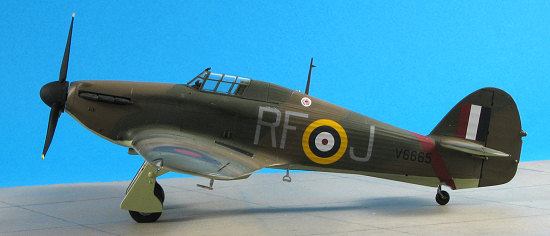
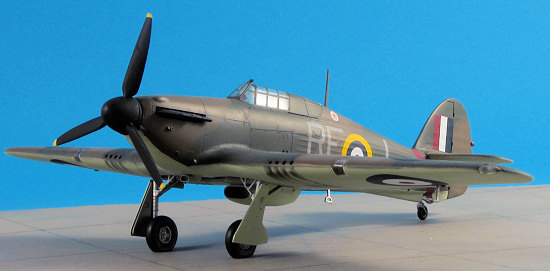
With those in place and dry, I sprayed on some clear gloss acrylic in preparation for the decals. On this aircraft, I wanted to use some Techmod Decals for one of the Polish squadrons that flew the plane during the Battle of Britain. I chose sheet 48-025 and the first option on there, mainly for the red tail stripe. This plane was flown by Flt Of J.A.Kent with 303 Sq out of Northolt in September 1940. As many know, there were British officers with the Polish squadrons as a requirement of the formation of these units.
Anyway, the decals are nice and thin and went down well. I used Microscale setting solution on them and for the most part it worked well, though there was some silvering. Some Solvaset cured most of that. I found the red stripe was not entirely long enough and did not completely conform to the area around the tail wheel. As I didn't have any of this red (probably roundel red), I left it as it was. Then I sprayed on the clear matte to seal things in.
| FINAL CONSTRUCTION |
Typical of many kits there were a lot of little things
that needed done towards the end. For one, I used Tamiya's pastels for the
exhaust and gun stains. I also built up the blunt nosed Rotol prop and pushed it
in place. Wing tip formation lights and the covers
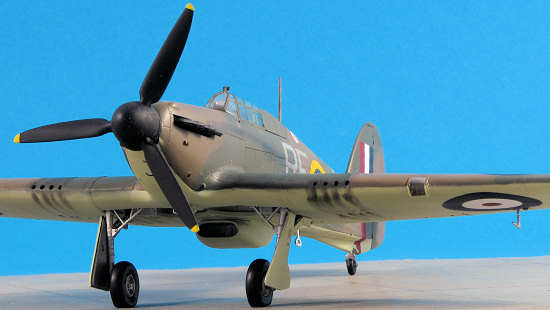 for the landing lights were
glued in place with no problems. I found the former to be just a bit smaller
than the areas into which they fit. The boarding step and pitot were attached
and the masking removed from the canopy. Final bit was the mirror (the
rectangular one) and the small light in front of the radio mast. There is a
light under the centerline of the fuselage and for that I used a #29 MV Products
lens. Some minor work with a technical pen and some touch-up paint and that was
it.
for the landing lights were
glued in place with no problems. I found the former to be just a bit smaller
than the areas into which they fit. The boarding step and pitot were attached
and the masking removed from the canopy. Final bit was the mirror (the
rectangular one) and the small light in front of the radio mast. There is a
light under the centerline of the fuselage and for that I used a #29 MV Products
lens. Some minor work with a technical pen and some touch-up paint and that was
it.
A note on the paint. I used AGAMA acrylic for this kit along with their glue and found both to be very good. The glue is a bit thick so isn't perfect for everything, but for the large bits it is great as it doesn't dry out almost immediately like most water thin glues. AGAMA's acrylic paint comes in bottles that make it impossible to get paint on the threads unless you actually put it there. When needing just a touch of paint (as in touch-ups), shaking the bottle puts enough in the cap to work with. It also dries the same shade if sprayed or brushed, which I found to be a very nice surprise. If you are an acrylic user and can get these paints in your area, I do highly recommend them. They also have a very fine pigment and hold up to Tamiya masking tape better than any other acrylics I've used.
| CONCLUSIONS |
Now I can say that I've built a Hasegawa 1/48 Hurricane. It wasn't a breeze as there are inserts that can cause all sorts of problems if one isn't very careful. It has a great interior and though the clear bits are quite clear, it would be nice if the canopy could be opened to show the work. Though I really was expecting a more trouble-free build, I've come to realize that Hasegawa kits, regardless of what the pundits tell you, all take some modeling skills to finish. Still, it is the nicest 1/48 Hurricane around until Tamiya decided to do a series!
Aftermarket used:
Ultracast 48079 Hurricane Wheel well, and 48076 4-spoke
Wheels.
Techmod sheet 48-025 for 303 Sq Hurricanes
MV Products LS 29 lens
Eduard painted RAF seat belts (early).
May 2007
#1468 in a series
Copyright ModelingMadness.com. All rights reserved. No reproduction in part or in whole without express permission from the editor.
If you would like your product reviewed fairly and fairly quickly, please contact the editor or see other details in the Note to Contributors.
Back to the Review Index Page 2023