Tamiya 1/72 Mosquito FB.VI
| KIT #: | 60747 |
| PRICE: | $23.00 SRP |
| DECALS: | Three options |
| REVIEWER: | Scott Van Aken |
| NOTES: |
| HISTORY |
The development of the DeHavilland Mosquito is a story that is
nearly legend. The idea of building a bomber fast enough to outrun
defending fighters has always been highly sought. It has also come to pass for a
short time on several occasions. Witness the development of the Bristol Blenheim,
or the Dornier Do-17, both of which were faster as prototypes than current
fighters. 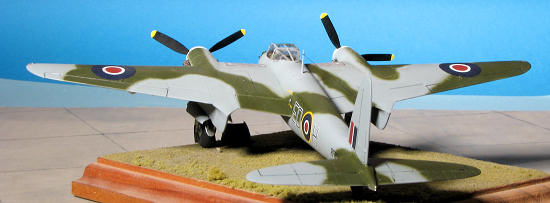 However, by the time all the needed operational equipment was
installed, that speed had deteriorated or the speed of fighters had increased.
However, by the time all the needed operational equipment was
installed, that speed had deteriorated or the speed of fighters had increased.
However, the wooden wonder from Hatfield was one bomber which was able to keep the performance edge for a long time. So successful was the Mosquito that it was developed into many different roles including night fighter, anti-shipping, target towing, special ops and a number of others as well as high-speed bombing.
Probably the most used version was the FB.VI (FB for Fighter-bomber). This version was widely used and though the Air Ministry was skeptical about its wooden construction, it proved to be very strong and able to take a lot of damage. Despite the problems in keeping wooden aircraft flying, several are still in the air 70 years after the prototype first flew and many more are in museums world wide.
| THE KIT |
Arguably the best Mosquito in 1/72 (the Hasegawa kit is also quite nice), the Tamiya kit is the result of a now quiescent program to pantograph down their excellent 1/48 kits.
First thing you
notice is that there are three poly bags, each with two sprues in it. Now this
is the way that kits should be packaged! Molded in the usual medium dark grey
plastic that Tamiya is well known for, it has lost none of its detailing from
the 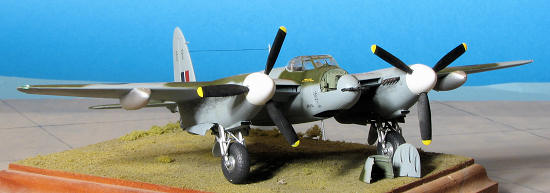 larger version. Rather than scan all the bits, I have chosen to show just a
small section from the underside of one wing to let you see the detail. This
image is about twice the size of the real part. You can see that nothing has
been lost.
larger version. Rather than scan all the bits, I have chosen to show just a
small section from the underside of one wing to let you see the detail. This
image is about twice the size of the real part. You can see that nothing has
been lost.
There are enough bits to make either an NF.II or FB.VI. This includes separate wing tips, the option of shrouded exhaust, different wheel hubs, different instrument panels, different propellers, and different things under wings. For the night fighter, one needs to open the holes near the wing tip for the antenna. For the fighter-bomber, one can have either rockets or bombs under the wings. The rockets (minus the tail fins) are molded onto the rails so displaying just the rails means you have to cut off the rockets. Thankfully, Tamiya has chosen not to pre-open these holes as some other kit makers have done! I did find, however, that one interior part had been torn from the sprues and was no where to be found in the bags.
 The instructions are the complete works that you have come to
expect from a premier model company. They are ten folded pages comprising 17
construction steps, each step showing needed paint colors and trim. Naturally
all paint call-outs are for Tamiya paints.
The instructions are the complete works that you have come to
expect from a premier model company. They are ten folded pages comprising 17
construction steps, each step showing needed paint colors and trim. Naturally
all paint call-outs are for Tamiya paints.
There are three decal options offered for the kit. Each are labeled as A, B, or C in the construction sequence so you can be sure to get the right building options to match the proper scheme.
First is a FB.VI of 487 squadron in the standard Dark Green and Ocean Grey over Medium Sea Grey. Next is another FB.VI of 143 Sq. This one is a coastal command unit and is Dark Sea Grey over what is listed as Deck Tan, but I think should be Medium Sea Grey. Finally the NF.II from 157 squadron in overall Matte Black. Any of the three schemes should produce a super kit.
| CONSTRUCTION |
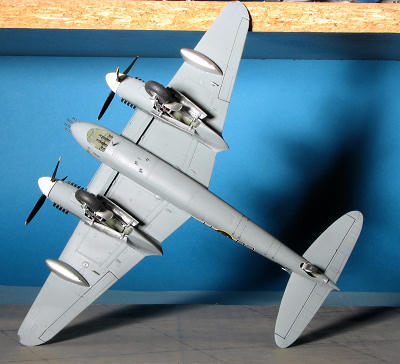
First step was to open the holes in the lower wing. The plan
is to recreate on of the Banff Wing aircraft that did ops along the Norway coast
and North Sea in the late months of the war. These aircraft were modified to
carry two paired rocket rails rather than four singles to allow the use of the
wing tanks as range was all important. The rail installment is something that
will need to be scratchbuilt and being lazy, I did not want to do this.
Fortunately, many of these planes flew ops before the rails were installed so
that was one I wanted to do. As Tamiya includes bits not used on this variant, I
was fortunate to have the wing tanks included
 as none of the standard kit
options used them. Though the instructions did not show the holes to open for
these tanks, it was pretty easy to figure out where they went.
as none of the standard kit
options used them. Though the instructions did not show the holes to open for
these tanks, it was pretty easy to figure out where they went.
I next assembled the engine nacelles. These required filler as did many other areas of the aircraft. Inner well walls were brush painted aluminum using Humbrol #11. I also assembled the tanks, wheels and started putting the interior together. This is where the radio was discovered to be the part missing from the sprues. Nothing to do but carry on. The interior was built up as much as I could and then everything was painted British Interior Green. I did the instrument panels in black as well as some of the interior details. I used the supplied decal which worked perfectly.
For some reason, I decided to add some additional detail. In this case, it was a nose gun detail set by Aires that I have had for many years. It looked to be simple enough. Just cut off the kit upper gun bay door and drop in the resin.
Right.
The first thing I did was to cement the nose halves and cap.
Figured I would remove the door while the bits were assembled to keep things
neat. Well that worked just fine, but the resin did not just 'drop in'. The
lower section almost did as there was already an opening there. However, I had
to do much 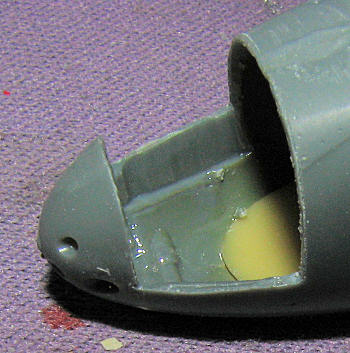 grinding to get the
upper section to fit. The nose cap had to be pretty well hollowed out with all
the little bits to hold the kit guns as well as the pin and sockets ground down
as far as I dared. Same went for the sidewalls as they are about twice as thick.
This will leave a prominent shelf on which the lower bay will rest. The aft
section of the kit area has to be thinned as well. I used a battery powered low
speed grinder to do all this work and it still took a good half hour with much
test fitting. The lower piece fit fairly well once I removed the interior guide
lugs.
grinding to get the
upper section to fit. The nose cap had to be pretty well hollowed out with all
the little bits to hold the kit guns as well as the pin and sockets ground down
as far as I dared. Same went for the sidewalls as they are about twice as thick.
This will leave a prominent shelf on which the lower bay will rest. The aft
section of the kit area has to be thinned as well. I used a battery powered low
speed grinder to do all this work and it still took a good half hour with much
test fitting. The lower piece fit fairly well once I removed the interior guide
lugs.
Even with all
this done and the pieces in place, I had to cut off a section of the forward
cockpit floor to get the nose to click into place with the rest of the fuselage.
This had to forcibly be held in place whil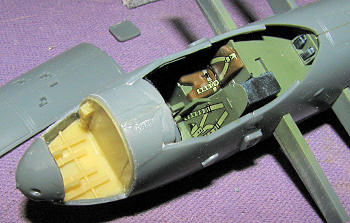 e I used super glue to get it to
properly join up. Getting the bomb bay and the aft lower hatch in place were
simple by comparison.
e I used super glue to get it to
properly join up. Getting the bomb bay and the aft lower hatch in place were
simple by comparison.
After that was done, I went to work on the wings and engine nacelles. Fit is pretty decent, but I had real trouble with the upper aft sections. They did not want to fit well at all with a prominent step between the upper wing and the aft nacelle join. Much super glue and sanding was needed to get a clean join. With that completed, the wing tanks were installed. These are handed though I found the right side one was not as tight a fit, leaving a gap with the wing. This was handled with filler while the other side just got some clear gloss paint.
 The tail planes were then glued on and when dry and square,
the wings. Wing fit was OK, but not the best I have ever dealt with. I then got
the canopy ready. There is an insert, if you can believe it, for the side of the
canopy. This one takes the flat pane that is provided. For those who do not want
to mess with this, Paragon offers a selection of Mossie canopies for the Tamiya
kit in nicely done vacuformed plastic. There are decals that go on the inside to
represent the painted inner frames. Good luck. I totally made a mess of mine and
removed them. Then the outside was masked. When masking you will find that not
all frames you see are on the outside of the canopy so those were not
accentuated. Then the canopy was glued in place.
The tail planes were then glued on and when dry and square,
the wings. Wing fit was OK, but not the best I have ever dealt with. I then got
the canopy ready. There is an insert, if you can believe it, for the side of the
canopy. This one takes the flat pane that is provided. For those who do not want
to mess with this, Paragon offers a selection of Mossie canopies for the Tamiya
kit in nicely done vacuformed plastic. There are decals that go on the inside to
represent the painted inner frames. Good luck. I totally made a mess of mine and
removed them. Then the outside was masked. When masking you will find that not
all frames you see are on the outside of the canopy so those were not
accentuated. Then the canopy was glued in place.
Back at the resin nose, I installed the guns, the ammo cans and finally the belt feed. Aries gives a pretty useless drawing for these. It sort of says "it all goes in here, somehow". Well, it seems that I installed the guns backward or something as the belts do not go to where I think they should. The belts were a real chore to get into place as well. The more I use sets like this, the less I am inclined to use them the next time. I can guarantee you that the next 1/72 Mossie I build, will have nothing like them. The bits have to be exact replacements for extant pieces or they stay on the shelves. Anyway, those were finally put in place, the resin areas masked off best I could, and it was time for paint.
| COLORS & MARKINGS |
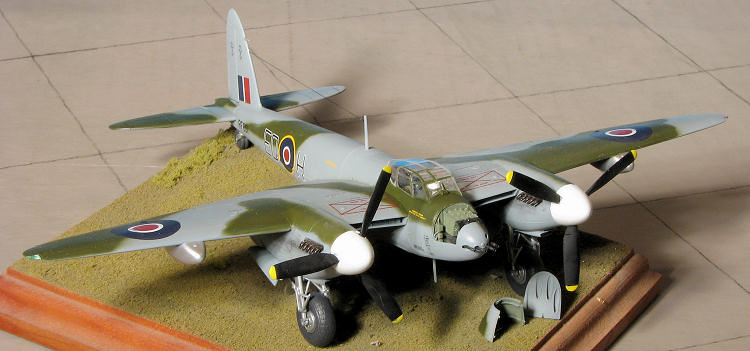
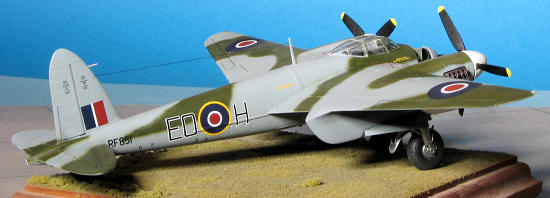 As this was to be a plane from the Banff Wing, it was painted
in the night fighter scheme. This is overall medium sea grey with dark green
areas on the upper surfaces. I used Testors paints for all the colors. Once the
airframe was in MSG, I had sprayed the dark green. As I have mentioned before,
it is a toss up in 1/72 as to hand spraying or masking these colors. I hand
sprayed as it is really less work and I sort of enjoy the experience. I always
have trouble spraying an even coat of dark green and hope that the clear coats
will sort of fix things. Each coat of paint, though dry to the touch in less
than an hour, was given a full day to cure. Then it was time to install the
landing gear.
As this was to be a plane from the Banff Wing, it was painted
in the night fighter scheme. This is overall medium sea grey with dark green
areas on the upper surfaces. I used Testors paints for all the colors. Once the
airframe was in MSG, I had sprayed the dark green. As I have mentioned before,
it is a toss up in 1/72 as to hand spraying or masking these colors. I hand
sprayed as it is really less work and I sort of enjoy the experience. I always
have trouble spraying an even coat of dark green and hope that the clear coats
will sort of fix things. Each coat of paint, though dry to the touch in less
than an hour, was given a full day to cure. Then it was time to install the
landing gear.
| FINAL CONSTRUCTION |
When assembling the landing gear, note that the additional
strut used on these gear will be to the inside. The landing gear is quite fiddly
with the X brace being easy to break. You also have to install these by feel as
you cannot see the struts connect with the slots in the well. With the kit on
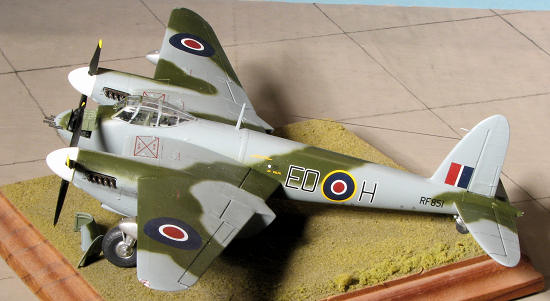
its gear, I started applying decals. I used the
Aviaeology sheet
exclusively on this one for a 404 Squadron plane. This unit flew Mossies late in
the war, mostly on coastal strikes along Norway's coast. I have to confess that
I 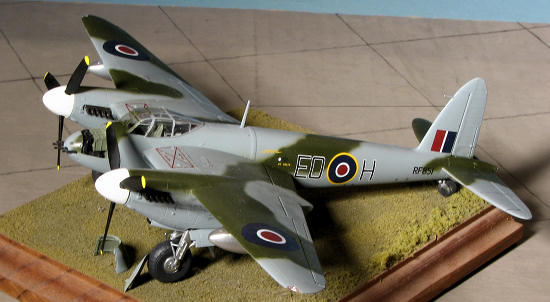 was not sure what color the under wing tanks and spinners were, thinking they
might be Sky, but an e-mail to Aviaeology revealed that the tanks were aluminum
and spinners white. They will be more specific on colors in future sheets. As I
had aready painted these things, some masking was needed for the repaint.
was not sure what color the under wing tanks and spinners were, thinking they
might be Sky, but an e-mail to Aviaeology revealed that the tanks were aluminum
and spinners white. They will be more specific on colors in future sheets. As I
had aready painted these things, some masking was needed for the repaint.
Then it was on to applying the decals. They are very thin and fit quite well. One has to be careful when handling them as their thinness also means they tear fairly easily. They were placed over a gloss clear fuselage and when done, a matte clear was sprayed.
I then drilled a hole for the HF trailing wire antenna, something that is not shown in the Tamiya instructions, but the mount is engraved in the plastic. Put this on as late as you can for it is easily broken during handling. I also used Aries resin exhaust. These need to be trimmed right up against the stacks fore and aft to fit in the slots. They do look nicer than the kit ones, but are rather fragile as rough handling can break the stacks. With those installed, the masking was removed and I used some pastels to add exhaust streaks. The gear doors were attached as were the wing tip lights after painting the tips the appropriate color. The last thing to add were the guns. These were painted gun metal and glued in place. They need to be trimmed quite a bit as are too long, but better too long than too short. More touch up was done and an antenna wire made from EZ-line.
| CONCLUSIONS |
As I stated in the B.XX article, this is a great kit. I made it more difficult for myself by adding resin bits that really did not need to be included, but there it is. The Aviaeology markings make for a somewhat different aircraft, though it seems the FB.VI is well represented in aftermarket decals!
December 2011
This is something I bought at the LHS just for the Modeling Madness 'Twins' group build.
Thanks to Aviaeology for the decal sheet.
If you would like your product reviewed fairly and fairly quickly, please contact the editor or see other details in the Note to Contributors.