Azur 1/48 Loire-Nieuport 411
|
KIT # |
021 |
|
PRICE: |
$ |
|
DECALS: |
Two aircraft |
|
REVIEWER: |
|
|
NOTES: |
Short run with vacuform and resin parts. |
|
BACKGROUND |
For a look at what is in the box and a brief history, please visit the preview
|
CONSTRUCTION |
First thing was to install the wheel wells. These are keyed to
which side is which. You can tell by looking at the leading edge of the insert,
it should follow the leading edge of the wing. The fit was quite good and it
mated up well. I used superglue to attach the parts and provided lots of it to
ensure they wouldn't come adrift later on.
While that was drying, I looked at the interior bits, cleaned
them up and glued the floor, back bulkhead and seat together. During this time,
I was test fitting it in the fuselage and not having a lot of success. There are
no mounting or alignment tabs to help. I did notice that it seemed the interior
could be inserted from below so I glued the fuselage halves together. Fit was
really quite good and I was pleased with the results.
My attention then turned to the interior. The control stick was
glued in place, and when dry, all of the interior parts were given a coat of
French Interior Dark Blue from the Aeromaster acrylic line. Then some of the
detail parts were picked out in black and other colors; then given a dry brush
with aluminum to show some detail. The side panels were glued on the bottom only
and slightly spread out. Then set aside to dry. Meanwhile, the instrument panel
was painted flat black, dry-brushed and glued in place. The fit is fair, but not
great.
Returning to the wing, there were more resin bits to attach. The
under wing radiators are resin and these inserts were not only too wide, but too
short in the fore and aft range to fit the slots in the lower wings where they
were to go. The too wide part was cured by some trimming of the openings to get
a good fit in that dimension, while the too short was blown off. When dry, the
injected plastic scoops were glued over them. Fortunately, these scoops hide
most of the radiator. On the back side of the wing, are the
radiator exits. These fit in the upper wing and have no upper wing doors to
cover them. Fortunately, these items were a pretty good fit. I made sure the
outer portions were flush with the wing so any 'adjustment' needed would be on
the inner side against the fuselage. I then test fit the upper wing and found
that some sanding was needed on the forward section of the gear wells before I
could get a good mating surface for the wing. The upper wing panels fit rather
well and I clamped them while the glue was drying. At this time, I also glued
together the upper and lower horizontal stabilizers after first removing the
ejector stubs and sanding the mating surfaces smooth.
Moving on, the horizontal stabilizers were glued in place and
adjusted to even things out as much as I could. Under the nose is a two-piece
resin/plastic radiator that was glued in place. Seemed like a good time for
another filler moment so that was done. If it appears that I use a lot of
filler, you are right. I'm not one of those '...never used a bit of filler...'
types of modeler. I always use filler. Perhaps I build too fast. I dunno.
Flipping it over on the back, it was time to get to work on the
landing gear. First thing I did was to drill out the attachment holes in the
resin wells. Actually I sorta overdid it on one side and drilled right through
the upper wing! The resin roof is very thing and you go through it in a flash. I
then glued in the plastic main gear struts. Good move for Azur as resin struts
would have warped with time. You'll also have to do some trimming of the forward
door housing and the lower struts to get a good fit.
Well, that is what is supposed to happen. The T strut is
actually too wide so needs trimmed back or you won't get both bellcranks within
the confines of the wheel well. I found this out after much time fiddling with
getting the first bellcrank in place then gluing the T strut to the well. No way
was I going to remove those bellcranks so I could shorten the cross-bar!
I then started fiddling with the pistons as they were on the bottom. No way
would it fit to the outside and look anything but odd, so I glued it to the
inside of each bellcrank. Fit wasn't bad. The upper I-beam braces, however, (and
remember, the kit is on its back for this) were too long. This required some
careful trimming and gluing to get them all in place. Naturally, I made 'durn
shure' that they weren't going to fall off by applying liberal amounts of
superglue. When dry, it was all smoothed down to look less like a mess!
Now all this took several days as I am by no means anything other than slow.
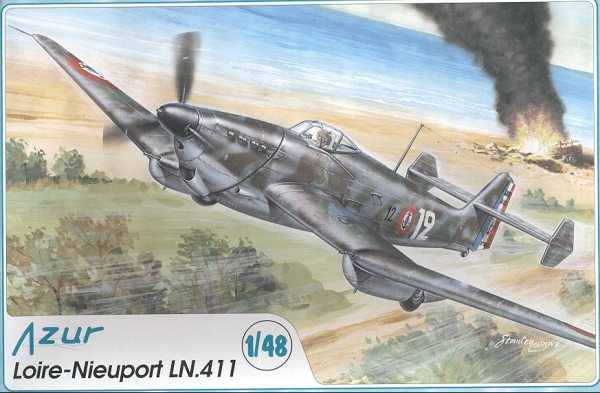
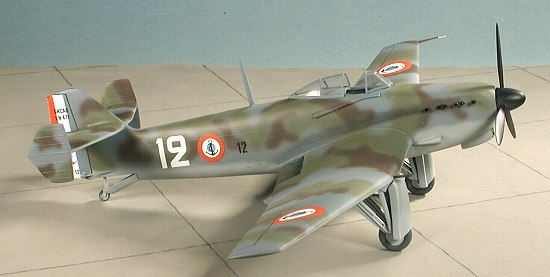
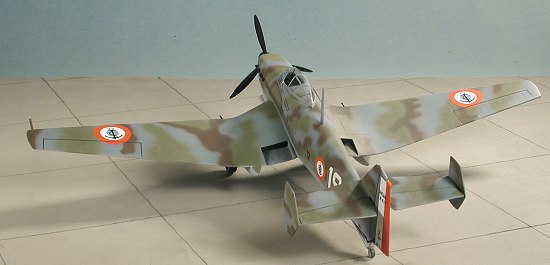
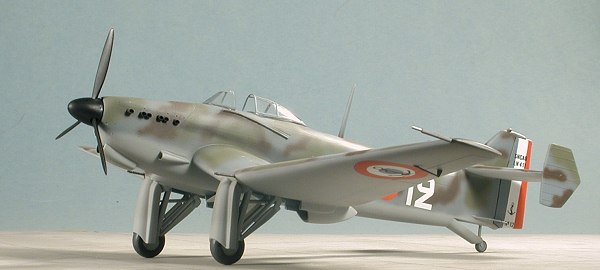
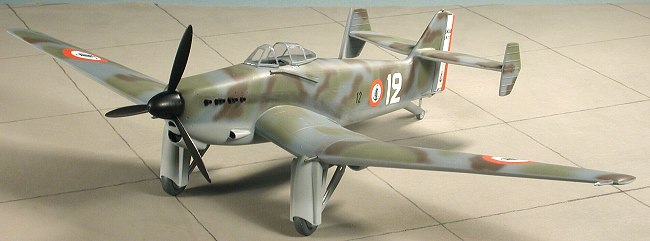
CAMOUFLAGE & MARKINGS In terms of unit markings, you get two choices. The only
difference (other than the number) is that one has a white circle around the
fuselage roundel and a white line along the fuselage. While this was the more
fetching of the two schemes, it required a very thin, tight spinner spiral or
rings to be painted. That was enough to put me over to the box art scheme.
Besides, French '2's are cool looking. The wing decals seemed a bit large
compared to the instruction drawings, a situation I've noticed before with Azur
kits. With FINAL BITS With the decals on and dry, the kit first had the control surfaces delineated
with a drafting pen. The guns were glued into holes I drilled in the wing
leading edges, the wheels installed and then the gear doors glued in place. It
was then that I found out that I should not have shortened those door actuating
rods. The doors should stick out from the leading edge of the wing quite a bit.
On mine they are flush. When you do yours, don't cut those rods until the very
end. They are also a bit shallow and didn't clear the main wheels as they
should. Be aware of that as you may need to trim the doors. I didn't and just
glued them in place. The tail wheel 'door' was no problem. With the exhaust in, the entire kit was then given a coat of flat acrylic
clear using the Tamiya/Gunze flat base mixed with Future combo I've been using
for nearly a decade. I have had little trouble with this and find it superior to
any other stuff I've used. Besides being inexpensive, I can easily alter the
'matte-ness' of it by adding either flat base or more Future. With that done,
the prop was installed, the masking removed from the clear bits, the canopy
glued on, some pastels used to dirty things up and I was done.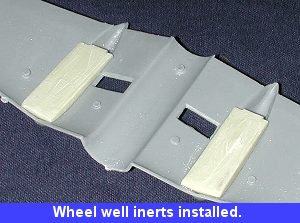 Well, I started on this beast by first sawing away on the blocks
that held the resin bits in place. This is a rather tedious job that I generally
don't look forward to. I often wish that these Czech companies would hire the
folks at Ultracast to do their resin as Ultracast resin bits are a breeze to
remove from the resin casting blocks. Well, it isn't going to happen, so after a
couple of hours of sawing and sanding, I had the big pieces ready to go.
Well, I started on this beast by first sawing away on the blocks
that held the resin bits in place. This is a rather tedious job that I generally
don't look forward to. I often wish that these Czech companies would hire the
folks at Ultracast to do their resin as Ultracast resin bits are a breeze to
remove from the resin casting blocks. Well, it isn't going to happen, so after a
couple of hours of sawing and sanding, I had the big pieces ready to go.
 I then started to install the interior. What once fit, now
didn't. The reason was the instrument panel. This was cured by cutting out the
forward upper 'square' on each side panel to give room to clear the instrument
panel. I guess that in a perfect world, the instrument panel would fit in
between the two side panels, but how to get that to do so I could not figure
out. With that done, the interior was installed along with liberal amounts of
superglue. When it was dry, I noticed that I'd not gotten the seat as centered
as I should have liked. I'm an adult, and after a short weeping session, I moved
on. The interior sides had to be clamped in place while gluing to fit flush
against the side of the fuselage.
I then started to install the interior. What once fit, now
didn't. The reason was the instrument panel. This was cured by cutting out the
forward upper 'square' on each side panel to give room to clear the instrument
panel. I guess that in a perfect world, the instrument panel would fit in
between the two side panels, but how to get that to do so I could not figure
out. With that done, the interior was installed along with liberal amounts of
superglue. When it was dry, I noticed that I'd not gotten the seat as centered
as I should have liked. I'm an adult, and after a short weeping session, I moved
on. The interior sides had to be clamped in place while gluing to fit flush
against the side of the fuselage.
 After much test
fitting and a touch of fiddling around, the wing was glued in place. I carefully
aligned everything and taped the wing so that the roots would be no problem.
There was a step at the back of the lower wing/fuselage join that I couldn't
adjust out so that area will need filler and filing to smooth out. Again, the
wing was clamped in place while everything dried. Naturally, when I removed the
clamp, something had slipped and my previously perfect alignment wasn't perfect
any more. Another short weeping moment and then the usual filler was applied to
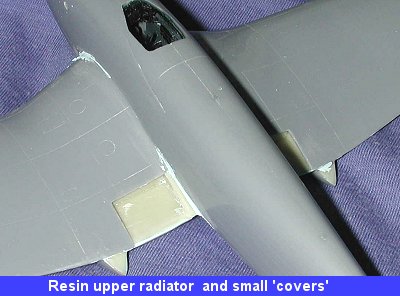
the joins. I also installed some small resin 'covers' for the upper rear of the
landing gear nacelles. One fit great, the other didn't. Probably my bad on that
one.
After much test
fitting and a touch of fiddling around, the wing was glued in place. I carefully
aligned everything and taped the wing so that the roots would be no problem.
There was a step at the back of the lower wing/fuselage join that I couldn't
adjust out so that area will need filler and filing to smooth out. Again, the
wing was clamped in place while everything dried. Naturally, when I removed the
clamp, something had slipped and my previously perfect alignment wasn't perfect
any more. Another short weeping moment and then the usual filler was applied to
the joins. I also installed some small resin 'covers' for the upper rear of the
landing gear nacelles. One fit great, the other didn't. Probably my bad on that
one.
 Anyway, once the radiator was on, I went for the tough stuff. First the two
intakes on either side of the nose were glued on and any gaps filled. Next were
the separate resin thingies that went along side the canopy. They aren't rails
but perhaps hand holds. Whose idea was this??? They need care in
cleaning up and they were also a tad shorter than the engraved track lines on
the fuselage.
Anyway, once the radiator was on, I went for the tough stuff. First the two
intakes on either side of the nose were glued on and any gaps filled. Next were
the separate resin thingies that went along side the canopy. They aren't rails
but perhaps hand holds. Whose idea was this??? They need care in
cleaning up and they were also a tad shorter than the engraved track lines on
the fuselage.
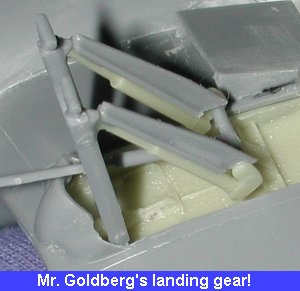 Then it was time
to figure out the landing gear extension/retraction mechanism. It seems that
when Loire/Nieuport needed to design this feature, they went to the US and hired
the expertise of the genius in mechanical engineering, a Mr. R. Goldberg for
this one. Well, first of all, there is a central strut which attaches to the
gear housing and has a very long (actually too long) strut for the gear door. No
worries on this as it will be shortened as needed. To the small stubs of this T
shaped strut go a small bellcrank. To the bottom is attached a piston and to the
top a sort of I-beam structure. Then to the outside of these is fitted a second
bellcrank.
Then it was time
to figure out the landing gear extension/retraction mechanism. It seems that
when Loire/Nieuport needed to design this feature, they went to the US and hired
the expertise of the genius in mechanical engineering, a Mr. R. Goldberg for
this one. Well, first of all, there is a central strut which attaches to the
gear housing and has a very long (actually too long) strut for the gear door. No
worries on this as it will be shortened as needed. To the small stubs of this T
shaped strut go a small bellcrank. To the bottom is attached a piston and to the
top a sort of I-beam structure. Then to the outside of these is fitted a second
bellcrank.
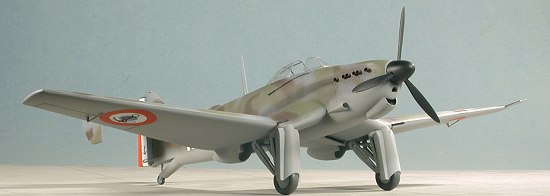
 Once the landing gear were
securely attached, the end plates were glued onto the stabilizers and lined up.
I pretty well had a complete airframe so it was on to some of the 'fiddly' stuff
in preparation for painting. The first was the canopy. I carefully cut it out
and cut off the windscreen. This was glued on as best I could and then masked
along with the canopy itself. The large radio antenna mast was then glued in
place. I cheated a bit and left a bit of a stub on the bottom of the antenna,
and then gouged a small hole on the spine for it to fit in. Then came the really
small stuff. There are two resin grab handles that were glued on. The aileron
and rudder actuators are also very fine resin bits. Naturally, one of them was
broken as was one of the grab handles. I fitted them in place and hope that they
stayed there. The actuators did, but the grab handles disappeared sometime
during painting. I also detached and installed the tail wheel. This required the
fuselage hole to be opened up quite a bit. Being a major coward, I left off the
exhaust stubs until near the end, though I did glue on the pitot tube.
Miraculously, it survived to have its picture taken!
Once the landing gear were
securely attached, the end plates were glued onto the stabilizers and lined up.
I pretty well had a complete airframe so it was on to some of the 'fiddly' stuff
in preparation for painting. The first was the canopy. I carefully cut it out
and cut off the windscreen. This was glued on as best I could and then masked
along with the canopy itself. The large radio antenna mast was then glued in
place. I cheated a bit and left a bit of a stub on the bottom of the antenna,
and then gouged a small hole on the spine for it to fit in. Then came the really
small stuff. There are two resin grab handles that were glued on. The aileron
and rudder actuators are also very fine resin bits. Naturally, one of them was
broken as was one of the grab handles. I fitted them in place and hope that they
stayed there. The actuators did, but the grab handles disappeared sometime
during painting. I also detached and installed the tail wheel. This required the
fuselage hole to be opened up quite a bit. Being a major coward, I left off the
exhaust stubs until near the end, though I did glue on the pitot tube.
Miraculously, it survived to have its picture taken!
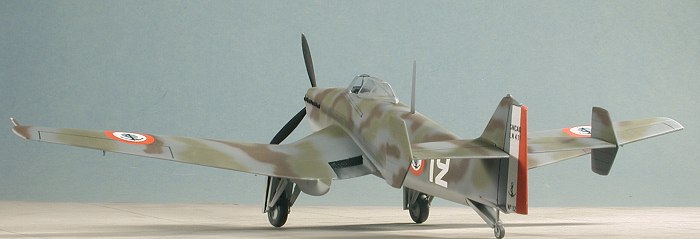
 If you like 'free
flowing' camouflage schemes, then you can't beat French stuff of this period.
The only thing that was the same between two planes were the colors used. There
are three upper colors, a blue-grey, brown and a greenish shade that the
French call Khaki. To me, Khaki is a tan, but the French have always marched to
the beat of a different drummer. The underside (and that includes wheel wells,
struts and wheels from those who were queried about such things) is a light blue
grey color that is close to RLM 76. I started with the bottom color, masked off
any important stuff, and then sprayed the upper colors. I started with the dark
blue grey then added the brown and the green. All of these colors were
Aeromaster acrylics. I had some trouble with clogging, but tried the use of
Future as a thinner and it seemed to help. I also tried some Polly Scale thinner
on a couple of colors, and it seemed to help as well.
If you like 'free
flowing' camouflage schemes, then you can't beat French stuff of this period.
The only thing that was the same between two planes were the colors used. There
are three upper colors, a blue-grey, brown and a greenish shade that the
French call Khaki. To me, Khaki is a tan, but the French have always marched to
the beat of a different drummer. The underside (and that includes wheel wells,
struts and wheels from those who were queried about such things) is a light blue
grey color that is close to RLM 76. I started with the bottom color, masked off
any important stuff, and then sprayed the upper colors. I started with the dark
blue grey then added the brown and the green. All of these colors were
Aeromaster acrylics. I had some trouble with clogging, but tried the use of
Future as a thinner and it seemed to help. I also tried some Polly Scale thinner
on a couple of colors, and it seemed to help as well. 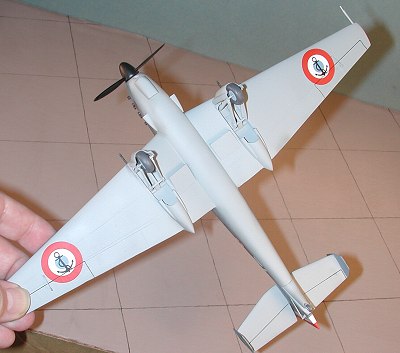 With all the
colors on it, the model was given a nice coat of clear acrylic gloss where
decals were to be put on. Naturally, I used the kit decals. They were a delight.
Made by Propagteam, they are thin, stuck well without using any setting solution
and are quite opaque. The tail stripes are given, but I didn't use the blue. Two
reasons. One is that the color of the blue is almost the same as the Aeromaster
dark blue grey paint! The other is that I'd already glued the rudder actuator
bits to the blue area of the rudder and wasn't keen on removing them. Though I
trimmed the white stripe (it is too wide as it is), I found I didn't really need
to. I had feared that it would show through the red one, but while fiddling
around with the red stripe section, I noticed that no white showed through it. I
did use some setting solution on the red parts of the rudder stripes to force
them to snuggle down over the edges and stuff.
With all the
colors on it, the model was given a nice coat of clear acrylic gloss where
decals were to be put on. Naturally, I used the kit decals. They were a delight.
Made by Propagteam, they are thin, stuck well without using any setting solution
and are quite opaque. The tail stripes are given, but I didn't use the blue. Two
reasons. One is that the color of the blue is almost the same as the Aeromaster
dark blue grey paint! The other is that I'd already glued the rudder actuator
bits to the blue area of the rudder and wasn't keen on removing them. Though I
trimmed the white stripe (it is too wide as it is), I found I didn't really need
to. I had feared that it would show through the red one, but while fiddling
around with the red stripe section, I noticed that no white showed through it. I
did use some setting solution on the red parts of the rudder stripes to force
them to snuggle down over the edges and stuff.
 Then I installed the exhaust
stubs. These babies are single exhaust stacks that have to be cut off the resin
backing and then stuck in the holes in the nose. They look nothing like what is
shown on the box art. They are very much like what I used on the
VG.33, also an Azur kit. However, they are not as they
are shorter and larger. There are little 'stops' inside the holes to fit these
exhaust. However, as they are, that makes them too long. There are two options.
One was to remove the little stops and carefully fit each stack in place with
semi-slow drying superglue. That is what I did. However, as I finished, I was
hit with the idea that one could have easily just glued them in and then sanded
them down to length with a sanding stick. Next time.......
Then I installed the exhaust
stubs. These babies are single exhaust stacks that have to be cut off the resin
backing and then stuck in the holes in the nose. They look nothing like what is
shown on the box art. They are very much like what I used on the
VG.33, also an Azur kit. However, they are not as they
are shorter and larger. There are little 'stops' inside the holes to fit these
exhaust. However, as they are, that makes them too long. There are two options.
One was to remove the little stops and carefully fit each stack in place with
semi-slow drying superglue. That is what I did. However, as I finished, I was
hit with the idea that one could have easily just glued them in and then sanded
them down to length with a sanding stick. Next time.......
|
CONCLUSIONS |
I must say that it is a very different airplane. It is actually quite large, thanks to those long gull wings. It required no more in the way of problem solving than most limited run kits and was actually much easier than most. MPM is slowly moving forward and the difference between its current crop of kits and those it started with is really startling. It is something I can recommend to those of you who some experience with these types of kits are able to do a bit of problem solving.
October 2002
Copyright ModelingMadness.com
Review kit courtesy of your editor and his odd penchant for equally odd aircraft.
Copyright ModelingMadness.com. All rights reserved. No reproduction in part or in whole without express permission from the editor.
If you would like your product reviewed fairly and fairly quickly, please contact the editor or see other details in the Note to Contributors.