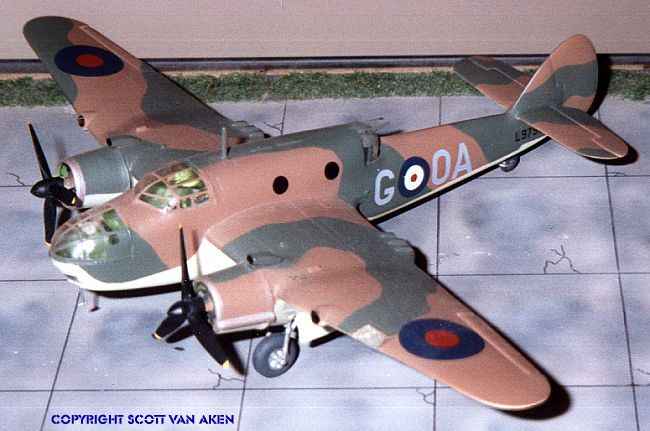
 Kit: Beaufort I
 Kit: Beaufort I
Scale: 1/72
Kit Number:
Manufacturer: unknown Russian/Frog
Price: 10 Pounds Sterling
Media: Injecte plastic
Decals: None
Date of Review: 30 Jan 98
Review and Photo by: Scott Van Aken
The Beaufort was a derivation of the Blenheim bomber designed specifically for Coastal Command. Among its abilities was that of a torpedo bomber, hence the enlarged fuselage. Many of the bits and pieces were directly from the Blenheim. The Beaufort saw much use in the early stages of the war in Europe and by the Australians in the middle and later stages of the Pacific War. It was also license built in Australia, where it gave sterling service.
The kit I bought in the UK in 1988 came wrapped in a plastic bag with no instructions and no decals. It also was greasy with mold release and had huge amounts of flash. However, it was a kit I knew I would build (eventually). That time came about 1992. When I finally got all the pieces washed off, it was time to attack the flash. It was extensive to say the least. In fact, just getting rid of the flash took several weeks of on and off scraping. Unfortunately, many of the more delicate parts succumbed to this effort including all the antennas and the braces between the landing gear legs. In these cases the flash was as thick as the parts, making clean separation nearly impossible.
Once cleaned up, what was there? Well, you had two engine cowlings that were conical in shape, clear parts that were way to big or too small for the openings they had to fit and a bunch of sink marks/mold release marks on all the parts. However, I was determined to add a Beaufort to my collection so I first got to work with the sink/mold marks with my trusty putty. After that was done, I painted the interior parts green and installed the seats and control sticks which made up the interior. Rather than go into great detail, I'll just mention that all the assemblies needed putty once joined. No part was particularly horrendous, although the engine nacelles needed several rounds to get a good shape.
Probably the most stressful part of the kit was the transparencies. The cockpit and nose ones were too wide and needed a lot of shaping to get close. The bomb aimer's window was too small so was firmly attached to one side of the nose and the gaps filled with white glue. The turret fit very tightly and has little in the way of guides for the framing, so an approximation was done from photos. The clear landing light lens was a disaster so was left off and replaced by tape when the kit was finished. All the smaller bits that had been destroyed in the flash removal were made from scrap plastic.
Once ready for painting, it was time to figure out what mark it was and find an appropriate scheme for it. Thanks to Scale Aircraft Modelling, I was able to determine that it was a mark I and to find an appropriate scheme. In this case it is a 22 Sq plane from the early war years. It was then painted in Gunze acrylics. All the serials and roundels were gleaned from the appropriate Modeldecal sheet. Those windows that were not included on the kit were reproduced in black decal.
Well, once done, I did have a sort of Beaufort to add to the shelves. Probably the most glaring error on the kit is the conical engine nacelles. I guess I could have built them up with putty and reshaped them, but I am not that much of a scratch-build modeller and my heart just wasn't into a lot of work on this kit. If you want one in 1/72, it is either this kit or one by High Planes (which is really limited run and may not be available). Overall, it is recommended only if you just have to have a 1/72 Beaufort and are willing to put in the work.
Those seeking any aftermarket sets, there is one.