|
PRODUCT: |
Just Plane Stuff 1/72 Modern Flight deck |
|
FOR: |
A variety of uses |
|
PRICE: |
$32.95 |
|
REVIEW BY: |
|
|
NOTES: |
Resin with etched brass |
If you have read the preview about this base, then you know that it is a pretty neat one. It is also incredibly easy to paint and get ready. Really, all you need to do, is to paint it and then stick on all the padeyes ( the little things used to attach tiedown chains to ).
Just to show you how simple it is, I decided to do this one. In terms of total time to finish, it took a few weeks. In total time spent on doing it, it was a few hours. Since most of the work involved painting, drying time had to be taken into consideration and that is what took all the time.
First step is to clean any remaining mold release oils off it. Do this using warm soapy water. Don't even think of getting the water hot as a sheet like this will warp in a heartbeat under hot water. If you do mess up, then quickly place the board on a flat surface and set something really heavy on it like a large book.
Once dry, then it is time to paint. Modern US carrier decks are painted with a black non-skid material. They are repainted very frequently and in real life, a roller is generally used as this stuff is pretty thick. What I did was just get normal old Testors Model Master flat black enamel and sprayed the entire surface. Then set it aside to dry.
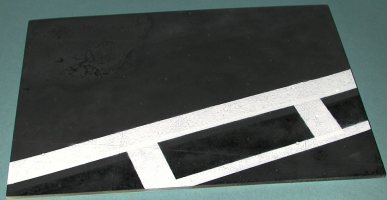
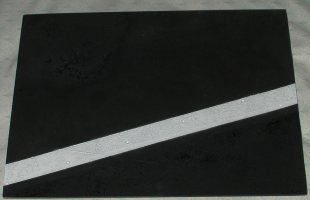
Using the photo that comes with it, I proceeded to paint the foul line (the white parts). This was done in three steps. First the big wide line, then the narrower line and finally the wide connecting lines. Don't sweat the actual dimensions unless you are really anal about it. There is a standardized size for these, but 99.95% of the people out there have no clue as to what it is and won't bother you about it. As you can see from the pictures below, it doesn't take long to have something that looks very nice. I used Testors Model Master gloss white, but a flat white would have worked just as well. I just didn't have any.
 |
 |
|
Now I had a basic painted deck section. The next thing to do was to paint all the padeyes. This was done by first lightly sanding the brass fret and then painting it with a light flat grey enamel. Doesn't matter what brand, just as long as it is an enamel. From my experience, acrylics don't seem to grab metal as well as enamels. Just make sure the coat of paint isn't too thick. Then paint the fret with your favorite white. Again, you want a rather thin mix to prevent clogging the detail. These padeyes didn't stay white for long, I can tell you. When repainted on the boat, they were not masked off, but just touched up with more white from a spray can.
Once you have the padeyes painted, the next thing to do is to remove them from the fret and glue them in place. Couple of things. First of all, you will be using superglue. Secondly, don't remove all the padeyes from the fret. JPS was nice enough to provide ten extras in case some of them disappeared into the carpet. I cut off three or four at a time until I got near the end. The parts are held on by very thin attachments and slight pressure on them with an Xacto knife blade tip is enough to cut them loose.
I used a toothpick to apply the superglue. Making a small puddle of glue on a sheet of glossy paper, I dipped the tip of the toothpick into the glue and made a circle of superglue around the indentation on the base. Then taking the wetted end of the toothpick, lifted up a padeye and simply placed it on top of the glue circle. I wetted the end of the toothpick by holding it in my mouth. What little saliva was on the end of the toothpick was enough to pick up the very light etched padeye. Using this method, it took about a half hour to place all the padeyes.
 |
|
Once the padeyes were all dry, the deck just looked too clean. First it was given a bit of a drybrushing using RLM 66 black grey, most of it going on the white parts to dirty them up a bit. Then most of the black areas was drybrushed very lightly with RLM 02 green grey. This brought out a lot of detail. The final step was to seal everything. I used both a clear gloss and a clear matte. Thing the deck is coated with non-skid, the deck also has a lots of oil, grease and other things on it that give it a sheen. Once that was done, so was the deck. Now all that has to be done is to have a border built for it or you can buy a 9x12 picture frame to put it in. Place an appropriate naval aircraft on it and you are done.
For those of us who are a bit lazy (OK, real lazy), these resin bases are just the perfect thing and something that just about anyone can do.
Review copy courtesy of Just Plane Stuff .
If you would like your product reviewed fairly and quickly by a site that has over 1,700 visits a day, please contact me or see other details in the Note to Contributors.