Wingnut Wings 1/32 Junkers J.1
| KIT #: | 32001 |
| PRICE: | $79.95 MSRP shipping, included |
| DECALS: | TFive options |
| REVIEWER: | Tom Cleaver |
| NOTES: | New mold kit |
| HISTORY |
It is incredible to consider that, within 13 years of the Wright
Brothers' first flight in 1903, an advanced all-metal airplane was in production
for operational use, but such are the exigencies of technological development in
wartime.
The stalemate on the Western Front after 1915 brought forth many creative
attempts to break through the defenses, which led to such technological
developments as the tank and the armored ground-attack airplane, of which the
Junkers J.I is the premiere example.
Professor Hugo Junkers had been convinced from the outset that aircraft
built of aluminum would be far superior to the wood and fabric airplanes that
dominated the early years of aviation.
He began experimenting with metal structures for aircraft as early as
1906 and had patented his corrugated skinning by 1913. In 1914, Junkers built
the first experimental J.1, a low-wing monoplane, which was ultimately developed
into the D.I single-seat fighter that saw operations at the very end of the war.
In 1916, in answer to a request for submissions by
Idflieg (Inspektion der Fliegertruppen ‑ "Inspectorate of
Flying Troops") for an armored airplane capable of making low-level attacks on
troops in forward trenches, Junkers responded with an airplane designated J.4.
It was a large sesquiplane, with an extremely advance armored “tub: that
ran from the engine firewall to just aft of
 the
gunner's cockpit, made of 5mm chrome‑nickel sheet‑steel, which gave complete
protection to the two man crew against any anti-aircraft weapon then in use.
The rest of the airframe including the forward fuselage, wings and
horizontal stabilizer were built of lightweight Duralumin alloy with Junker's
patented corrugated skinning. The rear fuselage aft of the cockpit and the
vertical fin and rudder were metal framed and fabric-covered; in later
production examples, the vertical fin and rudder would also be aluminum covered.
the
gunner's cockpit, made of 5mm chrome‑nickel sheet‑steel, which gave complete
protection to the two man crew against any anti-aircraft weapon then in use.
The rest of the airframe including the forward fuselage, wings and
horizontal stabilizer were built of lightweight Duralumin alloy with Junker's
patented corrugated skinning. The rear fuselage aft of the cockpit and the
vertical fin and rudder were metal framed and fabric-covered; in later
production examples, the vertical fin and rudder would also be aluminum covered.
The wings and tail were completely cantilever in structure and required
no bracing wires, while the fuselage was stressed monocoque construction. As a
result, what would be officially known as the J.I was technologically the most
advanced airplane in the world when it first flew in early 1917.
Although this unique design resulted in a strong and durable aircraft
that was capable of surviving enemy ground fire, the aircraft was heavy and so
cumbersome in its maneuverability that it gained the nickname on operations of
“Furniture Van” from its crews.
The J.I took forever to get off the ground, even powered as it was by the
200 h.p. Benz Bz.IV engine, the most powerful aero engine available in
The first tests of the J.4 were on
The J.I was reportedly well‑liked by its crews, and was first seen on
operations during the
 There were 227 J.I manufactured during the war, and there is no record of
any of them being shot down in combat.
Vizefeldwebel Robert Nieman of Flieger‑Abteilung A250
stated that the J.I could fly with 20cm holes in its wings, testimony to the
strength of this remarkable design.
There were 227 J.I manufactured during the war, and there is no record of
any of them being shot down in combat.
Vizefeldwebel Robert Nieman of Flieger‑Abteilung A250
stated that the J.I could fly with 20cm holes in its wings, testimony to the
strength of this remarkable design.
Interestingly, there is no surviving official documentation on the use of
the J.I in combat. One would think
that any Allied unit that experienced an attack from such a
seemingly-indestructible airplane capable of spreading destruction like the J.I
would have made at least some report of the event, but there is noting in the
records on either side.
One J.I survived in the
The main achievement of the J.I was that it proved all‑metal construction and the internally-braced cantilever wing were practical, paving the way for the eventual adoption of both these features in the production of subsequent military and civilian aircraft.
| THE KIT |
I first ran across the J.I way back in 1958, when I found the great
Harleyford book, “Aircraft of the 1914-1918 War.”
I always wanted a model of this fantastic-looking ugly airplane, but
failed to get any of those that have been released.
So far as I know, there was an expensive 1/48 resin kit released in the
1990s, and Eduard did a 1/72 kit.
Wingnut Wings burst on the scene this past May, and everyone took notice
of who was backing the company.
Peter Jackson, director of “The Lord of the Rings” trilogy and “King Kong,” is
known in aviation circles as the ulti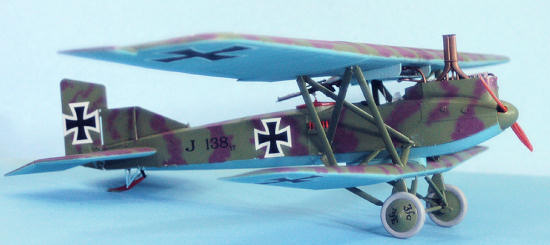 mate
World War I enthusiast. He owns
every original painting by noted Great War aviation artist Jim Dietz, and is
also owner of what might be the largest World War I “air force” in the world, a
series of dead-on 1:1 replicas created by his Vintage Aviator company, in
addition to an original Sopwith Camel.
mate
World War I enthusiast. He owns
every original painting by noted Great War aviation artist Jim Dietz, and is
also owner of what might be the largest World War I “air force” in the world, a
series of dead-on 1:1 replicas created by his Vintage Aviator company, in
addition to an original Sopwith Camel.
The Junkers J.I is the first of four kits that were released this summer,
to be followed at intervals by another eight.
The kits are amazingly well-designed and the intention is to take the
terror out of building a World War I airplane for the average modeler.
The instruction book booklet provides all the information one could ask
for regarding the original, with period photographs used throughout to
illustrate the project, and instructions that set a new standard for usefulness
and ease of use. I did, however,
find that there were a couple of places in the project where the construction
sequence should have been better-explained, which would have led to a much
easier completion of the model. I
have noted those places here in the construction review below.
The kit provides decals by Cartograf for five different aircraft, which cover the various differences in individual airplanes through the production run. (As a note, there is a preview in the archives. Ed)
| CONSTRUCTION |
 Overall, this kit is so well-designed that - if you follow the
instructions in the booklet and my notes here - any modeler who has yet to build
a World War I airplane can have an enjoyable experience and a very
distinctive-looking model as a result.
Overall, this kit is so well-designed that - if you follow the
instructions in the booklet and my notes here - any modeler who has yet to build
a World War I airplane can have an enjoyable experience and a very
distinctive-looking model as a result.
This kit, as with the others, comes with a beautifully-detailed engine.
In retrospect, I regret not opening at least one cowling panel to display
this model-in-itself, and suggest that you do so with yours.
Kit instructions would have you assemble the fuselage, then assemble the
wing center-sections, and attach them to the fuselage with their associated
struts. I disagree.
It is much easier to build both wings completely at the outset, which
will allow you to get a good fit with the outer sections.
The ailerons don't quite fit the upper wing, leaving a noticeable gap at
the inner edge. You can solve this
easily by cutting out a section of the aileron mass balance, to allow proper
fit. No one is going to be able to
“ding” you for wingspan if you do this, since there are no “J.I experten” out
there. This is much easier than
going out and buying the resin “correction piece” that was released this past
summer.
 Due to the airplane's configuration, once you have the upper wing on,
there is no way to see the detail in the pilot's cockpit.
As a believer in the dictum “If you can't see it, I didn't do it,” I
considered leaving things alone in there, but there is an opportunity to see
into the cockpit from the rear once the model is finished, that allows one to
see enough of the detail that you really should take the time to do it.
The only “hard part” in doing the cockpits was painting the “natural
wood” for the various panels inside the cockpit.
I painted the cockpit interior RLM 02 “Grau,” which is a color that has
been used by the German armed forces for nearly 200 years, and is very likely
the color used on the original. The
leather seats were done with Gunze-Sangyo “Mahogany” brown.
Due to the airplane's configuration, once you have the upper wing on,
there is no way to see the detail in the pilot's cockpit.
As a believer in the dictum “If you can't see it, I didn't do it,” I
considered leaving things alone in there, but there is an opportunity to see
into the cockpit from the rear once the model is finished, that allows one to
see enough of the detail that you really should take the time to do it.
The only “hard part” in doing the cockpits was painting the “natural
wood” for the various panels inside the cockpit.
I painted the cockpit interior RLM 02 “Grau,” which is a color that has
been used by the German armed forces for nearly 200 years, and is very likely
the color used on the original. The
leather seats were done with Gunze-Sangyo “Mahogany” brown.
Construction is almost fool-proof and you will know you have the parts in
the proper position when they “click” into place.
Do test-fit.
When it came to assembling the upper wing, I stupidly did it in the
“traditional” way of attaching the struts to the lower wing and then attaching
the upper wing. Wrong!! All of the
very nice positive-location pins for the struts are for attachment to the upper
wing. I strongly suggest that you attach the struts to the upper wing first,
which will have everything properly aligned.
Then let them set up nice and strong.
You will then have a pretty easy time attaching the upper wing to the
rest of the airframe. Again, study
where the struts go, and you will have no trouble here.
| COLORS & MARKINGS |
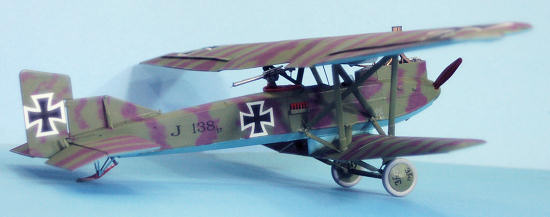
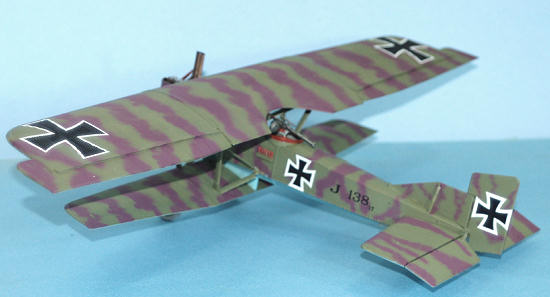
Painting:
 I painted the model when I had it in sub-assemblies of fuselage with tail
surfaces attached, lower wing, and upper wing.
I mixed a light blue using Xtracrylix “RLM 65" Hellblau with a Blau o4,
and some White, to match the color in the instruction book.
I found that the upper green color was a close match to Xtracrylix “RLM
83" Lichtgrun. I mixed the Mauve
color using Tamiya “Purple,” “Red” and some “White” for lightening it.
The tires were painted Tamiya “Sky Grey” and the prop was painted
Gunze-Sangyo “Wood Brown” with the lighter wood being a mixture of that color
and “Orange-Yellow.”
I painted the model when I had it in sub-assemblies of fuselage with tail
surfaces attached, lower wing, and upper wing.
I mixed a light blue using Xtracrylix “RLM 65" Hellblau with a Blau o4,
and some White, to match the color in the instruction book.
I found that the upper green color was a close match to Xtracrylix “RLM
83" Lichtgrun. I mixed the Mauve
color using Tamiya “Purple,” “Red” and some “White” for lightening it.
The tires were painted Tamiya “Sky Grey” and the prop was painted
Gunze-Sangyo “Wood Brown” with the lighter wood being a mixture of that color
and “Orange-Yellow.”
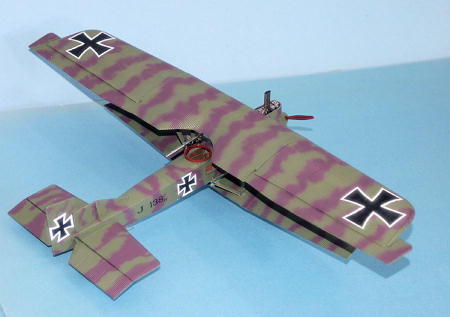
Decals:
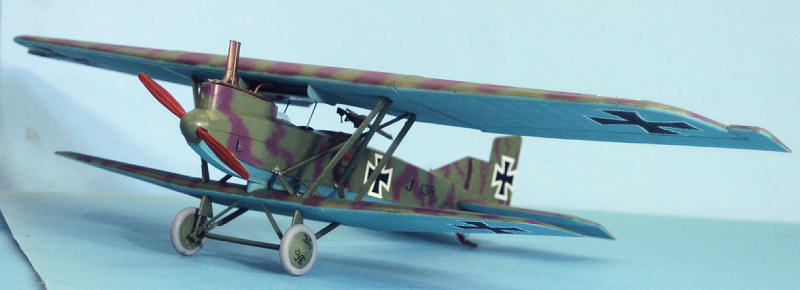
I did “138/17" from Flieger Abteilung 17. I found that the Iron
Cross insignia on the wings needed some extra help to settle into the corrugated
surfaces. I originally applied
Micro-Sol and let it set up, then sliced the decal where it did not settle in
with a #11 X-acto blade, then applied some Solvaset, which settled everything in
without problems. Once dry, the
model was given two coats of Xtracrylix Flat Varnish.
| FINAL CONSTRUCTION |
| CONCLUSIONS |
December 2009
If you would like your product reviewed fairly and quickly, please contact me or see other details in the Note to Contributors.