Roden 1/32 Albatros D.III (OAW)
|
KIT #: |
608 |
|
PRICE: |
$64.99 MSRP
|
|
DECALS: |
Four options |
|
REVIEWER: |
Tom
Cleaver |
|
NOTES: |
Eduard Photoetch set used. |
The Albatros series of fighters were the most advanced
fighters in the world at the time the D.I and D.II were introduced on the Somme
Front in the fall of 1916, setting the parameters for the next 20 years: two 30
caliber machine guns, a high speed, good maneuverability.
The airplanes were so advanced in comparison to their
British opponents that they transformed the air war on the Western Front.
Unfortunately, Idflieg,
the German Air Force high command, had been taken by the success of the French
Nieuport series of sesquiplanes that had ended the “Fokker Scourge” in early
1916.
As a result, all German aircraft manufacturers were instructed to
produce sesquiplanes, no matter the fact that the design really only worked with
a low-powered, lightly-loaded airplane.
This was just what the Albatros wasn’t, but the company
proceeded to convert their very successful, heavy, highly-loaded, fast biplane
to a sesquiplane.
This crippled the design for the rest of its service
through to the end of the war.
 In response to Idflieg,
Albatros began work on the prototype D.III in late July or early August 1916,
with the first flight of the prototype most likely occurring in September 1916.
The D.III used the same semi-monocoque plywood skinned
fuselage of the D.I and D.II.
The D.III adopted a sesquiplane wing design with an
extended upper wing, while the lower wing was reduced in chord with a single
main spar.
After a Typenprüfung on
September 26, 1916, Idflieg ordered 400
D.IIIs, at the time the largest German production contract.
In response to Idflieg,
Albatros began work on the prototype D.III in late July or early August 1916,
with the first flight of the prototype most likely occurring in September 1916.
The D.III used the same semi-monocoque plywood skinned
fuselage of the D.I and D.II.
The D.III adopted a sesquiplane wing design with an
extended upper wing, while the lower wing was reduced in chord with a single
main spar.
After a Typenprüfung on
September 26, 1916, Idflieg ordered 400
D.IIIs, at the time the largest German production contract.
The first D.IIIs entered squadron service in December
1916 with “Jasta Boelke.”
Early aircraft had a centrally-mounted radiator that
could scald the pilot if it was hit, which was changed after the production of
290 D.IIIs.
More seriously, the weakness of the wing was soon apparent.
While suspicion centered on the strength of the wing,
the truth was that the spar was too far aft, which induced aerodynamic twisting
under aerodynamic loads.
This was unknown throughout the production of the D.III
and the later D.V, which meant that pilots were forced to handle their airplanes
with restraint - exactly what isn’t wanted in a fighter.
The situation was so bad in January 1917 that the D.IIIs
were grounded until Albatros could produce a specially strengthened wing (which
didn’t solve the problem since the basic design was wrong).
The D.III was reinstated as being airworthy just in time
to become the killer of “Bloody April.”
The Allies were still using the Nieuport 17 and SPAD VII
and Sopwith Pup, which were excellent fighters when introduced in 1916 but were
already considered due for replacement.
Almost the only Allied fighter that could oppose the
Albatros without restriction was the Sopwith Triplane and outside of a few of
these equipped with two guns (with a degradation of performance as a result)
even the Tripehound was
 not fully
equal to the Albatros “V-Strutter” as D.III was known to the RFC. Fortunately
for the allies, good as it was, the D.III could always be outfought by an Allied
fighter whose pilot wasn’t afraid to throw the controls around.
Due to this aerodynamic problem, pilots like Manfred von
Richtofen created what would become the really effective style of air combat:
rather than dogfighting the opponent and giving him an even chance, they learned
to ambush the enemy, taking him out with a surprise attack from above, diving
away immediately, which didn’t put the Albatros at risk of structural failure.
“Beware the Hun in the sun!”
not fully
equal to the Albatros “V-Strutter” as D.III was known to the RFC. Fortunately
for the allies, good as it was, the D.III could always be outfought by an Allied
fighter whose pilot wasn’t afraid to throw the controls around.
Due to this aerodynamic problem, pilots like Manfred von
Richtofen created what would become the really effective style of air combat:
rather than dogfighting the opponent and giving him an even chance, they learned
to ambush the enemy, taking him out with a surprise attack from above, diving
away immediately, which didn’t put the Albatros at risk of structural failure.
“Beware the Hun in the sun!”
Albatros built 500 D.IIIs at the Johannistal factory
before transferring all D.III production to their subsidiary, the
Ostdeutsche Albatros Werke, where the D.III
remained in production until December 1917.
OAW had a reputation for quality work, and it was
generally conceded that the D.III (OAW) was superior to the original product,
and was the best German fighter prior to the introduction of the Fokker D.VII.
The OAW-built D.III was so good that as of August 31,
1918, there were still 54 of them in front line service on the Western Front.
As Kyle Bodily said in his original review of the Roden
1/32 Albatros D.III, it was only a matter of time before the D.I, the D.II and
the D.III (OAW) appeared.
The D.I showed up two months ago, here now is the D.III
(OAW). Can the D.II be far behind?
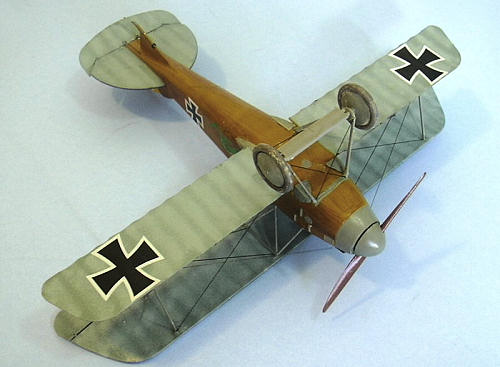
 This kit differs from the original D.III kit primarily
in having only one upper wing, with the offset radiator, and the larger rounded
rudder that visually distinguished the D.III (OAW).
Decals for four aircraft are provided, including the
boxart airplane that is alleged to have been flown by Ltn. Josef Loeser on the
Italian Front, surely one of the most colorful German fighters of the entire
war.
This kit differs from the original D.III kit primarily
in having only one upper wing, with the offset radiator, and the larger rounded
rudder that visually distinguished the D.III (OAW).
Decals for four aircraft are provided, including the
boxart airplane that is alleged to have been flown by Ltn. Josef Loeser on the
Italian Front, surely one of the most colorful German fighters of the entire
war.
People have complained that the Roden kits have doubled
in price in the past couple of years.
I queried Roden about this, and was informed that we in
the West should be aware that at the time of the orange Revolution, the Russians
- who supply all the oil and natural gas energy used in Ukraine - more than
doubled the price they had been charging for these energy essentials.
This price increase has filtered through the entire
Ukrainian economy, and has been felt most especially in plastics, where the
increase in cost for the basic materials, for the production materials, and for
transportation, are all highly reactive to such a price increase.
As Kyle Bodily described it so well, the Albatros D.III
is a “fiddly” kit to assemble.
 I found it advisable to assemble the interior structure
with cyanoacrylate glue, to insure proper positioning of the parts and solid
structure.
Other than that, taking the time to assemble things carefully
will insure good results.
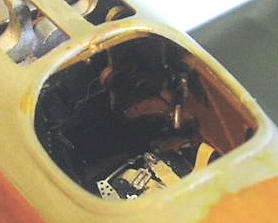
I regret not having photos of the interior, but it
turned out I needed to replace the camera batteries, as I discovered when the
photos taken of the early process didn’t turn out when downloaded.
I also found the Eduard photoetch set, with its
pre-painted seatbelts and instrument faces, made an improvement on the interior.
I found it advisable to assemble the interior structure
with cyanoacrylate glue, to insure proper positioning of the parts and solid
structure.
Other than that, taking the time to assemble things carefully
will insure good results.
I regret not having photos of the interior, but it
turned out I needed to replace the camera batteries, as I discovered when the
photos taken of the early process didn’t turn out when downloaded.
I also found the Eduard photoetch set, with its
pre-painted seatbelts and instrument faces, made an improvement on the interior.
 Getting the fuselage seam completely filled after
assembling the fuselage halves is extremely important since any remainder of the
seam will be obvious when one does a natural wood finish to the fuselage
exterior.
I have concluded the best way to fill seams on limited-run kits
(and while they are well-produced, the Roden kits are closer to limited-run kits
when it comes to assembly than they are to Tamigawa kits) is to use
cyanoacrylate glue and let it dry on its own, resulting in a smooth surface that
needs only a minimum of sanding afterwards to get a smooth finish.
Getting the fuselage seam completely filled after
assembling the fuselage halves is extremely important since any remainder of the
seam will be obvious when one does a natural wood finish to the fuselage
exterior.
I have concluded the best way to fill seams on limited-run kits
(and while they are well-produced, the Roden kits are closer to limited-run kits
when it comes to assembly than they are to Tamigawa kits) is to use
cyanoacrylate glue and let it dry on its own, resulting in a smooth surface that
needs only a minimum of sanding afterwards to get a smooth finish.
Once the fuselage was assembled, the rest of the
assembly was easy.
I attached the horizontal stabilizer and lower wing,
then proceeded with painting.
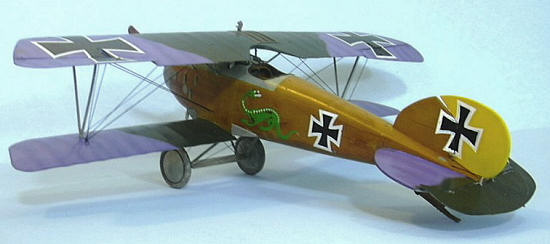
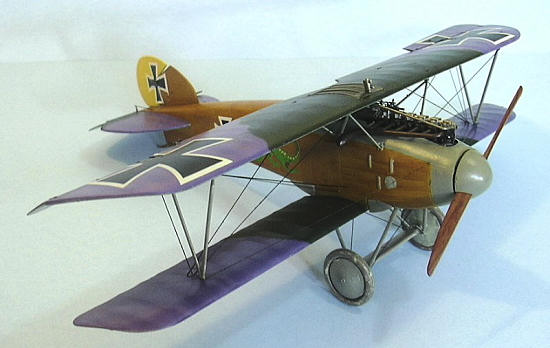
Painting:
I created a “wood color” by mixing Gunze “Medium Wood”
with Gunze “Orange-Yellow” to get a honey-brown color.
I applied that to the interior before assembly, followed
with a coat of Tamiya “Clear Yellow” for the varnish.
I did the same with the exterior,
 with the
addition of dry-brushing thinned Tamiya “Hull Red” for the “wood grain effect” I
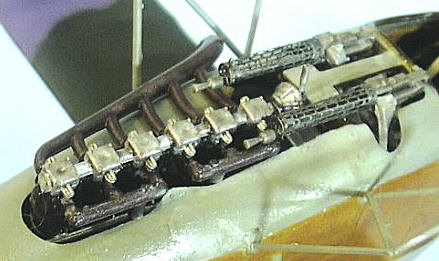
wanted. I painted the wings and horizontal stabilizer and the metal cowling,
masking them off before painting the wood effect on the fuselage.
I used Tamiya “Purple” and “Dark Green” for the upper
camouflage colors, and Tamiya “Light Blue” for the lower surfaces.
I mixed some Tamiya “RLM Grey” with “Sky Grey” and
“White” to get the “greenish-grey color that was used on the Albatros, which was
painted on the cowling, the various inspection panels, the struts and landing
gear.
The model was then given a coat of Future overall.
with the
addition of dry-brushing thinned Tamiya “Hull Red” for the “wood grain effect” I
wanted. I painted the wings and horizontal stabilizer and the metal cowling,
masking them off before painting the wood effect on the fuselage.
I used Tamiya “Purple” and “Dark Green” for the upper
camouflage colors, and Tamiya “Light Blue” for the lower surfaces.
I mixed some Tamiya “RLM Grey” with “Sky Grey” and
“White” to get the “greenish-grey color that was used on the Albatros, which was
painted on the cowling, the various inspection panels, the struts and landing
gear.
The model was then given a coat of Future overall.
Decals:
I had planned to do the Albatros flown by Erich
Lowenhardt, but just after applying the fuselage insignia and the “snake”, the
youngest feline jumped on the workbench, and as I grabbed at the model to be
sure it didn’t bounce off the workbench from her arrival, I grabbed the fuselage
right over the setting decals, thus creating a worse disaster than what I was
attempting to prevent.
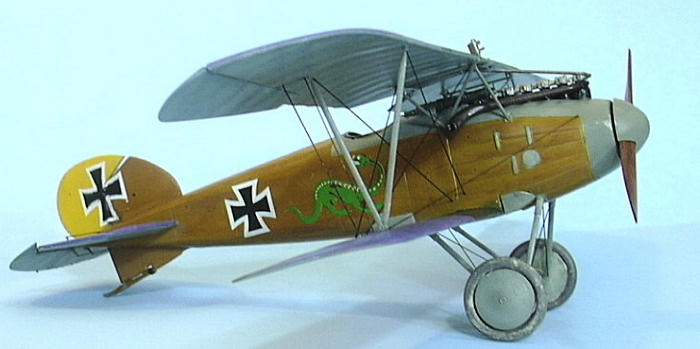
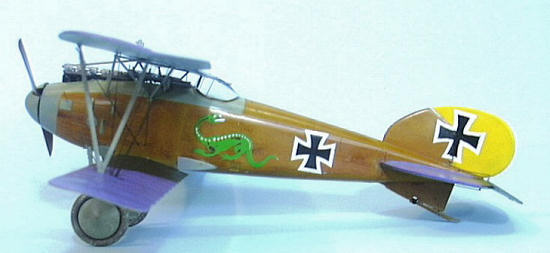
Fortunately, the other decals for the unknown “Green
Dinosaur” airplane were still available.
Other than the self-induced operator error, the decals
went down without problem and the white areas are opaque enough to remain white
over darker surfaces without problem.
When the decals were set, I washed the model and then
gave it an overall coat of Xtracrylix “Satin” varnish.
I attached the landing gear, then the cabane and
interplane struts, with cyanoacrylate glue.
I attached the upper wing, and then proceeded to rig the
model with .010 wire.
The rigging was useful in making the model “solid” since
the landing gear and struts are thin, which makes them a bit weak on a large
1/32 scale model without additional bracing, which the wire provided.
 For those World War I modelers who want a kit that can
produce a great model out of the box, or provide the basis for a real
show-stopper without that much extra effort, these Roden 1/32 World War I kits
are great.
They are simple enough that a modeler who hasn’t done a World War
I modeler before can approach them with confidence of producing a successful
model if they take their time, while providing excellent, accurate detail.
I have always thought that 1/32 was the perfect scale
for World War I models, and these kits prove me right.
The Albatros series are some of the best-looking
airplanes of the First World War and this kit doesn’t disappoint. Highly
recommended.
For those World War I modelers who want a kit that can
produce a great model out of the box, or provide the basis for a real
show-stopper without that much extra effort, these Roden 1/32 World War I kits
are great.
They are simple enough that a modeler who hasn’t done a World War
I modeler before can approach them with confidence of producing a successful
model if they take their time, while providing excellent, accurate detail.
I have always thought that 1/32 was the perfect scale
for World War I models, and these kits prove me right.
The Albatros series are some of the best-looking
airplanes of the First World War and this kit doesn’t disappoint. Highly
recommended.
Review kit courtesy of
Roden.
Tom
Cleaver
September 2008
Copyright ModelingMadness.com
If you would like your product reviewed fairly and fairly quickly, please
contact
the editor
or see other details in the
Note to
Contributors.
Back to the Main Page
Back to the Review
Index Page 2019