1/72 Sikorsky Le Grand Vityaz
| KIT #: | |
| PRICE: | $7.50 or so for the donor kit |
| DECALS: | None |
| REVIEWER: | Chris Peachment |
| NOTES: | Maquette Muromets kit used as the donor |
| HISTORY |
The Sikorsky Russky Vityaz or Russian Knight, previously known as the
Bolshoi Baltiski (The Great Baltic) was the first four-engine aircraft in the
world, designed by Igor Sikorsky and built at the Russian Baltic Railroad Car
Works in St Petesburg in early 1913. Which may explain why the cabin looks a
little like a railway coach.
Sikorsky conceived the S-21 design in 1911, when no aircraft could lift
more than 1,300 lb. On hearing about the construction of the Russky Vityaz,
aviation experts were predicted a complete failure. However, the first flight of
the Russky Vityaz on 10 May 1913 was successful. At the time, people outside
Russia believed it to be a hoax.
 The
Russky Vityaz was a four-engine multi-bay biplane with unequal-span wings. Its
fuselage was a girder of rectangular section, covered with plywood. The aircraft
had two passenger cabins with a storage room for spare parts. There was also an
open area in front of the cockpit with a pilot's searchlight and machine gun.
The first four-engined version of what was to become known as the Russky Vityaz,
when it was known as the Bolshoi Baltisky, was powered by four engines installed
in tandem pairs, one behind the other in a push-pull arrangement.
The
Russky Vityaz was a four-engine multi-bay biplane with unequal-span wings. Its
fuselage was a girder of rectangular section, covered with plywood. The aircraft
had two passenger cabins with a storage room for spare parts. There was also an
open area in front of the cockpit with a pilot's searchlight and machine gun.
The first four-engined version of what was to become known as the Russky Vityaz,
when it was known as the Bolshoi Baltisky, was powered by four engines installed
in tandem pairs, one behind the other in a push-pull arrangement.
But the whole project was originally designed as a two-engine plane,
known as Le Grand. The Russkiy Vityaz moved the twin pusher engines from the
Bolshoi Baltisky's layout onto the leading edge of the lower wing as tractor
configuration powerplants, outboard of the original inner tractor configuration
engines.
After the Russky Vityaz's first flights in May 1913, passengers could
walk around the cabins without causing any problems to stability. The aircraft
took off after a 2,300 ft run.
However the Russky Vityaz was short-lived. In a bizarre accident, a
passing Morane shed its engine onto the parked Vityaz and the damage was
irreparable.
Sikorsky decided not to repair the Russky Vityaz and began
working on his next brainchild, the massive Ilya Muromets.
| THE KIT |
I had first built the Maquette kit about 10 years ago, and it proved to
be the usual sort of Russian kit with struts made of two by four timber, and a
general agricultural look about it. Still, I was fond if it, as I recall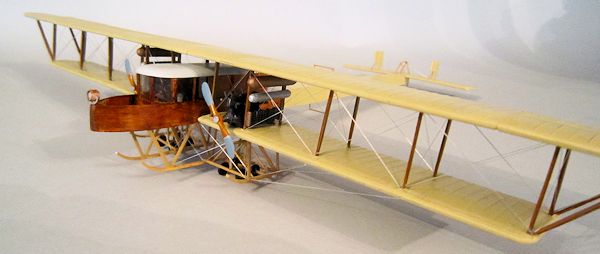 ed
seeing a MIG 21 at the Farnborough Air Show before the end of the Cold War,
which looked like it had been made of welded tin cans. Russia has a habit of
making things cheap and cheerful.
ed
seeing a MIG 21 at the Farnborough Air Show before the end of the Cold War,
which looked like it had been made of welded tin cans. Russia has a habit of
making things cheap and cheerful.
I saw another one recently at one of the few model shops left in London,
over at West Drayton, near Heathrow, and decided to splurge £5 (about $7.50) on
it and see what I could use it for. A little research proved that Sikorsky's
earlier experiments were a possibility. And since there was no Le Grand left in
existence, the least I could do was model one.
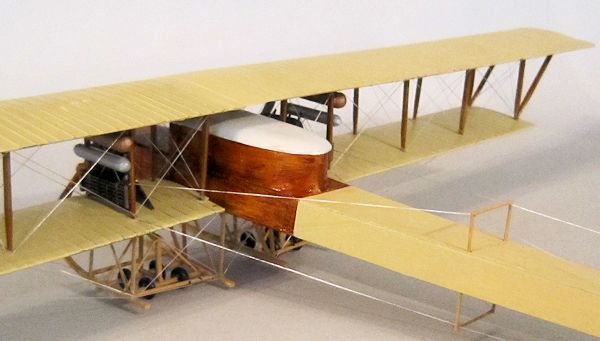
| CONSTRUCTION |
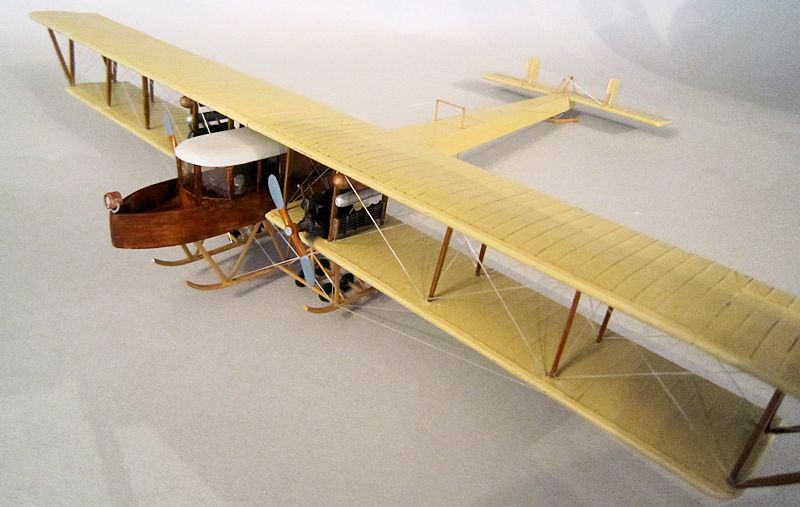
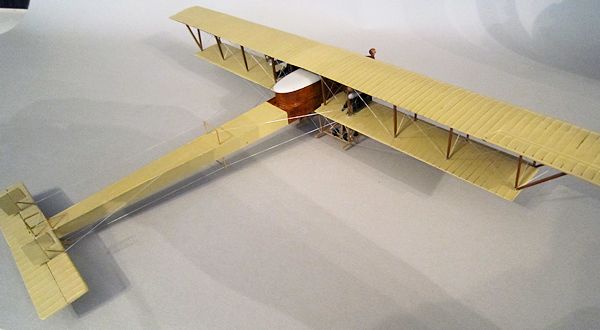
Work began on the wings, which aren't too bad in that they have all the ribs neatly defined. Both sets of wings need to be shortened in length and chord and the ailerons need to be sanded down to a rectangular shape. Care and attention must be paid to the leading and trailing edges, both of which resemble planks.
| COLORS & MARKINGS |
That was the easy part, and the wings were given a coat of medium brown,
followed by several coats of Vallejo bei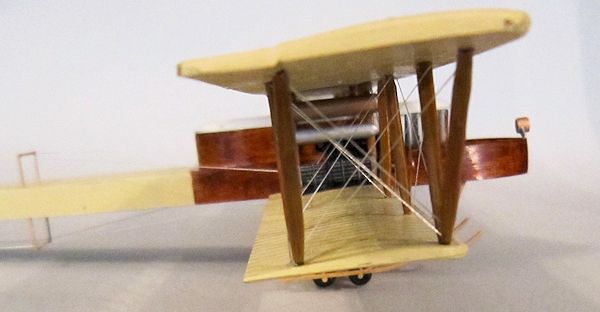 ge.
Once dry it was lightly sanded down to reveal the brown underneath, just to give
some definition to the ribs.
ge.
Once dry it was lightly sanded down to reveal the brown underneath, just to give
some definition to the ribs.
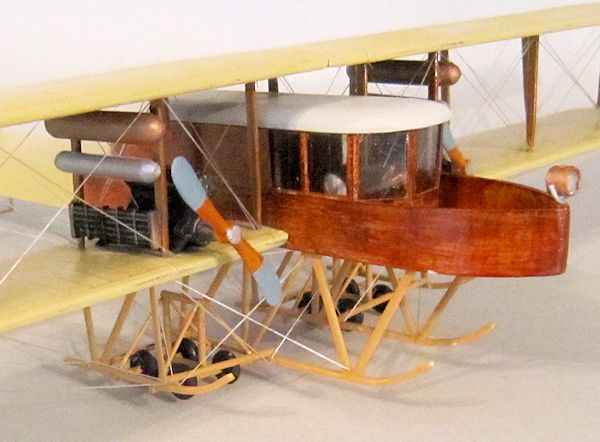
Now the testing part begins. Mercifully the fuselage is of simple
rectangular section, with no compound curves. Once you have the floor and sides
in place, then the upper deck can be cut to just behind the cabin. A couple of
coats of beige followed. The cabin sides were then cut from 20 thou plastic
cards, and the forward windscreens likewise, arranged at the right angles to
form the nose of the cabin. The whole cabin area, including the forward open
deck was given a coat of light brown. This was then dry brushed with darker
brown for a wood grain effect, and the whole given a coat of Tamiya Clear
Orange.
| MORE CONSTRUCTION |
There is a model of the 4 engined version on one of the websites below
which has the fuselage made of the cedar lining from cigar boxes. I don't know
how accurate this is in terms of grain, but I bet that the model smells nice.
I butt glued the lower wings onto the fuselage and put a couple of
holding rods through the sides of the cabin, since they would be hidden. I used
the interplane struts from the kits, but they have to shortened and sanded back
to their aerofoil
shape, which, given there are 12 each side, is quite a
chore. Once
 given the
wood grain effect, they were cemented in place on the lower wings and left to
dry. And of course you are going to have to re-drill all the location points,
according to the plans, and fill in all the old ones. Same with the upper wings.
At least there are no cabane struts.
given the
wood grain effect, they were cemented in place on the lower wings and left to
dry. And of course you are going to have to re-drill all the location points,
according to the plans, and fill in all the old ones. Same with the upper wings.
At least there are no cabane struts.
Lower the upper wing in place and leave for a couple of days to dry.
This beast may look robust, but it needs a lot more handling before it is
finished.
Leave the cabin for the moment, and turn it upside down, take a deep
breath and a glass of something fortifying, and then start cutting Contrail
struts material for the undercarriage. I cannot begin to describe how complex
this is, just take long and hard looks at the plans and any photos you can find.
Eight small wheels, which I guess were once tail wheels were found in the spares
box, and painted. They were threaded onto plastic rod axles. Once the whole set
up is in place, you can begin to rig it, with elastic thread and super glue. It
took me three seconds to type that sentence and 7 days to get it done. Once
finished, you can sit back and remember the old dictum from the WWI riggers who
used to work on the DH-2. One they had finished they would release a bird inside
the rigging, and if it got out alive, then there was a wire missing. And after
that, you can do the same to the wings, which are a milk run compared to the
undercarriage.
You are more than halfway there now. The tail plane can by butchered out
of the Muromets set, using a razor saw and
your fine honed surgical skills. Then attack it all with
the most brutal sanding stick you have and finally polish it all with something
more gentle. The two fins were also cut down from the originals, although I am
coming to think that the first experiments with this aircraft had no rudders,
but relied on the ailerons for all stability. Yet one more reason not to go up
in the thing. The tail skid was
 constructed
from thin rod, as were the two odd square rigging supports on top and below the
fuselage. Rig them, using the plans.
constructed
from thin rod, as were the two odd square rigging supports on top and below the
fuselage. Rig them, using the plans.
Now turn to the cabin. I could find no references for the pilot's
controls, and so used the one from the Muromets which is a crude rig with a big
steering wheel on top and a seat. This goes centre stage, and then the glazing
can be added from clear plastic sheet. Mine had a few scratches, but then I bet
the original's did too.
Finally the cabin needs a lid. I toyed with all sorts of ideas here for
the pagoda like top, including balsa and crash moulding, but finally settled for
two layers of thick card glued together and sanded to shape. And very
therapeutic it was, sanding away for hours with one eye gazing out the window
and the dust gathering in a thick carpet around my feet. Give the canopy a coat
of light grey and glue on top of the cabin.
Then make some engines. The kit's four engines are in fact rather good,
but they are 6 cylinder, and the Le Grand used four cylinder Argus engines, so I
reduced their length (much cutting and cursing) and used only four exhaust
pipes. You won't need the curious long intake pipes above the engine either.
Fitting the engines meant cutting out a couple of my rigging wires, for which I
wept salt tears. And then those curious cylinders above the engine can be made.
The upper ones are the fuel tanks and I used the kit's ones, but with rounded
ends, painted copper.
The two lower cylinders are, I would guess, header tanks for the
radiators, and these were made from thick sprue and painted silver. They are
mounted on the struts, outboard of the engine. As is the radiator on each side,
painted black with some gunmetal dry brushing.
The two propellors from the kit were carefully painted in wood, with
grey bandages on the outer length of the blade. Once glued in place, I then
realised that they would slice neatly through the cabin and gut the pilot. So
off they came and they were cut down to the right size, sanded back, and
repainted.
Now
the piece de resistance, the coup de grace, the icing on the cake. Ahead of the
cockpit cabin is an open area, rather like the decking ahead of a ship's bridge.
You can see from photos of the time that t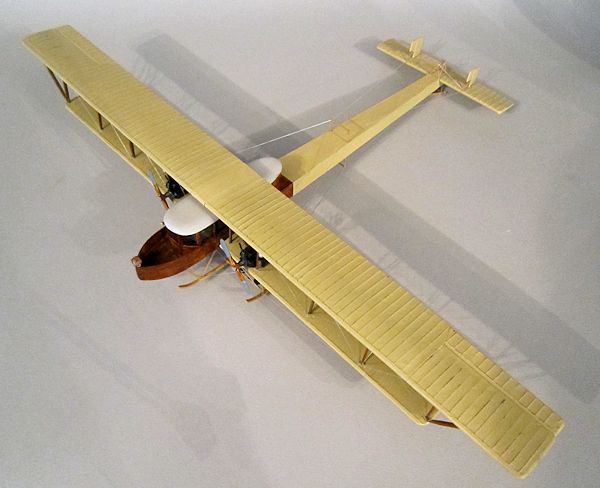 he
crew liked to stroll around on it, taking the air. And there is a searchlight.
What it was used for one can only guess. Illuminating possible targets perhaps?
Or maybe just handy for a little sight seeing if you are touring at night.
he
crew liked to stroll around on it, taking the air. And there is a searchlight.
What it was used for one can only guess. Illuminating possible targets perhaps?
Or maybe just handy for a little sight seeing if you are touring at night.
Anyway, I had nothing in the spares box. So one was made up of a length
of sprue with a rounded end for the lens, carefully wrapped in thin card for the
searchlight casing, and with another rectangle
of card on top for whatever that thing on top it is that
searchlights have. Ventilation perhaps?
The support was put together from thin rod, a post for it was mounted in
the nose, made out of plastic tube, and, once inserted, I have a tiny
searchlight which rotates. When I do the whole thing again in 10 years time, I
must make one which will swivel up and down too. I wouldn't hold your breath in
the meantime.
| CONCLUSIONS |
Draw your own conclusions. If you are looking for a challenge or feeling
terminally masochistic, then find one of the old Ilya Muromets kits and dive in.
Alternatively stick to those excellent Hobbyboss snap fit kits.
December 2013
If you would like your product reviewed fairly and fairly quickly, please contact the editor or see other details in the Note to Contributors.