Eduard 1/48 Nieuport 17
|
KIT # |
8033 |
|
PRICE: |
$29.95 |
|
DECALS: |
See review |
|
REVIEWER: |
|
|
NOTES: |
Profipack version |
|
HISTORY |
 Having only been back into modeling for
a couple of years now I have been struggling along, and looking at
everything that is available on the WEB. One thing that struck me was
how elegantly detailed guys were able to make WW I aircraft. As I was
barely able to get a Mustang finished and looking good, I thought no
way. Well, it isn’t as nice as some I have seen, even in the reviews
here, but I would like to think that this review is proof that two wings
DON’T make for disaster. I hope this review helps convince someone else
like me that it is possible.
Having only been back into modeling for
a couple of years now I have been struggling along, and looking at
everything that is available on the WEB. One thing that struck me was
how elegantly detailed guys were able to make WW I aircraft. As I was
barely able to get a Mustang finished and looking good, I thought no
way. Well, it isn’t as nice as some I have seen, even in the reviews
here, but I would like to think that this review is proof that two wings
DON’T make for disaster. I hope this review helps convince someone else
like me that it is possible.
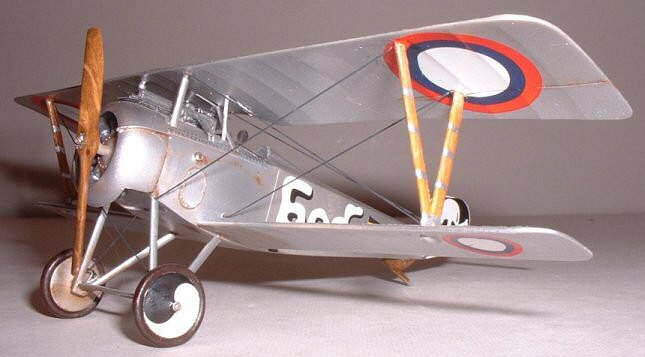
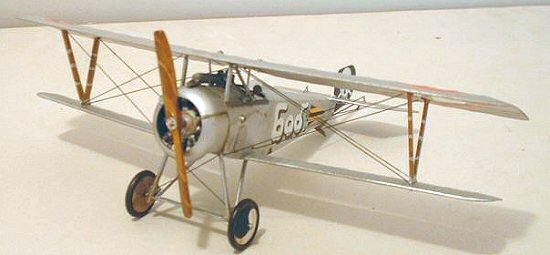
(Willfully cribbed from Eduard’s liner notes) The Nieuport 17 C1 appeared at the front in the beginning of May 1916. It was a successful follow up of Niueport’s previous sesquiplanes (a biplane that’s lower wing is less than 50% of the area of the upper wing). The new design was very successful, and was put into the service of many countries.
|
THE KIT |
On opening the box, one is greeted with two sprues of beautifully molded plastic, a small etched fret, two film windscreens, and a decal sheet from Aeromaster with 5 schemes. The instructions are, with only a couple of exceptions, very clear and easy to follow. There is a separate painting and decaling guide covering four of the schemes.
I had previously heard only good, or even great things about Eduard’s more current offerings. Comparisons are often made to Tamiya and Hasegawa. While it isn’t quite a case of shake the box and out comes a completed model, it did go together very well. A dry fit of the fuselage and lower wing revealed some fit problems, but nothing some sanding and a very small amount of filler wouldn’t cure.
|
CONSTRUCTION |
Because there are multiple wings, and they stack, and there are decals and painting to attend to, be ready to do some things “out of order”. For that reason, I have not structured this review in the MM typical format of construction, painting, and final bits. I hope it makes sense to you.
Why break any more rules? Not me. It is my first model of a plane with more than just a port and starboard wing and more rigging than an antenna wire. So I started with the cockpit. First up is painting. The visible portion of the interior, and anything made of wood, was brush painted with Model Master Wood and left to dry. While that stuff was drying, I turned my attention to the etched seat. I rolled the back around the handle of my exacto knife, bent the tabs under the seat bottom, and ran some thin super glue under them. Presto, my first bit of photo etch successfully used. It was then painted wood and left to dry.
 Word of warning here, if you are like me, the seat
will be the last easy bit of photo etch for a while. I still haven’t
quite got the knack of getting just the right amount of glue to just the
right place at just the right time. I did have my best success using the
clipped eye of a sewing needle as an applicator. But I still glued my
fingers together or to the part more often than I glued the part where it
was supposed to go.
Word of warning here, if you are like me, the seat
will be the last easy bit of photo etch for a while. I still haven’t
quite got the knack of getting just the right amount of glue to just the
right place at just the right time. I did have my best success using the
clipped eye of a sewing needle as an applicator. But I still glued my
fingers together or to the part more often than I glued the part where it
was supposed to go.
Anyway, buy now the “wood” parts had dried, and I went back over them with various darker brown enamels to get a bit of wood grain. My results were not spectacular, but there really isn’t that much clearly visible anyway and it makes a great place to practice painting wood grain. The cockpit was fully assembled, the lap belt painted and put in place, and the fuselage was ready to be closed up. Don’t forget to open up the holes for the gun support (part # A 25). Actually this is one of the places I had to think about the instructions. From the diagrams it takes a minute to get all the parts oriented in your mind and “see” where the piece is supposed to end up. A couple of dry fits, and another minute looking at the sketch, and it becomes clear. Just remember, dry fit twice, glue once.
The fuselage halves were glued together working slowly to make sure they were as well aligned as possible and surprisingly, I didn’t really miss not having any locating pins. I had a bit of a problem on the bottom of the fuselage, but figured better there than on the topside. Once the fuselage was pretty well cured (read, when I got home from work the next day) I glued the lower wing into place. Again, there were some minor fit issues, but with some dry fitting, sanding, and just a bit of putty at one wing root, everything looked pretty good and straight.
|
CAMOUFLAGE & MARKINGS |
 I figured I wasn’t even half done, and it was time
to paint. The fuselage, wings, and tail planes got a coat of Tamiya
Chrome Silver to replicate the standard aluminum dope. The forward third
of the fuselage got a coat of Model Master buffing Aluminum metalizer
(small mistake, more on this later). And the landing gear struts and
cowling got a coat of Model Master non-buffing steel for variety.
Although it doesn’t show up well in photo’s there is a nice subtle
difference in all three that make the model look more real to me than if
it had been all one finish. The rudder got shot with Polly Scale Reefer
White. The small mistake was in not sealing the metalizer. By the time
I was done, just a bit had worn away at the front end of the fuselage.
Not enough to make it worth masking and re-painting, but just enough so
that if I look close I notice. Drat, it really is as delicate as they
say it is. Next time I will try Alclad. The final touch was the tape
and stitching on the forward end of the fuselage where the sides meet the
top. I painted the tape a light gray and dry-brushed the stitching or
wiring a darker gray.
I figured I wasn’t even half done, and it was time
to paint. The fuselage, wings, and tail planes got a coat of Tamiya
Chrome Silver to replicate the standard aluminum dope. The forward third
of the fuselage got a coat of Model Master buffing Aluminum metalizer
(small mistake, more on this later). And the landing gear struts and
cowling got a coat of Model Master non-buffing steel for variety.
Although it doesn’t show up well in photo’s there is a nice subtle
difference in all three that make the model look more real to me than if
it had been all one finish. The rudder got shot with Polly Scale Reefer
White. The small mistake was in not sealing the metalizer. By the time
I was done, just a bit had worn away at the front end of the fuselage.
Not enough to make it worth masking and re-painting, but just enough so
that if I look close I notice. Drat, it really is as delicate as they
say it is. Next time I will try Alclad. The final touch was the tape
and stitching on the forward end of the fuselage where the sides meet the
top. I painted the tape a light gray and dry-brushed the stitching or
wiring a darker gray.
|
CONSTRUCTION |
Now it was time to think about rigging. Having read some reviews, I knew I had some holes to drill. No big deal, it’s just easier to do it now that when everything is complete. A slightly bigger deal was the etched control line horns. I found the best way of dealing with them was to drill small holes so the little tabs on them had somewhere to seat. A little super glue, and there they are.
At this point the Vickers gun was installed on the front of the fuselage. I painted it Tamiya Metallic Grey and dry brushed it with silver. The end of the barrel got drilled out and the shell ejector chute and ammo belt were added. Again, my difficulties with etch struck, and quite frankly by the time I got the comb shaped piece (PE 26) on top of the breech end, well it is a nice blob!
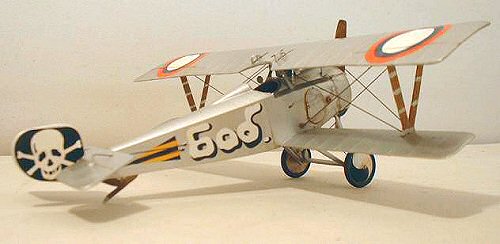
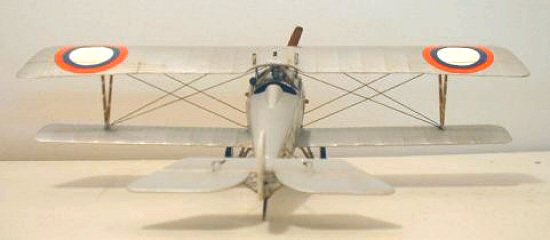
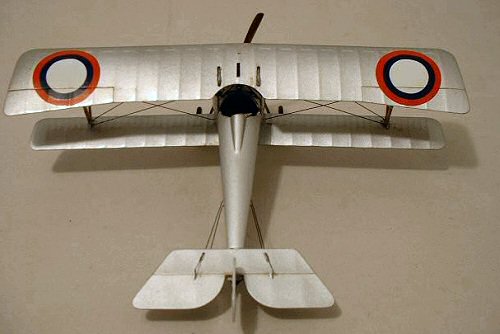
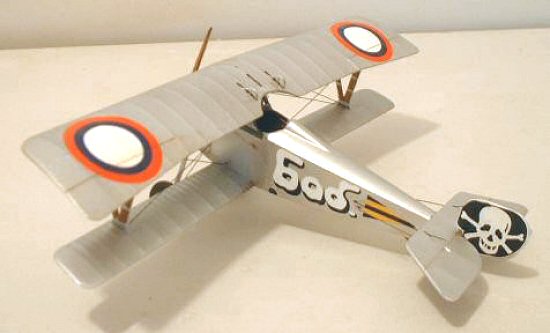 Finally, the moment of truth, the upper wing. Wait,
don’t glue it yet, you almost forgot the roundels on the bottom of the
upper wing. Not only will they be a real chore to get in place after the
wing is on but the interplane struts mount inside them. And here I was
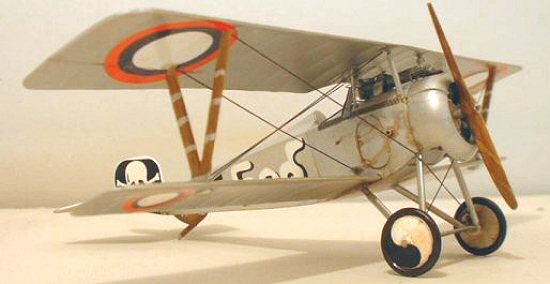
cursed. I saw Aeromaster’s Silver Hawks part II (48-521) with the
Russian “bob” scheme, and the skull and cross bones on the rudder. Gotta
do it. Anyway, night one, I apply the first layer of the Russian Red,
Blue and White roundel, hit it with a bit of microsol and leave it. The
next night I dropped the middle blue ring in place and hit it with a bit
of microsol. The third night I came home to disaster. The inner blue
ring had shifted and shrunk on both ends of the wing. Three days later I
found a blue that matched close enough (it IS on the BOTTOM of the wing)
and filled in the blue pretty well. My wife was kind enough to say she
never would have noticed.
Finally, the moment of truth, the upper wing. Wait,
don’t glue it yet, you almost forgot the roundels on the bottom of the
upper wing. Not only will they be a real chore to get in place after the
wing is on but the interplane struts mount inside them. And here I was
cursed. I saw Aeromaster’s Silver Hawks part II (48-521) with the
Russian “bob” scheme, and the skull and cross bones on the rudder. Gotta
do it. Anyway, night one, I apply the first layer of the Russian Red,
Blue and White roundel, hit it with a bit of microsol and leave it. The
next night I dropped the middle blue ring in place and hit it with a bit
of microsol. The third night I came home to disaster. The inner blue
ring had shifted and shrunk on both ends of the wing. Three days later I
found a blue that matched close enough (it IS on the BOTTOM of the wing)
and filled in the blue pretty well. My wife was kind enough to say she
never would have noticed.
NOW, on to mounting the upper wing. First I got the Interplane struts in place with liquid cement. Then the cabane struts were glued into place, again with liquid cement. While they were drying, I constantly checked them with calipers to make sure the spacing was correct (checked against the mounting dimples on the bottom of the upper wing), and repeatedly checked that they were aligned by eye. Once everything was pretty well set, but still soft enough to move a bit, I placed the upper wing. First on the pins of the interplane struts, and then the cabane struts popped right into place. A quick check that everything was visually in alignment, and a couple of drops of superglue, and hey, it’s a Sesquiplane!
As for the actual rigging, I did it in stages. For the rigging itself, I used 6 lb test fishing line. Once the wings were on, I rigged them. Using the predrilled holes, I anchored one end in a hole with super glue. When that was dry, I threaded it through the opposite hole, clamped a hemostat on it to provide tension, and filled the hole with superglue. Once dry, the excess was clipped with a fresh exacto blade. Where the exit isn’t covered with a decal, a dab of paint, and no one will ever know. Most of the line was painted Polly S Grimy Black after installation, and some of it was colored with a black Sharpie marker before installation. The color on the “sharp’ied” line is more consistent, but the painted line actually looks more like weathered wire cable to me.
There are a couple of things I will try next time. One thing is drilling the rigging holes in the wings at an angle. The holes on this model are drilled at 90 degrees, and the fishing line is just stiff enough to show a bend just as it enters the hole if you look close. I will also try to approximate turnbuckles next time. I’ve seen several methods in reviews and articles, but haven’t decided which one to try.
 The landing gear went together well and was rigged
just like the wings. The engine was assembled, painted and dry brushed,
and looks great behind the cowling. The cowling had to be cut away on
the bottom to match my references (ok, Aeromaster’s instructions). It
was also almost one of my disasters. The joints in the cowling sections
are represented by etched parts (yup, me and etch again), one on each
side in various locations depending upon your references. I got the
first one on pretty well, and then, while moving the second one into
place, my tweezers twisted, and it dropped. No amount of searching could
locate it. I resigned myself to having an asymmetric cowling and moved
on. A couple of days later, I was attempting to clean up my bench and
what’s this? The cowling joint!!!!! Eureka, my cowling is complete.
The landing gear went together well and was rigged
just like the wings. The engine was assembled, painted and dry brushed,
and looks great behind the cowling. The cowling had to be cut away on
the bottom to match my references (ok, Aeromaster’s instructions). It
was also almost one of my disasters. The joints in the cowling sections
are represented by etched parts (yup, me and etch again), one on each
side in various locations depending upon your references. I got the
first one on pretty well, and then, while moving the second one into
place, my tweezers twisted, and it dropped. No amount of searching could
locate it. I resigned myself to having an asymmetric cowling and moved
on. A couple of days later, I was attempting to clean up my bench and
what’s this? The cowling joint!!!!! Eureka, my cowling is complete.
Now onto painting the tailskid and propeller. By now, I had located a great article, or two, on the WEB on doing faux wood finishes. There are actually several on the fantastic WW I modeling site at www.wwi-models.org. I also found a great one on IPMS Stockholm at www.ipmsstockholm.org. The gist is, paint a base coat in acrylic (I used MM enamel Wood and coated it with Future). Then mix up some artists oils and turpentine (I finally bought some Windsor & Newton) in dark browns and yellows, and brush it on. Now take a clean brush and thin the oils out by pulling the brush in slightly wavy lines to replicate the wood grain. When you get to a color saturation and wood grain look you like, let it dry for several days. If you aren’t happy, wipe the oils off and try again. The oils take several days to dry once you are happy, but they look great. I’m sure I’ve messed up the laminations on the propeller, but the effect looks pretty good to me. Next time I’ll get it better.
I should also mention the Interplane Struts, as they are wood as well. I tried Aeromaster’s wood grain decal on them. The decals are essentially clear, with the wood grain represented by various colors of brown lines, depending on if you have light, medium, or dark wood decals. I chose the medium color, and started by painting the struts with MM wood. I then wrapped the struts with the decals with the wood grain running the length of the struts. The third step was a coat or two of Tamiya clear yellow to simulate varnish. Finally I painted the collars and mounting cups with Tamiya Chrome silver. Overall I was disappointed with the decals. The wood grain seems oversized for 1/48, and I think better results are possible from the artist’s oils treatment.
 Before rigging the tail sections, I thought I should
get the decals down, especially the pennants that are under the rigging.
Decal disaster number two. I forgot to clear coat with Future, and the
microset I used to float the pennant dissolved the Tamiya paint. I did
not know THAT would happen. I also lost the pennant. Time to touch up
the paint and order another decal sheet. Should have done it when the
first decal disaster happened, then I wouldn’t have that pesky paint
touch up that just isn’t quite right. To further justify the additional
sheet, I also buggered up one of the yin and yang decals for the wheels.
Before rigging the tail sections, I thought I should
get the decals down, especially the pennants that are under the rigging.
Decal disaster number two. I forgot to clear coat with Future, and the
microset I used to float the pennant dissolved the Tamiya paint. I did
not know THAT would happen. I also lost the pennant. Time to touch up
the paint and order another decal sheet. Should have done it when the
first decal disaster happened, then I wouldn’t have that pesky paint
touch up that just isn’t quite right. To further justify the additional
sheet, I also buggered up one of the yin and yang decals for the wheels.
Once the replacements were in, I Futured the plane and finished the decals. They really did go down great. As for the multiple decals for the roundels, I learned you have to let things sit for 2-3 days before setting the additional layers. The last bits were the tail rigging and the tail plane struts. Rather than mess with the plastic struts, I clipped a couple of straight pins to length and used those. No painting, and no mold lines clean up. Some final weathering with oils for oil streaks and mud stains, and I was done.
|
CONCLUSIONS |
Is it as easy as a Tamiya Wildcat or Corsair? Not quite. But it does go together very well. If you are like me, it will stretch your skills a bit, without sending you into therapy, and it will look great on your shelf. If you have been thinking about trying a WW I two winger, go for it. You will love it. Next on the WW I schedule is an Albatros D. V. Lots of wood to practice that faux finish on.
Oh, and does anybody need the better part of two Aeromaster sheets? They each still have 3 complete schemes!
|
REFERENCES |
Squadron/Signal Nieuport Fighters in action
Rigging: www.ipmsstockholm.org/magazine/2001/11/stuff_eng_tech_rigging.htm
Faux wood: www.ipmsstockholm.org/magazine/2003/03/stuff_eng_tech_wood_grain.htm
July 2003
If you would like your product reviewed fairly and quickly, please contact me or see other details in the Note to Contributors.