|
KIT: |
Eduard 1/48 Albatros D.III |
|
KIT # |
8035 |
|
PRICE: |
$30.00 |
|
DECALS: |
four versions: See review |
|
REVIEW & |
|
|
NOTES: |
Profipack version |
|
HISTORY |
The month of April 1917 was known as "Bloody April" to the Allied aircrews who had the misfortune of being alive at the front. Unfortunately for them, being alive was only a temporary state as the German Jasta’s wreaked havoc over them in a one-sided battle of unprecedented scale. By far the single most important aircraft during "Bloody April" was the agile and swift German Albatros D.III fighter. First posted to the front in January 1917, by April most of the Jasta’s had been equipped with this superlative fighter that would erase the overall superiority of numbers that the Allied possessed in the air.
 Some historians argue that
the D.III was not so much a superior aircraft, that the opposition aircraft
flown by the Allies were markedly inferior. This is certainly true when one
looks at the kill statistics from "Bloody April" in that many German
victories were over the hapless B.E. 2 "Quirk" and its not so
successful replacement the R.E. 8 "Harry Tate". It must also be
remembered that the leading Allied scouts at the time were the Nieuport 17, SPAD
7, and the Sopwith Pup which were certainly effective aircraft when they were
first deployed in 1916 but hopelessly outclassed in 1917.
Some historians argue that
the D.III was not so much a superior aircraft, that the opposition aircraft
flown by the Allies were markedly inferior. This is certainly true when one
looks at the kill statistics from "Bloody April" in that many German
victories were over the hapless B.E. 2 "Quirk" and its not so
successful replacement the R.E. 8 "Harry Tate". It must also be
remembered that the leading Allied scouts at the time were the Nieuport 17, SPAD
7, and the Sopwith Pup which were certainly effective aircraft when they were
first deployed in 1916 but hopelessly outclassed in 1917.
The British suffered tremendous casualties in the air during the fighting around Arras, starting the conflict with around 365 planes of which about a third were fighters. By the end of the month, they had lost around 176 aircraft compared to German losses of around 21 pilots killed and 15 wounded. The devastation in the air was particularly bad around Douai, where the Nieuport equipped 60 and 29 Squadrons lost 100% of their pilot strength in action to the fabled warriors of Jasta 11, led by the soon to be famous Manfred von Richtofen. Consider these accomplishments by the pilots of Jasta 11 during "Bloody April": Manfred von Richtofen posted 20 victories, his brother Lothar posted 15, Kurt Wolff was the "Top Gun" with 22, and Karl Allemroder posted 8.
British pilots during "Bloody April" had an average life expectancy of 92 combat hours compared to the end of 1916 when they had 295. The only saving grace for the RFC was that aces such as Albert Ball and Billy Bishop also posted impressive totals during the month. However, their rookie squadron mates were little more than cannon fodder for the aces of Jasta 11 and their potent Albatros D.III.
|
THE KIT |
The kit is Eduard’s Albatros D.III Profipack kit (8035). It is a mixed media kit and consists of injected molded plastic (55 parts), one sheet of photo-etch detail parts (13 items), finely cast resin Spandau machine gun components (4 parts), an acetate sheet for the windscreen, and the usual Czech printed decal sheet with options for four aircraft. A nice addition is an extra top wing with the radiator located offset from the center that enables the modeler to build either early or late versions of the D.III. The plastic parts are high quality injected molded pieces that rivals Tamiya/Hasegawa in quality. The instruction sheet is the usual six page diagram assembly with marked color painting guidelines, and a cross reference to Tamiya, Humbrol, Revell, Testor, and Aeromaster paints. In addition, a four-page sheet is provided showing the final painting and decaling schemes for the four-decal variants.
|
CONSTRUCTION |
 I started by pre-painting
all the parts as indicated in the instructions, with the exception of the
fuselage walls, bulkheads, floors, and engine mount floor which I covered with
Tauro wood grain decal. The stringer detail on the fuselage sidewalls were then
hand painted Testor Model Master (TMM) French Chestnut and given a light wash of
burnt umber.
I started by pre-painting
all the parts as indicated in the instructions, with the exception of the
fuselage walls, bulkheads, floors, and engine mount floor which I covered with
Tauro wood grain decal. The stringer detail on the fuselage sidewalls were then
hand painted Testor Model Master (TMM) French Chestnut and given a light wash of
burnt umber.
Assembly of the fuselage components was accomplished using super-thin superglue. Assembly proceeded as described in the instructions, with no major problems. I then skipped over the instruction sequence for the machine guns and started on the engine.
The engine components were next as I painted them, assembled them together, and then gave the whole assembly a heavy wash of black. I installed the engine floorboard to the fuselage side, wrapped the top half of the engine (exhaust stack was not installed yet) in parafilm, and installed the engine into the fuselage with superglue.
I then closed up the fuselage with liquid cement. Next, I glued with liquid cement the tail fin, the skid fairing, and lower wing to the fuselage. All joins were then sanded smooth, and no putty was required for gap filling. Then I drilled all of the rigging, strut, and landing gear mounting holes as described in the instructions. Next stop was the paint shop.
The model was painted, decaled, and weathered as described in the following subsections and then final assembly took place.
I installed the interplane and cabane struts into place and drilled small holes in the radiator to fit short sections of corresponding diameter brass wire for the radiator to engine piping. Superglue the wire to the radiator in the drilled holes and you will get a very sturdy join.
 Now it was time to assemble
the guns as shown in the instructions. Make sure you anneal (heat in a flame
until red-hot) the jackets and you will be rewarded with a truly circular
jacket. Roll the jackets around the correct size circular rod (styrene rod
works). Place the jacket seam to the bottom and no one will even see it! I
painted the machine guns in Testor Metalizer Gun Metal and dry brushed with
Floquil Gun Metal. The combination of the PE jackets with the finely cast resin
parts results in a beautiful machine gun.
Now it was time to assemble
the guns as shown in the instructions. Make sure you anneal (heat in a flame
until red-hot) the jackets and you will be rewarded with a truly circular
jacket. Roll the jackets around the correct size circular rod (styrene rod
works). Place the jacket seam to the bottom and no one will even see it! I
painted the machine guns in Testor Metalizer Gun Metal and dry brushed with
Floquil Gun Metal. The combination of the PE jackets with the finely cast resin
parts results in a beautiful machine gun.
Now onto the fun part, putting on the top wing! Actually, this task went smoothly with no problems. Since the cabane struts are already fixed in the correct position on the fuselage (remember using a caliper to set the actual distance) the top wing snapped into place in the correct position. I used small rubber bands to help hold both wings in place and then checked alignment of the top to bottom wing. When all was to my liking, I superglued the struts to the wing.
Now on to the next challenge, installing the landing gear! I installed metal pins into the ends to help ease this task. Push the pinned legs of the landing gear into the fuselage and set the approximate width of the landing gear axle. Then place the axle into place on the legs and after carefully aligning everything glue it in place. Let the glue fully cure then paint the assembly and let dry. Glue one leg into place with superglue, let set, then glue the remaining legs into place. Lastly install the painted wheels into place on the axle with superglue, and the tailskid.
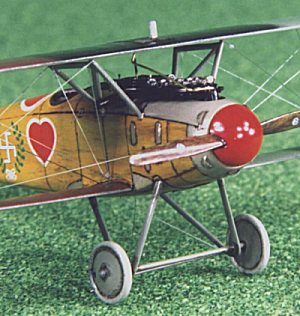
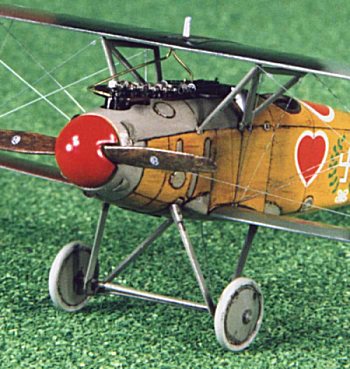
Carefully install the exhaust stack, propeller, and propeller spinner with superglue. I drilled out the exhaust stacks, painted them Testor Metalizer Burnt Iron and then applied a heavy wash of Rustall. The propeller was painted by using a base coat of dark yellow, and successive light dry brushing using a rake brush of TMM raw sienna, raw umber, burnt sienna, and burnt umber to replicate the wood grain.
Install all the remaining pieces as indicated in the instructions and rig the model as indicated on the instruction sheet.
|
PAINT & DECALS |
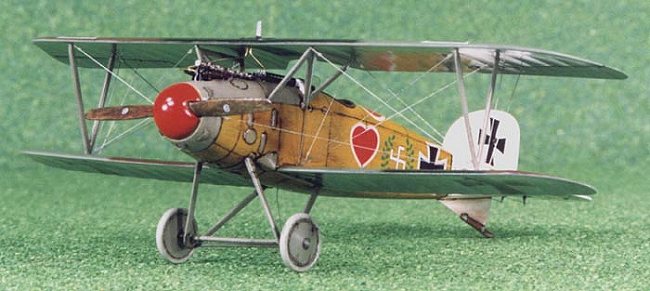
This version of the Albatros dates this airplane in mid-1917 while Voss was
flying for both Jasta 2 and Jasta 5. His aircraft was not repainted in a Jasta 5
scheme when he transferred. As mentioned above, all painting was done after
completion of the fuselage and attachment of the lower wing fairly early in the
construction process. I started first by airbrushing the entire fuselage and
tail section Polly Scale (PS) Acrylic White (RLM21). The white also served as
the base color for my wood grain finish discussed later. I then shot the
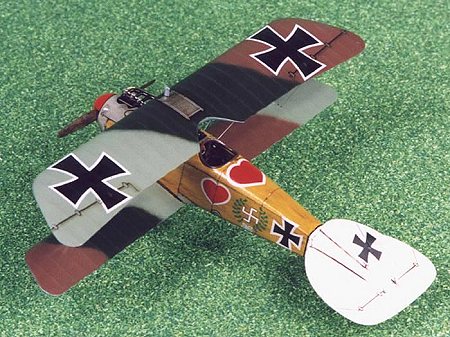
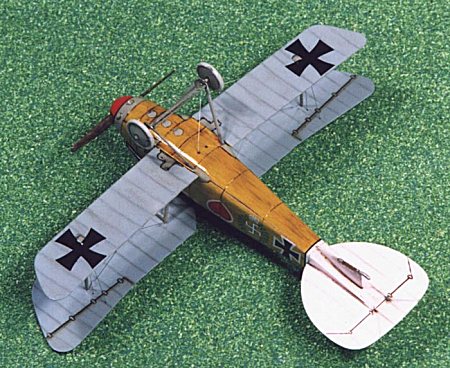
underside of the wings with PS RLM65 Light Blue for the underside blue. The top
 wings were sprayed freehand with
PS British Interior Gray Green (I should have chose a different color), Tamiya
J.N. Green (XF-11) and Humbrol German Red/Brown (#160).
wings were sprayed freehand with
PS British Interior Gray Green (I should have chose a different color), Tamiya
J.N. Green (XF-11) and Humbrol German Red/Brown (#160).
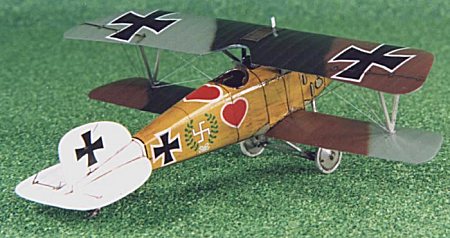
Next I replicated the wood grain finish on the fuselage. Previously, I had good success using a dry brushing technique with a rake brush that I used for smaller pieces. Starting with the white finish, I lightly dry brushed successive colors of TMM Raw Umber, Raw Sienna, Burnt Sienna, and Burnt Umber atop each other in a random pattern. I then dry brushed with a rake brush Humbrol Oak (#71) to randomly cover and let peek through the underlying dry brushed colors in an approximate wood grain pattern. After letting this cure overnight I shot many coats of Gunze Sangyo (GS) Clear Yellow (H91) to get that Albatros wood grain yellow look. A word of caution, you must apply many, many, many coats of clear yellow (I probably did about 10-12) to get that nice rich honey amber hue. After letting the yellow coat cure for a day I then masked the forward fuselage and shot GS RLM Gray 02 (H70). After a day of drying time, I sprayed a light coat of Future in preparation for decaling.
The decals supplied with the kit are typical Czech/Propagteam decals. Super thin and super fragile. After a short drying period of about an hour, I applied MicroSol setting solution to get the decals to melt into the surface and the control surfaces. I repeated with a second coat of setting solution to get all the decals fully down. After drying overnight, I wiped the decals off with a moist cloth with a bit of soap to remove any residue and after drying I shot a very light coat of Future thinned with rubbing alcohol (50-50 mix) over the decals to seal them. For weathering, I chose to accentuate the engraved panel lines and surface detail with a light burnt umber oil wash.
I then sealed everything with a light coat of PS Flat Finish to provide a surface for pastel application. I then used a pastel pencil to lightly highlight the rib detail on the wings/tail surfaces. I then randomly applied some ground up burnt umber pastels with a soft brush to simulate dirt staining on the lower surfaces. Lastly, I applied a heavy burnt umber oil wash to the wheels and control surface joins.
I then finished final assembly of the models as described above. Finally, several coats of straight Future was shot to achieve the final glossy finish common to most WWI aircraft.
|
CONCLUSIONS |
 This is an excellent model
of an important WW I aircraft. Overall the quality and accuracy are exceptional.
The level of detail engraved in the kit is a great improvement over previous
generation Eduard models, and no after-market sets are really needed for a
beautiful build. I highly recommend this kit for all levels of builders
including beginners. For those modelers that have built Eduard kits in the past
and swore them off due to the poor fit and construction problems, this model
will definitely change your opinion. If you were reluctant to try this model due
to the small photo-etch parts, I would recommend the Red Baron version of the
D.III (Kit #8017) as it is basically the same kit minus the photo-etch. That
would be an excellent kit for beginners or first time WW I modelers.
This is an excellent model
of an important WW I aircraft. Overall the quality and accuracy are exceptional.
The level of detail engraved in the kit is a great improvement over previous
generation Eduard models, and no after-market sets are really needed for a
beautiful build. I highly recommend this kit for all levels of builders
including beginners. For those modelers that have built Eduard kits in the past
and swore them off due to the poor fit and construction problems, this model
will definitely change your opinion. If you were reluctant to try this model due
to the small photo-etch parts, I would recommend the Red Baron version of the
D.III (Kit #8017) as it is basically the same kit minus the photo-etch. That
would be an excellent kit for beginners or first time WW I modelers.
I would like to take this time to give a heartfelt thanks to Tom Cleaver for his kind words of encouragement and more importantly for MM readers, the photography tips he has given me. This model and its pictures show the results of his wonderful suggestions.
|
REFERENCES |
Squadron/Signal Publications, Albatros Fighters In Action, SS1046, $8.95
Grub Street, Under The Guns Of The German Aces, $35.00
Albatros Productions LTD, Windsock Datafile, Albatros Fighters, $25.00
If you would like your product reviewed fairly and quickly by a site that has over 800 visits a day, please contact me or see other details in the Note to Contributors.