Blue Max 1/48 Albatros D.III (OEF)
|
KIT # |
PG 0114 |
|
PRICE: |
$33.96 |
|
DECALS: |
Three aircraft |
|
REVIEW : |
|
|
NOTES: |
Limited Run Injection Kit |
|
HISTORY |
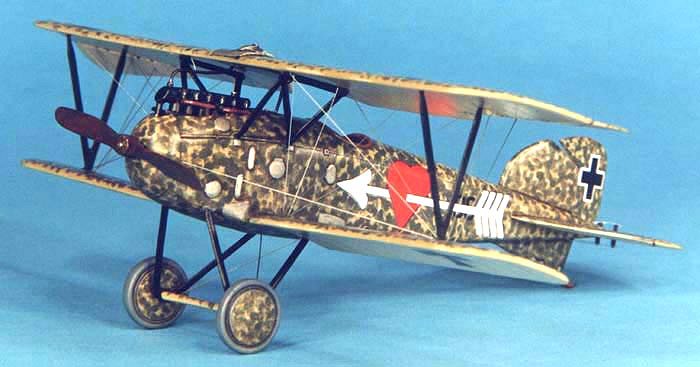
The Albatros D.III series single seat fighter was perhaps the best Albatros fighter produced during WWI. The Albatros D.III was produced in Germany at the Albatros factories at Johannistahl and Schneidemuhl (OAW). In addition, it was also produced under license in Austria at the Oesterreichische Flugzeugfabrik A.G. (OEFFAG) at Wiener-Neustadt for use in the Royal and Imperial Air Service of the Austro-Hungarian (AH) Army. Three variants of the D.III were produced at OEF, the Series 53, 153, and 253 which differed mainly in the engine supplied from the 185 HP, 200 HP, to 225 HP Austro-Daimler engine, respectively. In outward appearance the OEF version looked very similar to the Albatros produced aircraft, however, there are enough differences to warrant the production of the OEF version, as it would be a difficult modeling conversion. The aircraft modeled is a Series 253 version, flown by Oberleutnant Friedrich Navratil, who posted 10 victories.
Navratil was born to a Croatian family in Sarajevo on 19 July 1893. After attending primary school, he enlisted in the AH Army in an elite unit, the 1 Bosnia-Herzegovina Regiment. After being wounded twice against the Serbian Army in the early stages of the war, he was promoted to Oberleutnant and transferred to the Italian front. In early 1917 he requested a transfer to the Air Service and entered flight training at Wiener-Neustadt. He was first posted to Flik 13 on the Eastern Front and eventually transferred to Flik 41J led by the leading AH ace, Hauptmann Godwin Brumowski. His first kill was jointly shared with Brumowski in April 1918, when he downed a Camel near Arcade. In June 1918, he was promoted to command Flik 3J based at Romagano Airfield near Trent. Three Camels from RAF 45 Squadron shot him down on 31 August 1918, after earning his final kill. His combat career ended when he was severely hurt in a crash landing on 21 September 1918. After the war he served in the Yugoslavian Air Force and later became Minister of Defense of the Croat Republic in 1941. After WWII, he was condemned to death and executed in 1946. I would like to thank Witold Kozakiewicz for supplying the personal history of this pilot.
|
THE KIT |
The kit is a multi-media kit consisting of injected molded plastic parts (about 30 parts depending on version), white metal parts (15 parts), and allows you to build any of the three variants. Nice extras included alternate exhaust pipes and a winter cowling that allow you to model virtually any aircraft. It features decal options for three aircraft; a Series 53 flown by Wilhelm Haring, a Series 153 flown by Friedrich Losert, and a Series 253 flown by Navratil. The plastic parts are typical limited run injected plastic that require substantial clean-up of flash, however detail engraving on the surface is extremely well done. Clean up of the plastic is quite easy, as it is very soft. The white metal parts are finely cast and very well done requiring only minor clean up. The instruction sheet is very brief, providing only an expanded assembly drawing and some basic color and decal notes with pictures of the completed models. Most modelers will require additional reference material to build the kit, as there are no rigging diagrams or complete decal placement instructions.
|
CONSTRUCTION |
The first job up was to separate and clean up the plastic and metal parts. Care must be taken when removing the plastic parts, as the pour stubs on the sprue are very thick and pass into the part itself. I used a razor saw to cut off all parts to prevent damage to the adjacent surfaces. This task also included filing off of several molding channels and general flash clean up. It is critical when building a limited run kit, that extensive dry fitting and filing be accomplished prior to assembly so I assembled the major parts with masking tape to judge fit and shaped the parts where needed. Virtually every part needed some minor filing/sanding but in most instances this was no more than a few swipes of a sanding stick. However, major thinning was required of the tail surfaces as they were much too thick. I thinned down the tail fin, tail skid fin, and horizontal stabilizer by half. This was accomplished by sanding down the inner mating surface of the tail fin and grinding down the horizontal stabilizer. Rib tape detail was replaced using Eduard 0.5-mm masking strips.
 I then pre-painted all
the parts as indicated in the instructions. Assembly of the fuselage components
was accomplished using super-thin superglue and presented no major problems.
Cockpit details are a little on the sparse side, however it is adequate and
allows super-detailers room to add extras. I especially like the instrument
panel decal that even lets a poor painter like myself have a beautiful set of
gauges.
I then pre-painted all
the parts as indicated in the instructions. Assembly of the fuselage components
was accomplished using super-thin superglue and presented no major problems.
Cockpit details are a little on the sparse side, however it is adequate and
allows super-detailers room to add extras. I especially like the instrument
panel decal that even lets a poor painter like myself have a beautiful set of
gauges.
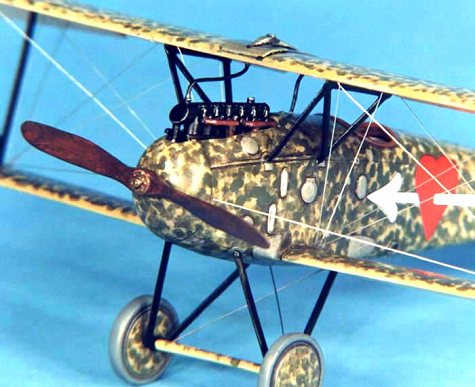
I painted the engine black and then drybrushed Metalizer Aluminum on the cylinder heads and crankcase cover. Assembly of the cowl resulted in several gaps, which were filled with putty and then sanded smooth before installation.
Next, I glued with liquid cement the rudder, horizontal stabilizer, and lower wings to the fuselage. All joins were then sanded smooth, and no putty was required for gap filling. Then I drilled and dry-fitted all of the rigging, strut, and landing gear mounting holes to assist in final assembly as nothing is more frustrating as trying to get these pieces together with a fragile biplane. Next stop was the paint shop.
The model was painted, decaled, and weathered as described in the following subsections and then final assembly took place.
Now onto the fun part, putting on the top wing! Actually, this task went smoothly with no problems. Since the cabane struts are already fixed in the correct position on the fuselage (remember using a caliper to set the actual distance) the top wing snapped into place in the correct position. I used small rubber bands to help hold both wings in place and then checked alignment of the top to bottom wing. When all was to my liking, I superglued the struts to the wing and also the landing gear.
Install all the remaining pieces as indicated in the instructions and rig the model. I used .006-fishing line painted silver, as this is far easier than using wire.
|
PAINT & MARKINGS |
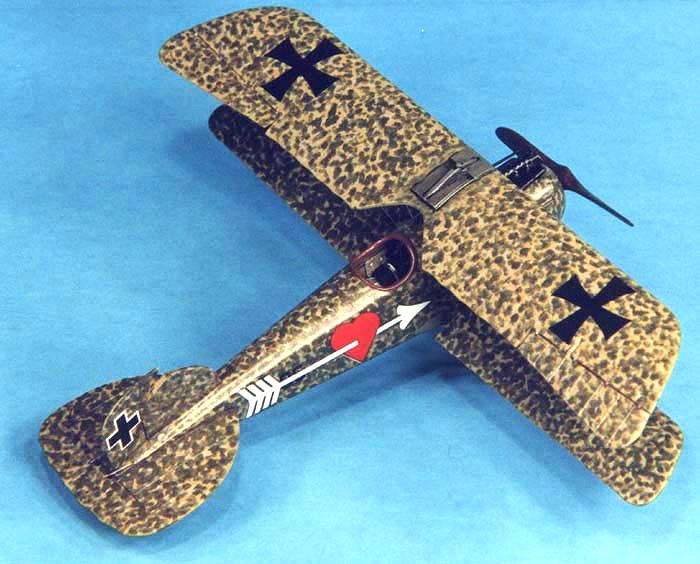
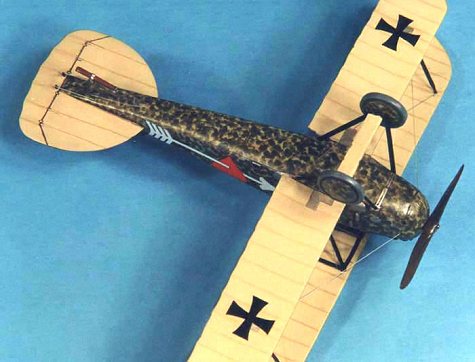 The paint scheme is an
interesting mottle of dark green and green-gray over an ochre background with
clear-doped linen undersides. I used a base coat of Tamiya Dark Yellow (XF-60)
with a mottle of Gunze-Sangyo RLM Gray 02 (H70) and Tamiya Dark Green (XF-61)
for the topside and shot a coat of GS Sail (H85) for the bottom. The mottle was
done using a 50% thinned mix of the paint dappled on with a Microbrush. After
the paint scheme cured for a day, I shot a light coat of Future to prepare the
surface for decaling.
The paint scheme is an
interesting mottle of dark green and green-gray over an ochre background with
clear-doped linen undersides. I used a base coat of Tamiya Dark Yellow (XF-60)
with a mottle of Gunze-Sangyo RLM Gray 02 (H70) and Tamiya Dark Green (XF-61)
for the topside and shot a coat of GS Sail (H85) for the bottom. The mottle was
done using a 50% thinned mix of the paint dappled on with a Microbrush. After
the paint scheme cured for a day, I shot a light coat of Future to prepare the
surface for decaling.
The decals supplied with the kit are fairly good. Nice and thin, but an excess of carrier film requires some delicate trimming. Do not use any setting solutions on these, as they will self-destruct! After drying overnight, I wiped the decals off with a moist cloth with Pollys (PS) Plastic Prep to remove any residue and after drying I shot a very light coat of Future thinned with rubbing alcohol (50-50 mix) over the decals to seal them. For weathering, I chose to accentuate the engraved panel lines and surface detail with a light burnt umber oil wash.
I then sealed everything with a light coat of PS Flat Finish to provide a surface for pastel application. I then used pastel and watercolor pencils to lightly highlight the engraved detail on the wings/tail surfaces and randomly applied some ground up burnt umber pastels with a soft brush to simulate dirt staining on the lower surfaces. Lastly, I applied a heavy burnt umber oil wash to the wheels and control surface joins. Finally, several coats of PS Semi-Gloss were airbrushed on to complete the model.
|
CONCLUSIONS |
This is an excellent model of an important WW I aircraft. Overall the quality and accuracy are exceptional. It was obvious that the scale drawings in the Windsock Datafile were used in the generation of the kit as every detail is exactly reproduced! Due to the limited run nature and its associated fit problems, along with careful work required for the thinning of the tail surfaces, I would highly recommend this kit to intermediate and advanced level modelers.
|
REFERENCES |
Albatros Productions LTD, Windsock Datafile #19, Albatros D.III (OEF), $14.00
Squadron/Signal Publications, Albatros Fighters in Action, SS1049, $8.95
Copyright ModelingMadness.com.
If you would like your product reviewed fairly and fairly quickly, pleasecontact the editor or see other details in the Note to Contributors.