Passchendaele 1/48 Albatros D.II conversion
|
KIT # |
|
|
PRICE: |
$16.00 |
|
DECALS: |
See review |
|
REVIEW: |
|
|
NOTES: |
Uses Eduard Albatros D.III |
|
HISTORY |
The Great Albatros Cook-up (http://members.xoom.com/OTprojects/index.html) was conceived by the WWI Modeling List (http://pease1.sr.unh.edu/) as a means to promote the building of WWI models. The goal is to show non-WWI modelers how easy these aircraft are to build, provide a one-stop source for on-line information and references, and illustrating how easy it is to become hooked on building them. For the cook-up I chose to model the Albatros D.II of the famous German ace, Manfred von Richtofen. Unfortunately, there is not an injected molded kit version of this aircraft; it however can be easily completed by using the 1:48 Eduard Albatros D.III kit combined with the Passchendaele Albatros D.II Conversion Kit. This review will focus primarily on the conversion kit. For a more complete review of the Eduard Albatros D.III kit see ( reviews/ww1/laskodid3.htm ) on this site.
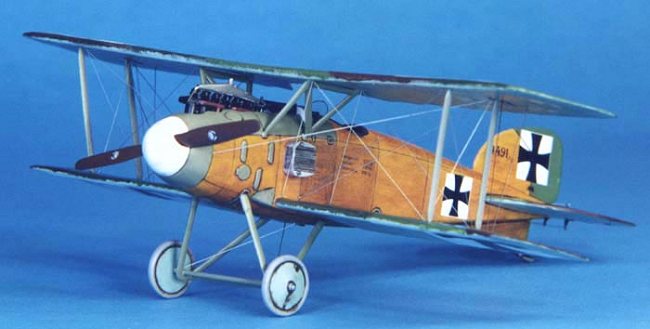
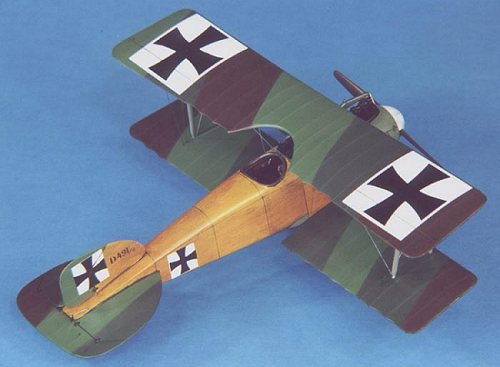
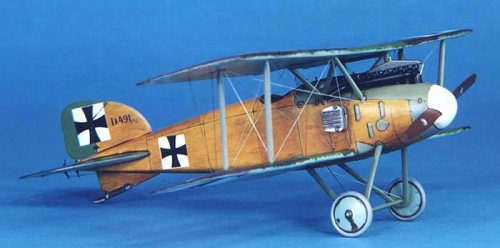
The model is an Albatros D.II flown by Manfred von Richtofen while stationed with Jasta 2 at Langincourt Aerodrome in November 1916. At the time the "Red Baron" had 11 victories and this was the same aircraft (491/16) that he used to down MAJ Lanoe Hawker 24 SQ RFC during an epic battle that firmly established him in his soon to be famous aerial career.
|
THE KIT |
The resin kit is from John Cyganowski of Passchendaele (janah@worldnet.att.net) and features high quality polyurethane castings of the Albatros D.II upper wing, lower wings, Windhoff fuselage mounted radiators, coolant reservoir/expansion tank, and wheel hubs with two sets of O-ring tires. It also includes two full color, three view profiles of the aircraft flown by Oswald Boelcke and Richtofen with matching decals manufactured by Microscale done from artwork generated by Bob Pearson. Well-written instructions also are included to complete the conversion.
|
CONSTRUCTION |
 The first order of
business was to detach the resin pieces from their molding blocks and clean up
the seams. The resin used by Passchendaele is of a kind I have not encountered
before, a very light white color without the bad smell. It is also not near as
brittle as most resin castings. The casting is flawless with no air bubbles or
other common resin faults. The pieces cleaned up very nicely in short order and
then it was time to tackle the Eduard kit. For details on the Eduard kit
assembly please see my earlier review.
The first order of
business was to detach the resin pieces from their molding blocks and clean up
the seams. The resin used by Passchendaele is of a kind I have not encountered
before, a very light white color without the bad smell. It is also not near as
brittle as most resin castings. The casting is flawless with no air bubbles or
other common resin faults. The pieces cleaned up very nicely in short order and
then it was time to tackle the Eduard kit. For details on the Eduard kit
assembly please see my earlier review.
After assembly of the fuselage interior, fuselage body, horizontal stabilizer, rudder, and tailskid fin I drilled all of the rigging, strut, and landing gear mounting holes as described in the instructions. Next stop was the paint shop.
The model was painted, decaled, and weathered as described in the following subsections and then final assembly took place.
The resin lower wings were then installed with clear epoxy using brass pins
to add strength to the joint. I installed the Eduard kit supplied cabane struts
into place and drilled small holes in the resin coolant reservoir/expansion tank
to fit short sections of corresponding diameter brass wire. After mounting the
machine guns, I flipped the fuselage onto its back atop the top wing and
carefully slipped the cabane struts into place. I used small blocks of styrofoam
to support the lower wings and fuselage and tweaked the placement of the top
wing into the correct position. When everything was aligned to my liking, I
carefully applied superglue to lock the cabane struts in place. While letting
the superglue cure completely, I fabricated the interplane struts from Contrail
strut stock as none are provided. After several dry fit attempts, I got the
correct strut length and carefully installed them into place. After carefully
 aligning the wings, I applied
superglue to the strut ends to lock them in place. This whole process went
rather quickly and I was pleasantly surprised at how easy it went!
aligning the wings, I applied
superglue to the strut ends to lock them in place. This whole process went
rather quickly and I was pleasantly surprised at how easy it went!
Now on to the next challenge, installing the landing gear! I installed metal pins into the ends to help ease this task. Push the pinned legs of the landing gear into the fuselage and set the approximate width of the landing gear axle. Then place the axle into place on the legs and after carefully aligning everything glue it in place. Let the glue fully cure then paint the assembly and let dry. Glue one leg into place with superglue, let set, then glue the remaining legs into place. Lastly install the painted wheels into place on the axle with superglue, and the tailskid.
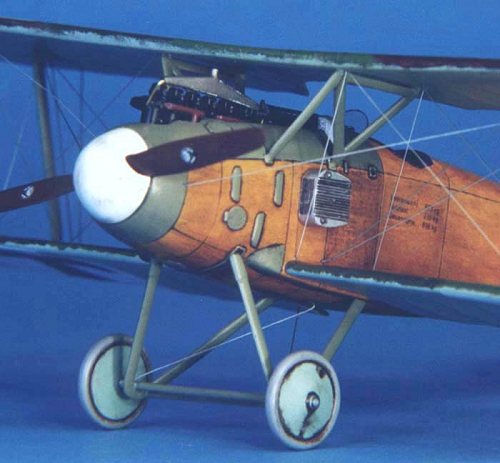
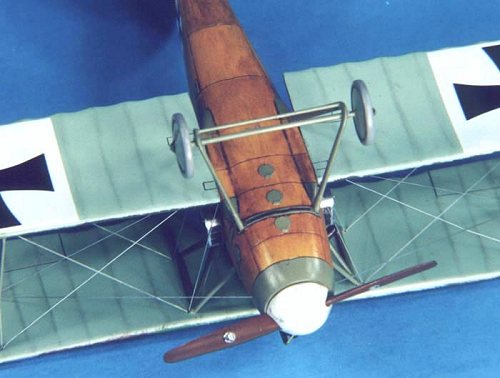
Carefully install the exhaust stack, propeller, and propeller spinner with superglue. I drilled out the exhaust stacks, painted them Testor Metalizer Burnt Iron and then applied a heavy wash of Rustall. The propeller was painted by using a base coat of dark yellow, and successive light dry brushing using a rake brush of TMM raw sienna, raw umber, burnt sienna, and burnt umber to replicate the wood grain.
Install all the remaining pieces as indicated in the instructions and rig the model as indicated on the instruction sheet. I used .006 diameter fishing line painted silver for the rigging.
|
PAINT & DECALS |
 As mentioned above, all
painting was done after completion of the fuselage fairly early in the
construction process. I started first by airbrushing the entire fuselage and
spinner Polly Scale (PS) Acrylic White (RLM21). The white also served as the
base color for my wood grain finish discussed later. I then shot the underside
of the wings with Xtracolor German WWI Underside Blue (X243). The top wings and
stabilizer were sprayed using paper masks with Xtracolor German WWI Topside
Green (X241), Aeromaster acrylic Japanese A/N Red Brown Primer (#1099), and
Gunze Sangyo RLM82 Light Green (H422).
As mentioned above, all
painting was done after completion of the fuselage fairly early in the
construction process. I started first by airbrushing the entire fuselage and
spinner Polly Scale (PS) Acrylic White (RLM21). The white also served as the
base color for my wood grain finish discussed later. I then shot the underside
of the wings with Xtracolor German WWI Underside Blue (X243). The top wings and
stabilizer were sprayed using paper masks with Xtracolor German WWI Topside
Green (X241), Aeromaster acrylic Japanese A/N Red Brown Primer (#1099), and
Gunze Sangyo RLM82 Light Green (H422).
Next I replicated the wood grain finish on the fuselage. Previously, I had good success using a dry brushing technique with a rake brush that I used for smaller pieces. Starting with the white finish, I lightly dry brushed successive colors of TMM Raw Umber, Raw Sienna, Burnt Sienna, and Burnt Umber atop each other in a random pattern. I then dry brushed with a rake brush Humbrol Oak (#71) to randomly cover and let peek through the underlying dry brushed colors in an approximate wood grain pattern. After letting this cure overnight I shot many coats of Gunze Sangyo (GS) Clear Yellow (H91) tinted with 10 drops of GS Clear Orange (H92) to get that Albatros wood grain yellow/orange look. A word of caution, you must apply many, many, many coats of clear yellow (I probably did about 10-12) to get that nice rich honey amber hue. After letting the yellow coat cure for a day I then masked the forward fuselage and shot GS RLM Gray 02 (H70). After a day of drying time, I sprayed a light coat of Future in preparation for decaling.
 The decals supplied
with the Passchendaele kit are excellent. After a short drying period of about
an hour, I applied MicroSol setting solution to get the decals to melt into the
surface and the control surfaces. I repeated with a second coat of setting
solution to get all the decals fully down. After drying overnight, I wiped the
decals off with a moist cloth with a bit of Pollys S Plastic Prep to remove any
residue and after drying I shot a very light coat of Future thinned with rubbing
alcohol (50-50 mix) over the decals to seal them. For weathering, I chose to
accentuate the engraved panel lines and surface detail with a light burnt umber
oil wash.
The decals supplied
with the Passchendaele kit are excellent. After a short drying period of about
an hour, I applied MicroSol setting solution to get the decals to melt into the
surface and the control surfaces. I repeated with a second coat of setting
solution to get all the decals fully down. After drying overnight, I wiped the
decals off with a moist cloth with a bit of Pollys S Plastic Prep to remove any
residue and after drying I shot a very light coat of Future thinned with rubbing
alcohol (50-50 mix) over the decals to seal them. For weathering, I chose to
accentuate the engraved panel lines and surface detail with a light burnt umber
oil wash.
I then sealed everything with a light coat of PS Flat Finish to provide a surface for pastel application. I then used pastel pencils to lightly highlight the rib detail on the wings/tail surfaces and to tint the individual wood panels in varying shades. I then randomly applied some ground up burnt umber pastels with a soft brush to simulate dirt staining on the lower surfaces. Lastly, I applied a heavy burnt umber oil wash to the wheels and control surface joins.
I then finished final assembly of the models as described above. Finally, several coats of Polly S Satin Finish was shot to achieve the final finish common to most WWI aircraft.
|
CONCLUSIONS |
This was an easy conversion of the Eduard Albatros D.III to an Albatros D.II using the Passchendaele conversion kit. I highly recommend this kit if you desire this specific Albatros variant as there are no injected molded versions of this aircraft available at this time. In the future, Eduard plans to release an Albatros D.II kit, but if you have to have this model now the Passchendaele conversion is the way to go.
|
REFERENCES |
Squadron/Signal Publications, Albatros Fighters In Action, SS1046, $8.95
Grub Street, Under The Guns Of The German Aces, $35.00
Albatros Productions LTD, Windsock Datafile, Albatros Fighters, $25.00
Copyright ModelingMadness.com
If you would like your product reviewed fairly and fairly quickly, please contact the editor or see other details in the Note to Contributors.
Back to Reviews Page 2019