Airfix Roland C.II Walfisch
|
KIT #: |
61040 |
|
PRICE: |
$7.00 or so MSRP |
|
DECALS: |
One option |
|
REVIEWER: |
Bill Michaels |
|
NOTES: |
Currently out of production. Also boxed by Heller |

The Roland C.II is one of
those aircraft that I probably would never have heard of, if it hadn’t been
produced as a plastic kit.
What little I know of the
aircraft’s history, I learned for other reviews here on MM and a quick peek at
Wikipedia.
 The
aircraft first flew in 1915, and was rather innovative for its time.
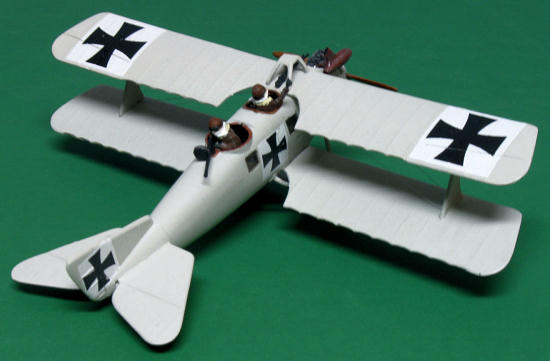
By mounting the top wing on the
fuselage, the plane had a streamlined shape, with fewer drag-causing struts and
wires than its contemporaries.
The
plane was fast, and sometimes used as an escort for slower two seaters.
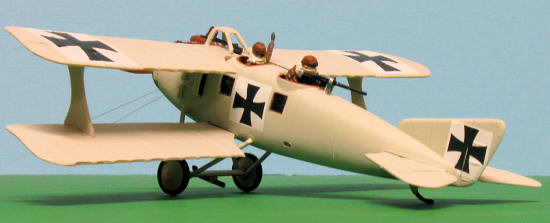
The plane’s distinctive shape
earned it the name “Walfisch” , which is German for “whale”.
The
aircraft first flew in 1915, and was rather innovative for its time.
By mounting the top wing on the
fuselage, the plane had a streamlined shape, with fewer drag-causing struts and
wires than its contemporaries.
The
plane was fast, and sometimes used as an escort for slower two seaters.
The plane’s distinctive shape
earned it the name “Walfisch” , which is German for “whale”.
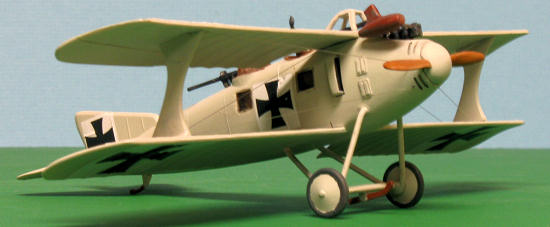
The
Roland was originally only equipped with the rear gun, which had an excellent
field of fire,
at least above the plane.
The downside was a significant
blind spot underneath. British ace and Nieuport pilot
Albert Ball had several kills
attacking Rolands from below.
The Roland was a tough opponent,
though, and there were times when Ball had to make a mad dash for home to escape
the speedy two-seaters.
Later
versions of the aircraft also had a forward firing gun for the pilot- the two
gun version is the one the Airfix kit represents.
Molded in very light gray, the
kit consists of 31 parts.
This is a typical kit of the era—
the detail is a bit limited, with raised detail, and heavy in execution.
Most of the small parts had
significant mold seams that needed to be cleaned up.
The
flying surfaces have fabric detail that is a bit more subdued that was found on
other kits of the era.
The wings still have the overdone
ribs that most old WW1 kits feature— in hindsight, I should have sanded them
down a bit.
Each wing panel also has a
prominent ejector pin mark that will need to be filled.
The trailing edges of the tail
feathers are also a bit thick.
 The
kit has no interior detail beyond a simple seat for the pilot.
There is no interior detail at all
for the gunner’s cockpit.
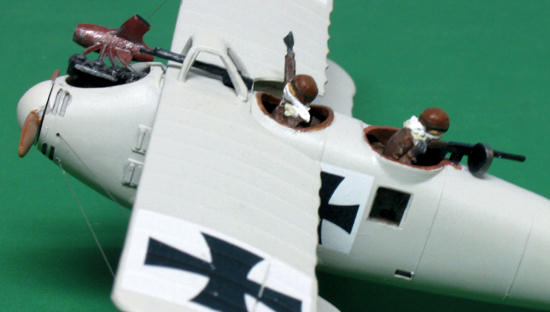
However, the kit does include a
nice pair of figures—some of Airfix’s best, IMO.
Instead of the more typical
matching pair of sitting figures in clunky, stiff poses, you get dedicated pilot
and gunner figures, in individual poses.
Instead of the usual generic flying
suit, they are molded with cold weather gear—long coats, with scarves over the
mouth and nose.
The detail is still a little weak
in places, but, if painted carefully, they look pretty good.
The
kit has no interior detail beyond a simple seat for the pilot.
There is no interior detail at all
for the gunner’s cockpit.
However, the kit does include a
nice pair of figures—some of Airfix’s best, IMO.
Instead of the more typical
matching pair of sitting figures in clunky, stiff poses, you get dedicated pilot
and gunner figures, in individual poses.
Instead of the usual generic flying
suit, they are molded with cold weather gear—long coats, with scarves over the
mouth and nose.
The detail is still a little weak
in places, but, if painted carefully, they look pretty good.
The
top of the engine is also simply molded, but will look OK after cleanup and
careful painting.
The
biggest problem with it is that the front cylinder is incompletely molded, and
doesn’t fit tightly against the front of the fuselage.
The exhaust stacks and muffler
are molded as separate parts.
My
one complaint about the kit is the way the landing gear parts are molded on the
sprue.
The “V” struts are at the very end
of the sprue, with one of the legs unprotected by any other plastic.
As a result, both parts were broken
as a result of the sprues moving around in the box.
Rather
than try to repair them,
I made a couple of
replacements from some brass rod.
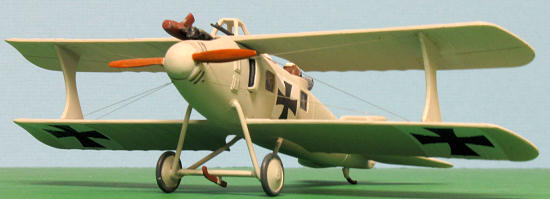
The kit includes decals
and painting instructions for one aircraft from 1916: An
aircraft flown by German ace Eduard Ritter von Schleiter,
who would later go on to command
Fighter Squadrons, and became known as the “Black Knight”.
Construction
starts with the interior of the fuselage, as there is no cockpit detail to slow
you down.
I built the kit OOB, so I used the
thick clear parts provided for the fuselage windows.
Once they were in, I painted the
interior of the fuselage a wood brown.
 (If
you don’t want to use the figures and instead add some scratch built interior
detail, then you’ll want to use something else for the windows.)
(If
you don’t want to use the figures and instead add some scratch built interior
detail, then you’ll want to use something else for the windows.)
The fuselage halves fit reasonably well—I only needed to use a little CA to fill
the seam.
Before attaching the
wings, I made a couple of shallow cuts with my knife in the fuselage at the wing
root so that I could install rigging later.
I then attached the lower wing,
stab, and rudder.
I
then airbrushed the model with light gray—I chose Model Master Acrylic
“Camouflage Gray”.
I also painted the top wing, wing
struts and wheels at this point.
When
I installed the top wing,
I installed the rigging at the same
time.
I used my standard “smoke” colored
invisible thread.
This has to be the easiest WW1
biplane kit there is, in terms of getting the top wing on.
Both wings mount solidly to the
fuselage, and alignment is guaranteed.
The wing struts fit perfectly, too,
without any trimming needed.
The
decals in my kit were very good—some of the best I’ve seen in an old Airfix kit.
The decals were printed in
register, and the white covered well.
When they were first applied, they
didn’t look like they’d settle down very well at all.
However, they responded well to
Micro-sol, and snuggled down very well after only one application of the magic
liquid.
After they had dried, I was very
pleased with the results.
Once the decaling was complete, it was time
to finish the model.
 As
I mentioned before, both of the “Vee” struts for the landing gear were broken.
I used a piece of appropriate
diameter brass rod from the scrap box, and made replacement parts.
I drill holes in the fuselage at
the mounting points, and then installed them with superglue.
As
I mentioned before, both of the “Vee” struts for the landing gear were broken.
I used a piece of appropriate
diameter brass rod from the scrap box, and made replacement parts.
I drill holes in the fuselage at
the mounting points, and then installed them with superglue.
For
the rigging, I used my standard “smoke” colored invisible thread.
Normal invisible thread is clear
floored nylon thread.
The “smoke” version has a dark grey
hue to it, and looks good on 1/72 models, I think.
Since I build these models to hang
over the desk, I build them OOB, so I don’t try to include every flying wire and
control cable.
I generally add some rigging
between the wings, and the landing wires to the LG struts, to give the illusion
of a fully- rigged aircraft.
The
final step was to airbrush the model with a coat of satin clear, to even out the
finish.
I
built this model to add to my collection of WW1 models that hang from the
ceiling over my desk.
As such, this model was perfect for
the task, with the nice figures a real plus.
It
was a quick build—something easy to work on as a side project while I waited for
parts on other, more complicated projects to dry.
 You
probably can’t find an easier WW1 biplane to build in 1/72 scale—no fragile wing
struts to deal with.
This is a fine kit for a quick OOB
build, and the only one on the market in this scale that I’m aware of.
The basics are there, and there are
a lot of things you could do to improve the model, if you’re so inclined—you
could add some cockpit detail, replace the guns, etc.
You
probably can’t find an easier WW1 biplane to build in 1/72 scale—no fragile wing
struts to deal with.
This is a fine kit for a quick OOB
build, and the only one on the market in this scale that I’m aware of.
The basics are there, and there are
a lot of things you could do to improve the model, if you’re so inclined—you
could add some cockpit detail, replace the guns, etc.
My
model was one of the Airfix
“Special Edition” series, with the
pilot’s picture on the box top.
The model has been around a long
time, and can be found in a variety of boxes with a variety of markings.
The same kit has appeared in both
Airfix and Heller boxes.
Review
kit courtesy of a swap meet find and my $4.
Special
thanks to Pip Moss for the great pictures he took of the completed model.
Bill Michaels
July 2008
Copyright ModelingMadness.com. All rights reserved. No reproduction in any form without express permission from the editor.
If you would like your product reviewed fairly and quickly, please
contact the editor or see other details in the
Note to
Contributors.
Back to the Main Page
Back to the Review Index Page 2025