
Aurora 1/48 Gotha G.V
| KIT #: | 785 |
| PRICE: | $30 on E-paid |
| DECALS: | One option |
| REVIEWER: | Scott Lyle |
| NOTES: | Decals by Hippo/Aires |
| INTRODUCTION |
 xt model” when opening the box of say, Tamiya’s new
1/32 P-51 Mustang is the modeler’s equivalent of
- well, I’ll let you fill in the blank of whatever
highly pleasurable activity you daydream about.
This is a family website after all.
xt model” when opening the box of say, Tamiya’s new
1/32 P-51 Mustang is the modeler’s equivalent of
- well, I’ll let you fill in the blank of whatever
highly pleasurable activity you daydream about.
This is a family website after all.
The truth is I when look at my collection of 1/48 scale
bombers, I have to have a
So
| THE KIT |
Maligned – badly - in just about every
review or blog I could find, the kit may have been state of the art in its day
but in today’s day it’s sorely lacking.
The shape of the wings is off.
The shape of the fuselage is off.
The engine nacelles are the wrong shape and size, and
the engines have only rudimentary detail.
The cockpit interior is as basic as basic can be,
meaning that the whole thing
 has to scratch-built.
The windows on either side of the nose are missing, a
rather noticeable omission.
The one pleasant surprise is that the famous
has to scratch-built.
The windows on either side of the nose are missing, a
rather noticeable omission.
The one pleasant surprise is that the famous
On top of the dimensional shortcomings are the
technological shortcomings, unavoidable given the kit’s age but still items that
have to be dealt with.
There are obvious knock-out pin marks on most of the
parts, molded-on part numbers on several of the parts, large sink-holes and even
the old
So you have to look at the kit as the basis upon which
you’re going to have to perform a lot of modifications and add a lot of
scratch-built details.
Or you could pitch the whole thing in the trash.
For reasons I can only blame on some sort of deep-rooted
psychological trauma, I jumped in head first, sort of like those divers in shark
shows that willingly get in the water with Great Whites.
There are some excellent references for this kit,
without which I would have gone the aforementioned trash route.
The first is the book “
 The second reference is an article by Mr. Carl Park in
the July 1995 issue of “Fine Scale Modeler” magazine.
In that issue Mr. Park provides a step-by-step account
about how he modernized the kit, and it is therefore a perfect reference for
this project.
The second reference is an article by Mr. Carl Park in
the July 1995 issue of “Fine Scale Modeler” magazine.
In that issue Mr. Park provides a step-by-step account
about how he modernized the kit, and it is therefore a perfect reference for
this project.
Another reference is the Wingnut Wings website.
They have recently released a 1/32 scale
I used three aftermarket kits for this project, the
first being a pair of resin Mercedes engines from CMK.
The two Parabellum machine guns were built from a Tom’s
Modelworks photo etch set, and the bombs came from Mirage’s German/Polish bomb
set.
I was also the beneficiary of an act of kindness from the Aires
aftermarket company.
They have marketed a limited run 1/48 kit of the
| CONSTRUCTION |
My strategy here was to add just enough detail to make
the interior look reasonably busy without driving myself insane.
Buying a couple packages of Evergreen rod stock in .020”
and .035” diameters helped, as did one of their packages of plastic sheet in
different thicknesses.
My first move was to cut out a piece of Evergreen sheet
to create a floor and then glue that into the left fuselage half.
I then added pieces of .020” rod stock evenly along the
fuselage walls as vertical braces.
 There are three bulkheads to come up with – one between
the nose gunner’s position and the pilot, one behind the pilot’s seat, and one
just forward of the rear gunner’s seat.
I modeled those from plastic stock, using the Wingnut
Wings instructions as a reference.
I then used plastic card to replicate the fuel tank
(confession – I have no idea what the actual fuel tank looked like, only that it
was unique to the G.V variant) between the pilot’s station and the rear gunner’s
station.
I used more plastic card and rod stock to create the three seats for the
crew.
They came out a little crude, but they’ll have to do.
There are three bulkheads to come up with – one between
the nose gunner’s position and the pilot, one behind the pilot’s seat, and one
just forward of the rear gunner’s seat.
I modeled those from plastic stock, using the Wingnut
Wings instructions as a reference.
I then used plastic card to replicate the fuel tank
(confession – I have no idea what the actual fuel tank looked like, only that it
was unique to the G.V variant) between the pilot’s station and the rear gunner’s
station.
I used more plastic card and rod stock to create the three seats for the
crew.
They came out a little crude, but they’ll have to do.
Before adding more detail I wanted to paint the
interior.
On the real Gotha G.V the fuselage was made of plywood, so I
first painted all of the surfaces Testors Acrylic US Marines Sand (a suitable
beige color I had on hand) and then used an old, stiff brush to drag Vallejo
Saddle Brown across the various panels to form a wood-grain look.
I then sprayed Testors Clear Orange over that and then
followed that step with Testors Flat Coat.
I painted the
large fuel tank Testors Camouflage Gray and dirtied it up with some paint chips
and washes.
Next I began adding some details to the inside.
From my spares box I fashioned three oxygen tanks (one
for each station), some spare machine gun ammunition, and the rudder pedals.
The photo etch fret from Aires/Hippo contained an
instrument panel, so I painted that up and glued it in place.
Some photo etch seatbelts were sourced from my spares
box, and with that I closed up the fuselage halves.
The fuselage seams actually weren’t too bad, but there
were some large sink-marks that had to be taken care of.
While I was addressing those I sliced off the overly
large rigging brackets molded onto the sides of the fuselage halves and replaced
them with the photo etch parts from Aires/Hippo.
 Setting aside the fuselage, I moved onto the tail-plane
assembly.
The Aurora part had some knock-out pin marks that had to be
addressed, and I also separated the elevators from the piece.
I glued in some very small plastic card tabs to
replicate hinges and then glued the elevators to those, giving the area a more
detailed look.
I also replaced the molded-on control wire horns with thinner
versions.
I then glued the assembly to the fuselage.
I attached the fin next, followed by the fin braces and
the rudder.
Setting aside the fuselage, I moved onto the tail-plane
assembly.
The Aurora part had some knock-out pin marks that had to be
addressed, and I also separated the elevators from the piece.
I glued in some very small plastic card tabs to
replicate hinges and then glued the elevators to those, giving the area a more
detailed look.
I also replaced the molded-on control wire horns with thinner
versions.
I then glued the assembly to the fuselage.
I attached the fin next, followed by the fin braces and
the rudder.
Next I moved on to the wings.
Each wing had some knock-out pin marks to take care of
and then, as I had done with the tail-plane, I separated all four ailerons and
modeled small hinges out of plastic card before reattaching them.
I then glued the lower wings to the fuselage and took
care of its seams, which were minor.
With the lower wings in place it was time to figure out
a strategy for attaching the upper wings, connecting struts, and all that
rigging.
My first step was to glue the kit-provided center struts that support
the upper wings to the fuselage, which are thankfully very sturdy.
I next glued the upper wings together, but I left the
seam in the center intact as on the real McCoy there was actually a small gap
between the upper wings.
Once the glue cured I temporarily taped the upper wing
in place, using those center struts to support it.
Here I received a bit of gratitude for all of my work –
with the upper wing in place it becomes very apparent that this is one large
biplane!
I next glued the vertical struts, one by one, to the lower wing, but not
to the upper wing.
The kit’s struts fit fine in the forward positions but
were too short in the rear positions, so those had to be made from scratch from
plastic card.
Once the struts had cured, I removed the upper wing and then
added the rigging to all of those struts using stretched sprue and EZ Line.
I had to be ultra-careful not to knock any of the struts
off during this process!
Up next were the landing gear, which I assembled using
the kit’s parts and then attached to the underside of the lower wings.
The kit’s parts are a bit chunky and out of scale, and a
better man might want to scratch-build them.
With the tasks of constructing the engine nacelles, attaching the upper wing, and adding roughly six miles of rigging still to come, I masked off any openings and headed to the paint booth.
| COLORS & MARKINGS |
The
decals I received from Aires/Hippo provided markings for Gotha G.V 670/16, a
very early G.V bomber.
Sources differ on how that aircraft was finished.
The Windsock reference states that the aircraft was
painted the same overall light blue as the G.IV series, but that the upper
surfaces of the upper wings and elevators were covered with five-color day
lozenge fabric.
The Squadron/Signal reference meanwhile shows a profile that
indicates the bomber was entirely light blue, with none of the lozenge fabric.
Without knowing which is correct, I opted for the latter
approach.
It seems probable to me that the first G.V’s coming off the line
would have carried the same paint scheme as the G.IV’s.
One thing both schemes have in common is that the engine
nacelles and wing struts were painted light gray.
 My first step was to wipe down the model with Polly S’s
“Plastic Prep” and then airbrush a primer coat of Mr. Surfacer 1000 onto the
model.
After touching up some seams I pre-shaded the model with some Testors
Enamel True Blue.
I then made a mix of roughly 50/50 Testors Acrylic White
and Testors Acrylic RLM 65 Hellblau and airbrushed that all over the aircraft.
To provide a faded paint effect I added some white to
the mix and applied it to the model in random splotches.
I then hand-painted the struts Testors Acrylic Gull
Gray.
My first step was to wipe down the model with Polly S’s
“Plastic Prep” and then airbrush a primer coat of Mr. Surfacer 1000 onto the
model.
After touching up some seams I pre-shaded the model with some Testors
Enamel True Blue.
I then made a mix of roughly 50/50 Testors Acrylic White
and Testors Acrylic RLM 65 Hellblau and airbrushed that all over the aircraft.
To provide a faded paint effect I added some white to
the mix and applied it to the model in random splotches.
I then hand-painted the struts Testors Acrylic Gull
Gray.
The next step was a coat of Future sprayed onto the
entire model.
I let the Future cure for two days and then applied the decals,
which performed perfectly with Walthers Solvaset.
Once they set I sealed them with another coat of Future,
and then I began the weathering process.
I wanted to break up the monotony of the light blue surfaces, so I started by applying small dabs of raw umber, medium gray, and black oil paint onto each surface. I then loaded a brush with thinner and spread the various dabs around to create streaks, smudges, and other such discolorations. This is a fun technique since you can control how much pigment you’re applying and where by varying how much thinner you apply. Once that was set I airbrushed on a coat of Testors Model Master Flat Finish, and then it was time to tackle the remaining construction issues.
| CONSTRUCTION PART DEUX |
There were some big construction jobs
yet to tackle including attaching the upper wing, adding more rigging, and
building and painting the engines and their nacelles.
My plan was to add the rigging to the fuselage first,
glue the upper wing into position, and then fit the finished and painted engine
nacelles into place.
On the Gotha all of the cables that control the
elevators and the rudder run outside the fuselage, so I added those first using
EZ-Line.
Once that was done I glued the upper wing in position using CA glue, and
then painstakingly glued the top of each vertical strut to the upper wing as
well.
Next I replaced any rigging that had been broken and then “bounced” the
ones that were slack to tighten them up.
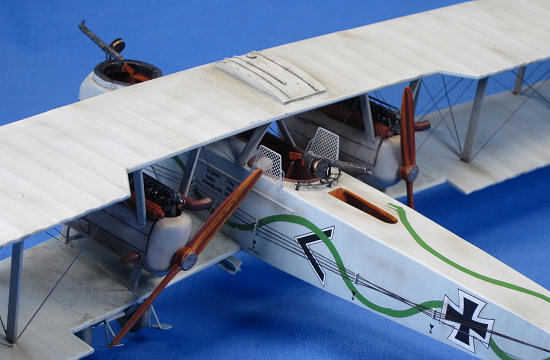
I tackled the engines next, assembling both of the CMK
resin engines and then coating them with a layer of Mr. Surfacer 1000.
I then painted them Vallejo Black Gray and gave them a
light dry-brushing of Testors Steel.
I used the kit’s exhaust pipes, but added some detail to
the muffler parts.
Those parts were then painted Tamiya Hull Red and
lightly drybrushed Testors Steel before being treated to so me rust-colored
The kit’s engine nacelle parts had to be modified to
accept the CMK engines.
To do this I cut off the bottom of the nacelles and
rebuilt them using plastic card.
With the engines trapped inside I glued the nacelles
together and painted them Testors Acrylic Gull Gray.
I weathered them with a Raw Umber wash and some paint
chipping using a Berol Silver pencil, and then airbrushed a very thin mix of
50/50 Tamiya XF1 Black and Tamiya XF64 Red Brown over all of the panel lines not
only on the engine nacelles, but all over the rest of the model as well.
With the engines now complete it was time to mount them
to the aircraft.
I had to scratch-build the four struts that support each one of
them and the four struts above them as well.
Once they had dried I painted them Testors Flat Gull
Gray and then added the rigging that goes around that area.
One thing was for sure – the Gotha did not lack for
rigging!
I was finally starting to see the light at the end of
the tunnel.
All that was left to do was to paint and attach the wheels,
props, machine guns, and bombs.
I painted the wheels Testors Gunship Gray and the tires
Testors Neutral Gray, and then weathered them with a Raw Umber wash and some
The props were first painted Testors Acrylic US Marines
Sand, and then some thin lines were masked off on them lengthwise.
I next sprayed some Testors Leather over them to create
the look of layers of wood laminated together.
This step was followed by a Raw Umber wash, a layer of
Testors Clear Orange, and finally a layer of Testors Flat Finish.
I assembled the photo etch machine guns from the Toms
Modelworks set, brush-painted a primer coat of Mr. Surfacer 1000, and then
painted them Vallejo Black Gray.
I lightly drybrushed them Testors Steel, and then
painted the wooden stock and grip using my usual wood-painting procedure.
Finally I assembled six 100kg bombs from the Mirage set and finished them in varying shades of light blue to make them look like they came from different “batches”. I weathered them with a dark wash and some paint chipping. I created six scratch-built bomb racks out of 0.020” plastic rod and glued them and four of the bombs to the Gotha. The other two bombs were left loose to display in a diorama setting someday.
| CONCLUSIONS |
And with that, my three and a half
month-long journey into modeling hell was over.
Okay, I’m being dramatic, it wasn’t hell.
No modeling project is ever hell; otherwise we modelers
wouldn’t do it.
But it was a long project, and was not without its
 frustrations.
Ultimately
I could have scratch-built many more items to make the finished product look
more refined, but life is short and spare time is even shorter, and I’m the type
who’s always looking forward to the next model.
frustrations.
Ultimately
I could have scratch-built many more items to make the finished product look
more refined, but life is short and spare time is even shorter, and I’m the type
who’s always looking forward to the next model.
Now that it’s done, a couple of things bug me about it.
I wasn’t able to create the very noticeable dihedral the
upper and lower wings of the real thing had.
The chunkiness of the landing gear, scarf ring, and
other detail items stick out to me eye.
The really cool open compartments beg for more detail to
busy them up.
Compared to my other models the whole thing looks a bit too
toy-like for my liking.
Perhaps after all of the time and money I spent on it, I
should have just saved up a few more dollars and sprung for the Hippo kit.
I don’t mean to slag Aurora – heaven knows I’ve loved
their products over the years more than any grown man should.
If you’re itching for a 1/48 Gotha you can certainly go
this route and create something reasonable.
But now that I’ve gone to all this trouble you need not
worry – the cynic in me knows that Eduard, Roden, or someone else will announce
a brand new 1/48 Gotha any day now.
And when they do, those screams of agony you hear from
over the horizon will be coming from me!
| REFERENCES |
-
Finescale Modeler, July 1995,
“Detailing Aurora’s 1/48 scale Gotha Bomber”, Carl D. Park
-
Squadron/Signal Publications, Aircraft in Action #173,
“German Bombers of WWI in Action”
-
Wingnut Wings website
February 2012
Copyright ModelingMadness.com. All rights reserved. No reproduction in part or in whole without express permission.
If you would like your product reviewed fairly and fairly quickly, please contact the editor or see other details in the Note to Contributors.