Wingnut Wings 1/32 LVG C.VI
| KIT #: | 32002 |
| PRICE: | $79.00 SRP (kit is now sold out) |
| DECALS: | Three options |
| REVIEWER: | Otis Goodin |
| NOTES: | Great kit, makes a beautiful model |
| HISTORY |
Several years ago I built a Blue Max 1/48 scale LVG CVI and
wrote an article about it for Modeling Madness. Later, Wingnut Wings
appeared and among their initial kits was a 1/32 scale LVG. I ordered
one and got it within a week from
 Peter
Jackson, the movie maker (of
Lord of the Rings
fame) who is also a WWI aviation buff. To quote from their website, “Wingnut
Wings' passion is to provide accurate, highly detailed, large scale
models that are as enjoyable to build for both the experienced and
novice modeler alike.” I have built several Wingnut Wings’ kits, and
based on my experience, they have more than succeeded.
Peter
Jackson, the movie maker (of
Lord of the Rings
fame) who is also a WWI aviation buff. To quote from their website, “Wingnut
Wings' passion is to provide accurate, highly detailed, large scale
models that are as enjoyable to build for both the experienced and
novice modeler alike.” I have built several Wingnut Wings’ kits, and
based on my experience, they have more than succeeded.
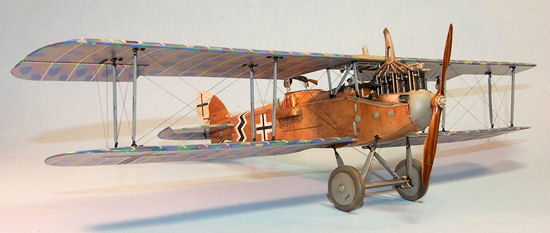
The LVG CVI was a successful upgrade to the CV version that LVG
developed in 1917. Prior to that LVG mainly produced other companies’
designs under license, such as the Albatros
| THE KIT |
The Wingnut Wings kit of the LVG is easily the best model of an LVG
ever produced and the only example that I know of in 1/32 scale.
To me, 1/32 is the best scale
 for
WWI subjects because of the relatively small size of the airplanes compared
to more modern aircraft. The larger scale allows for more detail, makes
rigging easier, and just makes it easier to see. The LVG, however, was a
fairly large airplane with very long wings so the model is pretty big,
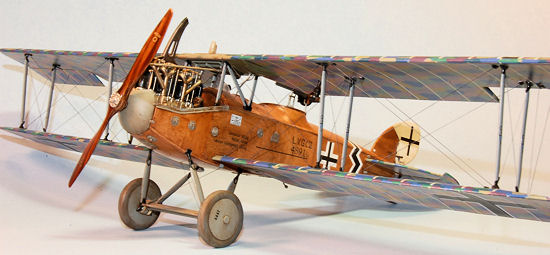
measuring 16 inches from wingtip to wingtip. The kit is injection molded in
light gray plastic and the 166 parts are first rate. No flash, all mold
injection pins are well hidden, and the pieces fit like they are supposed
to. The kit is engineered to be relatively simple to build and it is. You
are provided with lozenge decals, including the rib tapes, decals for seven
versions, photo etch seatbelts, and a 26 page instruction book complete with
detailed, in focus pictures of real LVGs from WWI. Boxtop art is done by
Steve Anderson, one of the best aviation artists around. I opted to do the
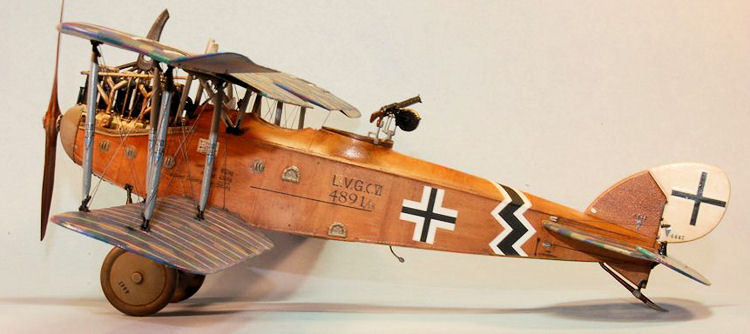
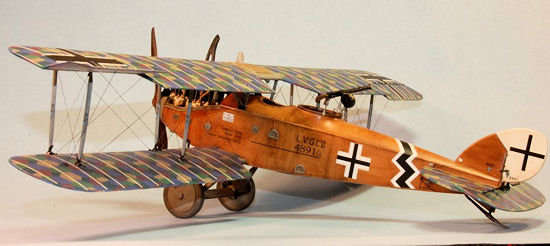
LVG depicted on the box top, LVG CVI 4891/18.
for
WWI subjects because of the relatively small size of the airplanes compared
to more modern aircraft. The larger scale allows for more detail, makes
rigging easier, and just makes it easier to see. The LVG, however, was a
fairly large airplane with very long wings so the model is pretty big,
measuring 16 inches from wingtip to wingtip. The kit is injection molded in
light gray plastic and the 166 parts are first rate. No flash, all mold
injection pins are well hidden, and the pieces fit like they are supposed
to. The kit is engineered to be relatively simple to build and it is. You
are provided with lozenge decals, including the rib tapes, decals for seven
versions, photo etch seatbelts, and a 26 page instruction book complete with
detailed, in focus pictures of real LVGs from WWI. Boxtop art is done by
Steve Anderson, one of the best aviation artists around. I opted to do the
LVG depicted on the box top, LVG CVI 4891/18.
| CONSTRUCTION |
Like most kits, construction begins in the cockpit. Beginning with
the seat, it consists of four parts that are then assembled to the fuel
tank. This is then attached to the floorboard along with the control column,
rudder pedals and three bulkheads. Be sure to install the photo etch seat
belts at this stage. I did a little rigging on the interior but most of it
is not really visible. Next I installed
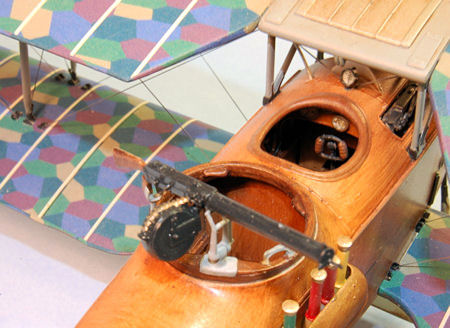 the
sidewalls, onto which there will be glued a bench seat for the observer, who
also gets a set of seat belts. I installed the wireless set to the right
fuselage half and glued this to the fuselage floor. There is no need to
guess about where to put things as the instructions are clear. I then glued
the other fuselage half to the floorboard and the other fuselage half. I
used a little putty at this point along with some Mr. Surfacer 500 to fill
the small gaps. Following this, I installed the completed cockpit assembly
into the fuselage along with the engine bearers. You are also instructed to
install the cabane struts. I really like the way Wingnut Wings has
engineered their struts and attachment points. They are sturdy and secure
making the installation of the top wing later a much less daunting task.
the
sidewalls, onto which there will be glued a bench seat for the observer, who
also gets a set of seat belts. I installed the wireless set to the right
fuselage half and glued this to the fuselage floor. There is no need to
guess about where to put things as the instructions are clear. I then glued
the other fuselage half to the floorboard and the other fuselage half. I
used a little putty at this point along with some Mr. Surfacer 500 to fill
the small gaps. Following this, I installed the completed cockpit assembly
into the fuselage along with the engine bearers. You are also instructed to
install the cabane struts. I really like the way Wingnut Wings has
engineered their struts and attachment points. They are sturdy and secure
making the installation of the top wing later a much less daunting task.
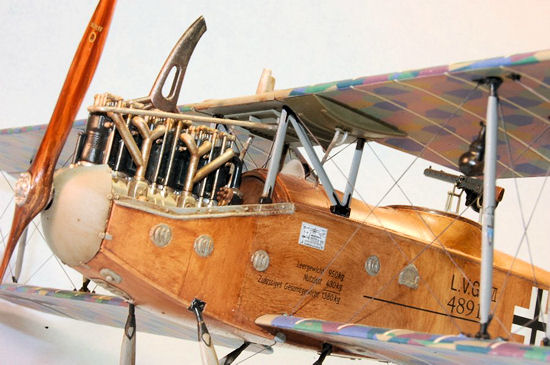
The next step was the construction of the engine. I’ll admit I’ve
never been much of an engine builder, preferring to get it out of the way so
I could move on to more interesting things like wings, wheels and
propellers. But these Wingnut Wings engines are so well done they are models
in themselves. Wingnut provides enough detail so you don’t feel like you
have to add to it to have a realistic engine, but they also provide some
great photos so you can super detail them if you wish. Wingnut recommends
that you leave the engine compartment open to show off the engine, but there
are cowling covers if you prefer. I chose to leave mine open.
Once the engine is installed it’s time to add the top deck to the
cockpit/observer area. Again, I used just a little Mr. Surfacer to fill in
any small gaps, although I’m not sure there were any. You can also add the
forward shooting Spandau machine gun at this point. There is no photo etch
cooling jacket which I found a little strange considering all the other
detail, but with some effective painting it’s not too noticeable. At this
point a few details are added like engine
 hatches
all along the fuselage, and the container on the side of the fuselage for
the hand thrown bombs.
hatches
all along the fuselage, and the container on the side of the fuselage for
the hand thrown bombs.
Next are added the tailplane and stabilizer. I used a little Mr.
Surfacer for the stabilizer but nothing for the tailplane as it was actually
a separate structure attached to the fuselage so I wanted it to have some
minor separation. Again the fit is so good this is not a problem. I then
added the center section of the top wing (to the cabane struts) which is
basically the radiator in a wooden structure to which the right and left
wings are added. There is some piping from the engine up to the radiator so
be sure to connect this before moving on to the wings. Following this
control horns are added to the stabilizer flap which is then installed onto
the stabilizer. Wingnut recommends, and I concur, that you secure this piece
by drilling holes into the flap and stabilizer and then install thin bits of
wire into the stabilizer before gluing the flap into place. This gives the
flap something more to hang onto than just gluing it to the stabilizer. The
same is true for the ailerons and the rudder.
The instructions call for you to add the landing gear assembly next
but I chose to delay this till the end. My next step was to install the
wings which I did by gluing the bottom wings into the fuselage and the top
wings into the center section installed earlier. Wingnut provides generous
connection tabs so that the wings fit securely into their assigned
locations. (No “butt joints” here!) In fact, the bottom wings are designed
to fit so that the correct dihedral is achieved. Once the wings have set up
some you can begin to add the interplane struts. It matters which struts are
installed where so pay attention to the numbers indicated in the
instructions. I find it best to work from the inside out, installing both
front and rear wing struts before moving on to the next ones. Install the
anemometer where indicated depending on the version chosen.
Once the wings were installed I added the landing gear. Wingnut
provides some detailed pieces including the axle wing, support bar, struts,
and even the bungee cord shock absorbers. The struts have long locating tabs
that fit into deep openings on the fuselage so the landing gear fits
securely once dry. This adds a lot of structural strength to the model and
that’s a good thing because the LVG is big and heavy. Once the struts had
set up I added the large wheels and wheel covers.
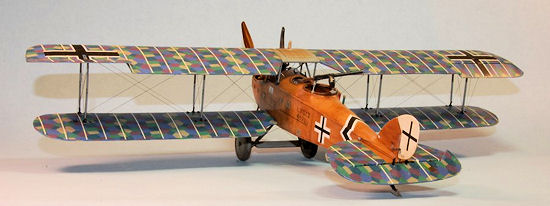
Having completed most of the construction it was time for rigging.
This is probably the part of WWI aircraft construction that discourages more
from trying it than anything else. However, once again, Wingnut Wings has
done its part to make it easier than it’s ever been. Besides providing
really good rigging diagrams, Wingnut also provides pre-drilled holes into
which to place the rigging including in the wings, in the fuselage, strut
turnbuckles, and in the control horns. For the past few years I have been
 using
EZ Line for rigging material. It comes in two sizes, basically thick and
thin, and I find the thin works best for most of the rigging I do. EZ Line
is a stretchy material that keeps the rigging from getting slack over time.
It doesn’t add structural strength like invisible thread does, but on
Wingnut kits you really don’t need to add strength anyway. I didn’t do it on
this kit, but you can add turnbuckles from Bob’s and still use the EZ Line.
You can also make turnbuckles from glue or thick paint once the rigging sets
up. I simply thread the EZ Line into the hole into which I’ve already put
some super glue, and allow it to set up.
EZ Line is a little tricky in that it’s very
flexible and it sticks to the super glue immediately so you have to be
careful or it will go places you don’t want it to. But if it does, you can
easily pull it away and start over (with a new piece of EZ Line). Once the
glue has set up (just about a minute) I can stretch the EZ Line to (or
through) the other connecting point and glue it in place. I usually hold
this end with a pair of locking tweezers or clamps to keep the line
stretched until the glue sets up. Then I trim off the excess and it’s done.
This is essentially the technique I use whether I’m rigging the wings,
struts, control horns, etc. When rigging the wings I usually attach the EZ
Line to the underside of the top wing first, and then pass it through a hole
in the bottom wing which I have drilled all the way through. I pull the EZ
Line tight, glue it with a drop or two of super glue, and let it set up
while stretched with the tweezers. Once done, I trim it off and treat the
hole to make it less noticeable. This usually involves a little more super
glue to fill the hole, sanding it smooth, and then painting over it to match
the bottom of the wing. With lozenge decals it’s even easier to hide the
touched up spot.
using
EZ Line for rigging material. It comes in two sizes, basically thick and
thin, and I find the thin works best for most of the rigging I do. EZ Line
is a stretchy material that keeps the rigging from getting slack over time.
It doesn’t add structural strength like invisible thread does, but on
Wingnut kits you really don’t need to add strength anyway. I didn’t do it on
this kit, but you can add turnbuckles from Bob’s and still use the EZ Line.
You can also make turnbuckles from glue or thick paint once the rigging sets
up. I simply thread the EZ Line into the hole into which I’ve already put
some super glue, and allow it to set up.
EZ Line is a little tricky in that it’s very
flexible and it sticks to the super glue immediately so you have to be
careful or it will go places you don’t want it to. But if it does, you can
easily pull it away and start over (with a new piece of EZ Line). Once the
glue has set up (just about a minute) I can stretch the EZ Line to (or
through) the other connecting point and glue it in place. I usually hold
this end with a pair of locking tweezers or clamps to keep the line
stretched until the glue sets up. Then I trim off the excess and it’s done.
This is essentially the technique I use whether I’m rigging the wings,
struts, control horns, etc. When rigging the wings I usually attach the EZ
Line to the underside of the top wing first, and then pass it through a hole
in the bottom wing which I have drilled all the way through. I pull the EZ
Line tight, glue it with a drop or two of super glue, and let it set up
while stretched with the tweezers. Once done, I trim it off and treat the
hole to make it less noticeable. This usually involves a little more super
glue to fill the hole, sanding it smooth, and then painting over it to match
the bottom of the wing. With lozenge decals it’s even easier to hide the
touched up spot.
Once the rigging was done I added the machine gun mount to the
observer opening and then attached the machine gun. Finally I added the
large exhaust and the propeller. This version used a Wolff prop, but an
Axial version is also included. WWI props, being made of wood, were replaced
fairly frequently and a plane could have a Wolff one time, an Axial the
next, and maybe even a Garuda or a Niendorff.
| COLORS & MARKINGS |
 Most
of the significant painting on this model involved the wood grain fuselage
and interior. My basic method for wood grain is to paint a base coat of
Model Master Tan and then use artist oils to apply a darker wood grain coat.
I use Griffin’s Alkyds (usually Burnt Umber, Burnt Sienna or Yellow Ochre)
which are fast drying oil paints made by Winsor & Newton. Traditional oil
paints can take several days to dry, but Griffin’s dries within 24 hours.
Griffin’s has an alkyd base to which the pigment is added while traditional
oils are usually linseed or safflower oil. To me the key to making an
accurate wood grain is to realize that you are working in a small scale so
the level of wood grain visible will not be that great. Even so, you need to
vary the direction and grain. Particularly on planes such as these, the
wooden fuselage was made up of various panels of plywood, usually installed
at 90 degree angles to each other for extra strength. For the LVG, most of
the interior was wood including the instrument panel, bulkheads, floorboard,
etc. I varied the wood by making some pieces darker and lighter.
Most
of the significant painting on this model involved the wood grain fuselage
and interior. My basic method for wood grain is to paint a base coat of
Model Master Tan and then use artist oils to apply a darker wood grain coat.
I use Griffin’s Alkyds (usually Burnt Umber, Burnt Sienna or Yellow Ochre)
which are fast drying oil paints made by Winsor & Newton. Traditional oil
paints can take several days to dry, but Griffin’s dries within 24 hours.
Griffin’s has an alkyd base to which the pigment is added while traditional
oils are usually linseed or safflower oil. To me the key to making an
accurate wood grain is to realize that you are working in a small scale so
the level of wood grain visible will not be that great. Even so, you need to
vary the direction and grain. Particularly on planes such as these, the
wooden fuselage was made up of various panels of plywood, usually installed
at 90 degree angles to each other for extra strength. For the LVG, most of
the interior was wood including the instrument panel, bulkheads, floorboard,
etc. I varied the wood by making some pieces darker and lighter.
The metal parts of the interior were generally painted in RLM Gray
or black. (All paints are Model Master Acryl unless otherwise noted). I
painted the fuel tank on which the seat rests in Polly Scale Copper (which
looks like brass), although many were painted black. The ammo can for the
forward Spandau was painted Aluminum. I painted the seat belts Leather,
weathered with Griffin’s Burnt Umber and highlighted with Tamiya Buff to
represent wear. The dial faces on the instrument panel were painted Silver
before applying the instrument dial decals. Wingnut provides excellent
instrument panel detail. The pilot’s seat was painted Leather, again
weathered with Burnt Umber and Buff. The observer’s area had various ammo
drums that were painted Gun Metal and highlighted with a little Metallic
Gray. The wireless radio was mounted on a wood painted panel and painted
Silver, Black and RLM Gray per the instructions.
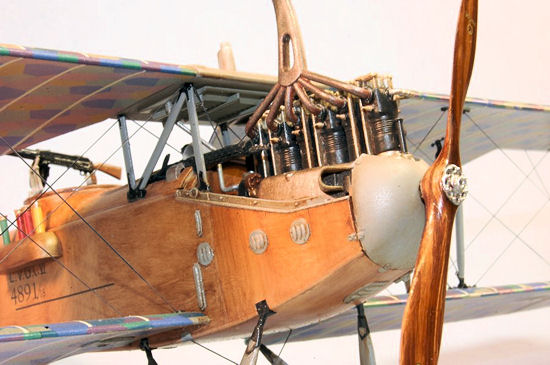 The
engine was painted a combination of Aluminum with Gun Metal cylinders. I use
Model Master Gun Metal because it has that true blue steel look as opposed
to the grayish tone some brands have. I also painted various parts Metallic
Gray, Burnt Iron (Gunze), and Brass. Detailed painting instructions are
provided. The engine was weathered with Griffin’s Burnt Umber and some
pastels. I painted all the struts and exterior hatches Neutral Gray, as well
as the center section of the top wing. The many strut brackets throughout
were painted Black. The top section of the radiator was painted Aluminum and
weathered with Burnt Umber. The radiator shutters on the underside of the
center section were painted RLM Gray. The pipes leading to and from the
radiator were painted Aluminum. The large exhaust stack was finished in Jet
Exhaust, drybrushed with Burnt Iron and Rust.
The
engine was painted a combination of Aluminum with Gun Metal cylinders. I use
Model Master Gun Metal because it has that true blue steel look as opposed
to the grayish tone some brands have. I also painted various parts Metallic
Gray, Burnt Iron (Gunze), and Brass. Detailed painting instructions are
provided. The engine was weathered with Griffin’s Burnt Umber and some
pastels. I painted all the struts and exterior hatches Neutral Gray, as well
as the center section of the top wing. The many strut brackets throughout
were painted Black. The top section of the radiator was painted Aluminum and
weathered with Burnt Umber. The radiator shutters on the underside of the
center section were painted RLM Gray. The pipes leading to and from the
radiator were painted Aluminum. The large exhaust stack was finished in Jet
Exhaust, drybrushed with Burnt Iron and Rust.
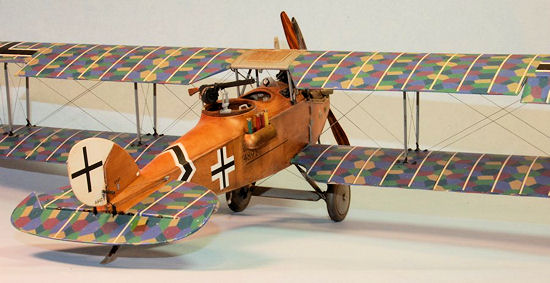
Wingnut provides the beautiful five color lozenge decals used to
cover the wings and tailplane, along with the rib tapes. Applying lozenge is
not difficult, just tedious and time consuming. These Cartograf decals don’t
require the usual amounts of decal solvent to make the decals fit well, but
I did use some in spots even though Wingnut tells you not to. Where I could
I used MicroSet instead of MicroSol, but in a few places MicroSol was
required. For the wings, I first painted them Neutral Gray, then coated them
in Future until a slick surface was achieved. I applied the underside
lozenge first, completely covering the underside of the top wings, but not
covering the sections of the bottom wing where the rigging would emerge
until after it was applied and cleaned up. I then applied lozenge in these
areas which completely covered the repair job. I had applied the topside
lozenge as well, and generally had all the lozenge areas covered before
assembling the wings to the fuselage, except for the areas that would need
repair after the rigging. You are given three sets of rib tapes to choose
from, blue, pink and a neutral buff or off white. It appears that most LVGs
used the neutral color so that is what I went with.
The ailerons and flaps were covered in lozenge that ran perpendicular to the
direction that the wings and tailplane were covered. Finally, I covered the
edges of the wings and tailplane in strips of lozenge that I cut from the
larger lozenge sheet. These strips “sealed” the edges all the way around. I
used more decal solvent here than anywhere else.
I applied the fuselage, rudder and wing crosses with no problems, and added the many smaller LVG markings and stencils to the various struts and panels. There are quite a few of them. I sealed the decals at various stages using Future, then later sprayed everything with Model Master Satin to tone down the glass. The lozenge was given an extra shot of Satin as these were generally finished with a coat of flat lacquer in the factory.
| CONCLUSIONS |
 After
about a month my LVG was finished and I was very pleased with the result. The
biggest problem was where to put it as it is quite large. It occupies its own
shelf in my glass enclosed cabinet. Wingnut Wings has done a fabulous job on
this kit both in terms of quality and subject matter. I never thought I would
ever see a 1/32 scale LVG, especially one as user friendly to build. Of course,
they have ventured places no model makers have ever gone before, including a
1/32 Gotha bomber and a Junkers J.1. If you have never built WWI before, I
highly recommend the whole line of Wingnut kits, although I might start with a
Pfalz D
After
about a month my LVG was finished and I was very pleased with the result. The
biggest problem was where to put it as it is quite large. It occupies its own
shelf in my glass enclosed cabinet. Wingnut Wings has done a fabulous job on
this kit both in terms of quality and subject matter. I never thought I would
ever see a 1/32 scale LVG, especially one as user friendly to build. Of course,
they have ventured places no model makers have ever gone before, including a
1/32 Gotha bomber and a Junkers J.1. If you have never built WWI before, I
highly recommend the whole line of Wingnut kits, although I might start with a
Pfalz D
| REFERENCES |
Wingnut Wings kit instructions
Classic Aircraft of WWI,
Melvyn Hiscock, Osprey Aerospace, 1994.
Windsock Datafile,
LVG CVI,
Albatros Productions.
November 2012
Review kit courtesy of my kit collection.
If you would like your product reviewed fairly and fairly quickly, please contact the editor or see other details in the Note to Contributors.