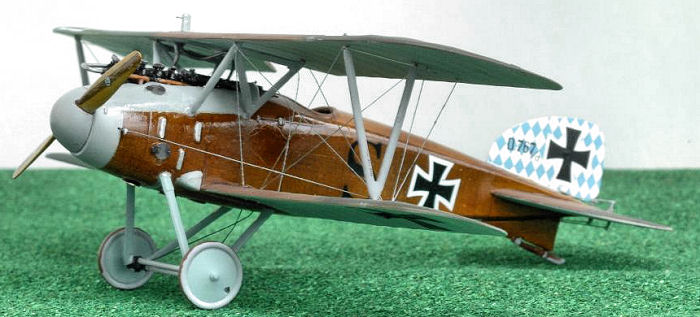
Eduard 1/48 Albatros D.III
|
KIT # |
8035 |
|
PRICE: |
$29.98 MSRP or $22.50 At Roll Models |
|
DECALS: |
Four options – |
|
REVIEWER: |
|
|
NOTES: |
Eduard Etched used |
|
HISTORY |
The Albatros Fighter was introduced in April 1916 by Albatros Werke, a small company on the outskirts of Berlin. Albatros was the mainstay of German aviation during the entire war. It started out as a new generation of aircraft, heavily armed and faster than its opposition. Within months the rapid pace of change brought improved competition from France, and England to the sky of Western Europe spurring Albatros on to improved versions of its streamlined aircraft. Although surpassed by Fokker in the last year of the Great War, most German WW I aces flew and fought in Albatros aircraft at one time.
The Albatros D.I made its combat debut on September 17, 1916, against seven British F.E.2b pushers. Five of the F.E.2b’s were downed with no Albatros losses. That day was recognized as the day German aviation’s introduction of the Albatros made every other aircraft in use by the Allies obsolete.
The version modeled here, the D.III was far superior to any Allied fighter of the time, a fact that contributed to the Allies "Bloody April" of 1917. The D.III was quite possibly the best looking of the Albatros fighter series. Most German aces flew the aircraft including Baron von Richthofen, Hermann Goering, etc. Powered by Mercedes Benz, this aircraft had the speed and reliable power to take on more agile allied fighters. The Austrian’s produced the aircraft as well, using Oeffag to build the Royal and Imperial Air Service of the Austro-Hungarian Army versions. The Austrians built a total of 540 Albatros aircraft in several versions with production continuing until October 1918. Use of the Albatros continued after WW I with Poland the most notable user.
|
THE KIT |
The Albatros is a fantastic looking aircraft. Until recently I knew very, very little about WW I aircraft types. What I did know is I had some books purchased over the years, such as the Squadron Albatros Fighters in Action, that I looked at briefly, out of curiosity, but not with the careful eye I apply to most other modeling efforts. After all, there were no good kits to build and the rigging is such a hassle. Eduard changed all that for me.
 Eduard’s Albatros D.III is an all-around winner. Out of the box this kit
gives you a nicely detailed replica of this famous fighter. The profipack
boxing gives additional etched metal and decal options that allow you to
build a beautiful model. I tried building an Eduard W.W. I kit in 1994 and
was defeated by the use of etched metal for many components. I could see
how in the right hands a masterpiece would result, but after this stalled
effort, I went back to my usual WW II and modern jets building. The end
result, a Siemens-Schuckert sits on my display shelf like a forlorn little
league “athletic participation” trophy.
Eduard’s Albatros D.III is an all-around winner. Out of the box this kit
gives you a nicely detailed replica of this famous fighter. The profipack
boxing gives additional etched metal and decal options that allow you to
build a beautiful model. I tried building an Eduard W.W. I kit in 1994 and
was defeated by the use of etched metal for many components. I could see
how in the right hands a masterpiece would result, but after this stalled
effort, I went back to my usual WW II and modern jets building. The end
result, a Siemens-Schuckert sits on my display shelf like a forlorn little
league “athletic participation” trophy.
This is one nice kit. I was happy looking at it in the box and as I built it no vices or problems were experienced. The instructions were clear. The parts went together well and as building progressed I kept thinking “what a nice kit this is to work with”. It is so pleasant to build that I ordered several more, before I was finished.
I kept comparing this kit to the Tamiya P-47D Razorback in 1/48th which was the last WW II kit I built that impressed me more and more as I built it. My awareness and appreciation for the kit grew while building and seeing the added details and incremental improvements over previously released Eduard kits. I enjoy kits that are such a sweet build. In the past I have often thought, “Eduard makes such nice etched metal but their plastic is for die-hards looking for a challenge”. I would find one or two parts misfits (like a wing-to-fuselage join) or lose a few etched metal parts tot he carpet monster or cluttered work bench and go on to other projects rather than building several more of the same kit. Small details make the difference between a good kit and a great kit. The Albatros turned out to be a great kit in my opinion. It is acceptably priced and turns into a real beauty when finished giving the average modeler an enjoyable build and a delightful end result. I am sure the better modelers, who build for contests, have a great time showing off their Eduard Albatros’. Also, since they are diminutive in 1/48th scale they will not take up too much display space. If you are space limited consider building more WW I aircraft.
There are a number of added details that shows someone in Eduard did their homework when designing and engineering this kit. Although an occasional nit will be identified or expressed in the many modeler web forums I have never seen and serious negatives over this kit. My summary - this baby made me happy and goes together quite well!
|
CONSTRUCTION |
First, I would like to recognize the breakthrough I experienced thanks to a few modelers sharing their experiences via web sites and web forums like Modeling Madness. Tom Cleaver, Tony Bell, Bob Laskodi, and Roger Fabrociani come to mind. Their how-to articles and stunning kits made me think – “why not build a WW I Bi-Plane?”
My disappointment with the first try, years ago, of building a WW I subject were caused by a few reasons. I failed to create a realistic wood effect for the fuselage or prop. The prop looked toy-like painted a solid dark brown to “simulate” wood. I even tried to improve the look with a “wood” decal added. The rigging was a mess. So, I ignored all the progress and beautiful WW I kits that came out in the intervening years. That is, until webzine articles from the above gentlemen gave me the inspiration to go for it!
My first challenge was trying to simulate a natural
exposed plywood surface. I used Tony Bell’s process of spraying Tamiya Buff
and over-painting it with artist’s oils. The oil paint is removed in a
reverse dry-brushing technique. I tried a variation using XF-60 Tamiya Dark
Yellow as a base coat which was applied by airbrush. Once it had dried a
few days, I hand brushed a coat of Winsor & Newton Oil Colour # 3 Burnt
Umber on the entire fuselage. As a thinner for the artists oil tube pigment
I used the Grumbacher Oil Painting Medium # I, which is slow to evaporate,
and added a small amount of paint thinner to speed up the drying a bit. I
would brush on the burnt umber oil paint using a stiff bristled square
tipped brush, thinking I was ruining a good paint job. By the time I had
applied it to the entire fuselage it was time to take some of it off. I
then cleaned the brush on a lint free cloth and started to
 brush over the
areas that were now almost dry. I tried brushing the paint in the same
direction within I each section or panel. I would then go 90 degrees in the
opposite direction within the next panel. I removed most of the oil paint
I had just picked up on the lint free cloth after each panel and noticed a
look of wood grain starting to appear. Magic! Thank you Tony Bell!
brush over the
areas that were now almost dry. I tried brushing the paint in the same
direction within I each section or panel. I would then go 90 degrees in the
opposite direction within the next panel. I removed most of the oil paint
I had just picked up on the lint free cloth after each panel and noticed a
look of wood grain starting to appear. Magic! Thank you Tony Bell!
I set the fuselage aside a few days to dry. I then applied (sprayed) Gunze H91 Clear Yellow to develop the golden honey look of varnished wood. It worked.
Until this experiment my only alternative was to use the aftermarket decals to simulate wood that I purchased years ago. After looking at them, and using them on the prop of my first WW I build, I decided it looked terrible. This effort looked great by comparison. No new technology – just shared skills and techniques
At this time too much Internet model building reading caused me to add another challenge. I needed to have a nice prop. One that looked better than my Siemens- Schuckert prop that I painted a solid wood brown color with a lame wood decal added to the middle of the prop in an effort to simulate layers of wood. I thought it would look great – it didn’t.
My solution with this build was to carve a prop out of wood. I was inspired by an article that described taking layers of wood veneer and using cyanoacrylate glue creating a multi-layered sandwich of real wood that looked perfect for a scale effect. I went to several lumber products stores and no one had the verneer I needed. I was told they could special order it but that would take a few weeks and they had a minimum quantity of 20 feet so.…it was back to the Internet. I found a supplier, Rockler Woodworking and Hardware, that had what I was looking for at http://www.rockler.com/product.cfm?page=2215.
Unfortunately, this led to a delay. Time is precious, and I hate to wait, so I looked for an alternative. After I ordered the wood verneers, I wondered, since this was a first effort why not try to use the wood I had left over from a previous project. I had scratch-built some mini-guns for an AC-47 (a 1/48th Monogram C-47 gunship conversion) mixing plastic and wood parts. I used some Midwest Products Basswood I found at a Michael’s Craft Store in a 1/8” X 4” X 24” format. I cut a few pieces and set about to carve a few props. I used the same burnt umber oil paint to stain it and sprayed the wood with the Gunze clear yellow acrylic. It worked for this effort. The next time I hope to have some real layered wood props. I now have enough verneer for 200 props!
When I tried to install the recently carved and stained wood prop I found it was a bit too large in the spinner cavity and at that point I returned to the basics, I painted the Eduard Kit prop in a similar process as the fuselage. I will get back to using real wood for the prop in another build. I needed to get away from an AMS induced stall and complete the kit so I forged ahead! The Eduard prop painted looked good enough for this build.
The Eduard kit goes together well without any vices. The first step is the cockpit and it looked great after I airbrushed a coat of Tamiya XF-60 and applied the oil coat with dry-brushed removal method. The fit of the Eduard plastic parts was perfect. Everything just fit into its place. The etched metal parts added some terrific detail.
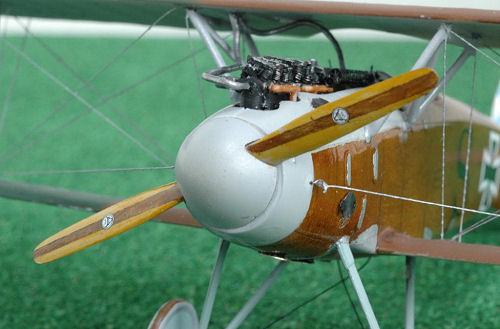
 The Albatros D.III article from Tony Bell had a step
where he detailed the Mercedes Benz engine. He added valve springs and
rocker arms. He was right about the opportunity to dress up the upper,
exposed part of the engine. The Eduard engine is nice out of the box.
Dressing up the top end was a great idea – thanks for the suggestion Tony,
since this is a small but very nice touch. I took a #80 drill bit and
wrapped some very thin copper wire around it. I cut the wire into small
spring segments. I drilled small holes and inserted small pins, made from
thin guitar wire, which is very rigid, along the top of the Eduard engine
valve covers. This helped hold the springs in place. Once they were in
place I added the rocker arms, which I cut from some squadron plastic card
stock. A coat of black paint and some silver dry brushing and another thank
you to Tony.
The Albatros D.III article from Tony Bell had a step
where he detailed the Mercedes Benz engine. He added valve springs and
rocker arms. He was right about the opportunity to dress up the upper,
exposed part of the engine. The Eduard engine is nice out of the box.
Dressing up the top end was a great idea – thanks for the suggestion Tony,
since this is a small but very nice touch. I took a #80 drill bit and
wrapped some very thin copper wire around it. I cut the wire into small
spring segments. I drilled small holes and inserted small pins, made from
thin guitar wire, which is very rigid, along the top of the Eduard engine
valve covers. This helped hold the springs in place. Once they were in
place I added the rocker arms, which I cut from some squadron plastic card
stock. A coat of black paint and some silver dry brushing and another thank
you to Tony.
I like to add spark plug wire to engines and this one will look good with them. The plug wires are below the cowling for all but the first cylinder on the Albatros and not visible for the rest of the engine so I elected not to add them this time. I may do this in a future project if I have a removed cowl version of this kit and add some further detail to the engine. I like Roden’s approach to provide a well-detailed engine you can build exposed. That has encouraged me to buy several Roden kits for future builds.
I followed the kit directions and assembly was very easy. I did not use any filler in building this kit except around the cockpit rim in order to obtain a seamless look for the leather pad that lines the edge of the cockpit. Eduard – I had no idea your plastic moulding had improved so much! Overall it was an excellent fit.
|
COLORS AND MARKINGS |
Painting:
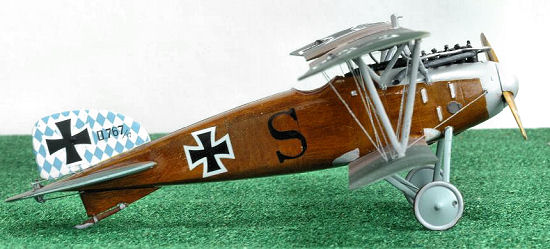
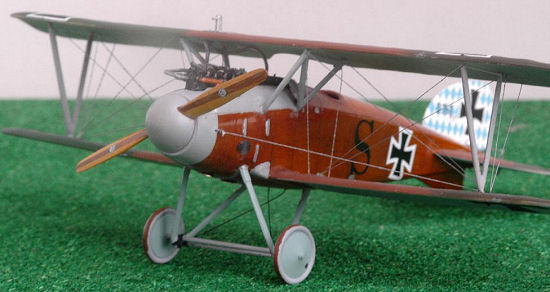
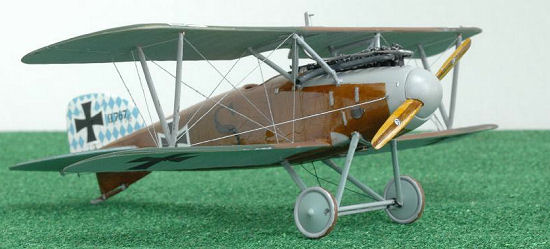
I used a Gunze Sangyo acrylic paint # H418 RLM 78 Light Blue on the underside and Tamiya XF-26 Olive Green and Tamiya XF-64 Red Brown with Gunze H330 Dark Green on the wings. I used Tamiya XF-60 Dark Yellow for the fuselage. Once the Tamiya XF-60 Dark Yellow was dry, I used the burnt umber oil paint and the dry brush technique to get a bare wood finish.
 I like
how it turned out despite having some real reservations about this modeling
tip working before I used it. It far exceeded my expectations. I hope you
too agree it looks like real wood although the pictures do not show the
detail as well as a close up look can. The engine exhaust is painted with
SnJ aluminum with some Testors metalizer burnt exhaust in a light secondary
coat. I added small amounts of Pactra rust to several areas to create
slightly used look to the aircraft.
I like
how it turned out despite having some real reservations about this modeling
tip working before I used it. It far exceeded my expectations. I hope you
too agree it looks like real wood although the pictures do not show the
detail as well as a close up look can. The engine exhaust is painted with
SnJ aluminum with some Testors metalizer burnt exhaust in a light secondary
coat. I added small amounts of Pactra rust to several areas to create
slightly used look to the aircraft.
For my next model of a bare wood fuselage I will try using Floquil F1100840 Railroad Colors “Foundation” along with a brown pastel pencil and Future floor wax wash to get a new and different wood finish. Although I was very pleased with the wood tone from this build, experimenting has its rewards. I will use this alternative technique in the future to compare the results and determine what new shades of wood are possible.
Decals:
I used the Eduard kit decals. They were thin and went on very easily. They looked like the propagteam decals of the past, which means you must be very careful to place them exactly where they need to go. They are not decals you can move around on a layer of microset. With this in mind every decal was placed in a “no second chance” process. That is, I used some microsol and applied the decal exactly where it was needed with no adjustments. Since they were thin they looked good once applied but the inability to move them once they touched the kit compromised my placement accuracy.
|
FINAL CONSTRUCTION |
There were a few parts I felt had to be added. Although I would say this aircraft is very well researched and superbly moulded, there may be a few parts that were overlooked. I added some radiator intake and outflow pipes using lead solder. The attachment points for these are moulded in locations on the radiators on the upper and lower wings but no plastic pipes are provided with the kit. Other Eduard kits like the Albatros D.V or Pfalz series for example, do have the radiator plumbing. Also, there is a small extension on top of the radiator, part # A11, that should have an additional pipe extending from it. I used a short piece of thin guitar wire to improve this part.
During
construction I usually added a wire pin securing it with cyano glue to the
building steps where a strong join is needed. It is the same principal used
by orthopedic surgeons fixing major bone breaks. Areas such as joining the
lower wing to the fuselage or cabane struts to fuselage and upper wing and
the landing gear to fuselage join received this modification. I did this to
improve the 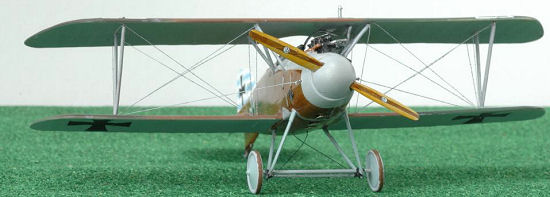 strength of the joins. I even added two pins to part # B13, the
tailskid, since it broke off on the initial build. At that point I started
using guitar wire pins on every join just to ensure nothing else would
break off. It makes for a solid assembly for otherwise “fiddley” parts.
This avoids something coming undone after you are finished painting,
building a kit or adding rigging, for example, and apply too much force and
hear the dreaded cyano glue cracking sound.
strength of the joins. I even added two pins to part # B13, the
tailskid, since it broke off on the initial build. At that point I started
using guitar wire pins on every join just to ensure nothing else would
break off. It makes for a solid assembly for otherwise “fiddley” parts.
This avoids something coming undone after you are finished painting,
building a kit or adding rigging, for example, and apply too much force and
hear the dreaded cyano glue cracking sound.
I may even use a set of pins for the fuselage halves next time I build the Eduard Albatros since I had a slight mis-alignment of the fuselage with this build. This was my fault and not a moulding problem. The fuselage halves match perfectly as moulded. I used my preferred glue, Tenax , but the fuselage separated after I applied an oil wash using some thinner. Perhaps the Tenax did not work the first time. I may have had some of the oil paint on the edges that were initially joined using Tenax. This required a re-gluing of the fuselage which was done using cyano glue to avoid damaging the wood simulated finish. Next time I will glue the fuselage together using Tenax before I use the acrylic and oil paint wood simulation process to see if that works better.
The final step in constructing WW I kits is the rigging. I am so new to WW I kits, that I still am looking for my preferred approach. So far, this is not my favorite step, but I can state I used Dai-Riki size 3X (.008 or 7.25 lb. test) rigging material from Roll Models. It worked and as a rigging material I found it produced the desired results. My only concern is I still need to find a preferred way to do the rigging and have read about other methods, such as creating turnbuckles from copper wire, lead fly-fishing or electronic micro-solder material. This is another “future” for me in the never-ending quest to improve the final model.
|
CONCLUSIONS |
Eduard’s Albatros D.III is a very enjoyable build. With no added parts or etched it will build into a great looking model. Using the Profipack version with etched parts it turns into a real beauty of a kit. The choices of colors and markings for Albatros aircraft are as plentiful and colorful as you can imagine. Eduard offer many variations with this kit boxing (#8035) and similar alternatives with most of their profipack kits. Actually, it makes it so hard to choose only one version. I can only resolve the problem by purchasing multiple kits in order to build the variety of color schemes they offer. There are ample aftermarket decals and references so what are you waiting for? All it takes are some new techniques and patience with the rigging. The Eduard injection moulding quality is superb. The fit of parts are world class. This won’t be the last Eduard WW I kit I build. The next few projects I have in mind are all Eduard 1/48th scale WW I subjects so that’s a hint of how pleased I was with this building project.
My Christmas wish for next year would be Roden issuing some of their WW I bombers, that are only available in 1/72nd scale in 1/48th scale. If they make the bombers in 1/48th scale my “to be built” list would grow and these would be the first to be built! I have heard others express this sentiment and now I see why building a WW I German bomber would be so enjoyable.
January 2006
|
REFERENCES |
Albatros Aces of World War 1 by Norman Franks, Osprey Aircraft of the Aces Volume 32, published in 2000.
Albatros Fighters – Windsock Datafile Special 3rd Edition 1998
Albatros D.III (OEF) Windsock Datafile # 19 published in 2000.
Albatros D.III by Peter M. Grosz, A Windsock Datafile Special published in 2003.
Review kit, courtesy of my stash and my wife’s continuing cooperation.
If you would like your product reviewed fairly and fairly quickly, please contact the editor or see other details in the Note to Contributors.