Choroszy 1/72 Albatros J.I
|
KIT #: |
A66 |
|
PRICE: |
$26.00
|
|
DECALS: |
One option |
|
REVIEWER: |
Kyle
Bodily |
|
NOTES: |
Resin kit |
In World War I the new and
untried nature of air combat made for a fertile field for the development of new
tactics.
The battles of
Verdun
and the
Somme
in 1916 were such fields.
Originally the
Germans tried a tactic called “Sparre” or blockade that would be like a trench
in the sky.
This would deny the
enemy use the airspace over the German lines and in the German rear.
In fact this idea was a two-dimensional tactic in a three-dimensional
battlefield.
The French and British
learned that they could easily go around, over, or under the patrolling Germans
thus exploiting this weakness and being able to bomb, reconnoiter, and strafe
virtually at will.
On top of their
tactics not being effective, the Germans found them to be quite costly in men
and machines, to say nothing of the lost raw materials that
Germany
could ill afford.
The result was a
total loss of air superiority in 1916, so devastating that a German troop would
say, “has anyone seen a German aviator let alone a German aircraft”.
Under the
supervision of Generalleutnant Ernst von Hoeppner, the German air service began
a total overhaul of its organization and tactics.
It had already started in August 1916 with the creation of the
Jagdstaffeln, but now the Schutzstaffeln (protection units) were created.
The job of the Schutzstaffeln was to protect the Field Flieger
Abteilungen (field flying units), the Flieger Abteilungen (long-range
reconnaissance units) and the Artillerie Flieger Abteilungen (Artillery spotter
units).
 The Schutzstaffeln were
organized to be every bit as mobile as the Jagdstaffeln.
This gave the Germans a very flexible tool to fight the war.
In contrasted to the relatively sedimentary allied units, the German
units were moved very often.
The Schutzstaffeln were
organized to be every bit as mobile as the Jagdstaffeln.
This gave the Germans a very flexible tool to fight the war.
In contrasted to the relatively sedimentary allied units, the German
units were moved very often.
The new
Schutzstaffeln were made up of mostly deactivated Kampfgaschwadder units.
Both
Prussia
and
Bavaria
organized Schusta units.
The original
Aircraft used by the new Schustas were the same two seaters and bombers that
were part of the older Field Flieger Abteilungen.
Basically two aircraft would be assigned to a photo- reconnaissance
mission.
If jumped by allied
fighters, the aircraft with the important information, the photos and radios
would head east while the Schlasta aircraft would stay and fight to cover the
escape of the Abteilungen aircraft.
On
24 April 1917
Hauptmann Eduard Wolfgang Zorer of Schutzstaffel 7 took his pilot and aircraft
to the front in support the Infantry units that were taking heavy pressure from
the French during the infamous Navelle Offensive.
During this operation he used his machine gun and countless hand grenades
to help shore up the German lines and demoralize the French.
This attack was considered so successful that Ground Attack tactics were
developed and units were more and more tasked to attack the ground in support of
infantry operations.
This is
important because this was the first time that aircraft were used specifically
to influence the outcome of the ground war in support of infantry objectives.
In other words this was the first time that a mission was specifically
planned and executed in support of infantry objectives.
Until now, attacking the enemy trenches was what you did on your way home
after the real mission had been accomplished or if you had a boring day that
needed some spicing up.
If a ground
attack was effective in influencing the ground war it was purely coincidental.
.
Because of
successes like Hauptmann Zorer’s and many others, the Germans began over time to
assign more and more of these grounds attack missions to the Schustas.
The Germans began to be called infantry support missions Sturmflieger.
In March 1918 the Schutzstaffeln that were becoming quite good at their
ground attack craft were renamed Schlachtstaffeln.
Modern day Army and Marine rotorwing attack aviation along with very
specialized Airforce fixed wing aviation can trace their lineage to the German
Schlachtstaffeln of the First World War.
It was soon
discovered that these aircraft needed some kind armor to protect the aircrews.
It was considered that the personnel density of the front was about six
soldiers per meter of front. That means that from any one point of the front you
could have well over six thousand soldiers who had you in the effective range of
their weapons plus any who would take pot shots at you from outside their
weapons effective range.
It is no
wonder that accounts from the Schlasta pilots told stories of their aircraft
being buffeted about from the turbulence caused by the large number of
projectiles passing by their machines.
 An average
Schlasta attack would begin with the enemy troops running in disarray.
This allowed for an almost instant stop of the enemy’s advance or for the
German troops to advance in somewhat safety.
It was not long however until the more experienced soldiers and NCOs
would rally their troops begin to return fire.
One Schusta pilot said that it was like hearing thousands of whip cracks
as the enemy bullets rushed by.
An average
Schlasta attack would begin with the enemy troops running in disarray.
This allowed for an almost instant stop of the enemy’s advance or for the
German troops to advance in somewhat safety.
It was not long however until the more experienced soldiers and NCOs
would rally their troops begin to return fire.
One Schusta pilot said that it was like hearing thousands of whip cracks
as the enemy bullets rushed by.
One aircraft
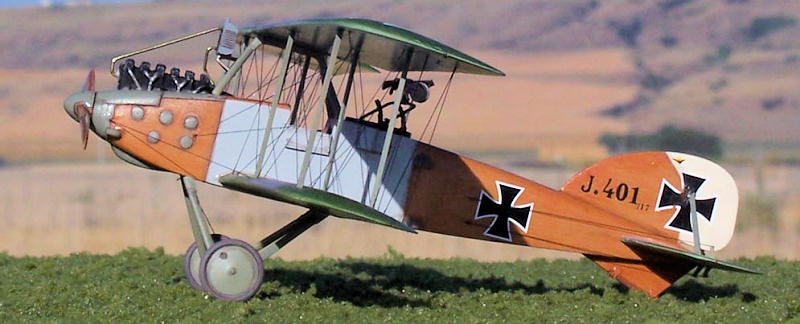
designed for the challenges of the Schlachtstaffeln was the Albatros J.I.
This type of aircraft was developed for the even more dangerous
low-altitude battlefield reconnaissance missions.
The pilots had to fly at altitudes of 150 feet or less to ascertain very
specific points of interest.
Such
as identifying the enemy units by seeing their uniforms and insignia.
For the most part Albatros J.Is were issued to Fliger Abteilungen in
support of the Army Corps or Army Headquarters.
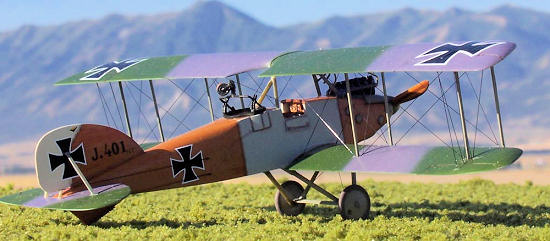
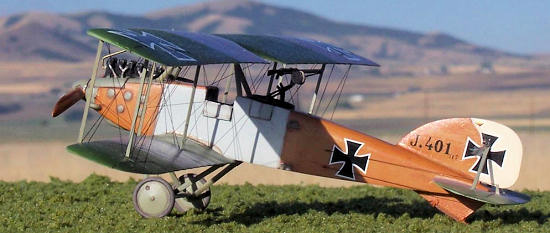
The Albatros J.I
was a derivative of the Albartos C.XII.
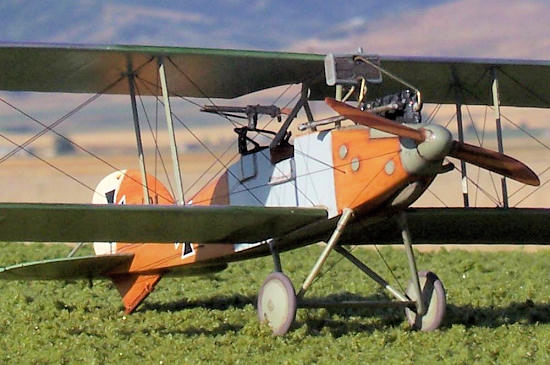
The J.I had a heavily armored crew compartment.
The sides and bottom were 5mm thick chrome nickel steel plate that was
bolted to the wood frame.
The armor
weighed some 1078 lbs.
The Germans began receiving
the J.Is in April 1918 and they were first used in the Battle of Lys, or as the
allies called it the Battle of Armentieres.
The crews were very grateful for the armor and the pilots were very happy
for the very good visibility of the low set engine on landing.
The only real change in the original J.I was that if the spinner was
damaged it would come off and could damage the aircraft or the propeller.
The aircraft was then modified with a bowl like nose somewhat like the
Oeffag Albatros D.IIIs of Austria-Hungary.
By June of 1918 the new Albatros J.IIs started to show up at the front
and the numbers of the J.I began to fall.
Albatros J.I
served until the Armistice in the German Airforce and two were bought by
Austria-Hungary.
Even after the war
it was still operated by Poland, Norway, Ukraine.
Poland was the largest post war user of the type.
When I started to build resin kits the first thing that I noticed
was that they were not cheap.
The
second thing that I noticed was that the quality was kind of hit and miss.
Sometimes you got a kit that had the best detail you had ever seen and
other times it seemed like you bought a block of resin that you would have to
carve a model from,
 The first time I
opened a Chorozy kit I felt like I had hit the jack-pot.
The quality was among the best that I have ever seen.
The wing detail is the best that I have ever seen in any scale.
The kits start at around $26.00 and go up from there.
I’ve seen the same kits that I got for $26.00 going for $35 on ebay.
So I guess it is important to shop around.
The first time I
opened a Chorozy kit I felt like I had hit the jack-pot.
The quality was among the best that I have ever seen.
The wing detail is the best that I have ever seen in any scale.
The kits start at around $26.00 and go up from there.
I’ve seen the same kits that I got for $26.00 going for $35 on ebay.
So I guess it is important to shop around.
When you open
the box you will find 51 parts in four zip-lock bags.
They are beautifully cast in yellow-tan resin.
The first bag contains the wings and tail surfaces.
The second holds the fuselage halves.
The third has the engine and associated parts.
The forth bag contains everything else.
Loose in the box are the decals and a small sheet of film for a
windscreen.
The instructions
are nicely printed with very helpful four view drawings that I find really help
me with the rigging.
The only color
call callouts are for the exterior.
For the crew compartment you will need to get some references.
The decals are in two
colors, black and white, but they are very well done and thin.
Well I can’t
wait to start this kit so let’s build this thing and find out if it builds as
good as it looks.
Well nothing to different
here.
I started with the cockpit
and engine.
The only thing I added
to the cockpit was the Eduard P-E German seatbelt set.
The detail is very good and I really did not think the cockpit needed
anything else.
The two fuselage
halves went together well and I didn’t need any putty for the seams.
 I decided to use
brass stock for the interplane struts, all other struts were the resin parts
from the kit.
At this point I
studied the three views and any photos that I could get my hands on and
determined the rigging placement.
I
used a #80 drill bit and drilled all the holes for the rigging and painted
everything.
I like to drill the
holes for the rigging before I paint so I don’t accidently mar the paint while I
drill the rigging holes.
I decided to use
brass stock for the interplane struts, all other struts were the resin parts
from the kit.
At this point I
studied the three views and any photos that I could get my hands on and
determined the rigging placement.
I
used a #80 drill bit and drilled all the holes for the rigging and painted
everything.
I like to drill the
holes for the rigging before I paint so I don’t accidently mar the paint while I
drill the rigging holes.
After I painted
the rest of the parts I assembled the model without the undercarriage.
As a rule I save the undercarriage until the last so I don’t knock it off
while I rig the model.
I like to use mono-filament
because of its strength and the fact that it adds a lot of strength to the
model.
Sometimes resin models will
droop over time.
I have found that
if I rig like this, my resin kits don’t droop.
All I do is
drill little holes in the top wing that only go about half way through and drill
little holes that go all the way through the bottom wing.
I use thick super glue to anchor the mono-filament in the top wing and
set it aside to cure well. Then I thread the line through the bottom wing and
anchor it with a drop of super glue.
After the glue has dried I clip the line flush with the wing surface.
Coincidently enough, the bottom insignia almost always covers up the
rigging holes and all you need to do is apply the decals to the bottoms of the
wings.
If not, just hit the area
with a sanding stick and apply some touch up paint and you’re good.
 I looked at a lot of photos
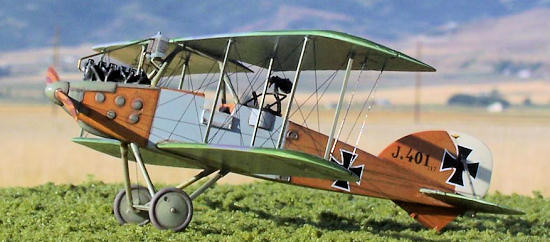
and decided to paint the fuselage wood.
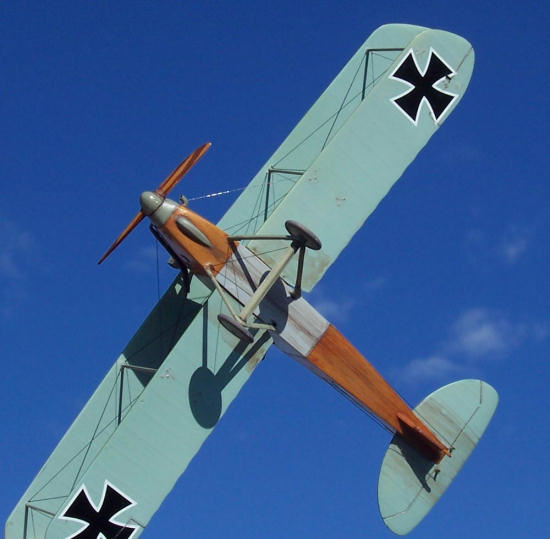
The wings, horizontal stab, and elevator are typical green and lilac.
I painted the steel armored cockpit light gray inside and out to mach my
interpretation of the photos.
I
painted the struts and cowlings RLM 02 again to match my interpretation of the
photos.
I looked at a lot of photos
and decided to paint the fuselage wood.
The wings, horizontal stab, and elevator are typical green and lilac.
I painted the steel armored cockpit light gray inside and out to mach my
interpretation of the photos.
I
painted the struts and cowlings RLM 02 again to match my interpretation of the
photos.
The decals went
on well and settled down perfectly.
After the decals dried I weathered the model with the usual washes and dry brush
techniques.
The rigging was
straight forward and only took a couple hours.
Viola done
This was a very fun and
surprisingly easy kit to build.
This can only be credited to the quality of the model kit and the craftsmanship
of the pattern maker.
Since it is
an all resin kit you should have a little experience using super glue.
Other than that, if you’ve done some Bi-planes and want to build
something that will probably not be boxed as an injected plastic kit then this
is a kit you should consider.
Above
all this looks awesome next to my other WWI two seaters
 “Schlecht-Flieger!
Germany and the origins of Air/Ground support 1916-1918” Rick Duiven & Dan-San
Abbott
“Schlecht-Flieger!
Germany and the origins of Air/Ground support 1916-1918” Rick Duiven & Dan-San
Abbott
“Jane’s All the Worlds
Aircraft 1919” (Jane’s Fighting Aircraft of World War I)
“Austro-Hungarian Army
Aircraft of World War One” by Peter M. Grosz, George Haddow and Peter Schiemer
“Reconnaissance & Bomber
Aircraft of the 1914-1918 War” Harleyford Publications limited
Kyle
Bodily
September 2010
If you would like your product reviewed fairly and quickly, please
contact
me or see other details in the
Note to
Contributors.
Back to the Main Page
Back to the Review
Index Page