
| KIT #: | ? |
| PRICE: | $? |
| DECALS: | ? |
| REVIEWER: | Carmel Attard |
| NOTES: | Vacuformed plastic |
| HISTORY |
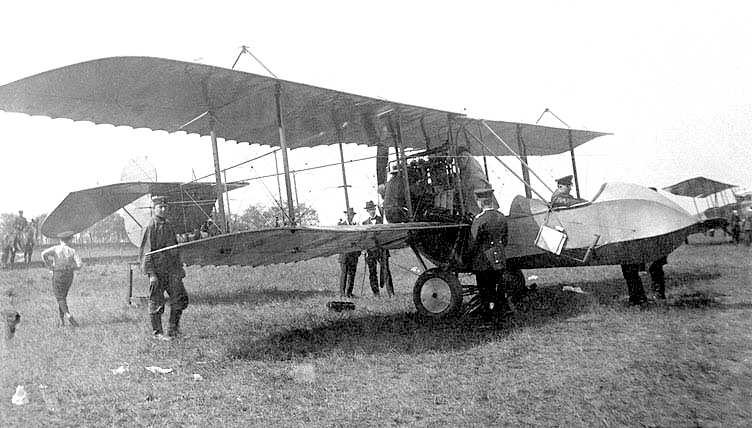
 The Otto
Doppeldecker was a German WWI pusher biplane. It was designed by Gustav
Otto and flown for the first time in 1913 and served with the Imperial
German Air Service, during the early years of WWI. The Otto Aircraft
Company of Munich produced several types of aircraft up until 1916.
Unfortunately only scant intelligence seem to be
available on the Otto firm. The instruction sheet that comes with the scale
model produced by the Phoenix Models gives some important details of this
aircraft. Other information is available in the Book ‘German Aircraft of
the First World War produced by Peter Gray and Owen Thetford which is
supplied by Putnam. On Page 499 of this book is a photo from the Otto
series of pusher biplanes which is of a slight variation from the one
featured in this article.
The Otto
Doppeldecker was a German WWI pusher biplane. It was designed by Gustav
Otto and flown for the first time in 1913 and served with the Imperial
German Air Service, during the early years of WWI. The Otto Aircraft
Company of Munich produced several types of aircraft up until 1916.
Unfortunately only scant intelligence seem to be
available on the Otto firm. The instruction sheet that comes with the scale
model produced by the Phoenix Models gives some important details of this
aircraft. Other information is available in the Book ‘German Aircraft of
the First World War produced by Peter Gray and Owen Thetford which is
supplied by Putnam. On Page 499 of this book is a photo from the Otto
series of pusher biplanes which is of a slight variation from the one
featured in this article.
| THE KIT |
 The 1/72
scale vacform model of the Otto Doppeldecker supplied by phoenix Models is
made of white plastic with prolific fabric. It is not however the sort of
kit suitable for the beginner. In fact it is quite a challenge to undertake
to build the kit even for the experienced modeler. There is a multitude of
rigging that needs to be attached to the kit wings and flimsy framework. It
is therefore worth spending some time trying to figure out a method on how
to produce a sturdy boom framework.
The 1/72
scale vacform model of the Otto Doppeldecker supplied by phoenix Models is
made of white plastic with prolific fabric. It is not however the sort of
kit suitable for the beginner. In fact it is quite a challenge to undertake
to build the kit even for the experienced modeler. There is a multitude of
rigging that needs to be attached to the kit wings and flimsy framework. It
is therefore worth spending some time trying to figure out a method on how
to produce a sturdy boom framework.
| CONSTRUCTION |
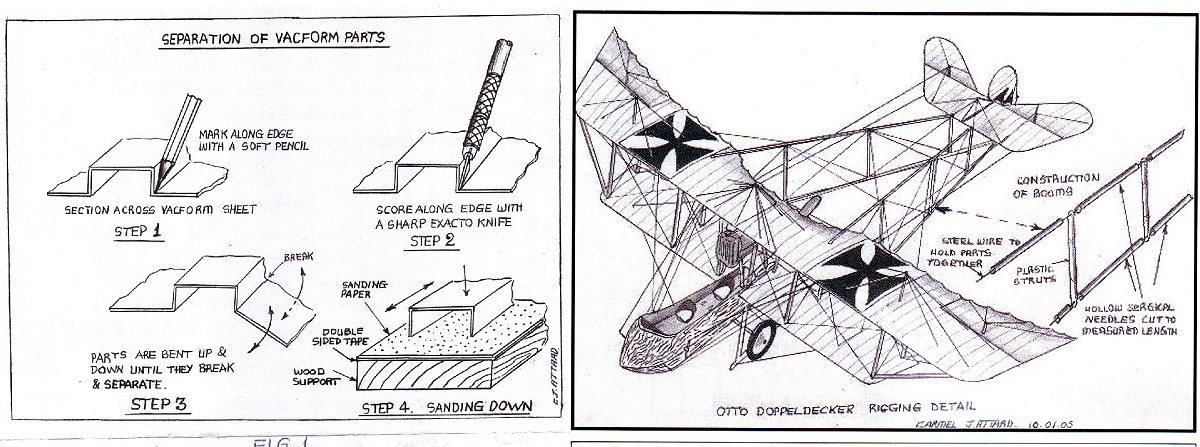 A method that
I have tried and found to work is as follows. Using the scale plans
provided with the kit I have measured as accurately as possible the length
of each segment on the boom construction and made a list of the pieces
required which were in duplicate. These lengths were then worked out of
steel surgical needles, thus forming the horizontal pieces. The vertical
struts were measured and these were made out of Contrail plastic strips of
the correct thickness and cut to the measured lengths. The figure shows how
the whole arrangement is built up together and glued with super-glue. The
whole assembly was secured with thin steel wire which puts the whole
assembly together. Having applied this method to produce the tail booms and
also the wheel assembly, the rest is a matter of applying rigging to each
and every place shown using a 0.4 mm diameter pin drill and invisible
thread or ultra thin fishing line for the rigging.
A method that
I have tried and found to work is as follows. Using the scale plans
provided with the kit I have measured as accurately as possible the length
of each segment on the boom construction and made a list of the pieces
required which were in duplicate. These lengths were then worked out of
steel surgical needles, thus forming the horizontal pieces. The vertical
struts were measured and these were made out of Contrail plastic strips of
the correct thickness and cut to the measured lengths. The figure shows how
the whole arrangement is built up together and glued with super-glue. The
whole assembly was secured with thin steel wire which puts the whole
assembly together. Having applied this method to produce the tail booms and
also the wheel assembly, the rest is a matter of applying rigging to each
and every place shown using a 0.4 mm diameter pin drill and invisible
thread or ultra thin fishing line for the rigging.
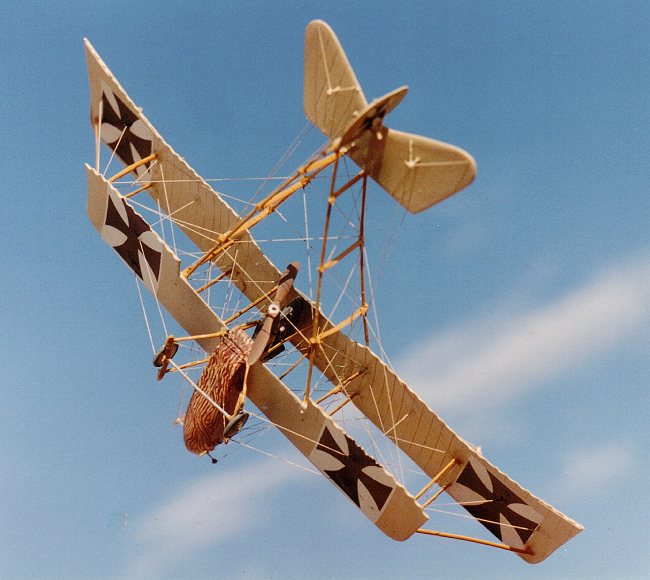
 The end
result is quite effective and pleasing at the same time. Patience and
perseverance is a requirement but in the end you would want to build more
of the early birds with complex structures
which is very rewarding. As for the colour details, the cockpit interior is
buff with dark leather seat and cockpit coming. The instrument panel is
dark natural wood or black with black-faced instruments with white
numerals. All other cockpit parts were either natural wood or painted grey.
The struts were dark varnished wood or painted grey on some aircraft. Tyres
were dark grey.
The end
result is quite effective and pleasing at the same time. Patience and
perseverance is a requirement but in the end you would want to build more
of the early birds with complex structures
which is very rewarding. As for the colour details, the cockpit interior is
buff with dark leather seat and cockpit coming. The instrument panel is
dark natural wood or black with black-faced instruments with white
numerals. All other cockpit parts were either natural wood or painted grey.
The struts were dark varnished wood or painted grey on some aircraft. Tyres
were dark grey.
April 2005
Copyright ModelingMadness.com. All rights reserved. No reproduction in part or in whole without express permission from the editor.
If you would like your product reviewed fairly and fairly quickly, please contact the editor or see other details in the Note to Contributors.