1/72 Blackburn Sparrow
| KIT #: | |
| PRICE: | $ |
| DECALS: | Spares box |
| REVIEWER: | Chris Peachment |
| NOTES: | Scratch-built |
| HISTORY |
In my long quest to uncover the world's ugliest and least successful aircraft, I
came across the The Blackburn Sparrow, which is usually known under the more
anonymous name of AD Scout, AD
standing for Admiralty Department, since it was designed for the Naval Air Arm
to counter the Zeppelin menace during WWI.
It was designed by Harris Booth
and four prototypes were ordered, two built by Hewlett and Blondeau, and two by
Blackburn. I don't know what it is about Blackburn, but they have been
responsible for some of the ugliest aircraft of all time. Just try Googling
Blackburn Blackburd or, if you can withstand the shock, the Blackburn Blackburn.
Blackburn seemed not only unable to spell Blackbird, but also to have run out of
names when they got to the Blackburn Blackburn. One look at the thing is enough
to suggest that it ought to have been c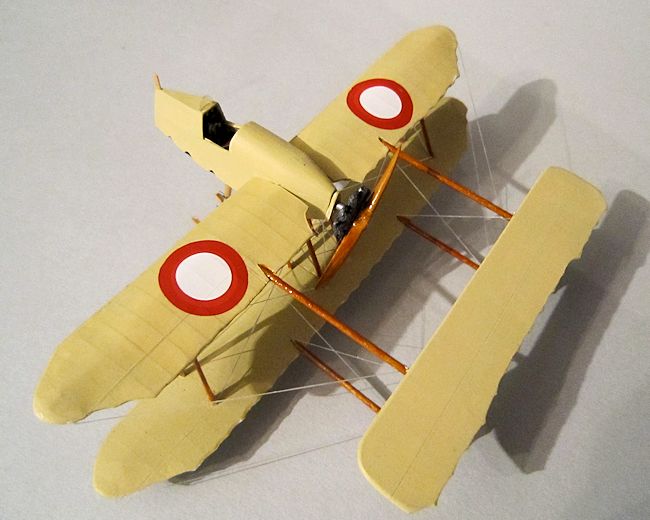 alled the Rhino. They were also guilty of
the later Blackburn Kangaroo, which is as weird as its animal namesake.
alled the Rhino. They were also guilty of
the later Blackburn Kangaroo, which is as weird as its animal namesake.
I can even claim to have seen, back in the early 1960s, a Blackburn Beverly
coming in to land, with all the nimble grace of a pregnant hippo.
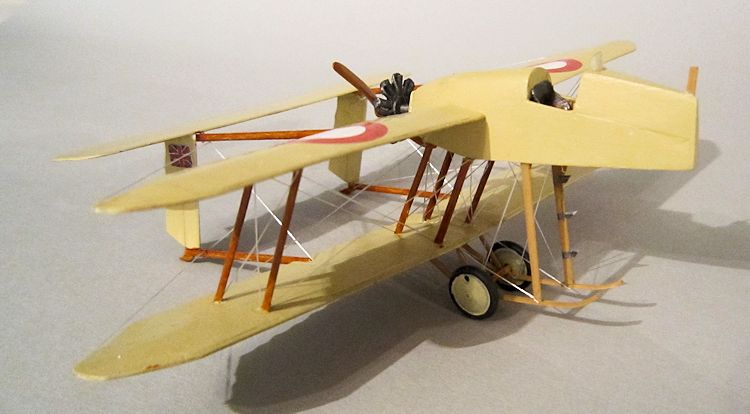
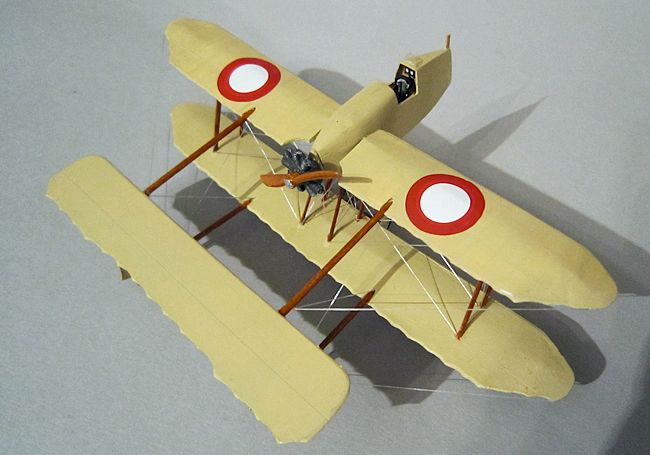
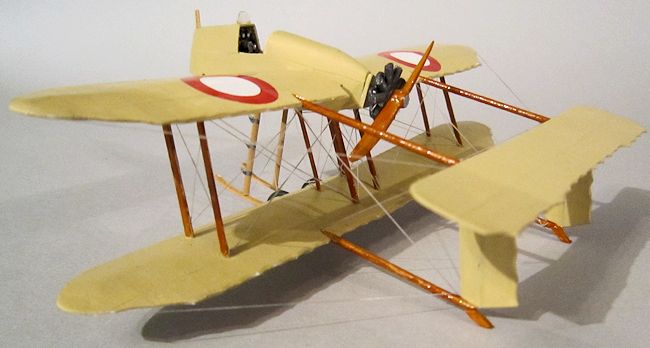
The politest description of the Scout is 'unconventional'. There is no reason
why a biplane with a fuselage mounted on the
upper
wing need not work. The Handley Page Heyford for example managed it very well.
But you don't have to be anything like an engineer to see just how hopelessly
top heavy this thing would be. The twin-rudder tail was attached by four booms.
Which again might have been fine, if only the horizontal tailplanes weren't
nearly the same span as the wings. Finally, as if all that weren't enough to
terrify the pilot as he tentatively approached, the undercarriage is very
narrow-tracked and high off the ground. Getting into, or worse, getting out of,
the cockpit, could lead to the man becoming airborne before the aircraft moved.
Armament was intended to be a two pounder recoilless David Gun lying on the
cockpit floor. but this was never fitted. Which is just as well, because the
whole aircraft was so fragile, that one round from a two pounder, the same
armament as the first Churchill tanks, would have shivered the kite to
fragments.
As if that weren't enough, trials flown at Chingford proved the aircraft to be seriously overweight, sluggish, and difficult to handle. One can easily imagine trying to taxi that thing over rough turf. And a landing at night, in a cross wind, would be Russian roulette with five rounds in the chamber.
| THE KIT |
Unsurprisingly neither Airfix nor Revell have ever lighted upon this poor neglected creature. Even the short run kit manufactures have probably looked at it for a few seconds, then quickly turned the page. So I don't know exactly why I just had to make it. Possibly an overdeveloped sense of pity for the underdog. Like that ragged mutt who is the last of the litter to be adopted from the animal rescue centre, there is something about it that stirs the heart.
| CONSTRUCTION |
A good set of plans can be found on the excellent Russian website Their Flying
Machines, listed below. Don't
worry, some of it is in English.
Then gathering all available sheets of plastic card, together with my bags of
off-cuts, dead struts, discarded wheels and assorted junk from the boneyard, I
had a stiff single malt and put my sharpest scalpels in a row.
And now comes the part that is easier to do that describe. Just cut up several
of the plans as templates, stick them down on the card with blobs of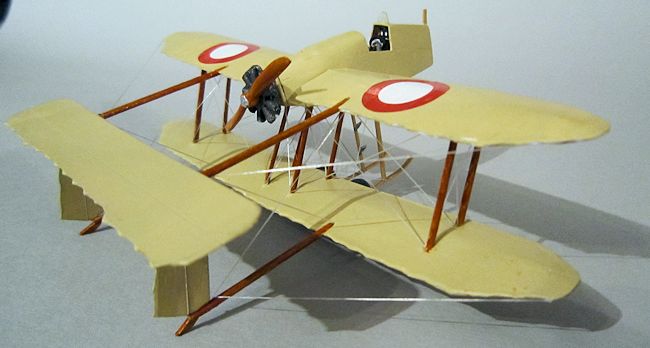 Blu-tack,
and carefully cut around them. I began with the wings, each of which I made from
two thin sheets of plastic card cut to shape. The upper surface was scored
heavily underneath with a biro, to make the rib patterns. Then the two were
joined at the leading edge, a spar made from round contrail strut inserted at
1/3 of the chord, the trailing edges were mated, and then scalloped edges were
cut out between the ribs.
Blu-tack,
and carefully cut around them. I began with the wings, each of which I made from
two thin sheets of plastic card cut to shape. The upper surface was scored
heavily underneath with a biro, to make the rib patterns. Then the two were
joined at the leading edge, a spar made from round contrail strut inserted at
1/3 of the chord, the trailing edges were mated, and then scalloped edges were
cut out between the ribs.
Both wings have a decided dihedral, and in retrospect it would have been easier
to make the lower wing in sections, with a level centre section.
The fuselage is a box section, but with sloping panels, all of which can be put
together around a few inside formers.
The port side has those three cutouts, which I take to be footholds.
Remember to box in the cockpit, and also to make an instrument panel which I did
from an old etch set. It only has three or four dials. Pilots flew with their
head outside and a wetted finger in the air in those days.
The only hurdle is the odd shaped turtle-back decking behind the cockpit. I
dithered for a while, eyeing up
some balsa sheets, before gluing several thick pieces of plastic card together
and attacking with the nasty sanding stick. The sort that would rip your nails
off if you tried it on those. Then polish with a nice one, from your wife's
cosmetics box. It is best to ask first, I find.
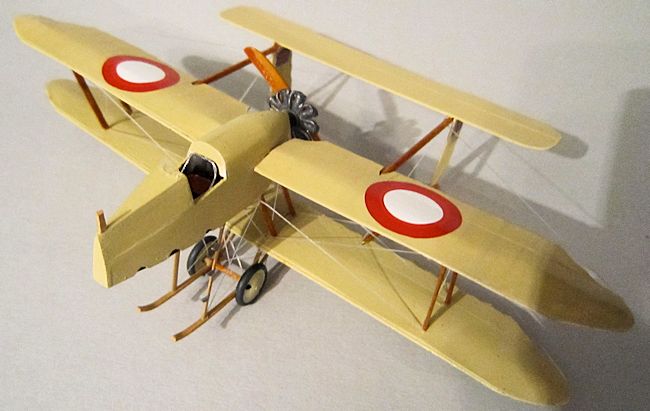
An old seat was painted and then mounted on a stalk from a piece of sprue. And a
joystick made from strut, with a wheel on top.
| COLORS & MARKINGS |
At this stage I decided to paint the wings and fuselage separately, as I always
do with biplanes. And I made a strange, and possibly life-changing, discovery.
I had been using white plastic card. After one coat of Vallejo beige paint, I
noticed that the aircraft had acquired that translucent look that biplanes have
if they are covered with doped linen.
I recently had a strong experience of this when looking at the Vickers Gunbus in
the RAF museum at Hendon. The sun was shining, and the linen became not just
translucent, but almost transparent. All that
 you could see was the outline of
the skeleton, surrounded by a vague, creamy mist.
you could see was the outline of
the skeleton, surrounded by a vague, creamy mist.
Now I know that modellers have employed all sorts of tricks to duplicate this
look. I have seen WWI models which have used incredibly cunning shading around
the ribs. And modellers have even sprayed very light roundels on the underside
of the upper wing, as if they were the visible shadow of the roundel on top. I
am very admiring of such skill, but truth to tell, it never looks more than a
very clever paint job. Until such time as we can devise a method of making the
skin of the aircraft translucent, then it won't be accurate.
And here I may have found the answer.
The problem was that without the light shining through the model, then the paint
job just looked like a dog's dinner. It was that one first coat, which is a bit
streaky and is really only an undercoat. So what to do?
Could one assemble a WWI aircraft, in the fashion of those Eduard Stripdown
kits, whether from etched brass, or plastic rod and card, and then cover them
with some sort of tissue paper? Entex did try that some time ago, but the
problem was that the airframe looked like it was made from tree trunks, and the
glue marks holding the tissue down looked hideous.
What is it that flying modellers use? I ask because I am entirely ignorant of
their materials. Can anyone out
there suggest something? The future of WWI modelling could be in the balance
here.
| FINAL CONSTRUCTION |
Enough theorising. I then cut some struts to length and attached the fuselage to
the lower wing with four of them. The upper wings can be attached using the main
spars as locating tabs. Note that the rear of the wingroot stands proud of the
engine area. Interplane struts can be added here, though not before four cutouts
are made for the tail booms. These are round strut material, and the horizontal
tail was made from plastic card as were the two fins and rudder. It was just a
case of cutting them to shape from the plans. Glue the booms, glue the tail,
glue the fins, and you are done.
 Once it is all set, then rig it, using elastic thread coloured silver with a gel
pen, and drops of superglue. I know
how many people find their entrails gripped by icy fingers when they hear the
word 'rigging'. But the only way you will be able to laugh heartily in the face
of such danger is by doing a lot of it. So lay on MacDuff.
Once it is all set, then rig it, using elastic thread coloured silver with a gel
pen, and drops of superglue. I know
how many people find their entrails gripped by icy fingers when they hear the
word 'rigging'. But the only way you will be able to laugh heartily in the face
of such danger is by doing a lot of it. So lay on MacDuff.
The engine and prop came from the Plastic Bag of Dead Things.
The undercarriage came from strut material again, with one of them having those
neat little steps up the side, made from triangular chips of old vacform
plastic. Wheels came from the same Magic Bag. And I noted that in the b and w
photos that the covers seems to be paler than the rest of the linen so that is
how I painted them.
What that blade thing on the nose does is a mystery. I can only surmise that it
is the upper part of a scabbard for the pilot's sabre, should he ever get close
enough to a Zeppelin and the gun fail on him.
A couple of tiny Union Jack flags were found on the internet, scaled down,
printed on decal paper, and then observed to fall off one hour after they were
applied. They were hammered in place with some Humbrol Clearfix. Finally a
couple of Admiralty Department roundels were found from the spares box, which
were in fact French roundels without the inner blue circle.
| CONCLUSIONS |
Place the model in a prominent place, sit back and give yourself a reward while
you happily contemplate such an intricate piece of modelling. And offer up a
prayer of thanks to the Saint of Aviation that you
 never had to fly it. There
are in fact three Saints for Aviation:
St Thérèse, St Joseph of Cupertino and Our Lady of Loreto.
never had to fly it. There
are in fact three Saints for Aviation:
St Thérèse, St Joseph of Cupertino and Our Lady of Loreto.
The last one presides over the house in which the Virgin Mary first received the
Annunciation, and which was transported by angels from the Holy Land to Loreto
in Italy, sometime in the early 13th century. In a choice between
angels and the Blackburn Sparrow, I would take the celestial beings every time.
Someone once pointed out to me many years ago that modelling was a pointless
pursuit. And it has taken me a long while to realise that is precisely its joy.
Far from it being an insult, I can think of no other pointless pursuit which
gives such harmless pleasure.
| REFERENCES |
http://flyingmachines.ru/Site2/Crafts/Craft25416.htm
http://www.aviastar.org/air/england/black_scout.php
http://www.theaerodrome.com/forum/aircraft/41540-d-scout-sparrow-drawings.html
http://en.wikipedia.org/wiki/AD_Scout
http://crimso.msk.ru/Site/Arts/Art3273.htm
February 2014
If you would like your product reviewed fairly and fairly quickly, please contact the editor or see other details in the Note to Contributors.