Roden 1/48 Airco DH.4
| KIT #: | 422 |
| PRICE: | $30 at a prominent retailer |
| DECALS: | Three options |
| REVIEWER: | Scott Lyle |
| NOTES: |
| HISTORY |
Having just
built a model of one of the most advanced bombers in the world, the B-1B Lancer,
I thought it would be fun to build a model of a World War 1-era bomber.
Perhaps the most famous bomber of that era was the
German 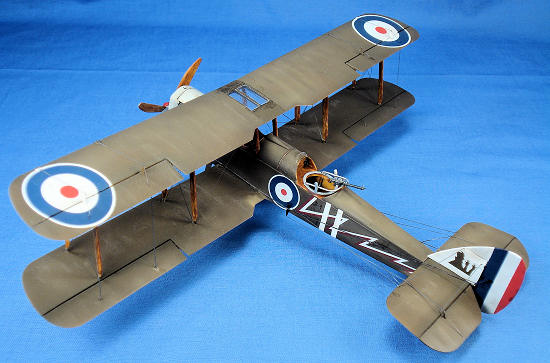 1/48 kit (that I can afford) of that bird doesn’t exist, I
had to search for other alternatives.
Roden’s line of 1/48 Airco DH.4 kits fit the bill
nicely.
1/48 kit (that I can afford) of that bird doesn’t exist, I
had to search for other alternatives.
Roden’s line of 1/48 Airco DH.4 kits fit the bill
nicely.
The DH.4 had a successful career during the war as a
single-engine day bomber.
Designed by Geoffrey de Havilland, it was sturdy, easy
to fly, and had such high speed that it could perform its bombing missions
without fighter escort.
First appearing during the spring of 1917, it was
supposed to be replaced by the DH.9 during 1918, but problems with that aircraft
kept the DH.4 in front-line service for the remainder of the war.
The DH.4 was very widely produced with some 1,400 being
built in
| THE KIT |
 Roden’s
kit comes molded in light gray plastic with a small transparent sheet to provide
the small windscreens and the transparent sections in the upper wing.
In my boxing the parts were very well molded, with the
fuselage and wings exhibiting very subtle but natural-looking surfaces.
One criticism is that there are no locating pins on the
parts that we modelers are accustomed to having them on, like the fuselage
halves.
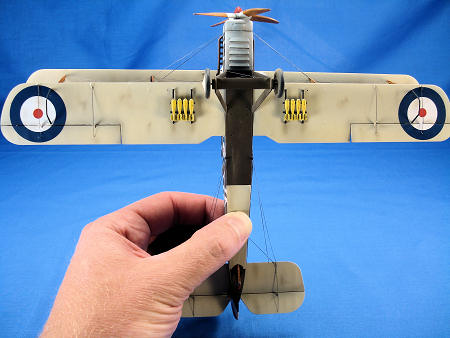
A plus is that different sized bombs are provided, allowing you to load
out your DH.4 in different ways.
Decals are provided for three different bombers, and
since there are some substantial differences between the three, you have to
decide which one you’re going to build fairly early in the process.
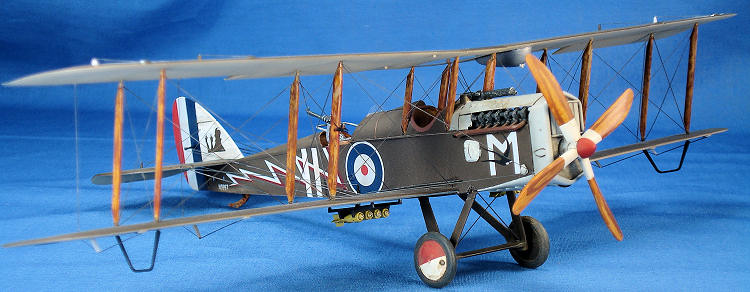
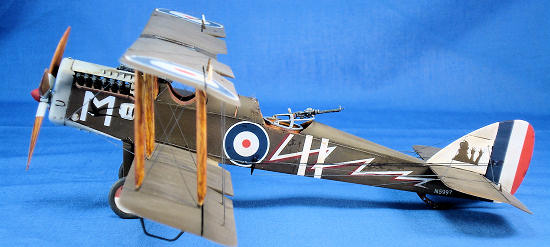
I choose to build N9557 of the Royal Navy’s No.202
Squadron, if for no other reason than its cool “I’m thumbing my nose at you”
artwork on the tail.
Roden’s
kit comes molded in light gray plastic with a small transparent sheet to provide
the small windscreens and the transparent sections in the upper wing.
In my boxing the parts were very well molded, with the
fuselage and wings exhibiting very subtle but natural-looking surfaces.
One criticism is that there are no locating pins on the
parts that we modelers are accustomed to having them on, like the fuselage
halves.
A plus is that different sized bombs are provided, allowing you to load
out your DH.4 in different ways.
Decals are provided for three different bombers, and
since there are some substantial differences between the three, you have to
decide which one you’re going to build fairly early in the process.
I choose to build N9557 of the Royal Navy’s No.202
Squadron, if for no other reason than its cool “I’m thumbing my nose at you”
artwork on the tail.
| CONSTRUCTION |
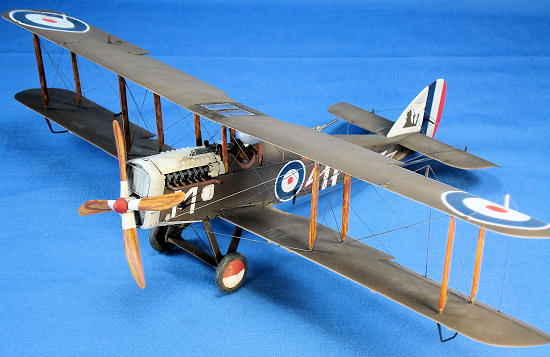
Construction
starts off with the cockpit per usual, and like most World War 1 aircraft,
things are pretty simple in the “office”.
Manned by a crew of two, there were actually two
offices, both consisting of wooden floorboards, seats, control sticks, and
rather sparse instrument panels.
Roden captured that detail nicely, and I first painted
all of the wood parts Testors Acrylic
 The instructions call for the fuselage side walls to be
painted in a linen color, but references point out that the forward part of the
DH.4 was constructed of thin plywood, so I painted the sidewalls with my wood
paint procedure as well.
I don’t know if that’s accurate or not as the plywood
could have been painted any color, but without extensive references, I blindly
proceeded.
The details on the instrument panels were picked out by hand, and
then I started assembling the various parts together.
The instructions call for the fuselage side walls to be
painted in a linen color, but references point out that the forward part of the
DH.4 was constructed of thin plywood, so I painted the sidewalls with my wood
paint procedure as well.
I don’t know if that’s accurate or not as the plywood
could have been painted any color, but without extensive references, I blindly
proceeded.
The details on the instrument panels were picked out by hand, and
then I started assembling the various parts together.
I attached some photo etch seatbelts from my spares box
to both the pilot’s seat and the rear gunner’s stool, and then those parts were
attached to their respective floorboards, along with the control sticks and
rudder bars.
Next I glued the fuselage halves together; a step during which
you have to pay careful attention.
There are no locating pins, and the box-shape of the
fuselage is very open on top, meaning the only real seam to apply glue to is on
the bottom.
The assembly is fairly weak until you start gluing on the top
portions of the fuselage.
While the instructions specify that you glue the various
cockpit parts to one of the fuselage halves before you close them up, you don’t
have to do it that way.
Since the whole thing is open on top, you can easily fit
everything in from above.
Without locating pins the placement of the top parts is
rather ambiguous, so I first glued the horizontal stabilizer onto the rear (it
actually had locating pins).
With that in place the upper part that covers the rear
fuselage was butted up against it and glued in place, and in that fashion I
worked my way forward from back to front.
In a couple of nights the fuselage was complete and
fully loaded with wood-painted WW1 stuff.
The fit of the parts isn’t perfectly precise, especially
around the engine, so you have to do a lot of test-fitting and use your modeling
skills.
Still, in short order the fuselage was finished and I moved on to the
wings.
I attached the pilot’s cockpit to the lower wing per the in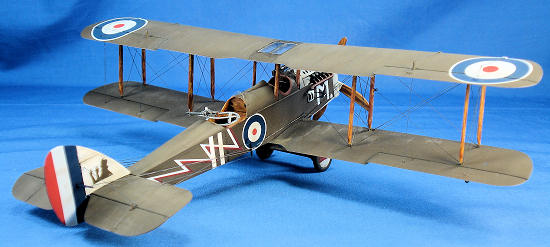 structions,
and then glued the lower wing to the fuselage.
The joint only needed a quick swipe of Mr. Surfacer 500
to fill any gaps.
Up next I attached the landing gear (without the
wheels), and then started planning how to attach the upper wing.
structions,
and then glued the lower wing to the fuselage.
The joint only needed a quick swipe of Mr. Surfacer 500
to fill any gaps.
Up next I attached the landing gear (without the
wheels), and then started planning how to attach the upper wing.
I wanted to assemble the wing struts and rig them
without having to glue the upper wing in place (for painting reasons), and
luckily the four struts around the cockpit attach firmly into pockets in the
fuselage.
When those were set up I set the upper wing temporarily in place
on those using Tamiya masking tape, and that allowed me to snap the rest of the
wing struts into place – a credit to the kit’s engineering.
I glued the lower ends of each strut in place (but not
the upper ends) and then set the model aside to dry overnight.
The next night I removed the upper wing and then used
stretched sprue to rig the wing struts.
The DH.4 has a lot of rigging, so this process – not my
favorite part of model building by the way - took a few nights!
At any rate with the lower wing covered in fragile struts and rigging, the model was now ready for paint. It was going to be a challenge to keep from knocking some of those struts off during the painting process.
| COLORS & MARKINGS |
I first wiped the model down with Polly
S’s Plastic Prep, and then airbrushed a primer coat using Mr. Surfacer 1000.
I then pre-shaded the few panel lines that there were
with Tamiya XF-1 Black.
The first color to go on was the light gray on the
engine panels (per the version I was modeling), for which I used Testors
Camouflage Gray.
I masked that off and then lightly airbrushed Testors Sand onto
the undersurfaces to simulate the Clear Doped Linen color so ubiquitous on
British WW1 aircraft.
Letting that dry for a night I masked that off and then
applied the equally ubiquitous Dark Green PC10 shade to the upper surfaces using
 Tamiya XF-62 Olive Drab.
That was lightened slightly and then misted on randomly
to provide a faded effect.
The wing struts were brush-painted to look like wood
using my wood painting process as detailed above, and then a coat of Future was
airbrushed over the whole model to prepare it for the decals.
Tamiya XF-62 Olive Drab.
That was lightened slightly and then misted on randomly
to provide a faded effect.
The wing struts were brush-painted to look like wood
using my wood painting process as detailed above, and then a coat of Future was
airbrushed over the whole model to prepare it for the decals.
The kit’s decals proved to be a challenge.
They were thick and didn’t settle down over surface
details like decals usually do, even with a strong solvent like Walthers
Solvaset.
They also cracked and tore easily – very frustrating!
I knew I was going to have to touch up a lot of the
decals with paint later, something I don’t like to do because it’s hard to match
the color of the paint precisely with the color of the decal.
With the decal step completed I sealed them with another
coat of Future, and then applied a wash of Mig Productions “Dark
| FINAL CONSTRUCTION |
With the painting step largely done it was time to
finish the model’s construction.
I glued the upper wing into place and also attached the
forward machine gun, bomb racks, and wheels.
I “zinged” the rigging between the wings with matches,
and
 then it was time to attach the rest of the rigging, of which there was
plenty.
The tail section is covered in rigging, and then there is a maze of
lines leading from the cockpit to the tail as well.
I used more stretched sprue as well as some EZ Line to
finish the job.
With that done I glued on the final parts, consisting of the rear
machine guns, wing skids, and the prop.
I dusted some earth colored pigments onto the wheels and
tail skid, and declared the model complete.
then it was time to attach the rest of the rigging, of which there was
plenty.
The tail section is covered in rigging, and then there is a maze of
lines leading from the cockpit to the tail as well.
I used more stretched sprue as well as some EZ Line to
finish the job.
With that done I glued on the final parts, consisting of the rear
machine guns, wing skids, and the prop.
I dusted some earth colored pigments onto the wheels and
tail skid, and declared the model complete.
| CONCLUSIONS |
Roden’s
DH.4 is well engineered and goes together quickly.
The detail and “delicateness” of the biplane is
excellent, and the ability to build three different versions is also admirable.
The one big fly in the ointment is those decals.
I felt they damaged the overall look of the finished
model, and unnecessarily so.
In this day and age I expect any kit from a major
producer to have decals that perform properly, and I don’t think that’s an
unreasonable demand.
While I certainly would build another Roden kit in the
future, I would make sure I had a set of applicable aftermarket decals on hand
before I began.
| REFERENCES |
-
Profile Publications #26, “The de
Havilland D.H.4”
-
Wikipedia, the Online
Encyclopedia
August 2011
If you would like your product reviewed fairly and fairly quickly, please contact the editor or see other details in the Note to Contributors.