Wingnut Wings 1/32 SE.5a 'Hisso'
| KIT #: | 32003 |
| PRICE: | $69.00 |
| DECALS: | Five options |
| REVIEWER: | Dan Lee |
| NOTES: |
| HISTORY |
The Royal
Aircraft Factory Scout Experimental 5a eventually became the favorite mount of
many of the British Empire’s leading aces from its introduction in 1917.
It was sturdy, fast, good in a dive, forgiving to novice
pilots and a match for the Fokker DVII.
The 5 wasn’t as maneuverable as the Camel, the armament
configuration left something to be desired (although it wasn’t much of an issue
due to the bugs in the synchronization gear) and the original engine proved to
be temperamental, but ceased being a problem with the mating of the Worsley
Viper engine to the SE5a airframe.
 More
detailed information on the type can be found elsewhere on Modeling Madness.
More
detailed information on the type can be found elsewhere on Modeling Madness.
No. 6 Squadron
RAAF (from Wikipedia)
No. 6 Squadron
was formed at Parkhouse, England, on 15 June 1917 as a flying training unit of
the
Australian Flying Corps (AFC). The unit was
initially designated No. 30 (Australian Training) Squadron, Royal Flying Corps
and its role was to train fighter pilots for service with
No. 2 Squadron of the AFC (which was designated
No. 68 (Australian) Squadron RFC at the time) on the
Western Front.
The squadron
moved to
Shawbury the day after it was formed and then to
Ternhill on 29 June. On 1 September it became part
of the
1st Training Wing when that unit was established to
command the four AFC training squadrons in England (the others being
No. 5,
No. 7 and
No. 8 Squadrons). In January 1918 the squadron was
redesignated No. 6 Squadron AFC; the other AFC units were also renamed at this
time. No. 6 Squadron moved to
Minchinhampton on 25 February. The squadron used
several different types of aircraft to train pilots, including the
Bristol Scout D,
Sopwith 1½ Strutter,
Sopwith Pup,
Avro 504,
Airco DH.5,
Royal Aircraft Factory S.E.5 and
Sopwith Camel.
While most of these aircraft types were outdated and
suitable only for elementary flight training, the S.E.5s, Sopwith Pups and
Sopwith Camels were up to date and in service with combat units in France.
Like the other
units of the 1st Training Wing, No. 6 Squadron continued to train pilots after
the end of the war. This was undertaken to keep personnel occupied while they
awaited transport back to Australia as well
 as to
strengthen the AFC. No. 6 Squadron was disbanded in March 1919, and its
personnel left Minchinhampton to return to Australia on 6 May that year.
as to
strengthen the AFC. No. 6 Squadron was disbanded in March 1919, and its
personnel left Minchinhampton to return to Australia on 6 May that year.
In 1939 it
would be reformed when No. 4 squadron, a patrol squadron, was redesignated No.6.
“Six” would serve in World War 2 flying Ansons, Hudsons
and Beauforts while conducting anti-submarine patrols and air strikes on naval
and land targets in the South Pacific.
“Six” would be disbanded again after WW2.
In 1953, No. 23
Squadron was redesignated as No. 6 Squadron and became the RAAF bomber
conversion unit during the Cold War.
It flew Lincolns, Canberras, F-4 Phantoms, and F-111C
Aardvarks before transitioning to the F/A-18F in 2011 and eventually the ultra
expensive F-35 Lightning IIs whenever the increasingly expensive bugs are ironed
out.
| THE KIT |
See Tom Cleaver’s review of the kit for the details.
| CONSTRUCTION |
 Wingnut
Wings produced another winner here.
Follow the instructions using the build order is
recommended except the engine as I didn’t want to pose the engine cover off.
Most of the parts were painted according to the paint
guide prior to assembly.
Most of the cockpit details were hand painted while I
passed on adding extra detail to the interior as it most it would be hidden
inside the tiny cockpit.
Wingnut
Wings produced another winner here.
Follow the instructions using the build order is
recommended except the engine as I didn’t want to pose the engine cover off.
Most of the parts were painted according to the paint
guide prior to assembly.
Most of the cockpit details were hand painted while I
passed on adding extra detail to the interior as it most it would be hidden
inside the tiny cockpit.
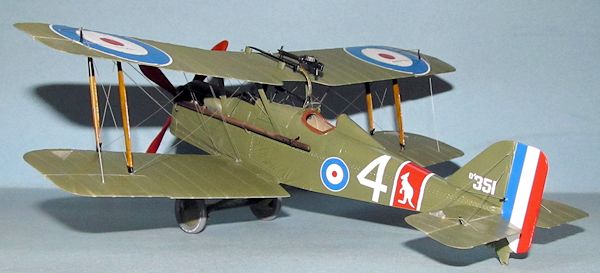
The most difficult
part in assembly was the Vickers machine gun which involved some delicate PE,
especially the gunsight.
Gluing the
fuselage together was a snap.
I did not add the fuselage struts or the Vickers machine
gun.
I then left the plane alone for a couple of weeks for the glue to cure
so that I reduce the chance of getting a phantom seam.
There was some
sanding and filling to do on the center seams on the top of the fuselage and the
underside.
I used CA glue and Tamiya’s version of Mr Surfacer for
the filling. Once the seams were done to my satisfaction, the various holes were taped off or stuff with wet tissues in preparation for painting.
| COLORS & MARKINGS |
I first did the
tedious task of masking all the areas between the wing, elevator and aileron
frames.
I had a roll of 1/4” painters tape which I used for masking.
On my previous WNW build (a Sopwith Pup) I did this
freehand, but it did not look very good.
It took an hour to carefully cut tap and mask the wings
before they were painted flat white.
 Unlike most
of my previous builds I opted not to pre shade the fuselage and went straight to
painting the plane.
The Tamiya XF-55 Deck Tan was used as the underside
doped linen color.
It was sprayed in thin coats just enough to cover the
white.
Afterwards, I sprayed on a very thin coat of Tamiya XF-60 Dark Yellow to
add a slight yellow tinge.
I let the underside dry for a while as I painted various
other parts.
Unlike most
of my previous builds I opted not to pre shade the fuselage and went straight to
painting the plane.
The Tamiya XF-55 Deck Tan was used as the underside
doped linen color.
It was sprayed in thin coats just enough to cover the
white.
Afterwards, I sprayed on a very thin coat of Tamiya XF-60 Dark Yellow to
add a slight yellow tinge.
I let the underside dry for a while as I painted various
other parts.
Once the
underside was dry enough, I then masked off the underside of the wings except
the leading edges and them painted the entire plane along with the under
carriage and wheels with Polyscale PC-10.
I used extra thin coats on the topside of the wings,
elevators and ailerons to allow the flat white to show through because sometimes
Polyscale paints look like they don’t cover when wet, but dry opaque.
It didn’t turn out as well as I hoped.
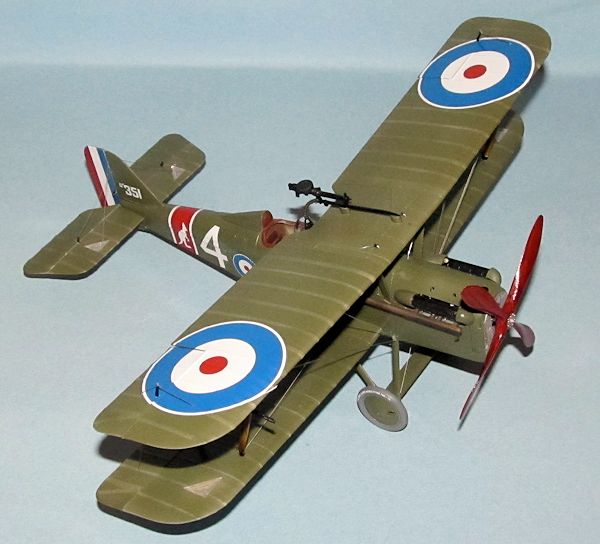
The rudder was
painted gloss white just in case the white on the tail decals wasn’t opaque
enough.
 Next I
masked off one side of each wheel and painted it Tamiya XF-75 Kure Grey to
represent the wheel rubber.
The Vickers and Lewis machine guns were painted
gunmetal.
The interior interplane struts were painted PC10 while the outer
ones (and the four bladed prop) were painted desert yellow.
Lastly, the exhausts were sprayed with a combination of
desert yellow, red brown and flat black.
Next I
masked off one side of each wheel and painted it Tamiya XF-75 Kure Grey to
represent the wheel rubber.
The Vickers and Lewis machine guns were painted
gunmetal.
The interior interplane struts were painted PC10 while the outer
ones (and the four bladed prop) were painted desert yellow.
Lastly, the exhausts were sprayed with a combination of
desert yellow, red brown and flat black.
Once the paint
was cured and dry, I sprayed on three thin coats of Future gloss to prepare the
surface for the decals.
It took a couple of days for the Future to cure (ie: not
smell.)
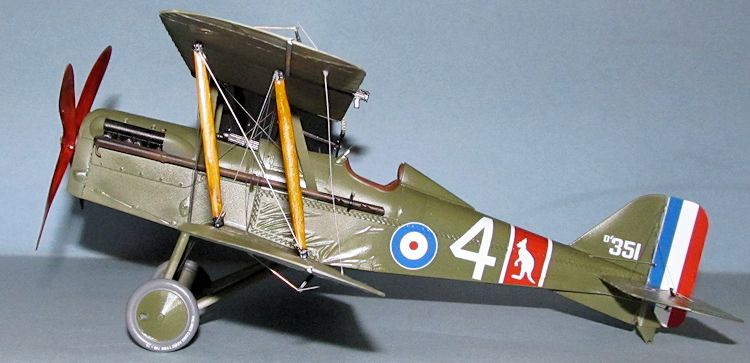
I selected the
markings of the 6th Training Squadron of the Australian Flying Corps because it
was the most colorful of the bunch.
The decals were added using some MicroSet without any
issues.
I did not weather
the plane because I wanted to show it as almost brand new.
The plane was wiped down with a wet rag to remove the excess decal solution and then was sprayed with a thin coat of Future.
| FINAL CONSTRUCTION |
When the paint
was dry on the interplane struts and prop, I dry brushed them with Model Master
Acryl Burnt Sienna to simulate the wood grain.
Once the burnt sienna was dry, I used a flat wide brush
to paint on a coat of Tamiya Clear Yellow.
I then added a coat of Tamiya Clear Red to the prop to
simulate the mahogany color.
After all that was dry, I painted the metal supports on
the interplane struts black and the prop hub metallic grey.
The engine was
assembled and painted.
I didn’t really care about the seams except the cylinder
blocks because most of the engine would be hidden.
It was painted using the color guide.
I followed Tom’s advice in his review of the kit and cut
off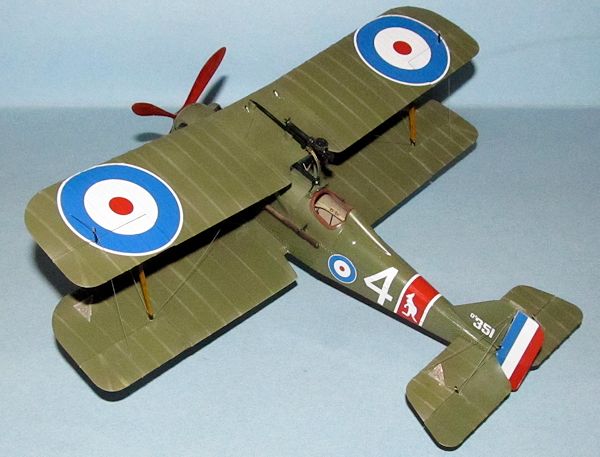 the
mounting pegs for the engine cylinder blocks before gluing the prepainted engine
cover on.
the
mounting pegs for the engine cylinder blocks before gluing the prepainted engine
cover on.
I’ve built the
Roden 1/48 SE5a.
It’s not a bad kit, but it is light years behind the larger scale
WW version especially in regards to the interplane struts.
It seemed that with a lot of kits in the smaller 1/48
scale, the holes for the interplane struts were just holes so you were forced to
make do with you best guess which often times led to frustration and wonky
alignment.
With the WNW kits, the struts are keyed so they are aligned
correctly unless you willingly screw up the alignment.
I glued in the
fuselage window (used Elmer’s white) and then added the Vickers machine gun,
telescopic gunsight and the gun cover to the fuselage.
The upper wing
was added without issue.
Next the wheels were assembled and the entire
undercarriage assembly was added without a problem.
One thing I
forgot to add was the parts to help mount the elevators on the wings.
These were painted and added just before I added the
elevators, ailerons and the tail.
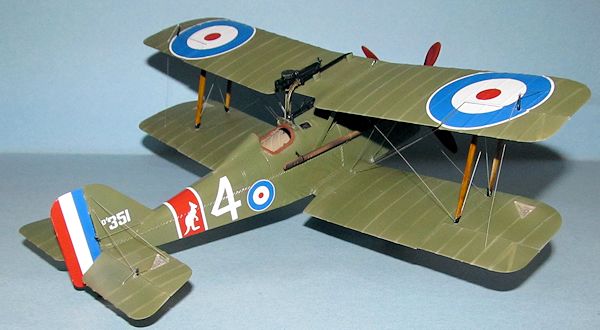
Lastly I added
the rigging.
I don’t mind rigging most biplanes, but I really hated rigging
the SE5a.
It’s not the fault of the model itself, but rather the layout of
the SE5a because of how it was rigged in real life.
I used RB production 1/32 scale PE RAF flying wires to
rig the model.
The interior rigging was done first and then I gradually moved
outwards.
However, the interior rigging and the rigging that connects from
the middle of the upper wing to lower wing just before the fuselage proved to be
a frustrating headache.
I’m glad that I never rigged the 1/48 Roden version
because I think I would have gone mad if I did.
It took several tedious frustrating days to get all the
rigging done.
All the rigging was glued on with Elmer’s white glue.
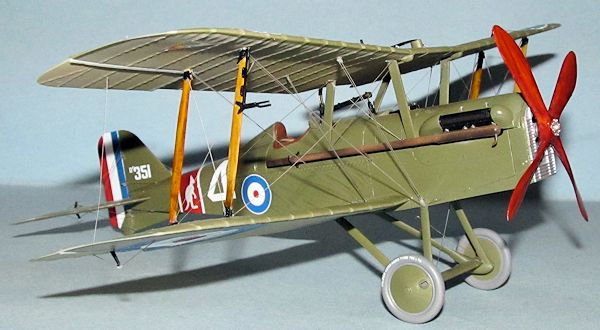
| CONCLUSIONS |
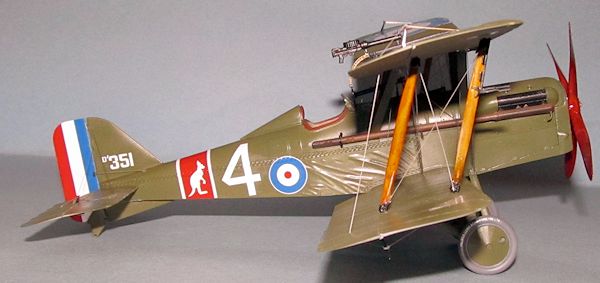 The Wingnut
Wings SE5a is an excellent kit for builders of almost all skill levels (except
beginners.)
I have to agree with Tom Cleaver that 1/32 is a very good scale
for WW1 fighters.
Despite its relatively high price, the kit is worth the
money as it provides everything you need except the rigging.
It might not be the best kit for those who want to build
their first WW1 biplane because of the rigging which I found to be a pain.
The Wingnut
Wings SE5a is an excellent kit for builders of almost all skill levels (except
beginners.)
I have to agree with Tom Cleaver that 1/32 is a very good scale
for WW1 fighters.
Despite its relatively high price, the kit is worth the
money as it provides everything you need except the rigging.
It might not be the best kit for those who want to build
their first WW1 biplane because of the rigging which I found to be a pain.
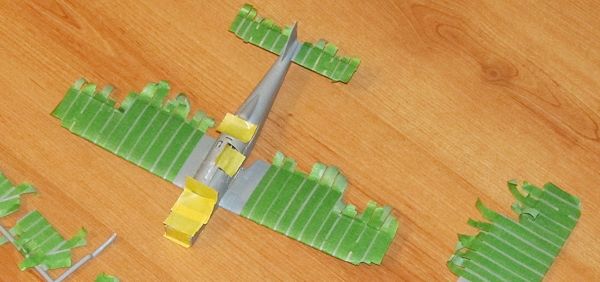
On a sad note, I was going to show a comparison of the 1/48 Roden version with this one in a photograph, but when I gently grabbed the 1/48 model, the struts and upper wing crumpled in my hands to my dismay. It was permanently “retired.”
February 2013
If you would like your product reviewed fairly and fairly quickly, please contact the editor or see other details in the Note to Contributors.