Roden 1/48 DH-4
| KIT #: | 422 |
| PRICE: | $37.95 SRP |
| DECALS: | Three options |
| REVIEWER: | Dan Lee |
| NOTES: |
| HISTORY |
The De
Havilland Four was first flown in late 1916 and became operational in January
1917 with the RFC and later the RNAS.
The DH4 is considered the best single engined bomber of
WW1 thanks to its versatility plus speed and altitude when fully loaded (the
latter two aspects appeared when the DH4 was fitted with the Rolls Royce Eagle
engine.)
It could be considered the forerunner of
 the
Mosquito as it often flew bombing missions unescorted thanks to its high
performance.
the
Mosquito as it often flew bombing missions unescorted thanks to its high
performance.
The DH4
also flew coastal patrols, Zeppelin intercept missions and acted as a courier
aircraft besides its normal bombing/observation role.
Near the end of the war, the DH4 flew as a strategic
daylight bomber relying on its speed and firepower to stop enemy fighters.
The poor results were a precursor to the heavy losses
and flawed assumptions of massed bomber raids of World War 2.
By the end of the war, the DH4 was slowly being replaced in RAF bomber
squadrons by the inferior DH9 whose only improvement on the DH4 was that it had
a shorter distance (hence better communication) between the observer/gunner and
pilot as the center fuel tank was moved elsewhere.
After the Great War, the DH4 would be converted to many civilian roles
around the world such as passenger plane, courier and postal plane.
Info from Wikipedia.
| THE KIT |
 The Roden
DH4 comes with eight thick sprues of light pinkish tan soft plastic, a decal
sheet with markings for three planes (two from the RNAS and one from the RFC)
and a small clear acetate sheet for the windscreen and windows.
The Roden
DH4 comes with eight thick sprues of light pinkish tan soft plastic, a decal
sheet with markings for three planes (two from the RNAS and one from the RFC)
and a small clear acetate sheet for the windscreen and windows.
It contains
several options for the exhausts, engine covers, bombs and machine guns as the
DH4 came in several variants.
Be careful to make sure you are using the correct parts
for the DH4 you build.
The kit parts require some cleanup as there is flash and thick sprue connections. It is also a touch grainy while the decals leave something to be desired based on my past experience with Roden’s decals.
| CONSTRUCTION |
I dry
fitted the parts and discovered that the fuselage of the Roden DH4 is one fiddly
assembly.
The rear fuselage is easy to put together, but it needed extra
support so I reinforced the rear fuselage seam with a piece of cut plastic card.
The
interiors parts were painted with Gunze Sail and the wood grain was hand painted
using red brown (first) and when dry, clear yellow.
The center fuel tank was painted silver but I wish I
didn’t as the tank is hidden so there was no point in painting it.
I used Tamiya tape for the seat belts.
I lined the rear fuselage pieces up and glued them
together.
The fit was not that good so I sanded
 and filled
with CA glue (this was done a few months later as I had stopped building models
for a while as demands of work ate up most of my time.)
and filled
with CA glue (this was done a few months later as I had stopped building models
for a while as demands of work ate up most of my time.)
Roden’s
fuselage pieces have a lot of sink marks thanks in large part to the interior
detail.
I chose to ignore most of them except a few of really obvious ones.
These were filled in with CA glue and sanded flat.
I next added the lower wing assembly.
I ended up waiting a week for the glue to cure before
filling and sanding the seams.
The nose is
one of the more complex assemblies as you have to attach the pilot seat with
frame as well as the engine parts.
One problem I encountered is that the pilot seat frame
is 1/2 mm too short making a butt join a difficult proposition.
I used a couple of thick drops of super glue to keep the
seat in place.
I then followed the instructions, but soon realized during dry
fitting that the nose needed to be reinforced so I used a “measured” length of
the sprue gate to stiffen the nose.
In test
fitting the cowling (which was painted first), I noticed that nothing really
lined up and that there were a 0.5mm gap on the sides.
I cut a shim of 0.005 thick plastic card to cover the
gaps on both sides.
I had to carefully sand down the nose join till it lined
up in test fitting.
Lastly, I
glued on the top portion of the fuselage to the plane.
There were some gaps that needed to be filled with
Note: I painted the wings, stabilizers, cowling and fuselage separately and then assembled them after painting.
| COLORS & MARKINGS |
 Paint
Paint
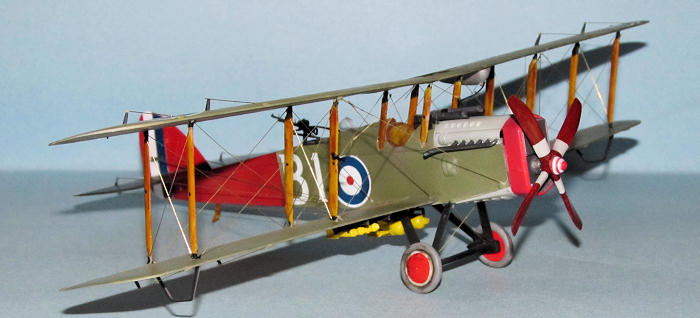
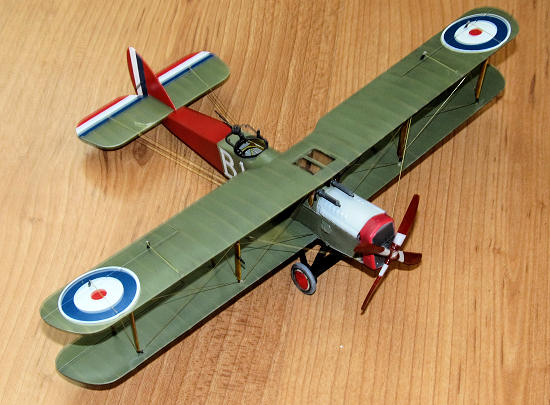
The DH4
scheme I selected was the RNAS one from the box which had a bright red nose and
tail.
This scheme is “interesting” from the mask/paint/repeat perspective, but
it also has uses fewer decals than the other schemes which is important if you
are familiar with the stubborn nature of Roden decals.
The first
thing I did was to cut thin strips of tape to mask the top and bottom areas of
the wings, stabilizers and tail where the frame meets the canvas.
I then sprayed on flat black or dark gray onto these
surfaces.
Next I preshaded the fabric seams and when the paint was dry I
removed the masks.
These parts sat for a couple of months as I had no time
or passion for the hobby.
When I did
have the time/passion, I sprayed on several thin coats of Tamiya Deck Tan for
the underside doped fabric color and the tail was painted flat white (for the
red.)
When that was dry, I masked off a thin area of the underside of the
wings and stab just past the leading edge and then sprayed on the Poly Scale
PC10 (again in several light coats.)
Afterwards the fuselage was preshaded with flat black
and then sprayed PC10 except the tail and parts of the nose.
When the paint was dry these areas were masked,
unmasked, the PC10 areas masked painted white first then red.
I put the model outside on the porch after each painting
step to cure quickly in the sun.
The PC10
portions around the engine and tail were masked and then I sprayed on light gray
for the engine covers and Gunze Red Madder for the red.
I had painted the engine cowling earlier, but had to
redo  the
red after I realized that the Red Madder on the fuselage was way too dark
because I shot other colors first and did not clean out the airbrush enough so
the other colors contaminated the red paint.
I used Insignia Red to darken the cowling.
the
red after I realized that the Red Madder on the fuselage was way too dark
because I shot other colors first and did not clean out the airbrush enough so
the other colors contaminated the red paint.
I used Insignia Red to darken the cowling.
Once the paint was cured, I sprayed on a couple of thin coats of Future
for the decals.
The prop
was dry brushed red brown, painted with a mix of clear red and yellow (two parts
clear red to one part clear yellow) to represent the colors used on British
props.
When the paint was dry, it was masked and painted light grey (Tamiya
XF-80.)
Next the struts were done the same way except I just used clear yellow.
The ends of the struts were painted gloss black as well
as the pitot tube.
The wing mounted oil tank (?) was painted silver and the
oil line was replaced with wire (because I broke it) and painted black.
Lastly, the
wheels were painted using leftover Eduard wheel masks while the landing gear
itself was painted flat black.
The hubs were painted white first and the thin strip
around the hub masked off.
Next the tire was painted red then the middle was masked
off and the tire itself was painted Tamiya
Decals
 My
experience with Roden decals has not been good.
Fortunately, the scheme I picked doesn’t use many decals
and most are solid colors.
The roundels went on okay except I lost a small piece
off one of the underside ones and had to cut off a piece from a surplus decal.
My
experience with Roden decals has not been good.
Fortunately, the scheme I picked doesn’t use many decals
and most are solid colors.
The roundels went on okay except I lost a small piece
off one of the underside ones and had to cut off a piece from a surplus decal.
Roden
provides the stabilizer flashes but not in precut shapes.
I just lined them up on the flaps and then when dry
trimmed off the excess with a really sharp knife.
Roden decals are also rather brittle so be very careful
when trimming.
Unfortunately, the white isn’t that opaque and the red paint of
the tail shows through so I had to cut some white decals and trimmed to fit.
Weathering and Final Coat.
The upper wing was lightly weathered, sealed with Xtracrylix Satin Coat and the clear acetate panels for the upper wing viewports were glued in place with Elmers white glue. The rest of the plane was weathered later. The only parts of the plane that I really did was the underside. I used a light watercolor wash on the underside, but made it dirty where the mud would splatter. The topside of the lower wings were dirtied a bit where the crew would enter. After all the model was fully assembled and the excess weathering was removed then I sprayed on a light coat of Xtracrylix Satin coat.
| FINAL CONSTRUCTION |
One problem
I have with biplanes, but especially British ones is that there is no easy to
get the strut angles correct.
Fortunately Roden did a simple and effective way to get
the angle on the struts correct for those on the fuselage as they are keyed to
the correct angle.
I glued those in place with Tamiya Extra Thin Cement and
let the glue harden.
I added the
guns, oil tank(?) and front windscreen next because adding them afterwards would
be almost impossible to do with all rigging in the way.
Next I attached the landing gear with CA glue.
The toughest part was aligning the tail skid, but it was
long enough to glue to the ceiling of the fuselage.
 The upper
wing was glued in place (CA glue) and then each set of struts was added to the
wings with CA glue.
It took a bit to adjust them into the proper angle.
Next I added the wire one everything was dry, I added
the rigging.
It took about 6 hours of work to get the inter wing rigging done
using dividers, 0.008 brass wire and white glue.
FYI, there is a total of 9 1/2 feet of brass wire on
that model.
The upper
wing was glued in place (CA glue) and then each set of struts was added to the
wings with CA glue.
It took a bit to adjust them into the proper angle.
Next I added the wire one everything was dry, I added
the rigging.
It took about 6 hours of work to get the inter wing rigging done
using dividers, 0.008 brass wire and white glue.
FYI, there is a total of 9 1/2 feet of brass wire on
that model.
For the
most part, the clear acetate parts went on okay except the rear windscreen.
The way it is angled there is no way I could use any
glue short of CA glue to keep it on.
After I lost the rear windscreen piece as it flew from
my hand onto the floor, I rummaged through my spare windscreens and found a part
from a Nieuport 17 that looked the part (sort of.)
A drop of Tamiya was used to hold it in place.
The tiny
multi stripe prop hub was not very pleasant to do.
It took me two tries to get something that looked like
but not exactly the number of stripes of the actual hub.
I ended up painting the hub white then cutting thin
strips of Tamiya tape (approx 0.8mm wide) and carefully wrapped them around the
hug keeping them from bunching up or screwing up the alignment.
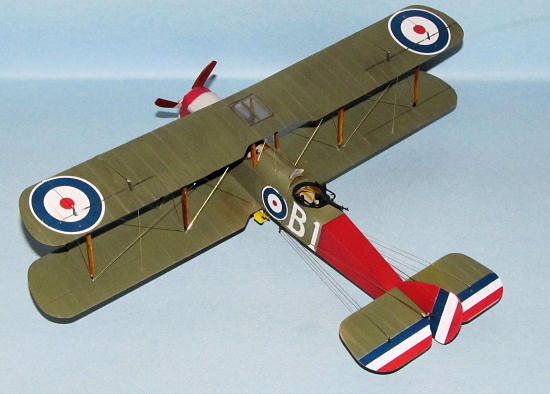
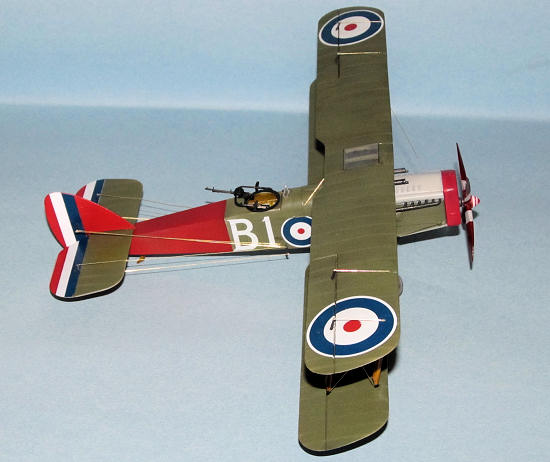
As you can tell from the photos, there was no physical
way I could do four stripes of red and three stripes of white on such a tiny
hub, I settled for three stripes of red and two stripes of white.
I did the best I could and I’m going to let someone else
make it correct.
I glued on the rear machine gun ring and the exhaust tubes thus
completing my DH4.
| CONCLUSIONS |
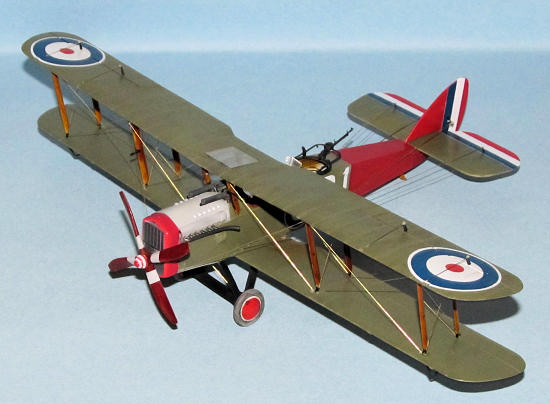
The Roden
DH4 is a nice 1/48 scale kit of this important WW1 aircraft.
It certain does take a lot of work to get something that
looks decent.
It was certainly a challenge for me.
I think it is a more advanced kit and I recommend that
if you’re going to tackle something like that you have some experience building
WW1 aircraft and have plenty of brass wire (or whatever you use for rigging) on
hand.
September 2011
If you would like your product reviewed fairly and fairly quickly, please contact the editor or see other details in the Note to Contributors.