
| KIT #: | 128 |
| PRICE: | AU$8.00 |
| DECALS: | Two options |
| REVIEWER: | Peter Hobbins |
| NOTES: | Kit decals extremely inaccurate; also reboxed by Eastern Express |
| HISTORY |
 Designed as an evolution of the successful but decidedly
tricky to fly Camel, Sopwith’s Snipe would have been a major combat aircraft if
World War I had continued on into 1919. As it was, various squadrons along the
Western Front were only just re-equipping with the type by the time of the
Armistice. Reports on the Snipe vary considerably. Some authors refer to the
service trials, suggesting it only just passed muster, being barely faster than
the Camel and lacking that type’s legendary manoeuvrability. Others – who point
to its brief but impressive combat record – suggest it was Britain’s answer to
the superb Fokker D.VII. The most famous Snipe was undoubtedly E8102, in which
the Canadian, WG Barker, earned a Victoria Cross for shooting down four German
planes while sustaining several serious wounds. Whatever its merits, the Snipe’s
longevity in Royal Air Force service (it pressed on until 1926) was guaranteed
by the cessation of hostilities – most wartime fighters were superseded after
only a year or so at the front.
Designed as an evolution of the successful but decidedly
tricky to fly Camel, Sopwith’s Snipe would have been a major combat aircraft if
World War I had continued on into 1919. As it was, various squadrons along the
Western Front were only just re-equipping with the type by the time of the
Armistice. Reports on the Snipe vary considerably. Some authors refer to the
service trials, suggesting it only just passed muster, being barely faster than
the Camel and lacking that type’s legendary manoeuvrability. Others – who point
to its brief but impressive combat record – suggest it was Britain’s answer to
the superb Fokker D.VII. The most famous Snipe was undoubtedly E8102, in which
the Canadian, WG Barker, earned a Victoria Cross for shooting down four German
planes while sustaining several serious wounds. Whatever its merits, the Snipe’s
longevity in Royal Air Force service (it pressed on until 1926) was guaranteed
by the cessation of hostilities – most wartime fighters were superseded after
only a year or so at the front.
| THE KIT |
While previously kitted in vacform, Toko’s Snipe is the only
injection-moulded offering of this type (it has since been reboxed by Eastern
Express). The two sprues contain some nicely shaped components, but the age of
the mouldings is now showing. Compared with the finesse of Roden’s series of
World War I types, this kit has thick trailing edges, a Spartan cockpit, poorly
 defined detail parts and no rigging diagrams. However, this is not to say it’s a
bad kit; it just requires more work than current offerings. Two marking options
are offered, namely Barker’s RAF machine and another aircraft captured by the
Soviets during the Russian Civil War. The markings for Barker’s machine are
incorrect for at least three reasons: the blue in the cockades is much too dark;
the relative widths of the rings in the roundels are completely wrong, and E8102
was an early version of the Snipe, whereas the kit represents a later production
variant. (Likewise, ignore the painting of Barker’s aircraft on the cover of the
Squadron/Signal Sopwith Fighters book, as it is incorrect in several
respects, including the aileron style, rigging and wheel colours.)
defined detail parts and no rigging diagrams. However, this is not to say it’s a
bad kit; it just requires more work than current offerings. Two marking options
are offered, namely Barker’s RAF machine and another aircraft captured by the
Soviets during the Russian Civil War. The markings for Barker’s machine are
incorrect for at least three reasons: the blue in the cockades is much too dark;
the relative widths of the rings in the roundels are completely wrong, and E8102
was an early version of the Snipe, whereas the kit represents a later production
variant. (Likewise, ignore the painting of Barker’s aircraft on the cover of the
Squadron/Signal Sopwith Fighters book, as it is incorrect in several
respects, including the aileron style, rigging and wheel colours.)
I found that an excellent complement to this kit was PART’s photoetch set (S72-075). As always, PART include more components than anyone is likely to use, but the cockpit interior and external details go a long way to bringing the Toko kit up to more current standards, and for a reasonable price.
| CONSTRUCTION |
The first step in building the Snipe is to identify which aircraft you want to model. The Toko kit represents the later production version with horn-balanced ailerons and larger fin and rudder; this variant only came into service right on the Armistice. Otherwise, one will need to trim back the ailerons to match the lower wing outline, and convert the fin and rudder to the bullet shape peculiar to the earlier variants (such as Barker’s machine). I wanted to model one of the Snipes flown by 4 Squadron Australian Flying Corps during the last weeks of the war and then on occupation duties in Germany. Most of their aircraft were the early variant, but after an extensive review of photos on the Australian War Memorial site (www.awm.gov.au), I found a few AFC Snipes of the later type to model.
An early decision to make is whether to thin down the
trailing edges. I must have been feeling lazy as I didn’t do this, but the
rudder in particular would definitely benefit from considerable thinning. If you
are building the kit from the box, then construction
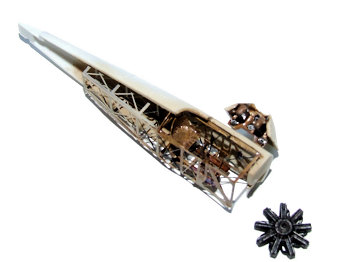 could proceed fairly
quickly. Because I was adding the photoetch set, I assembled PART’s nicely
detailed interior framework and painted it. This extends all the way to the rear
of the fuselage, but of course almost all of it is invisible once the kit is
assembled – an alternative may be to cut off the rear half of the framework
structure before assembly and save it for use in another kit. Attaching the
wicker seat was the most difficult element of the photoetch, as the support beam
was much too wide for the space between fuselage frames. Once the frame was
built up, I found that I had to sand away a decent chunk of wing root from the
kit interior in order to make the etch fit. When I attempted to add the lower
wing, I also needed to snip away the lower front of the etch framing to make
room for the engine tray. Likewise, I had to cut some of the top of the etched
cockpit framing to allow the photoetch instrument panel to slide into place.
Otherwise, the kit fuselage components all fit together reasonably well.
could proceed fairly
quickly. Because I was adding the photoetch set, I assembled PART’s nicely
detailed interior framework and painted it. This extends all the way to the rear
of the fuselage, but of course almost all of it is invisible once the kit is
assembled – an alternative may be to cut off the rear half of the framework
structure before assembly and save it for use in another kit. Attaching the
wicker seat was the most difficult element of the photoetch, as the support beam
was much too wide for the space between fuselage frames. Once the frame was
built up, I found that I had to sand away a decent chunk of wing root from the
kit interior in order to make the etch fit. When I attempted to add the lower
wing, I also needed to snip away the lower front of the etch framing to make
room for the engine tray. Likewise, I had to cut some of the top of the etched
cockpit framing to allow the photoetch instrument panel to slide into place.
Otherwise, the kit fuselage components all fit together reasonably well.
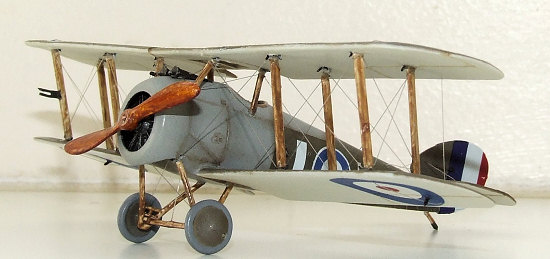
The remainder of construction is relatively straightforward,
but there are two additional areas of note. The kit’s engine is a poor
representation of the Bentley BR2 and really needs to be replaced by an
aftermarket alternative (e.g. by Aeroclub). I found that one of the spare
engines in my Roden Camel TF.1 kit looked very similar to the BR2, so after
adding some exhaust pipes I attached it to my Snipe. When the cowling is affixed
to the front fuselage, a fair bit of filler is required to blend it in to the
upper fuselage fairing. I also sanded off the kit’s propeller boss and replaced
it with an etch item from one of PART’s generic World War I sets. The second
area to consider during construction is the rudder, which is too large and needs
to be cut down on the lower surface. Part
 of this size problem can be explained
by the nature of the Snipe’s tail, which was actually mounted on posts rather
than being attached to the top of the tailplanes, but even allowing for this the
kit item is too big.
of this size problem can be explained
by the nature of the Snipe’s tail, which was actually mounted on posts rather
than being attached to the top of the tailplanes, but even allowing for this the
kit item is too big.
There are quite a few struts, the Snipe being a twin-bay biplane, but the kit items aren’t too bad and they all locate in their respective holes quite solidly. Be careful to check your slots when attaching the cabane struts to the fuselage decking; I accidentally glued mine into the shell ejector chutes for the Vickers guns, before realising something was amiss! To be fair, this was my fault – the instructions are pretty clear about placement. I attached the PART control horns to the control surfaces (the instructions incorrectly show them on the underside of the top wing, whereas they should only be on the top of that wing and the underside of the bottom wing), and also the etch rigging brackets at the root of all of the struts.
The kit’s undercarriage is fine but the wheel faces lack the subtle detail that Roden now offers. I chose not to add the photoetch enhancements as I felt that they would not really improve matters – the detail would then be too prominent.
| COLORS & MARKINGS |
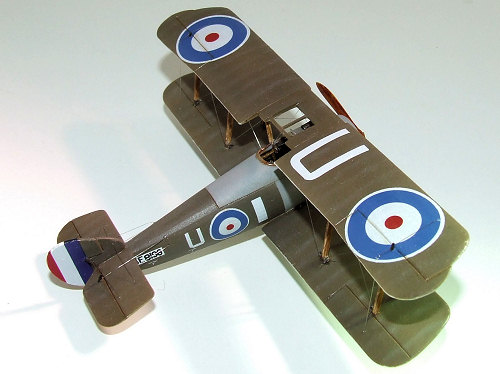
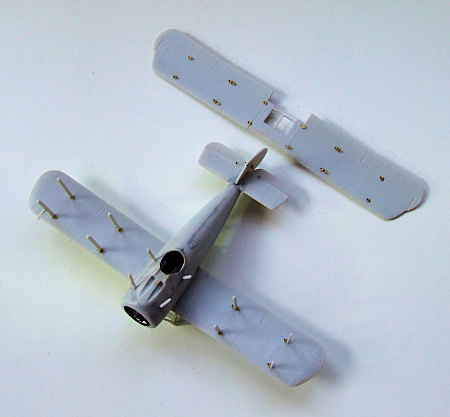
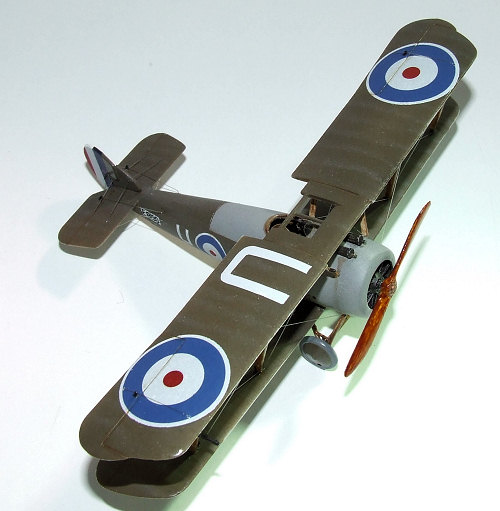 In line with most Royal Flying Corps/Royal Air Force types
of the era, the AFC’s Snipes were painted in PC10 over clear doped linen, with
light grey cowlings and decking. For these shades I used Xtracolor Linen and RFC
Green, plus Tamiya’s Sky Gray. All were followed with lightened tints of the
same colour to accentuate panel lines or ribbing. Indeed, the ribbing effect on
the undersides of the wings disappears under a coat of paint, so you may prefer
to add rib tape decals if you are especially keen. The propeller and struts were
painted in the enamel linen colour before streaking thinned brown acrylic paint
over the top in order to create a wood grain effect; all ‘wooden’ parts were
then coated with clear orange as well to represent varnish.
In line with most Royal Flying Corps/Royal Air Force types
of the era, the AFC’s Snipes were painted in PC10 over clear doped linen, with
light grey cowlings and decking. For these shades I used Xtracolor Linen and RFC
Green, plus Tamiya’s Sky Gray. All were followed with lightened tints of the
same colour to accentuate panel lines or ribbing. Indeed, the ribbing effect on
the undersides of the wings disappears under a coat of paint, so you may prefer
to add rib tape decals if you are especially keen. The propeller and struts were
painted in the enamel linen colour before streaking thinned brown acrylic paint
over the top in order to create a wood grain effect; all ‘wooden’ parts were
then coated with clear orange as well to represent varnish.
Since the kit decals were inappropriate and the cockades
incorrect, I turned to the spares box. Pegasus provided the roundels from their
excellent generic sheet. I used the kit’s rudder decal and while this settled
down well with plenty of overhang for trimming, the blue is really too dark. The
serial number also hailed from the Pegasus sheet of World War I serials (which
includes white backing bars); I also used these bars to create the rectangular 4
Squadron marking below the cockpit decking. The kit’s ‘lift here’ decals also
worked well, which just left the prominent white ‘U’ of this aircraft for the
fuselage sides and upper wing. The spares box finally yielded the
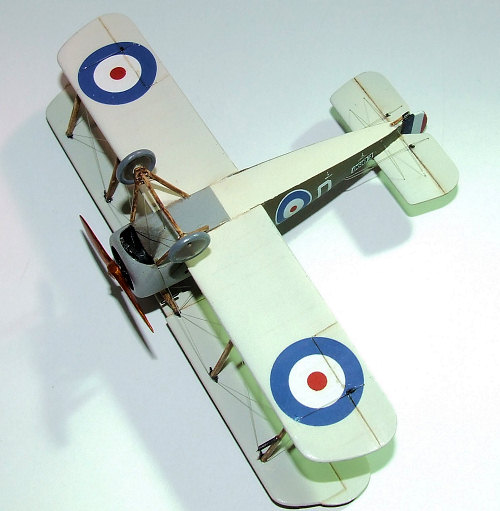 fuselage
letters, but the large ‘U’ for the wing had to be created from white sections of
some C-47 invasion stripes. Once the decals were all snuggled down with some Mr
Mark Softer, the airframe was wiped over with a moistened cloth and sprayed with
Gunze flat clear, which produces a slightly satin finish that I feel is
appropriate for World War I types. I then added a wash of thinned oil paint to
accentuate some panel lines and control surface edges.
fuselage
letters, but the large ‘U’ for the wing had to be created from white sections of
some C-47 invasion stripes. Once the decals were all snuggled down with some Mr
Mark Softer, the airframe was wiped over with a moistened cloth and sprayed with
Gunze flat clear, which produces a slightly satin finish that I feel is
appropriate for World War I types. I then added a wash of thinned oil paint to
accentuate some panel lines and control surface edges.
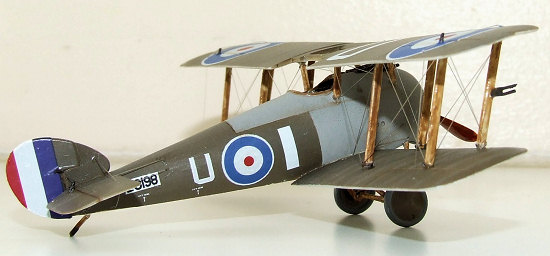
This left the attachment of the upper wing and the rigging. The former is a little tricky owing to the profusion of struts, whereas the latter is difficult as there are no rigging diagrams in the instructions. The drawings in the Squadron/Signal book are also incomplete/incorrect with regard to rigging, so in the end I simply followed photos. The only problem I can see was that I had attached the rudder control horns above the elevators rather than underneath them, but – shame on me – I’ve left it as it is for now. PART suggest that modellers should rig aircraft through the tiny holes in the etch brackets they provide, but this is not really feasible so I will probably leave off these fittings when building future biplane kits. After I took the photos I assembled the bomb rack provided by PART, glued on four Aeroclub Cooper bombs, then and added it to my Snipe – several AFC aircraft were photographed with these racks in place.
| CONCLUSIONS |
Toko’s kit captures the surprisingly handsome lines of the Snipe quite well. Indeed, I have found I much prefer the aesthetics of this Sopwith product over the preceding Camel. Out of the box, the kit would be OK from a distance but really lacks the subtlety of current-era First World War models. I recommend the PART photoetch set as an inexpensive but very useful addition to the basic kit; it will also benefit from an aftermarket engine and decals too. If you like biplanes then the Snipe would be an attractive addition to your collection, while offering a few more modelling challenges than current offerings such as Roden’s excellent Camel series.
| REFERENCES |
 JM Bruce. “Sopwith Snipe: the RAF’s first fighter”. Air
Enthusiast International, April 1974, 190–207.
JM Bruce. “Sopwith Snipe: the RAF’s first fighter”. Air
Enthusiast International, April 1974, 190–207.
Peter Cooksley. Sopwith Fighters in Action. Carrollton: Squadron/Signal Publications, 1991.
Keith Isaacs. Military Aircraft of Australia 1909–1918. Canberra: Australian War Memorial, 1971.
Alec Lumsden. “On silver wings”. Aeroplane Monthly, October 1990, 587–92.
Charles Schaedel. Men and Machines of the Australian Flying Corps 1914–19. Melbourne: Kookaburra Technical Publications, 1972.
October 2007
Copyright ModelingMadness.com
If you would like your product reviewed fairly and fairly quickly, please contact the editor or see other details in the Note to Contributors.