Pegasus 1/72 Bristol M.1C
| KIT #: | ? |
| PRICE: | $? |
| DECALS: | No options |
| REVIEWER: | Mark Fordham |
| NOTES: | Short run |
| HISTORY |
 In the
spring of 1916 casualties among Royal Flying Corps' aircrew began to mount
as their aircraft were no match for the Fokker monoplanes used by the
Germans. Better fighting machines were desperately needed.
In the
spring of 1916 casualties among Royal Flying Corps' aircrew began to mount
as their aircraft were no match for the Fokker monoplanes used by the
Germans. Better fighting machines were desperately needed.
To meet this demand Captain F.S. BarnwelI at the Bristol Aeroplane Co.
designed a new single-seat monoplane incorporating much of the experience
gained from earlier machines including the large low drag spinner first
used experimentally on the Bristol Scout D.
The new aircraft had a sparkling performance and manoeuvrability. It was,
in many respects, superior in all round performance to much later types
such as the SE5 and Sopwith Snipe. Great things were expected of the M1 but
a combination of prejudice against monoplanes, a dislike for its high
landing speed and poor downward view meant it found little favour in the
War Office and only 125 were ordered. Only five squadrons were partly
equipped with the M1 for operational use although a number were issued to
flying schools where they were prized by instructors as personal mounts.
| THE KIT |
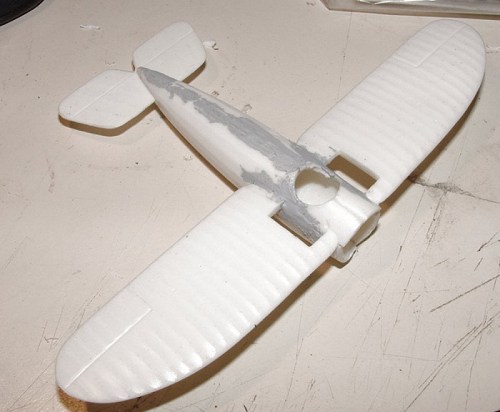
 The
model consists of some 12 pieces comprising of a very soft white plastic
that has soft detailing due to it low pressure injection molding, no decals
and a bright orange A4 sheet with construction tips and a nicely drawn set
of 1/72nd scale plans with detailed information on the items not
supplied in the kit that the builder is required to scratch build, all this
is packaged in a heavy plastic bag held together with a folded cardboard
top, just like the original Bagged Airfix kits of years gone by.
The
model consists of some 12 pieces comprising of a very soft white plastic
that has soft detailing due to it low pressure injection molding, no decals
and a bright orange A4 sheet with construction tips and a nicely drawn set
of 1/72nd scale plans with detailed information on the items not
supplied in the kit that the builder is required to scratch build, all this
is packaged in a heavy plastic bag held together with a folded cardboard
top, just like the original Bagged Airfix kits of years gone by.
Due to the low pressure molding there are very thick sprue gates to contend with and the easiest way to deal with them is to cut the parts off with a razor saw, as trying to cut them off will more that likely result in a trip to the hospital to remove broken scalpel blade from your finger, once the fuselage has been removed from the sprue a little bit of cleaning is required, a fair amount of flash has to be removed and the mating surfaces need to be “trued up” by taping a sheet of 600 wet-n-dry onto a sheet of glass and carefully sanding the fuselage halves so you have a flat join to glue.
| CONSTRUCTION |
The cockpit is nothing to write about with the only details provided is a rather poorly molded seat, this was cleaned up and thinned out and glued into the fuselage half. I didn’t get too carried away as there is very little you can see through the tiny cockpit hole anyway, with a splash of paint around the cockpit the fuselage was glued together using liquid glue, because the mating surfaces had been trued up the fit was good and no filler was needed.
 With the fuselage done the wings were removed from the thick sprue and
cleaned up, I attacked the top and bottom with 600 wet-n-dry to knock back
the really heavy rib details and on retrospect I could have taken it back a
little more as it’s still very much the “hills and valleys” representation
of ribs. The Bristol’s wings have a cutout area by the wing root to improve
the pilot visibility before he stacks the trainer into the ground, these
holes were cleaned up and the ribs and stringers scratch-built with thin
plastic card and sprue.
With the fuselage done the wings were removed from the thick sprue and
cleaned up, I attacked the top and bottom with 600 wet-n-dry to knock back
the really heavy rib details and on retrospect I could have taken it back a
little more as it’s still very much the “hills and valleys” representation
of ribs. The Bristol’s wings have a cutout area by the wing root to improve
the pilot visibility before he stacks the trainer into the ground, these
holes were cleaned up and the ribs and stringers scratch-built with thin
plastic card and sprue.
The
wings were attached with some lengths of brass tubing added for strength
and to help with alignment. The one piece tail-plane was removed, cleaned
up and glued into place, remember to constantly check the alignment with
these limited run kits as they don’t have the slot and tabs that ensure the
correct
 dihedral that the mainstream kits spoil us with these days. The
rudder was given the same cleanup treatment but was put to one side for
now.
dihedral that the mainstream kits spoil us with these days. The
rudder was given the same cleanup treatment but was put to one side for
now.
With the main kit supplied components assembled the modeler is now confronted with the task of scratch building the rollover frame and the undercarriage legs that are not supplied with the Pegasus kit but thankfully unlike a lot of the short run kits Pegasus give you excellent plans to work from, not only do they have the profiles but they also include separate drawings showing you the correct lengths to cut the struts rather than trying to guess the length from the plans. I used striped down 20 thou plastic card to make the struts.
| COLORS & MARKINGS |
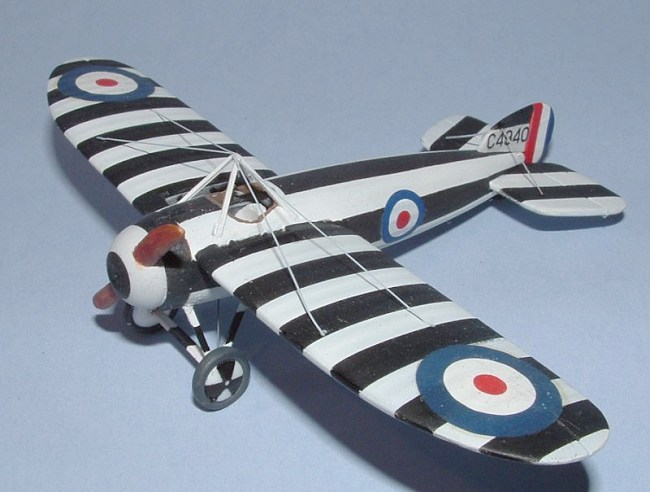
With the undercarriage on it was time to do some painting, the colour scheme that Pegasus supplied was of a boring natural linen and olive drab (ish) machine that frankly looked horrible so I did a bit of poking around on the net and found a photo of a 1/48th scale Bristol done up in the ultimate “D-Day” stripes and thought to myself, ‘yeah just gotta do that one’ and yes I know this is another model of a model :- )
First job was to undercoat the plane with a couple of coats matt Humbrol
white and leave to harden for a week, the black stripes was rather complex
and I discovered that the easiest way to do them was to mask all the flat
surfaces like the main wings and tail-planes up with masking tape and spray
them with matt Tamiya black. Once dry and the masking tape removed
 it was
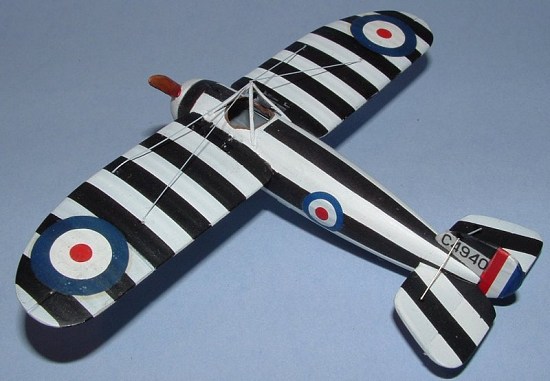
time to do the fuselage stripes, it was at this time I discovered that I
had made the wing stripes slightly too wide and if I put the correct amount
of stripes on the fuselage they would be considerably thinner than the wing
stripes and it would look wrong, I didn’t feel particularly inclined to respray the plane and do a another 2 hour marathon masking session to
narrow the stripes on the wings so I cut the amount of stripes down on the
fuselage to 4, that way they would be the same width as the wing stripes
and even though they are historically “wrong” are more ascetically
pleasing.
it was
time to do the fuselage stripes, it was at this time I discovered that I
had made the wing stripes slightly too wide and if I put the correct amount
of stripes on the fuselage they would be considerably thinner than the wing
stripes and it would look wrong, I didn’t feel particularly inclined to respray the plane and do a another 2 hour marathon masking session to
narrow the stripes on the wings so I cut the amount of stripes down on the
fuselage to 4, that way they would be the same width as the wing stripes
and even though they are historically “wrong” are more ascetically
pleasing.
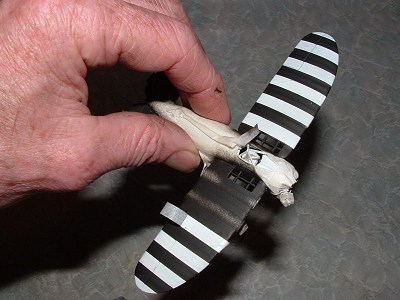
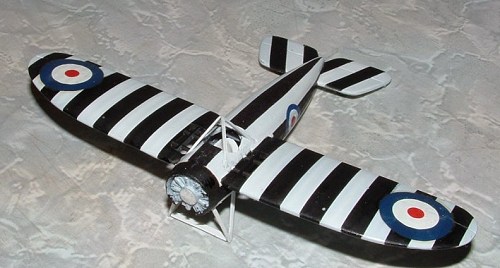 Trying to mask stripes that start at 4 mm wide and taper off to nothing
(remember this is very small plane in 1/72nd scale with a total
length of less than 8 cm) wasn’t going to be easy and of course I had made
it even harder by adding the roll over bar and undercarriage, with these in
the way masking was almost impossible so I turned to my tile decals again,
by running the tile decal through the laser printer I had a solid area of
black some 8 cm x 6 cm that I could make the stripes out of. I used a paper
template to get the taper right and them transferred the shape to the decal
paper and cut out the stripes and applied as normal.
Trying to mask stripes that start at 4 mm wide and taper off to nothing
(remember this is very small plane in 1/72nd scale with a total
length of less than 8 cm) wasn’t going to be easy and of course I had made
it even harder by adding the roll over bar and undercarriage, with these in
the way masking was almost impossible so I turned to my tile decals again,
by running the tile decal through the laser printer I had a solid area of
black some 8 cm x 6 cm that I could make the stripes out of. I used a paper
template to get the taper right and them transferred the shape to the decal
paper and cut out the stripes and applied as normal.
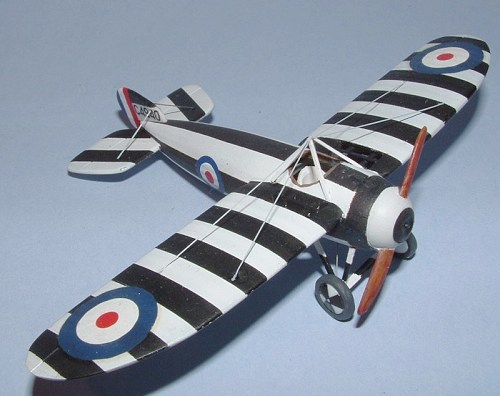
 The
black disk on the propeller was done by printing the Wingdings font letter
“L” at 26 points and applying with my homemade decal softener at almost 70%
strength, this caused the decal to literally melt and ensure it conformed
to the compound curves of the spinner. The black stripe behind the spinner
was applied the same way and touched up with black paint as needed. The
final area that gave me grief was the fancy mag wheel effect on the wheel
covers, try as I might I could not paint them properly as they are some 6mm
in diameter so I had to do a bit of lateral thinking again and came up with
the idea of printing out the international symbol for radiation scaled down
to the correct diameter and then applied it as a decal.
The
black disk on the propeller was done by printing the Wingdings font letter
“L” at 26 points and applying with my homemade decal softener at almost 70%
strength, this caused the decal to literally melt and ensure it conformed
to the compound curves of the spinner. The black stripe behind the spinner
was applied the same way and touched up with black paint as needed. The
final area that gave me grief was the fancy mag wheel effect on the wheel
covers, try as I might I could not paint them properly as they are some 6mm
in diameter so I had to do a bit of lateral thinking again and came up with
the idea of printing out the international symbol for radiation scaled down
to the correct diameter and then applied it as a decal.
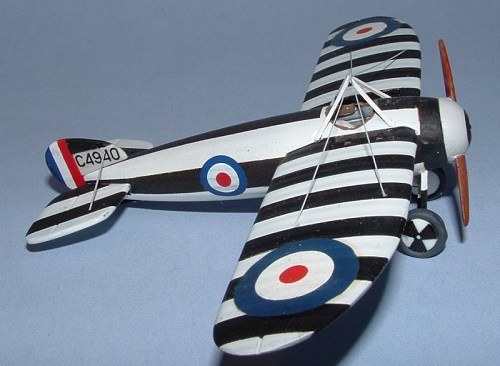
The roundels came from some antique Esci sheet I had floating around and the serial number was again printed out on the printer. With all the decaling finally done and the rudder attached the model was given a couple of coats of future to seal the decals and reduce the slight lip the thick tile decals leave, once the Future was hard a couple of thinned coats of Humbrol matt Kote was added. The rigging for this particular aircraft is pretty simple and was added using stretched sprue for the wings and guitar string for the undercarriage to help strengthen it up a bit as I had discovered that the weight was causing the thin struts to sag a little.
| CONCLUSIONS |
 Not
my best assembled model and full of build and historical errors to boot,
but it is one of my favorite and striking models, if nothing else this
model helped me come to grips with a more complex masking scheme that I
normally wouldn’t have tried, so okay I stuffed up the width of the stripes
on the wings and that threw out the rest of the build, but frankly I don’t
really care too much as I’m quite happy with the finished result and I
learnt a heap of new things and refined my homemade decal making with this
build.
Not
my best assembled model and full of build and historical errors to boot,
but it is one of my favorite and striking models, if nothing else this
model helped me come to grips with a more complex masking scheme that I
normally wouldn’t have tried, so okay I stuffed up the width of the stripes
on the wings and that threw out the rest of the build, but frankly I don’t
really care too much as I’m quite happy with the finished result and I
learnt a heap of new things and refined my homemade decal making with this
build.
My thanks to Derek Pendelton for the opportunity to drive myself insane with a complex masking job.
Long live Airfix and death to the heretics
| REFERENCES |
WWW for the 1/48th scale pictures of the Bristol M1-C
History thanks to the RAF museum http://www.rafmuseum.com/bristol-m1c.htm
December 2004
Copyright ModelingMadness.com.
If you would like your product reviewed fairly and fairly quickly, please contact the editor or see other details in the Note to Contributors.