| KIT: | Roden 1/48 Se.5a (Hispano-Suiza) |
| KIT #: | 419 |
| PRICE: | $28.99 MSRP |
| DECALS: | Six ptions |
| REVIEWER: | Kyle Bodily |
| NOTES: |
| HISTORY |
Often ranked up with the Sopwith Camel as the most successful British aircraft of the First World War. It was not always considered to be even a good aircraft. Captain Albert Ball had an intense dislike for the aircraft calling it a “dud” and “rotten machine”. He personally liked his Nieuport 17 more and would have preferred to fly the Austin A.F.B.1 instead of the S.E.5. Needless to say the A.F.B.1 never saw production and Albert Ball grudgingly accepted his S.E.5. In the end he grew to like the aircraft.
The first two prototypes had 150 hp engines, and while they were quite liked they were roughly equivalent to German aircraft of the time. On the 17th of January 1917, the third prototype with a 200 hp engine was delivered. The first few flights were successful and the initial reports looked good. Then on the 28th of that same month the wing failed and it crashed, killing the test pilot. The wing problems would go on to take the lives of many pilots until the spring of 1918 when several modifications were built into all S.E.5a wings. This fixed the wing problem.
 The engine was another problem. The
Hispano-Suisa was the most advanced engine of its time and was, to say the
least, complicated. As they say “the more parts you got the more parts that can
break” and the reduction gears alone consisted of “lots of parts”. It seems
that poor quality control allowed engines with incorrectly hardened reduction
gears to get through. Most of the higher quality French engines were going to
their SPAD fighters and since the British had lots of airframes and no engines
they installed them anyway saying “a bad engine is better then no engine”. To
fix this problem the British started to build them at home but the engines they
were building had problems also. The situation was getting critical and the
British began to think that they may be more successful building the 150 ho
engines and putting them in all the aircraft that were waiting for power plants.
The engine was another problem. The
Hispano-Suisa was the most advanced engine of its time and was, to say the
least, complicated. As they say “the more parts you got the more parts that can
break” and the reduction gears alone consisted of “lots of parts”. It seems
that poor quality control allowed engines with incorrectly hardened reduction
gears to get through. Most of the higher quality French engines were going to
their SPAD fighters and since the British had lots of airframes and no engines
they installed them anyway saying “a bad engine is better then no engine”. To
fix this problem the British started to build them at home but the engines they
were building had problems also. The situation was getting critical and the
British began to think that they may be more successful building the 150 ho
engines and putting them in all the aircraft that were waiting for power plants.
To give you an idea of this problem of the 800 airframes that had been completed by December 1917 (the aircraft had been in France since 8th of April 1917) the British only had enough engines to field five Squadrons.
Now, Wolseley Motors Ltd. Of Birmingham had the contract for the 200 hp Hispano-Suisa engine that they called the Adder. This engine like the Sunbeam Arab was disappointing. So, Wolseley got an order to build four hundred of the 150 hp Hispano-Suisa engine in case the 200 hp Hispano-Suisa Adder engine failed and got canceled. Well it did and it was.
Then the big mistake happened.
Wolseley was to make the 150 hp Hispano-Suisa engines but for some unknown
reason they thought they were to build 200 hp engines. So the engineers set to
the task of designing a 200 hp engine out of a 150 hp direct
 drive engine
official requirement. The result was the Wolseley Viper. The first Viper
engined S.E.5a took to the air in August 1917. The engine performed as well if
not slightly better then the geared 200 hp Hispano-Suisa. But it was reliable,
easier to build and required less maintenance. However the engines didn’t
become available in large numbers until well into 1918. S.E.5a pilots just had
to make do with whatever they could get until then. Remember at this same time
(spring and summer 1918) the Germans were fielding their excellent Fokker D.VII.
So S.E.5a pilots were going up against more and more Fokker D.VIIs while waiting
for a reliable engine and a wing that wouldn’t fail in a steep high-speed dive.
drive engine
official requirement. The result was the Wolseley Viper. The first Viper
engined S.E.5a took to the air in August 1917. The engine performed as well if
not slightly better then the geared 200 hp Hispano-Suisa. But it was reliable,
easier to build and required less maintenance. However the engines didn’t
become available in large numbers until well into 1918. S.E.5a pilots just had
to make do with whatever they could get until then. Remember at this same time
(spring and summer 1918) the Germans were fielding their excellent Fokker D.VII.
So S.E.5a pilots were going up against more and more Fokker D.VIIs while waiting
for a reliable engine and a wing that wouldn’t fail in a steep high-speed dive.
In short the S.E.5a in and of itself didn’t get to heavily impact the German Jastas until the spring and summer of 1918. Not because it wasn’t a good aircraft, but because there were just not that many of them. It can be argued and is, that all the fame gained by the S.E.5a in World War One was truly forged in the last four to six months of the war. A fact that I think tells you just what an excellent aircraft it really turned out to be.
| THE KIT |
 (Also see
the preview)
(Also see
the preview)
The kit looks beautiful in the box. On first look I see no flash or sink marks. The plastic is very thin and crisply molded. The cockpit looks like it will be very nice. The wing detail is as good as I have ever seen. On many of the actual aircraft you can see wrinkles in the fabric under the cockpit. This is the only thing that on first look I can see that a modeler may want to reproduce. But on the other hand it is not seen on all aircraft so I guess you will just have to check your sources. The decals are spot on and very sharp. I have been told that this kit has the new decals. I am looking forward to trying them if in fact I truly have a set of the new ones.
The instructions are very nicely done. The paper is of good quality and adequate weight. The printing is well done and they come with a very clear rigging diagrams with several smaller diagrams showing close ups of some of the other places not readily seen in the main diagram. All in all I think this is going to be a fun build, so lets get to work.
| CONSTRUCTION |
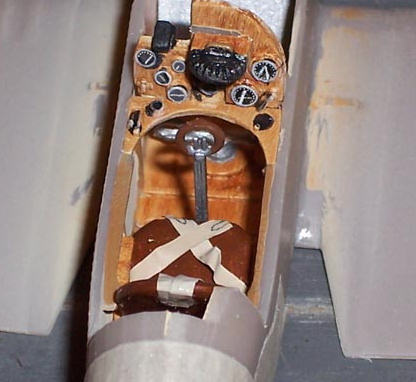
I started by painting all the
internal surfaces Ray Dome Tan for clear doped linen. I then painted all the
surfaces that were wood with oil paints to simulate wood. I painted the
instruments black then the gage faces with white details and dry brushed some
highlights. The cockpit went together quite well, and wings went on slick. The
rest of the fuselage went together without a hitch.
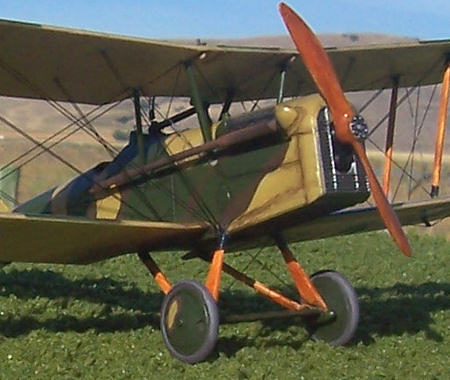
 Now, the fuselage is made
of seven parts. The two fuselage halves, the cockpit fairing, and the four
engine cowling parts necessary for the Hispano-Suiza versions. The Viper engine
SE.5a has four cowling parts that are unique to its engine. In this manner, the
Roden kits are very similar to Hasegawa kits. If you have ever built one of
Hasegawa’s Hawker Typhoons, Hurricanes or even a Messerschmitt Bf-109, you will
know what I mean. These kits have a core set of parts. So, by simply changing
the parts that are unique to that mark or series the manufacturer can make many
different kits from one core set of parts. While this is good for the
manufacturer it does make for a kit that, to many will seem kind of fiddly.
Don’t get wrapped up about this just take it in stride and it will come out
well. The fact that I had no problems assembling the fuselage speaks well of
the excellent job that Roden is doing in manufacturing these kits.
Now, the fuselage is made
of seven parts. The two fuselage halves, the cockpit fairing, and the four
engine cowling parts necessary for the Hispano-Suiza versions. The Viper engine
SE.5a has four cowling parts that are unique to its engine. In this manner, the
Roden kits are very similar to Hasegawa kits. If you have ever built one of
Hasegawa’s Hawker Typhoons, Hurricanes or even a Messerschmitt Bf-109, you will
know what I mean. These kits have a core set of parts. So, by simply changing
the parts that are unique to that mark or series the manufacturer can make many
different kits from one core set of parts. While this is good for the
manufacturer it does make for a kit that, to many will seem kind of fiddly.
Don’t get wrapped up about this just take it in stride and it will come out
well. The fact that I had no problems assembling the fuselage speaks well of
the excellent job that Roden is doing in manufacturing these kits.
I like to build the fuselage and all the components that I can and then paint. After I paint and apply the decal I do any weathering that I want. Then I drill all the holes for the rigging.
I like to build and rig at the same time. For instance I set the top wing and let it dry. Then I rigged the wings. Then I set the tail and let it dry then rigged it. Finely I set the landing gear let it dry and then rigged it. I find that you just got to take your time and everything will work out.
Just wade in to it, with a good attitude, have fun and remember. If something can go wrong, it is about to, if not it has gone wrong and you just haven’t discovered it yet. But you will, OH YOU WILL.
| COLORS & MARKINGS |
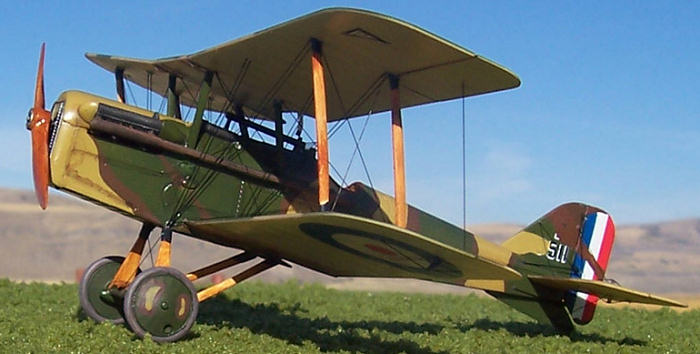
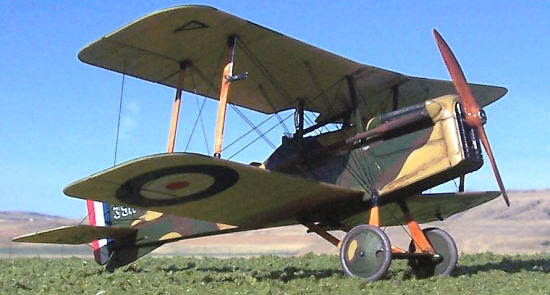
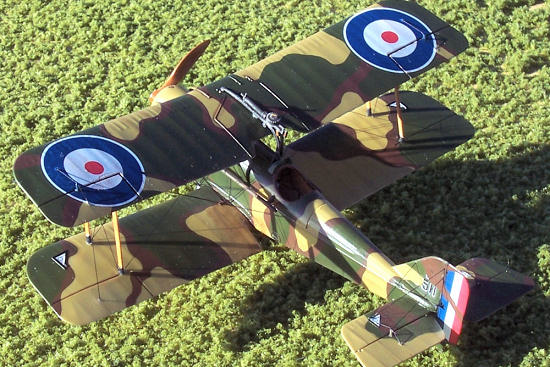
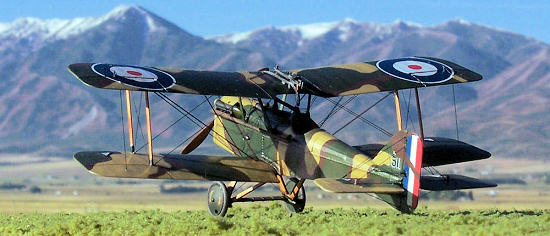
You don’t get a lot of fancy paint jobs with the S.E.5a. However you sometimes get something like the aircraft flown by Major Dallas. This aircraft had an attractive disruptive paint job. So that is the crate I picked.
I started by painting the under surfaces a clear doped linen. I masked this color off and painted the lightest color next. I used middle stone, after this dried I masked it and painted the median green. Once again I let this dry and masked it and finely painted Italian brown on it. After all was dry I took all of the masking off and there you go, it was done.
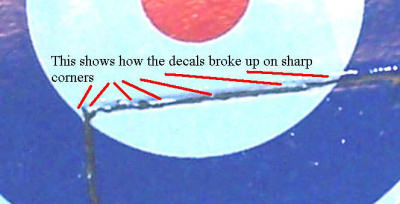 I found the decals to be thin and
the white needed to be a little bit more opaque. This makes me think that they
are the old type. They did seem to stick better then some of the older ones.
So may be they are an intermediate attempt. They were brittle and I had to be
careful not to break them up. Even with care I found myself having to piece
back together an edge or two. They didn’t seem to silver and in the end I was
able to work them down. But like all of my other experiences with Roden decals
they just would not soften with any decal solvents that I could find and when I
tried to push them into the aileron joints they just broke up and would not even
conform to the sharp corners. A friend of mine assures me that the new decals
do not behave this way.
I found the decals to be thin and
the white needed to be a little bit more opaque. This makes me think that they
are the old type. They did seem to stick better then some of the older ones.
So may be they are an intermediate attempt. They were brittle and I had to be
careful not to break them up. Even with care I found myself having to piece
back together an edge or two. They didn’t seem to silver and in the end I was
able to work them down. But like all of my other experiences with Roden decals
they just would not soften with any decal solvents that I could find and when I
tried to push them into the aileron joints they just broke up and would not even
conform to the sharp corners. A friend of mine assures me that the new decals
do not behave this way.
Now all you need to do is all the finishing/touch up panting and assembly. Once this is done you can rig.
| CONCLUSIONS |
When you look at modern model companies the two that always stand out are Hasegawa and Tamiya. If I were to pick which one Roden kits are the most like I’d pick Hasegawa. Hasegawa and Tamiya are both excellent companies but they build model kits differently. As a rule of thumb you will find more parts in a Hasegawa kit then you will find in a Tamiya kit. These parts are usually finer and more delicate and you will often find that one core kit will build many variants. Tamiya kits however usually go together a little easier. I would say that Tamiya kits are more like the Eduard offerings in the World War One kits.
This kit was fun but it does have its fiddly points. I think that all the fiddlyness is a direct result of Rodens attempt to build one core kit for several types of aircraft. The fiddly nature also gives the builder the more options for greater individual detail. To say nothing of the fact that if you get the right kit you get a few extra parts for your parts box. If you build Vac-u-form or Resin kits this is a big plus.
Roden has come a long way since they released their 1/72nd scale Albatros series. You know the ones with the very fiddly three-piece wings. In fact I would say that all their 1/48th scale kits are among the best you can get with the exception of their decals.
 If I could find one thing that I
didn’t like about this kit it would have to be the decals. While they are not
show stoppers they are somewhat difficult to work with. They look very nice and
the registration is about as good as it gets. Also, in this kit, you get enough
decals for six different aircraft. Roden is renowned for giving you lots of
decals. In fact I know of no other company that gives you more options to build
more aircraft then they do. They also seem to adhere well on a glossy surface
and conform to light surface detail. But they become difficult on corners and
medium to heavy surface detail. They are brittle and they just will not soften
at all. No matter what solvent I use and trust me I’ve spent a small fortune on
solvents that just don’t work on these decals.
If I could find one thing that I
didn’t like about this kit it would have to be the decals. While they are not
show stoppers they are somewhat difficult to work with. They look very nice and
the registration is about as good as it gets. Also, in this kit, you get enough
decals for six different aircraft. Roden is renowned for giving you lots of
decals. In fact I know of no other company that gives you more options to build
more aircraft then they do. They also seem to adhere well on a glossy surface
and conform to light surface detail. But they become difficult on corners and
medium to heavy surface detail. They are brittle and they just will not soften
at all. No matter what solvent I use and trust me I’ve spent a small fortune on
solvents that just don’t work on these decals.
Roden kits are getting better and better. The decals by no means make this kit unbuildable just a little more challenging. I don’t think that this kit is for everyone since it does require modest skills that need to be honed on less fiddly kits. That being said, I think that most modelers could build this kit with a little patience. In other words it is a very buildable kit. Just take it as it comes, be ready for something new and have fun.
A side note is that all Roden kits have taken a very large leap in price in the last couple of months. Some kits have nearly doubled in price. This kit use to go for $19.98 at full retail but now is going for around $28.99. So if your local hobby shop has a kit at the old price get it. This kit is a very good value for $19.98.
| REFERENCES |
“Windsock Datafile #10 RAF SE5a” (Albatros
Productions LTD)
“S.E.5a in action” aircraft #69 Squadron/signal publication
“Jane’s All the Worlds Aircraft 1919” (Jane’s Fighting Aircraft of World War I)
“Fighter Aircraft of the 1914-1918 War” Harleyford Publications limited
Letchworth, Herts (Now out of print, but if you can find one, a good
investment.)
October 2006
If you would like your product reviewed fairly and quickly by a site that has over 325,000 visitors a month, please contact me or see other details in the Note to Contributors.