| KIT #: | 01048 |
| PRICE: | $ varies depending on release |
| DECALS: | Two options |
| REVIEWER: | Brian Baker |
| NOTES: |
| HISTORY |
The Avro 504 first appeared in 1913, and the type became the standard trainer of
the Royal Flying Corps during World War I. Thousands were produced in a number
of variations, usually powered by rotary engines, ranging from the 80 hp. Gnome
Rotary, the 100 hp. Gnome Monosoupape, the 130 hp. Clerget engine, and various
other powerplants. There were numerous variants, and some designated versions
had different powerplants. The 504A through 504D had 80 hp. Gnome rotaries,
while the 504E flew with a 100 hp. Gnome Monosoupape. The 504F had a 75 hp.
Rolls Royce Hawk, while the 504G and 504H
 reverted to the 80 hp. Gnome. The
504J’s had either 100 hp. Monosoupapes or 80 hp. Le Rhones, while the 504K’s had
100 or 110 hp. Le Rhones, 130 hp. Clergets, and even 150 hp. Bentleys. Other
variations included landing gear form, aileron shape, and the absence of a
vertical stabilizer, giving the appearance of the familiar “comma” shaped
rudder. Although a few Avros were employed in combat roles at the beginning of
the war, most were used as trainers, but some, modified as single seaters and
armed with one machine gun, were used as interceptors as late as 1918.
reverted to the 80 hp. Gnome. The
504J’s had either 100 hp. Monosoupapes or 80 hp. Le Rhones, while the 504K’s had
100 or 110 hp. Le Rhones, 130 hp. Clergets, and even 150 hp. Bentleys. Other
variations included landing gear form, aileron shape, and the absence of a
vertical stabilizer, giving the appearance of the familiar “comma” shaped
rudder. Although a few Avros were employed in combat roles at the beginning of
the war, most were used as trainers, but some, modified as single seaters and
armed with one machine gun, were used as interceptors as late as 1918.
During the war, a total of 8340 Avro 504’s was built by several different manufacturers, and many of these continued in service following the end of hostilities. However, in the 1920’s the aircraft was redesigned, resulting in the Model 504N, powered by an Armstrong Siddeley Lynx IV of 160 to 180 hp., or the later Lynx IVC of 215 hp. These were produced from 1927 through 1933, and 570 were built. These had several different types of ailerons and a different landing gear, and when they were finally replaced by Avro Tutors in the 1930’s, some were sold surplus, and were used as civil aircraft until they wore out. A few, however, were used at the beginning of World War II when they were reacquired by the RAF. They pretty much fulfilled the same function as did the Curtiss JN-4 “Jenny’ in the United States. In addition, postwar, some Avro 504’s were produced in Japan and Communist Russia, and a few were converted to autogyros by Cierva.
| THE KIT |
The Airfix Avro 504K kit was first produced in the early seventies, and the
copyright date on my example is 1973, and they first appeared in the original
stapled plastic bag that many early Airfix kits were packaged in. Mine is on a
card with a vacuformed plastic container which holds the parts. Later, the kit
 was issued by MPC in a box, and I understand that they have been issued in other
places, notably New Zealand. There have been other kits issued of the Avro 504
(Burns’ Guide lists A-Model, Expo, Formaplane, Frog Penguin, HR Model, and
Phoenix in 1/72 scale) but I have not seen any of these. There are 33 parts
molded in yellow styrene, along with a set of decals providing markings for two
RFC training aircraft of the World War I period. For a kit of this vintage, the
moldings are quite nice, with only a little flash and a few circular injector
marks that can easily be trimmed with a round tipped Xacto knife. The cockpit
interior is minimal, with two small instrument panels and two seats. The serious
modeler will want to use some thin plastic rod to install sidewall structure,
braced by thin wire. The seats probably need some trimming down, and control
stick can be added. The wings are perhaps a little overdone with fabric and rib
detail, but to my mind, they are acceptable. Although the cowling is a little
thick, the rotary engine is nicely detailed, and fits very well inside the cowl.
was issued by MPC in a box, and I understand that they have been issued in other
places, notably New Zealand. There have been other kits issued of the Avro 504
(Burns’ Guide lists A-Model, Expo, Formaplane, Frog Penguin, HR Model, and
Phoenix in 1/72 scale) but I have not seen any of these. There are 33 parts
molded in yellow styrene, along with a set of decals providing markings for two
RFC training aircraft of the World War I period. For a kit of this vintage, the
moldings are quite nice, with only a little flash and a few circular injector
marks that can easily be trimmed with a round tipped Xacto knife. The cockpit
interior is minimal, with two small instrument panels and two seats. The serious
modeler will want to use some thin plastic rod to install sidewall structure,
braced by thin wire. The seats probably need some trimming down, and control
stick can be added. The wings are perhaps a little overdone with fabric and rib
detail, but to my mind, they are acceptable. Although the cowling is a little
thick, the rotary engine is nicely detailed, and fits very well inside the cowl.
| CONSTRUCTION |
The kit goes together easily, and everything fits. I started with the cockpit
interior, trimming off the seat pegs and constructing sidewall detail with thin
plastic rods for structure and rigging wire for internal bracing. I used the
instrument panels, adding some instrument faces. These would have been wood, so
that would be the appropriate color. Control sticks and rudder pedals would also
be appropriate. There
 are a few
photos of cockpits on line for reference here. Once the interior is complete,
the fuselage halves can be joined, using whatever putty is required to fill the
seams. Since the rudder is molded onto the left fuselage half, it will be lined
up pretty straight. The horizontal tail surfaces need to be glued into position
and carefully aligned. Before joining the fuselage halves, the engine should be
attached to the firewall. It is designed to spin with the prop, it being a
rotary engine. The cowling fits over it. If you are using a different engine,
wait a while before attaching it. You may need to trim off the mounting ring for
the rotary.
are a few
photos of cockpits on line for reference here. Once the interior is complete,
the fuselage halves can be joined, using whatever putty is required to fill the
seams. Since the rudder is molded onto the left fuselage half, it will be lined
up pretty straight. The horizontal tail surfaces need to be glued into position
and carefully aligned. Before joining the fuselage halves, the engine should be
attached to the firewall. It is designed to spin with the prop, it being a
rotary engine. The cowling fits over it. If you are using a different engine,
wait a while before attaching it. You may need to trim off the mounting ring for
the rotary.
The wings are molded in single pieces, so the lower wing can be attached to the fuselage, taking care to align it with the tail surfaces. The upper wings have slots for the wing struts, and these should probably be glued into position before painting in order to have the strongest structure possible. The bottoms of the wing struts then fit into small holes on the upper surface of the lower wings. The cabanes can also be painted and installed before the upper wing is attached. This structure is more complicated than the old Monogram biplanes, but it’s not a difficult job to mount the wing correctly.
 The
landing gear is a bit spindly, especially considering that it has a skid on the
bottom to prevent noseovers. Later versions dispensed with this, so check the
version you are modeling to be sure you have the correct landing gear
arrangement.
The
landing gear is a bit spindly, especially considering that it has a skid on the
bottom to prevent noseovers. Later versions dispensed with this, so check the
version you are modeling to be sure you have the correct landing gear
arrangement.
Of course, a biplane of this type needs to have rigging wires attached, as it looks like a toy without them. I use electronic wire for my models, and trim the insulation off, pull out the wire, flatten it out, roll it, and then cut the straight pieces to length before attaching them with a small drop of ordinary white glue. I have described this process in previous articles. I feel that this method is much easier than stretched sprue, and that the result is more realistic. If you’d like to see an article on this process, I’ll be glad to write one. Wires also include control cables and wires that brace the various structures. They can all be made from the same material, simplifying the process.
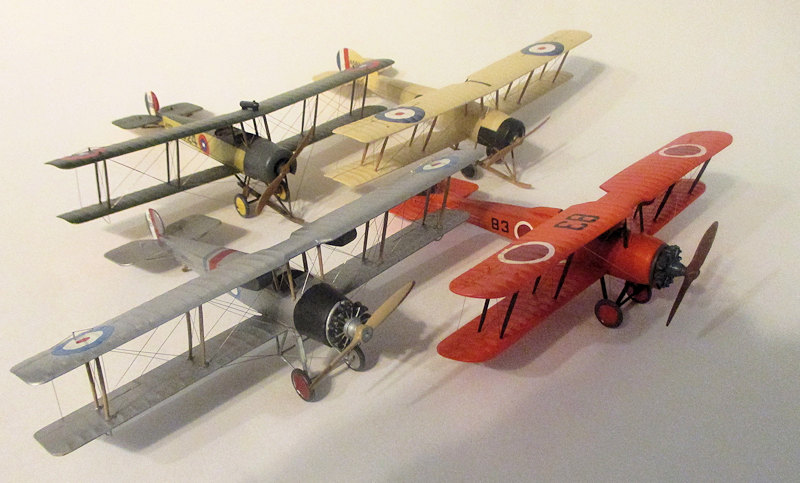
Over the years I've made several models from this kit.
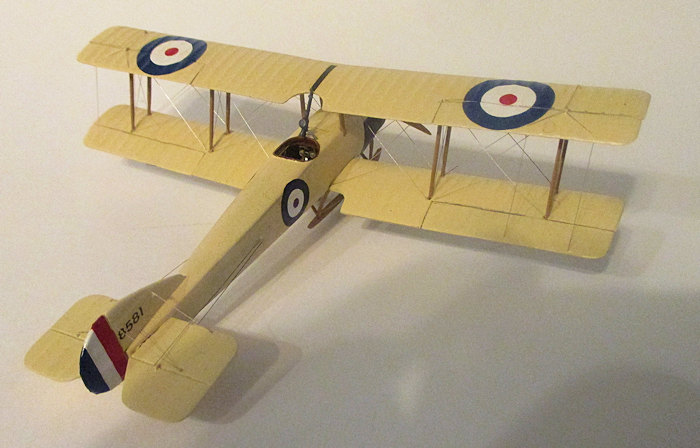
Avro 504C “Zeppelin Interceptor”
This aircraft, #8581, was used by the Royal Naval Air Service in England during 1916. It is basically like the 505K except that the front cockpit is covered over, and a Lewis gun is mounted in the upper wing cutout. The plane had the extended vertical fin for added stability. The gun rotated on its mount so the pilot could reload ammunition containers. The fin and rudder were scratch built.
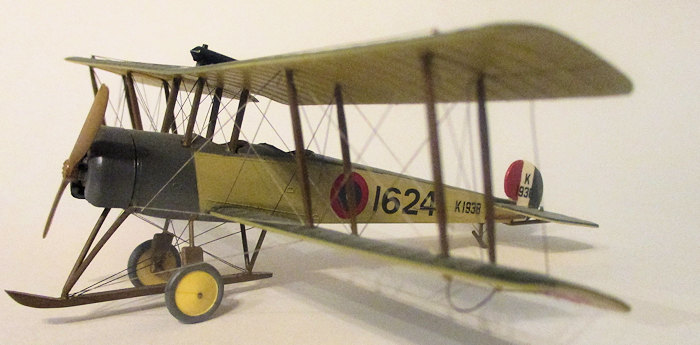
Avro 504K. Trainer.
This aircraft, #1624 and K1988, is in American markings, as it is one of the type acquired by the Americans for use at their Issoudon Flying School in France during 1917-1918. It carried the standard U.S. roundels, similar to the old Imperial Russian markings, and is a standard 504K in all respects. It was built straight out of the box about 1976, when the kit was a fairly new issue.
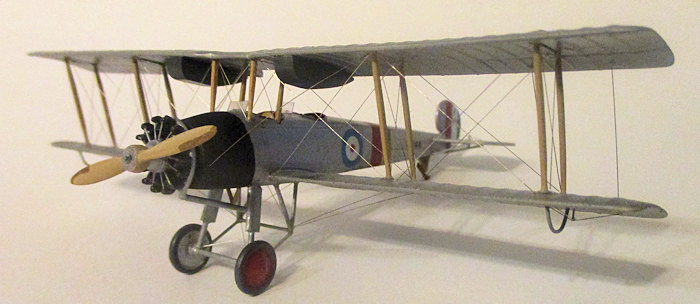
 Avro 504N
This model depicts a Royal Canadian Air Force trainer from “E” Flight, CFS Winnipeg, Canada, about 1931. It was silver overall, and has a different engine and landing gear. Otherwise, it is pretty much straight out of the box.
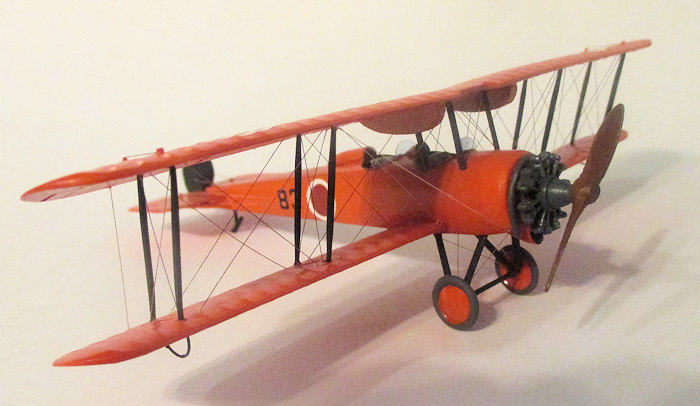
Avro-Yokosuka K2Y-2
The Avro 504K was produced in Japan starting in 1928, and the K2Y-2 was an improved version, first appearing in 1930, and powered by a Hitachi Kamikaze radial engine of 160 hp. The wingtips were rounded, and a different type landing gear was installed. Some remained in service until the beginning of World War II. Japanese trainers were overall orange, so they make very colorful models.
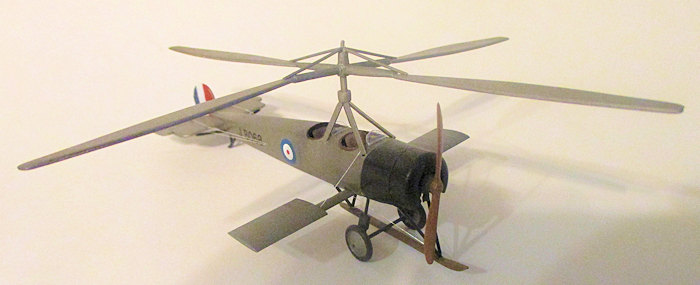
Avro-Cierva Autogyro.
This was a civil registered Avro 504 conversion done about 1930. The aircraft had conventional controls, with the small “wing units” serving as ailerons for lateral control. Avro-Cierva Autogyro
This aircraft was tested by the RAF about 1931, and led to the development of the Avro Rota Autogyro which was used by various countries at the beginning of World War II. .
| COLORS & MARKINGS |
 Biplanes usually should be painted before the upper wing is attached. It is
virtually impossible to paint a biplane once it is fully assembled, unless it is
entirely one color or you have developed a method of hand brushing I’ve never
discovered. Small parts can be hand painted, but airbrushing is usually the best
way. I’ll cover each of the models separately, as they are all distinctly
different. Rigging should not be attempted until the model is otherwise
completed.
Biplanes usually should be painted before the upper wing is attached. It is
virtually impossible to paint a biplane once it is fully assembled, unless it is
entirely one color or you have developed a method of hand brushing I’ve never
discovered. Small parts can be hand painted, but airbrushing is usually the best
way. I’ll cover each of the models separately, as they are all distinctly
different. Rigging should not be attempted until the model is otherwise
completed.
| CONCLUSIONS |
The Airfix Avro 504K kit has a lot of developmental potential, and being as cheap as the kit has been over the years, it should provide the basis for a lot of interesting conversions. All you have to do is do the research, and the information is there if you can find it. There are some three views available in various sources, such as the Harleyford series, and the on-line site can be very useful. Try a couple of these, and you’ll find out what real modeling used to be like in the early days.
| REFERENCES |
Strangely, I couldn’t find a lot of reference material on this aircraft. I’d have sworn that there was a Profile Publication on the aircraft, but I couldn’t find either the actual profile or a listing for one in my Profile Publications listing. Even Googling does not come up with one. I have two books, J.M. Bruce’s British Aeroplanes, 1914-1918, and Owen Thetford’s Aircraft of the Royal Air Force since 1918, and these have a lot of information although no color data. There is some data on line, but since most of my Avro 504 models were built many years ago, ranging from 1976 through 2008, I am not sure of where the documentation came from. Some data might have come from the old IPMS Phoenix publication, Dirty Plastic. One website, www.avro504.org is an official site for Avro 504 information, and there are a lot of photos and data available there. I don’t know if there were very many decal sheets issued on the airplane in 1/72 scale. I’m usually pretty careful on my documentation, but I guess I should have kept a record anyway.
Brian Baker
30 May 2016
Copyright ModelingMadness.com If you would like your product reviewed fairly and fairly quickly, please
contact
the editor or see other details in the
Note to
Contributors.