1/72 Schreck Diapason
|
KIT #: |
None - scratchbuilt |
|
PRICE: |
Pittance |
|
DECALS: |
None required |
|
REVIEWER: |
|
|
NOTES: |
Made from 10, 20 and 40 thou plastic card, rod and strut |
|
HISTORY |
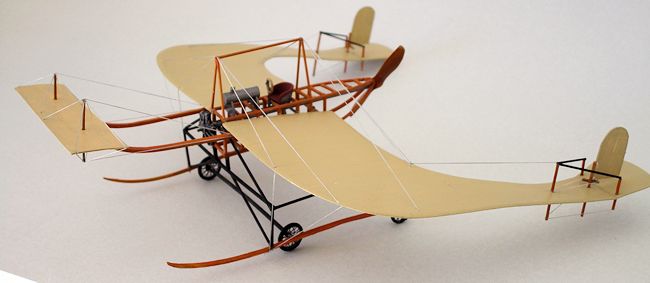
In spite of his German-sounding name, Louis Schreck was in fact French, and Diapason is the French for a tuning fork. And this, his mighty creation, does indeed resemble a tuning fork, if, that is, the tuning fork had been seized by a blacksmith, heated until it glowed red hot, then hammered flat on a large anvil, curved into the shape of twin scimitars, then two duck beaks added at the tips. So in other words, it isn't much like a tuning fork. To modern eyes, it resembles an early stealth bomber, which has managed to land on a baby carriage.
M. Schreck had been a pilot, before he began his own design work in 1911 with this strange beast which, as attested by the dozen or so photographs available on the internet, actually flew.
 It underwent various
incarnations. One had a water cooled Chenu engine, with a large radiator on the
nose. The rudders for this one were square shaped, and the fuselage was covered.
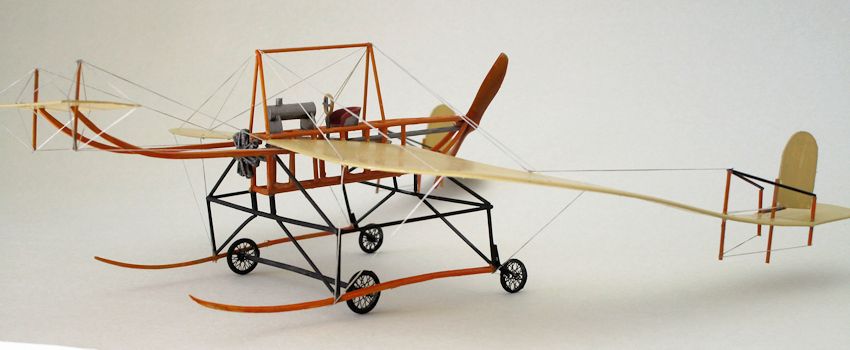
And the one I chose to build, which had a 50hp Gnome rotary engine, with the
fuselage left bare and small round-topped rudders set above the trailing
wingtips, with elevators hinged to the ends. The engine was at the nose and
drove a pusher propeller at the rear via a long shaft. Hence the high seat for
the pilot, who would sit athwart the prop shaft. It is surprising that his seat
isn't like a saddle.
It underwent various
incarnations. One had a water cooled Chenu engine, with a large radiator on the
nose. The rudders for this one were square shaped, and the fuselage was covered.
And the one I chose to build, which had a 50hp Gnome rotary engine, with the
fuselage left bare and small round-topped rudders set above the trailing
wingtips, with elevators hinged to the ends. The engine was at the nose and
drove a pusher propeller at the rear via a long shaft. Hence the high seat for
the pilot, who would sit athwart the prop shaft. It is surprising that his seat
isn't like a saddle.
Since I could find no plans for the aircraft I used the following dimensions: Span 12 m; length 14 m. Once a rectangle of that dimension had been drawn on some graph paper, I then used the photos to sketch in the shape. There are a number of good large pictures which show ground crew up against the machine and one can gauge measurements against them, assuming their median height to be about 5 foot 9 inches, which would have been average at that time. What is an inch or two between friends?
One of the Diapasons was supposed to have been fitted with a retractable amphibian undercarriage, though I could find no photographic evidence of this. One can only imagine that it looked like the creature from the black lagoon. If indeed it was true, then it would point towards Schreck's future in aviation, which, after he had joined and left a number of early manufacturers, saw him designing WWI flying boats, many of which bear his name.
|
CONSTRUCTION |
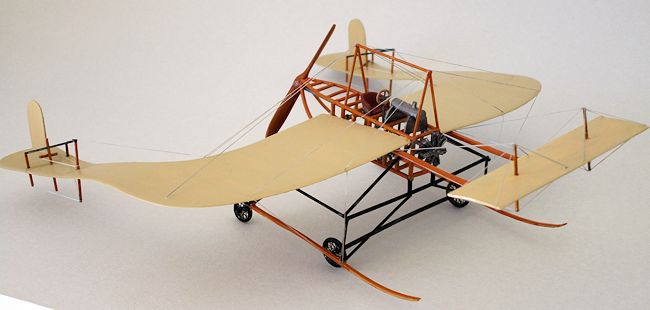
 Those wings are the
unique feature of this strange device and so I decided to get those done first.
The photos show that they were quite thick, and also roughly finished, with many
holes and rough patches in the fabric. I cut them from 40 thou card, and sanded
the edges to a suitable thinness before judiciously bending them to shape. In
side view they swoop down and then up again toward the ailerons at the rear, in
an elegant S-shape. But they also have a degree of wash-in around the curve of
the leading edge and so this is going to have to be bent to shape as well. I
immersed them in fairly hot water as I bent them to shape, and this helped
matters. The ribs were scored in place using a metal ruler and dark pencil. For
some reason they don't show up in the photographs.
Those wings are the
unique feature of this strange device and so I decided to get those done first.
The photos show that they were quite thick, and also roughly finished, with many
holes and rough patches in the fabric. I cut them from 40 thou card, and sanded
the edges to a suitable thinness before judiciously bending them to shape. In
side view they swoop down and then up again toward the ailerons at the rear, in
an elegant S-shape. But they also have a degree of wash-in around the curve of
the leading edge and so this is going to have to be bent to shape as well. I
immersed them in fairly hot water as I bent them to shape, and this helped
matters. The ribs were scored in place using a metal ruler and dark pencil. For
some reason they don't show up in the photographs.
I suspect that M. Schreck had cottoned onto some sophisticated aerodynamic laws, without realising it. The wings on this, with their sinuous curves and leading edge wash-in, put you in mind of the Concorde's ogive delta. Although that wasn't made of wood and linen.
Once the wings were done, and feeling smug at having got the main part right, then I made the fuselage out of plastic rod, which simply a matter of constructing a ladder frame for the top, then two boat shapes for the sides, and another ladder frame for the bottom, making sure that they all curved inwards at the rear. A small length of plastic tube for the prop shaft tied it all together at the rear. A Gnome engine from the spares box was glued to a length of rod for the shaft, and put in position. This is best done now, before attending to the furniture on the fuselage.
A bucket seat for the
pilot was found in the spares box, cut down to shape, and painted aluminium with
a leather seat cushion. The petrol tank was cut from thick sprue, with some
mounting brackets from card,
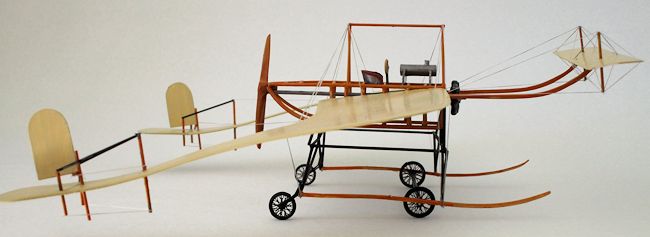 and a filler cap from rod. A control wheel was
fashioned from a circle of solder, with spokes from scrap, and mounted on a
column. There is a rudder bar in there too, but you can't see it. Finally the
two sets of kingposts, from rod, were put in place.
and a filler cap from rod. A control wheel was
fashioned from a circle of solder, with spokes from scrap, and mounted on a
column. There is a rudder bar in there too, but you can't see it. Finally the
two sets of kingposts, from rod, were put in place.
The fuselage got a coat of wood brown, followed by some clear orange.
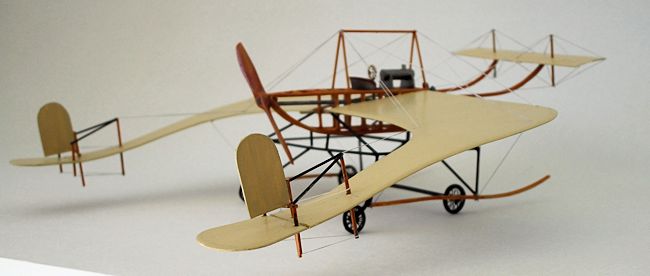
Now the wings can painted buff for clear doped linen, from the Vallejo range, and mounted. Note that they are set at a very high angle of incidence. They are quite heavy, being solid card, and so a couple of spars were first glued through the fuselage for them. They will sag, but then so did the original. Allow them to dry overnight, as the machine has still got a lot of handling to be done to it.
The rear of the wings were then drilled to take the actuating rods for the ailerons and rudders. The rudders are simple card cutouts mounted on vertical strut. You can see that not all the levers are in alignment. A glance at the photographs show that they sat at a bewildering array of angles to each other, which suggests that the controls were not locked while on the ground.
The undercarriage looks complex, but in fact takes only a little while to assemble from rod cut to length. It helps to pin the sub-assemblies to a cork board while setting. It is a fairly strong rig once finished, though I didn't attach it until the final stages.
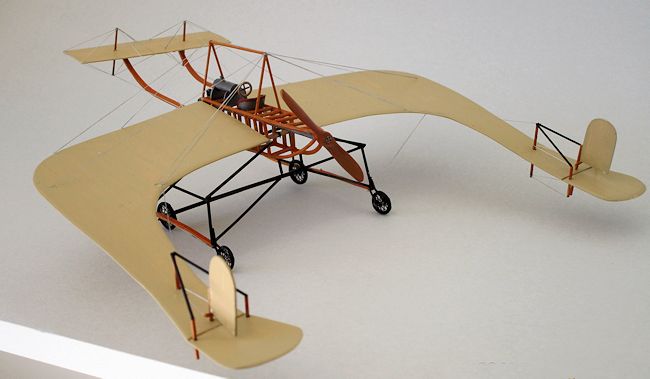
 The canard elevator
is simply a rectangle of card, scored for ribs, and mounted on some ski-shaped
prongs made from square section rod. The two kingposts are rod, and it is best
to rig this before mounting. The two prongs disappear into the wing leading
edges.
The canard elevator
is simply a rectangle of card, scored for ribs, and mounted on some ski-shaped
prongs made from square section rod. The two kingposts are rod, and it is best
to rig this before mounting. The two prongs disappear into the wing leading
edges.
Turn the whole monster upside down and glue the undercarriage in place. The two main spars are sprung, and so need to be bent first. Then the wheels were made from solder wrapped around a paint brush, with Eduard etched spokes set into the middle with superglue. The front main wheels were attached to an axle, and note that they sit inside the main undercarriage spars. The two rear wheels were given a couple of yokes from rod, which was then glued to the rear upright, and bent at a judicious angle. Once it is all dry, sit it on the ground.
If by the grace of God all four wheels touch the ground, it is then worth checking the height of the rear ailerons. Photos show that these vary when the aircraft was stationary. Sometimes they are almost touching the ground, sometimes a little higher. I would guess it would depend on how loaded the beast was, and whether the ground was soft or not. This is one heavy machine and it could easily sink into soft ground.
Now with a happy sigh, which suggests that the end is in view, you can settle to the rigging.
I laugh in the face
of rigging. I pour ice cubes down the vest of rigging. There is nothing that
rigging can now do to me to disturb my night's rest. Unwind some elastic thread
from the spool and hold between sprung tweezers. Colour it silver with a gel
felt-tip pen. Place a tiny spot of gel superglue on the wing where the line
begins, using a toothpick sharpened to a fine point. Always remember that with
superglue,
 less is more.
Hold one end of the thread against it with some tweezers, and it will set in seconds. Then grip the other end of the line with the sprung tweezers and manoeuvre the line so that it drapes over the kingpost. Give it some tension, and then another spot of superglue will hold it in place. Cut off the remainder with a new scalpel blade. It is worth using a new sharp blade, as otherwise you can pull the line from its mounting, resulting in torn hair and loud sobs, which is not a good thing in a grown man. Repeat until close to happiness.
Continue, while adapting the above rules to other settings. Some of the rigging starts on the lower leading edge, then travels to the undercarriage posts. The rigging to the rear attaches the tops of the control rods. But note that the upper controls are in fact solid rod, painted black.
|
CONCLUSIONS |
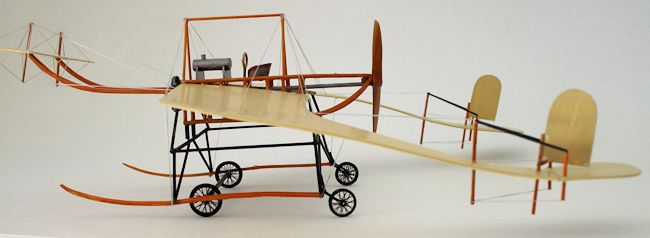 Before you know
it, voilà, you have a fully rigged thing, from the very dawn of aviation. It is
easy to laugh at it now, but had it been a success, then all aircraft might have
looked like this. No one knew at the time what would work and what wouldn't.
Before you know
it, voilà, you have a fully rigged thing, from the very dawn of aviation. It is
easy to laugh at it now, but had it been a success, then all aircraft might have
looked like this. No one knew at the time what would work and what wouldn't.
Note that Brian Baker had a very nice fully rigged Pegasus FB 5 Gunbus on this website a few days ago, using electrical wire and superglue. This sounds a lot trickier than mine to achieve, most especially on a birdcage like the FB 5. So pursue whatever rigging method suits you best. Each to his own.
|
REFERENCES |
http://www.ctie.monash.edu.au/hargrave/schreck.html
http://celticowboy.com/Round%20Aircraft%20Designs.htm
http://flyingmachines.ru/Site2/Crafts/Craft29431.htm
http://www.podniebni.zafriko.pl/str/samoloty_na_s
September 2015
If you would like your product reviewed fairly and fairly quickly, please contact the editor or see other details in the Note to Contributors.