Airfix 1/72 Sopwith Pup
|
KIT # |
1062 |
|
PRICE: |
99 cents when new |
|
DECALS: |
Two aircraft |
|
REVIEWER: |
|
|
NOTES: |
1973 Blister Pack issue |
|
HISTORY |
 The
Sopwith Pup quickly became a favourite with pilots of the Royal Naval Air
Service. It was superior to the Fokker D.III and more than a match for
any of the new Halberstadt and Albatros scouts. Armed with a single
synchronous machine gun, it was lighter and less dangerous than it's
successor, the Sopwith Camel. Although under armed with only one Vickers
.303 machine gun , pilots liked the plane because it was manoeuvrable and
fast. It could climb and hold its altitude better than any other fighter
With a top speed of around 106 MPH and a endurance of 3 hours the pup was
usually powered by a Le Rhône 9C, 9 cylinder, air cooled rotary of
around 80 hp or a Gnome Monosoupape, air cooled rotary, of 100 hp. In
total 1,770 Pups were built and In August 1917, the Sopwith Pup was the
first aircraft to land aboard a moving ship, the Royal Navy's H.M.S.
Furious
The
Sopwith Pup quickly became a favourite with pilots of the Royal Naval Air
Service. It was superior to the Fokker D.III and more than a match for
any of the new Halberstadt and Albatros scouts. Armed with a single
synchronous machine gun, it was lighter and less dangerous than it's
successor, the Sopwith Camel. Although under armed with only one Vickers
.303 machine gun , pilots liked the plane because it was manoeuvrable and
fast. It could climb and hold its altitude better than any other fighter
With a top speed of around 106 MPH and a endurance of 3 hours the pup was
usually powered by a Le Rhône 9C, 9 cylinder, air cooled rotary of
around 80 hp or a Gnome Monosoupape, air cooled rotary, of 100 hp. In
total 1,770 Pups were built and In August 1917, the Sopwith Pup was the
first aircraft to land aboard a moving ship, the Royal Navy's H.M.S.
Furious
|
THE KIT |
This
particular issue of the Pup is from 1973 and is packaged in those groovy
clear blister packs were you can see the parts and decals, You know I
really miss those days, modelling seemed to be a lot less complicated
back then and I remember spending many a pleasant Friday night (Late
night shopping) pawing over the Airfix blister packs and peering through
the little clear window of the Matchbox boxes at the local toy shop
trying to make up my mind which lucky kit was
 going to be purchased with
that weeks pocket money. Back then, it wasn’t the type of aircraft that
swayed me out of my money, or the historical importance ( what 7 year old
is interested in history? ) it was the color of the plastic, in those
days paint cost money better spent on kits and god knows how many
Matchbox kits I bought just because of the cool two color schemes or how
many “Baby Blue” Airfix kits ended up coming home with me.
going to be purchased with
that weeks pocket money. Back then, it wasn’t the type of aircraft that
swayed me out of my money, or the historical importance ( what 7 year old
is interested in history? ) it was the color of the plastic, in those
days paint cost money better spent on kits and god knows how many
Matchbox kits I bought just because of the cool two color schemes or how
many “Baby Blue” Airfix kits ended up coming home with me.
The Airfix pup hasn’t changed at all over the years and I think it is still in the latest Airfix catalogue with only different decals. Back in ’73 the moulds were still in very good condition and the parts are very cleanly moulded with little flash or sink marks. The fabric effect is a little heavy but once a coat of paint is applied the effects tone down nicely. Instructions are printed on the inside of the cardboard backing sheet with a three view color profile printed on the back. The struts are delightfully thin and free of warping and ejector pin marks.
|
CONSTRUCTION |
 As this
is the first WWI aircraft I have done and there aren’t a lot of pieces to
assemble with the Pup. I started with the simple cockpit, the seat and
instrument panel were painted up and installed, a few pieces of sprue
were glued to the sides to represent stringers and my last photo etched
seatbelt was glued to the seat. Once dry the tiny fuselage was joined up
and the lower wing added. A dab of filler was needed to hide the join
under the wing but that’s all that was needed on the whole plane, not bad
for the age!
As this
is the first WWI aircraft I have done and there aren’t a lot of pieces to
assemble with the Pup. I started with the simple cockpit, the seat and
instrument panel were painted up and installed, a few pieces of sprue
were glued to the sides to represent stringers and my last photo etched
seatbelt was glued to the seat. Once dry the tiny fuselage was joined up
and the lower wing added. A dab of filler was needed to hide the join
under the wing but that’s all that was needed on the whole plane, not bad
for the age!
At
this point I started thinking about how I was going to rig the Pup
“shudder” I started by drilling holes in the tailplanes and rudder
with my smallest drill bit which turned out to still be
 too big. Since
the top and bottom wings were both one piece rigging hole were drilled
right the way through the wings. At this point the subassemblies were
sent of the paint shop as the top wing is easier to paint if it isn’t
attached to the plane.
too big. Since
the top and bottom wings were both one piece rigging hole were drilled
right the way through the wings. At this point the subassemblies were
sent of the paint shop as the top wing is easier to paint if it isn’t
attached to the plane.
The original Propeller went AWOL and hasn’t reported in for duty as of yet, as this is my first WWI plane I didn’t has any suitable spare in the parts bin so I had to “borrow” one of the props off my Airfix Anson and use it as a master to cast a new one for the Anson, the original Anson prop was then cut down and reshaped to a more suitable size and with my first attempt of painting wood grain finally had a prop for the Pup.
|
CAMOUFLAGE & MARKINGS |
The
under side of the wings and tailplanes are natural doped linen and this
was painted by first hand painting matt black over the ribs to pre-shade
them. I used a home brewed shade for the linen as I couldn’t find
anything locally that looked the part, once a couple of light coats were
sprayed over the wing I went back and filled in the valleys so the ribs
showed up as 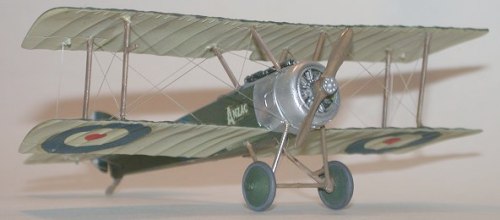 being slightly darker, you cant see it in the photos as my
camera is having a few issues lately but the pre-shading is there.
being slightly darker, you cant see it in the photos as my
camera is having a few issues lately but the pre-shading is there.
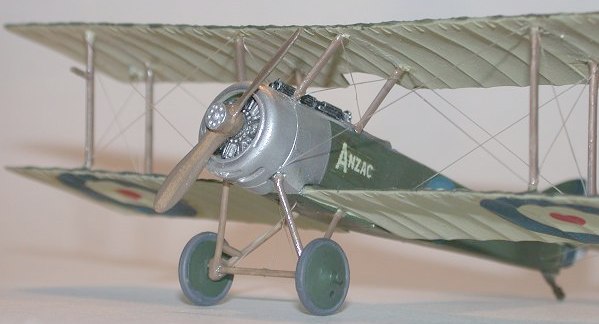
Once dry the lower surfaces were masked off and the green was sprayed using the same formula so the ribs showed up as being slightly darker, Airfix doesn’t quote colors so I used Tamiya Olive drab with a dash of Olive Green in it. All that was left for the painting was to mask off the engine panels and coat them with Rub-n-buff and buffing them up to a high shine.
A
couple of coats of Future was sprayed on in preparation for the decals
but unfortunately the decals had suffered from the ravages of time and
the first roundel disintegrated in to a million pieces on contact with
water. I managed to find some wing roundels from the spares box but had
to coat the “Anzac” decal and the fuselage roundels with liquid decal to
get them to hold together long enough to transfer them to the aircraft.
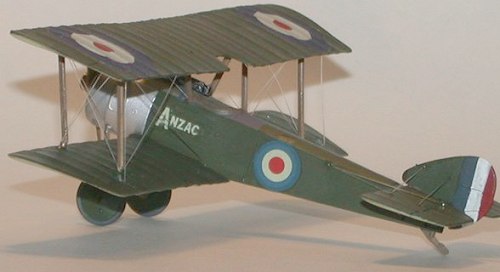
As you can see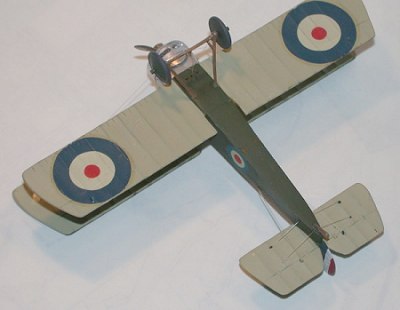 the
blue in the wing roundels is quite a bit darker than the fuselage
roundel. The rudder stripes were hand painted as the decals were
unusable.
the
blue in the wing roundels is quite a bit darker than the fuselage
roundel. The rudder stripes were hand painted as the decals were
unusable.
Once the marking were on and dried it was time to add the top wing and start on the rigging. Airfix supply two pieces of plastic to use as a jig for the upper wing making it a snap to get the stagger right. If all WWI models were this easy a lot more people would do them I think. Once the Superglue had hardened on the upper wing it was time to start feeding invisible thread through the pre drilled holes. Once fixed on one end it is a simple matter to pull the thread up tight and add a dab of superglue to fix the other end. When dry a new No11 blade was used to trim off the excess and the touch ups done with a 00 brush. The final touch was to use an incense stick (Oh wow, man...Patchoulli....Ed, tripping back to the late 60s...) and wave it under the invisible thread to snap it tight. The Undercarriage was assembled and painted up with a wood grain finish. Wheels were cleaned up and painted Tamiya Dark Grey after reading Tom Cleavers excellent post about tyre colors through the ages.
|
CONCLUSIONS |
The Pup was a mixture of nostalgia and firsts for me, the childhood memories of the Airfix Blister packs taking me back to a time when all I had to be worried about was getting up in time for soccer on Saturday and not spilling too much glue on the table. The Pup was also the first WWI aircraft I have done since my youth and with it’s few parts and simple but effective jig a real novice like me can get that all important stagger right. Rigging isn’t too complicated with this one and I’m glad I cut my teeth on the Pup as it has inspired me to do more aircraft from the great war.
|
REFERENCES |
http://gdasquadron.4t.com/custom.html
http://m2reviews.cnsi.net/reviews/w1/mpup.htm
June 2003
Copyright ModelingMadness.com. All rights reserved. No reproduction in any form without express permission from the editor.
If you would like your product reviewed fairly and fairly quickly, please contact the editor or see other details in the Note to Contributors.