Spin Models 1/48 SPAD S.A-2
|
KIT # |
003 |
|
PRICE: |
$24.95 |
|
DECALS: |
See review |
|
REVIEW : |
|
|
NOTES: |
Resin kit |
|
HISTORY |
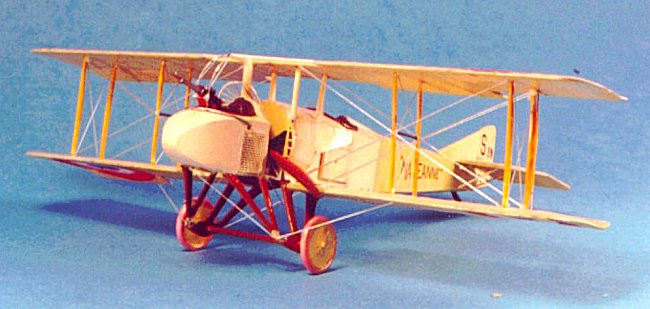
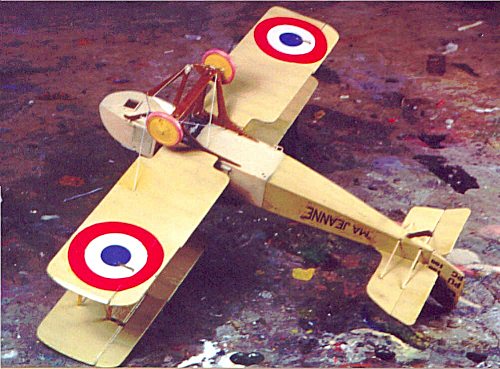
Surely one of the strangest aircraft to see service in the Great War was the S.P.A.D. S.A-2, whose prototype first took flight around May 21, 1915. While most would think that the unusual position of the second crew member - ahead of the propeller in a braced nacelle called "the pulpit" for obvious reasons - was to provide forward fire for the machine gun in the days before gun synchronization, the fact is that the primary reason for this was that the vision of the observer of a tractor airplane was quite often obstructed by the position of his cockpit; this gave the observer the clearest possible field of vision, and only secondarily provided forward-firing armament. At the time of its first flight, the aircraft had a slightly-superior performance to contemporary single seaters, and was placed in limited production in the summer of 1915.
 The 42
produced were dispersed in small numbers to various Escadrilles, and
accomplished nothing of note during their few brief months of frontline service;
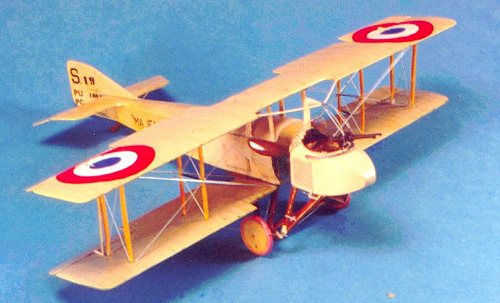
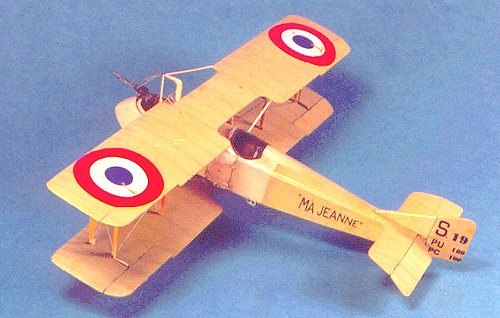
they were all off operations by early 1916. "Ma Jeanne," whose unit is
unknown, is the best-known S.P.A.D. S.A-2 due to the fact several photos were
taken of it which survived the years. And additional 57 of these oddities were
sent to Russia, along with 10 S.A-4s, where they lasted longer than they did
over the Western Front, though their service is not recorded.
The 42
produced were dispersed in small numbers to various Escadrilles, and
accomplished nothing of note during their few brief months of frontline service;
they were all off operations by early 1916. "Ma Jeanne," whose unit is
unknown, is the best-known S.P.A.D. S.A-2 due to the fact several photos were
taken of it which survived the years. And additional 57 of these oddities were
sent to Russia, along with 10 S.A-4s, where they lasted longer than they did
over the Western Front, though their service is not recorded.
In his book, "One Man's War," Lafayette Escadrille member Bert Hall recalled seeing one S.A-2 flown by a French friend crash fatally, and recorded that none of the Americans would would have anything to do with the airplane. He said the reason for the crash was nose-heaviness of the design, which led to a takeoff stall/spin. The fact the standard S.A-2 only had an 80 h.p. LeRhone rotary meant it was severely underpowered; "Ma Jeanne" had a 110 h.p. LeRhone, which might have something to do with why it survived long enough to be photographed.
|
THE KIT |
Spin is a small company in the Czech Republic that has, to date, produced three World War I aircraft models that are in this reviewer's opinion the very best full cast resin kits I have ever seen. They are the Bristol M.1C "Bullet" , the Ansaldo S.V.A.5, and this S.P.A.D. S.A-2. The very similar (other than only having ailerons on the upper wing) S.A-4 is also due from the company soon. What is to me incredible is that these kits have been produced at this level of quality at a price fully competitive with anything from Eduard. If one were to airbrush the parts of these Spin kits light grey, it could be argued you were looking at an Eduard kit with the parts off the sprue tree, they are that good.
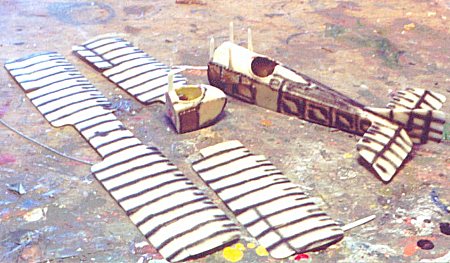
 Looking
in the box, one finds a one-piece upper wing, the left and right lower wings,
horizontal stabilizer, rudder, fuselage halves, "pulpit" halves, and
all interplane and landing gear struts and wheels, prop and engine, in light tan
resin, with some flash around the smaller parts which is easily cleaned up. The
wings are extremely thin and feature some of the best rib and fabric detail of
any World War I model extant. The instruction sheet is a xeroxed drawing of the
general assembly, with a detailed look at the assembly of the cockpit and the
pulpit, with a general arrangement drawing on the other side. Obviously, the
model is not for the beginer. A sheet of very good decals is included for the
above-mentioned well-known "Ma Jeanne," of an unknown Escadrille in
late 1915.
Looking
in the box, one finds a one-piece upper wing, the left and right lower wings,
horizontal stabilizer, rudder, fuselage halves, "pulpit" halves, and
all interplane and landing gear struts and wheels, prop and engine, in light tan
resin, with some flash around the smaller parts which is easily cleaned up. The
wings are extremely thin and feature some of the best rib and fabric detail of
any World War I model extant. The instruction sheet is a xeroxed drawing of the
general assembly, with a detailed look at the assembly of the cockpit and the
pulpit, with a general arrangement drawing on the other side. Obviously, the
model is not for the beginer. A sheet of very good decals is included for the
above-mentioned well-known "Ma Jeanne," of an unknown Escadrille in
late 1915.
It would be almost impossible to construct this model without the additional information in the Windsock Mini-Datafile on the airplane. My thanks to fellow WW1 List member Steve Perry for loaning me his copy.
|
CONSTRUCTION |
 Most cast
resin kits have the smaller parts in some other medium, usually white metal.
These parts are thin and delicate. I cleaned them all up carefully with a No.11
Xacto blade, and set them aside in the box.
Most cast
resin kits have the smaller parts in some other medium, usually white metal.
These parts are thin and delicate. I cleaned them all up carefully with a No.11
Xacto blade, and set them aside in the box.
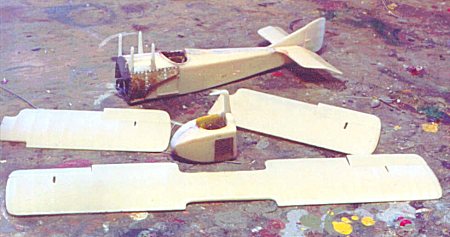
Looking at the general arrangement drawing in the Mini Datafile, and seeing how the lower wings fitted to the landing gear instead of the fuselage, it was clear this model would have the pulpit and fuselage assembled with the tail surfaces attached to the fuselage, at which point it would be painted and decaled before further construction could proceed.
I sanded the centerline joins of the fuselage and puplit smooth, and painted the interior, in clear doped linen (for which I used Tamiya "Dark Yellow" lightened a bit with Tamiya "Flat White") and three different shades of Gunze Sanyo browns for the various wood parts.
There are no photos of the cockpit interior of this airplane, but I thought that the very basic and generic cockpit setup other than the floorboards and seat were very "un-Spad-like." The cockpit interior of the SPAD VII and SPAD XIII are very distinctive, and also very much alike. It ocurred to me that this distinctive design likely began with the first SPAD, and so I made the upper "bench" and wraparound instrument panel from sheet styrene, copied from the cockpit of one of my SPAD XIII models.
While all this was drying I painted the interior of the pulpit in Gusnze-Sanyo "Sail Color," which was masquerading as the light yellow enamel the French used on wooden and metal parts, and the seat construction was finished in two different shades of brown.
 I
assembled the cockpit interiors, using Eudard French WW1 seatbelts, and then
closed up the fuselage and pulpit. Since one has to use cyanoacrylate to glue
the resin parts, I made certain of the fit of everything before applying glue. I
then sanded the join lines and painted them with thick coats of Mr. Surfacer
500. When this dried, I sanded and filed the seams smooth, and applied a thin
coat of Mr. Surfacer 1000 to finalize everything. I then attached the metal
cowling parts, which I curved properly before assembling by running a 1/4"
dowel back and forth on the photo-etched part.
I
assembled the cockpit interiors, using Eudard French WW1 seatbelts, and then
closed up the fuselage and pulpit. Since one has to use cyanoacrylate to glue
the resin parts, I made certain of the fit of everything before applying glue. I
then sanded the join lines and painted them with thick coats of Mr. Surfacer
500. When this dried, I sanded and filed the seams smooth, and applied a thin
coat of Mr. Surfacer 1000 to finalize everything. I then attached the metal
cowling parts, which I curved properly before assembling by running a 1/4"
dowel back and forth on the photo-etched part.
I carefully cut away the control surfaces, filed them smooth and reattached them in a more dynamic re-posing.
While all that was drying, I painted the 110 h.p. Gnome Le Rhone engine with several shades of Testors Metalizer, and then sealed it with Tamiya "Smoke" to pop out the detail, and when it was dry glued the engine in position and then the cowling plate. I finished initial construction by attaching the horizontal stabilizer and vertical fin to the fuselage.
|
PAINT & DECALS |
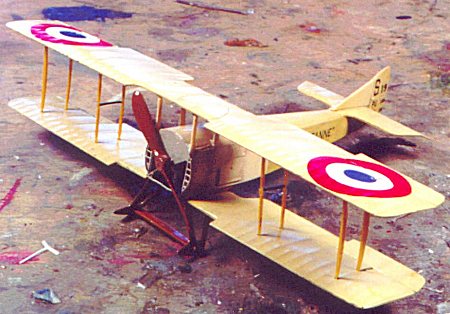
Painting:
I painted the wings and rear fuselage with the Tamiya Dark Yellow mix I had made for French clear doped linen, and the forward part of the fuselage and the pulpit with Gunze-Sanyo "Sail Color." The landing gear and main pulpit braces were painted Gunze Sanyo Cocoa Brown, and the rest of the struts were overpainted as they were with Gunze-Sanyo "Clear Yellow," which left them looking like ash. When everything was dry I shot two coats of Future and let everything set up overnight.
Decals:
The kit decals went on well with a light coat of Micro Sol and snugged down. When they had dried and set, I washed the model, and then Futured it again.
|
CONSTRUCTION |
 Since I
had glued the cabane struts into position on the upper fuselage, the one-piece
upper wing could be positioned, and I attached it first. I then attached the
landing gear legs and spreader bar. After that I attached the "H"
struts to the lower wings and then attached the wings to the landing gear, using
the "H" struts to attach them to the upper wing.
Since I
had glued the cabane struts into position on the upper fuselage, the one-piece
upper wing could be positioned, and I attached it first. I then attached the
landing gear legs and spreader bar. After that I attached the "H"
struts to the lower wings and then attached the wings to the landing gear, using
the "H" struts to attach them to the upper wing.
At this point, I noticed that the model was out of alignment, so I moved the right lower wing to a right angle as it should be, applied more cyanoacrylate to the joint, and shot it with accelerator to seal it in position. I repeated this with the left lower wing, and then had to apply a bit more glue to the cabane strut joints and hit them with accelerator. Everything was now positioned right, so I attached the outer interplane struts. I then assembled the pulpit with its main braces.
Rigging:
I could see there would be difficulty rigging the model once the pulpit was attached, so I did the rigging for the wings but not the landing gear at this point, using my high-E guitar string stainless steel wire.
Final Assembly:
 The
Pulpit went into position easily and was glued with C-A and accelerator on the
lower braces. I then attached the upper braces. With all this done, I then
rigged the bracing on the landing gear and the pulpit braces.
The
Pulpit went into position easily and was glued with C-A and accelerator on the
lower braces. I then attached the upper braces. With all this done, I then
rigged the bracing on the landing gear and the pulpit braces.
It was now time to attach the photo-etch gun mount. The photo-etch for this kit was the one area where there could have been better quality, since the photo-etch seemed to be made out of rusted, weathered metal. As I started bending the mount into shape, it crumbled!
I ended up using some .010 brass wire to make the mount, and painted it with Testors Metalizer Stainless Steel when it was glued together. I attached it to the pulpit, and all looked as it should. I glued the Lewis gun in position and the work was finished. (The work on the mount was actually as easy as described here, though it was time consuming to bend the wire and glue it all together, and only became easy after the air over the workbench went purple for a few minutes following the initial crumbling.)
|
CONCLUSIONS |
This model was actually far easier to build than it looks like it would have been. Any modeler who has made a few advanced World War I models (like the Eduard Albatros D.V) would have no trouble with this kit. The one thing that has to be borne in mind throughout the project is that resin is brittle and any harsh handling with result in breakage that is almost always not easily repaired.
Thanks to VAMP Mail Order Service for providing the review copy. You can order your copy from VAMP at http://w3.inshop.cz/vamp/inshop/shop.asp
If you would like your product reviewed fairly and fairly quickly, please contact me or see other details in the Note to Contributors.