Blue Max 1/48 LFG Roland D.VIb
|
KIT # |
BM 117 |
|
PRICE: |
$49.98 |
|
DECALS: |
two options |
|
REVIEWER: |
|
|
NOTES: |
Short run with pewter parts |
|
HISTORY |
Roland L.F.G.
was established in 1908 to manufacture Parseval airships under license,
with aircraft production starting in 1912. Following the outbreak of war
in 1914, Roland began the license production of Sablatnig &
Friedrichshafen seaplanes, followed by a production contract for Albatros
fighters. On its own, the company was responsible for some of the
best-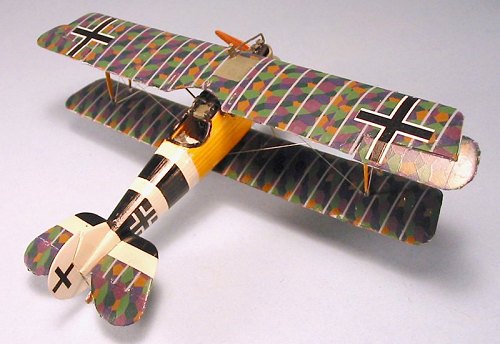 looking, most aerodynamically-advanced aircraft to be used by the
Luftfarttruppen during the First World War. The C.II, known as the
Walfisch, served on the Western Front during 1915-16 as a two-seat
reconnaissance/bombing aircraft with the ability to outrun its
single-seat opponents. In 1916 the D.II Haifisch entered
production. The Argus engine lowered the performance of what was a
clever and aesthetically pleasing design, resulting in its banishment to
use as a fighter trainer.
looking, most aerodynamically-advanced aircraft to be used by the
Luftfarttruppen during the First World War. The C.II, known as the
Walfisch, served on the Western Front during 1915-16 as a two-seat
reconnaissance/bombing aircraft with the ability to outrun its
single-seat opponents. In 1916 the D.II Haifisch entered
production. The Argus engine lowered the performance of what was a
clever and aesthetically pleasing design, resulting in its banishment to
use as a fighter trainer.
Learning from the mistake of the D.II, the D.VI series was designed to use the 185 h.p. Benz Bz.IIIa, the best German aero engine available. The "clinker" style of fuselage construction created a light yet strong structure that required little maintenance since it did not require the fabric covering of the previous Roland method of fuselage construction, making it easier to manufacture and repair. The D.VI entered service in the summer of 1918, but offered no advantage over the earlier Albatros D.V, and was completely outclassed by the Fokker D.VII, especially the version powered by the same engine as the D.VI. Modifications to the design resulted in the D.VIb which entered service in the late summer of 1918, but the aircraft were mostly used as "fighter trainers" on the squadron level, preparing newly-trained pilots in combat tactics.
|
THE KIT |
For a look in the box and a description of its contents, please visit the preview.
|
CONSTRUCTION |
Blue Max kits are "limited run." They are produced by a very low-pressure injection molding process that has not changed since the first kit was introduced more than ten years ago. Thus, the first thing a modeler must do is separate the parts from the very thick sprues and clean them up. This involves getting rid of flash and sanding down and smoothing the flow points from the sprues. Additionally, the detail parts are made of a particularly soft pewter-like white metal, which means they are going to be deformed from the shipping and handling the kit has experienced, and in bad need of restoration. This was particularly the case with this kit, with its very thin cabane struts and landing gear legs.
|
CAMOUFLAGE & MARKINGS |
 Once this was
completed, I decided to start with the wings. This was due to the fact
that they would be covered with lozenge decal, which is a long and
involved process. After cleaning up and de-flashing the wings and
ailerons, I airbrushed all the parts with Future.
Once this was
completed, I decided to start with the wings. This was due to the fact
that they would be covered with lozenge decal, which is a long and
involved process. After cleaning up and de-flashing the wings and
ailerons, I airbrushed all the parts with Future.
Chris Gannon of Pegasus/Blue Max was kind enough to provide review copies of all the Blue Max line of decals, which includes their 1/48 4 and 5-color lozenge decal. These come on large sheets, in long strips like the original fabric, in upper and lower colors. These are, to my mind, the best lozenge decals available. They are made directly from the new lozenge fabric now being used to restore WW1 aircraft, which was created from lozenge fabric found in the Prague Museum that had never been exposed to sunlight and was in original condition. The colors and patterns are correct. The decals themselves are so thin that one does not need to use any decal solvent on them, and must in fact apply the decal carefully to avoid any curling-in or folding-over of the piece.
The process of applying lozenge is simple, but time-consuming. For the D.VIb, I cut the decals to make chord-wise sheets for the upper wings, and span-wise sheets for the lower wings, since they were narrower in chord than the width of the decal strip. I applied the upper colors first, measuring the pieces by moving the cut-out strip along the wing and tracing the outline of that particular section, with a little "overlap" for and aft. Once the decal was applied, the part was put aside and left to set up for 24 hours. When that was done, I applied a coat of Future to the decals to protect them, and then applied the lower surface lozenge, which was trimmed to closely conform to the dimension of the wing; this results in the fabric being applied smoothly for the final look. After a day of setting up, these surfaces were Futured, and then the rib tapes were applied, first the upper and then the lower colors.
 I also decaled
the interplane struts with "Yellow-varnished wood" and set those aside.
I also decaled
the interplane struts with "Yellow-varnished wood" and set those aside.
While the decals were setting up through that process, I went to work on the rest of the model. I cleaned up the mating surfaces of the fuselage halves, then Futured the interior and applied some of the Blue Max "Yellow-varnished wood" decal to the interior surfaces. I used a different-color wood decal for the cockpit floor and the internal bulkheads. Once all this had set up, I Futured the decals, and then assembled the interior. I didn't worry about super-detailing the cockpit, inasmuch as this model was ultimately headed for the Planes of Fame Air Museum, where it would be displayed behind glass and no one would see the cockpit interior.
|
CONSTRUCTION CONTINUES |
I then assembled the fuselage, filled the centerline seam with CA glue, sanded it smooth, applied Mr. Surfacer 500 where necessary, and cleaned up the assembly. I cleaned up the vertical fin and horizontal stabilizers, and cut the control surfaces so they could be posed dynamically. I then glued the tail surfaces to the fuselage.
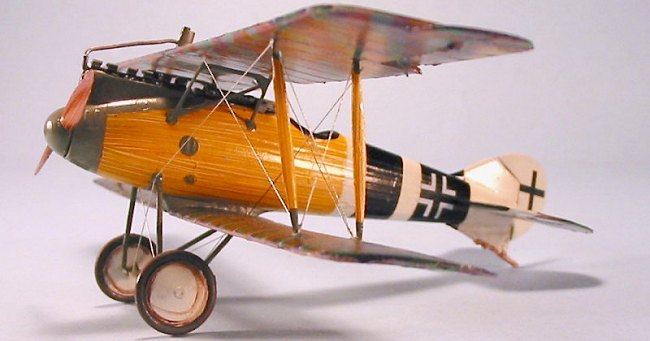
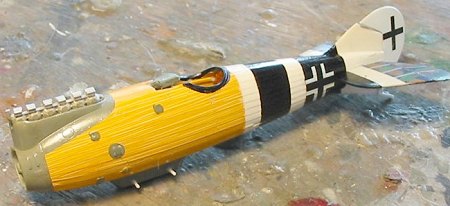 Since I had
decided to do the markings option of an operational D.VIb, I painted the
rear fuselage white, masking it and painting the black stripes. I
painted the cowling area with Tamiya RLM02, which I (and many other WW1
modelers) now believe was the "grey-green" color mentioned with regard to
German WW1 airplanes. When all was done, I unmasked the black and white
stripes, and Futured the fuselage sub-assembly.
Since I had
decided to do the markings option of an operational D.VIb, I painted the
rear fuselage white, masking it and painting the black stripes. I
painted the cowling area with Tamiya RLM02, which I (and many other WW1
modelers) now believe was the "grey-green" color mentioned with regard to
German WW1 airplanes. When all was done, I unmasked the black and white
stripes, and Futured the fuselage sub-assembly.
The outer fuselage was now covered with the "Yellow-varnished wood decals, while the horizontal stabilizers were covered with lozenge on the rear sections.
Finally, the various sub-assemblies were given a thick coat of Future to protect all the decals during assembly.
The lower wings attach to the fairing beneath the fuselage, which is not much of a structure for any strength. I drilled out holes in the lower wings and the fairing, and glued in Evergreen rod to provide extra strength, then glued the lower wings to the fuselage with cyanoacrylate glue. I also used CA to glue the cabane struts to the fuselage. I then attached the upper wing to the cabane struts, aligned it, and applied CA glue to the joints using accelerator to get everything to hold. I then attached the outer wing struts.
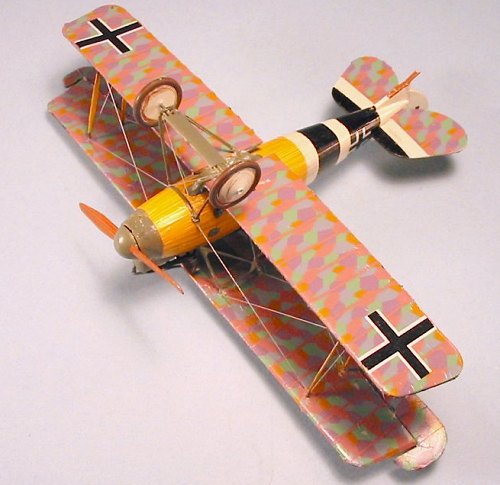
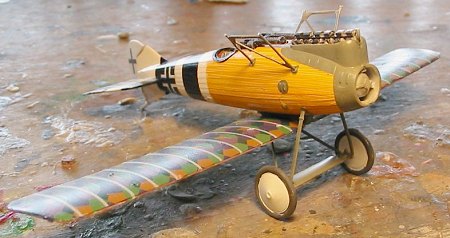 It was at this
point, while checking the alignment of the wings, that I made the
discovery that puts me off the kit. The left upper wing is 1/8 inch
shorter in span than the right upper wing, measured from the central
rib. The result is that the left interplane struts toe out from upper
wing to lower wing, viewed from ahead. They should be vertical, like the
interplane struts on the right wings, and the angle is very noticeable.
It was at this
point, while checking the alignment of the wings, that I made the
discovery that puts me off the kit. The left upper wing is 1/8 inch
shorter in span than the right upper wing, measured from the central
rib. The result is that the left interplane struts toe out from upper
wing to lower wing, viewed from ahead. They should be vertical, like the
interplane struts on the right wings, and the angle is very noticeable.
Fortunately for this particular model, it will eventually be posed in a glass case out at the museum at an angle where viewers will not notice this. For a modeler who plans to keep this model in their collection, I have no idea what to do to solve the problem. The space between ribs is marginally different on the left wing than the right, which would mean sectioning the wing at several locations to put in plugs that would result in extending the wing sufficiently. These could be sanded down, covered with Mr. Surfacer, and hidden under the lozenge decals, but the overall result would be a model that is even more fragile than this one is - and this is one of the most delicately fragile WW1 models I have ever built.
I attached the landing gear, which is very thin and not at all strong so that I first covered the white metal gear legs in CA glue to add strength before painting them RLM02. Finally, I attached the radiator tubing and the propeller, then rigged the model with .008 wire. The rigging pattern is simple (thank goodness).
|
CONCLUSIONS |
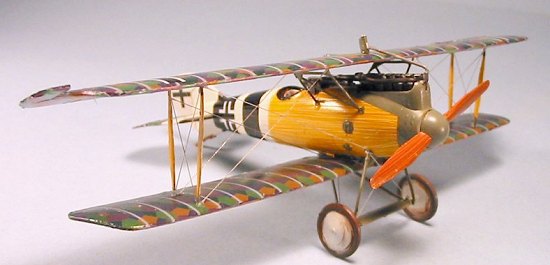
 This is a very
good-looking model, which is fatally harmed by the incorrectly-designed
upper wing. If you can live with the toed-out struts on the left wing,
it's an interesting addition to a WW1 collection.
This is a very
good-looking model, which is fatally harmed by the incorrectly-designed
upper wing. If you can live with the toed-out struts on the left wing,
it's an interesting addition to a WW1 collection.
Recommended only to advanced WW1 modelers due to difficulty of assembly and overall fragility of the result.
The Blue Max lozenge and wood decals are recommended without hesitation as the best available anywhere.
Copyright ModelingMadness.com. All rights reserved. No reproduction in any form without express permission from the editor.
Review decals courtesy Blue Max/Pegasus
If you would like your product reviewed fairly and fairly quickly, please contact the editor or see other details in the Note to Contributors.