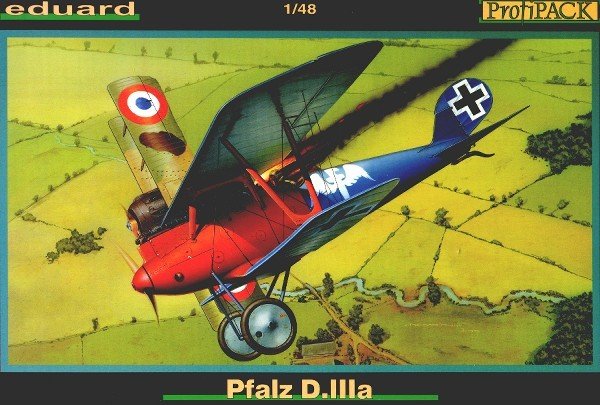
Eduard 1:48 Pfalz D.IIIa Profipack
|
KIT # |
8045 |
|
PRICE: |
$23.25 |
|
DECALS: |
see review |
|
REVIEW: |
|
|
NOTES: |
|
|
HISTORY |
I know almost
nothing about this little fighter, so I will have to crib from Eduard's potted
history: "[The] Pfalz D.III was, together with the Albatros D.V and Fokker
Dr.I one of the three main classic German dog-fighters from Fall 1917 until
Summer 1918, when all of them were replaced by the excellent Fodder D.VII."
The D.IIIa improved on the D.III with a new wing and tail, and by moving the two
Spandau machine guns out of the fuselage and into the slipstream for better
cooling. Altogether, 750 D.IIIa's were produced, some of them going on to
serve with training units once they'd been replaced at the front by the Fokker
D.VII.
|
THE KIT |
The kit is Eduard's
Pfalz D.IIIa "Profipack," No. 8045. It consists of 46 injection
molded parts, 24 photoetched nickel plated brass pieces (PE), a set of vinyl
masks, and decals for three aircraft - Berthold's Jg. II (depicted on the box
top, and the kit includes an optional lower wing to depict this aircraft),
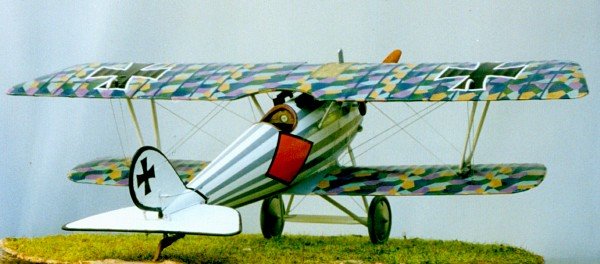
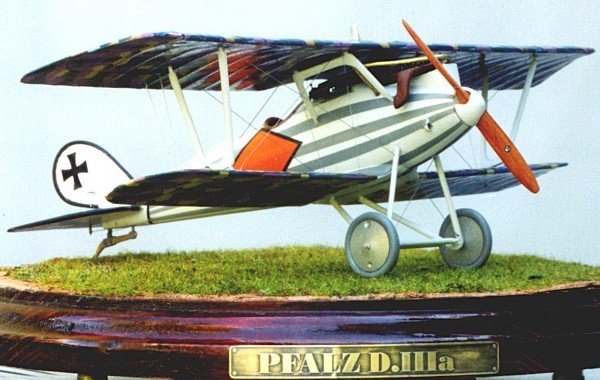
Pollinger's Jasta 77b, and Bethge's Jasta 30, which is the one I
built. The molding quality must be seen to be appreciated. The
panel lines and fasteners around the engine are beautifully scribed, and almost
all the parts fit so well there is no need for alignment pins. With this
kit Eduard has met, and perhaps even surpassed, the standard set by the Japanese
manufacturers. The 10 page instructions are clear, and include a painting
guide that cross references paints from Tamiya, Humbrol, Revell, Testor's, and
Aeromaster.
|
CONSTRUCTION |
As this was my first WWI plane ever, I was a little nervous. I really had no clear idea how to tackle that problematic second wing, not to mention the dreaded rigging. However, the WWI Modeling Mailing List was extremely helpful in answering my questions. As it is a mailing list, you have to subscribe before you can post to it or receive posts. More information about it can be found here: WWI Modeling Mailing List FAQ . I also obtained a copy of Scale Aviation Modeller International's Volume 3, Issue 5, as it has a special section devoted to this plane. Some net surfing yielded pictures of the Mercedes engine, Spandau MG's, and lots of photos of this kit built by other modellers. So, Armed with some good reference works, I dove right in.
I started by painting the interior. Eduard suggests this be painted wood, but since the Pfalz was actually built by wrapping two layers of thin plywood skin in a monocoque construction, it was more likely the interior was painted Pfalz Silver Gray, with only the stringers being varnished wood.
I mixed up 3 parts Testor's Model Master (TMM) aluminum with one part Light Aircraft Gray for the Silver Gray, and used TMM Wood for the stringers. Various bits were painted Humbrol 106, TMM Gloss Black, or, in the case of the PE, left unpainted to replicate light steel or aluminum. Eduard's cockpit is remarkably complete, lacking only the control linkages and Bowden cables. However, since the cockpit is cramped and very dark, much of the beautiful detail can't be easily seen, which is a great pity. I departed from Eduard's instructions by cementing the injected plastic and the PE rudder bar together, in order to give my control cables something a little beefier to connect to. I also combined the injected panel with the PE offering, since the PE alone was so thin it sat too far into the fuselage. I scraped the nickel plating off the bezel to reveal the brass beneath, since photographs of WWI-vintage instruments often showed them having brass bezels. I painted the litho-printed RPM gauge with Humbrol Linen, to give it a creamy look which would complement the brass surround. Most of the various bits were glued with Testor's tube glue, and the PE was attached with CA.
The engine was next. It's nicely molded, and compares well with after market white-metal offerings. It's pretty complete, but lacks the piping to connect it with the wing mounted radiator. following my references, I painted the crankcase TMM Aluminum, with the lower part of the cylinders TMM flat white and the upper part TMM Gloss Black. Other parts were painted TMM Aluminum. The exhaust pipe was primed with Plasti-Kote's primer, then dipped in baking powder while still wet, to obtain a good rough finish. It was then coated again with primer to seal in the powder. After the exhaust pipe dried, I painted it TMM Rust, then dipped it in KDG's Rustall "Rust" and Black Wash, and finally in their Dead Flat to obtain a good scaly, rusty, look. The engine and cockpit were then cemented into the fuselage, but the exhaust pipes were put aside for later attachment. Pay close attention to the cockpit floor attachment diagram, as it is easy to glue it in too far back. Once the engine and cockpit were firmly in place, I cemented the the fuselage halves with Testor's liquid glue, as it's milder than Tenax and has a longer working time. It is testimony to this kit's quality that I needed no filler on the fuselage, and only minimal amounts when I attached the rudder, elevator, and lower wings. After all these had set up, I drilled out the various dimples Eduard includes for the control linkages. One set of dimples is incorrectly placed - the upper elevator link holes should be placed about 1 mm further forward, otherwise the elevator interferes with the cables. I also drilled out the dimples for the control horns on the rudder and elevators at this time, and these were all accurate as given. Strangely, while Eduard includes a dimple on the forward port side fuselage as a guide for the opening for the fuel lines, they omit one for the second, (rear) radiator pipe. following my references, I used a #60 bit to drill a hole on the vertical panel line slightly above where it joins the horizontal one on the starboard forward fuselage. It's hard to miss, as it is the only panel line on the whole fuselage! The same reference also indicates the various filler caps are slightly too proud of the fuselage, but a few swipes with a sanding stick brought them more into scale.
Next were the MG's and here is where the PE truly shines. It shows the jacket's delicate filigree to great advantage. I used 2 mm OD tubing as a mandrel, and the soft brass bent very easily to create perfect hollow cylinders. I departed from the instructions by not detaching the muzzle from its plate, and by keeping a small stump once I'd cut the the plastic filigree from the rest of the part. I used this stump as a sleeve over which I passed the PE jacket, using it as a guide to keep the jacket straight. A stump was also retained from the plastic muzzle plate and slid into the PE jacket. I used small piece of rod to substitute for a barrel. Once all the various parts had been put together, I then used Tamiya Semi Gloss Black to paint them all up, rather than Gunmetal, as it looked more like the references. I put the machine guns aside at this point, as I still had the body and tail to paint and decal. Because I'd chosen Bethge's mount, I painted the fuselage, landing gear, control horns, spinner and the struts Aeromaster Reefer White, and coated them in Future once they dried. I then applied the vinyl masks to the tail and rudder, and painted them Tamiya Semi Gloss Black. It was my first experience with these masks, and I was generally pleased. They mask well, but can be tricky to apply uniformly, especially as it seems these don't fit perfectly. Could it be the tail masks were originally designed for the earlier D.III kit's tail?
Next came the fuselage stripes. Each stripe is laid out individually, which can create problems in keeping everything aligned and uniform. Next time, I may coat the decals with decal film, which will help them to stay properly oriented to each other.
All the stripes were slightly too long, but a gentle trim with a new blade
removed the excess. When I applied the orange diamond, I was disappointed
to see it was quite translucent. I gently removed the still-wet decal and
left it floating in water while I scanned the other diamond and used it as a
pattern to print out a white copy on my ALPS printer. Even though I double
printed the white, I was only partly successful in overcoming the translucency,
which is a pity. The decals are also quite thick, and the Solvaset I used
to make the decals set made the orange diamonds shrink down so much over the
stripes there's a slight corrugated effect. Still, the decals aren't all
bad - how many other brands could be pulled off, dripping with Solvaset, dunked
in water and then reapplied, and not disintegrate?
I next had some decalling of the upper and lower wings to do. Solvaset to the rescue again, as they needed a good bath to wrap around the wings. The upper wing's underside decal has a radiator cutout that's a little too far to port. When properly placed to fully cover both wings, a small gap appears on the port side. Unless you're making Pollinger's plane, you can cut some lozenge from the tail decals and make an almost invisible patch. The rest of the lozenges fit fine, but because they are so thick, the aileron hinge lines are almost invisible, even after I inked them in. Next time, I think I'll cut and reposition the ailerons.
Once all the decals were dry, it was time to drill out the rigging holes and attach the struts and upper wing. Eduard's illustration suggests the rigging should be attached to the interplane and cabane strut pins, but I preferred to drill holes in the actual upper and lower wings and use the rigging to help insure the upper wing stays firmly attached. I only drilled holes part way through the upper wing, but all the way through the lower wing, as this would allow me to pass the rigging through it and avoid having to measure the rigging to length. Eduard provides some dimples as guides, but the holes closest to the fuselage on the lower wing don't have any guides, so I chose to drill through the little plates on the wing underside.
I attached the struts in two stages. First, I used Elmer's white glue to temporarily attach the interplane struts to the upper wing, and then flipped the wing over and fit the strut pins into their respective slots. Once I was convinced the wing was properly aligned, I dabbed CA glue onto the lower wing pins and let everything dry overnight. I then soaked the upper attachment points in water until the white glue dissolved, and was able to remove the upper wing and leave the perfectly aligned struts on the lower wing. I repeated the process with the cabane struts. Doing the wing this way let me attach it without having to worry about the delicate bits like MG's and the exhaust pipe getting in the way.
Next came the radiator piping. For this I used some phone electrical cord I found in an ashcan, cut approximately to length. I glued it to the radiator's front hole, temporarily attached the top wing, and basically futzed and fiddled with the piping until it looked right. I repeated the process with the second pipe, that goes from the rear hole to the hole I drilled in the starboard fuselage. When all looked right, I removed the wing and painted the pipes TMM Bright Brass. I also drilled two small holes in the outboard corners of the gas tank, and glued in a couple of strands of 30 gauge wire to replicate the fuel lines. While these dried, I attached the MG's and the exhaust pipe. Finally, the upper wing was attached and held in place with rubber bands while I dabbed more CA glue into the various slots and pins, and put the various piping into the appropriate places. Everything was then allowed to dry overnight.
While the wing was drying, I drilled small holes in the landing gear struts to take the rigging. Eduard's guide is more accurate here, but I felt the landing gear would benefit from being more firmly attached. I then assembled the landing gear with white glue and offered it to the fuselage, fiddling around with it until it sat straight. Then more CA was dabbed on and allowed to dry. Finally the wheel hubs were painted TMM Aluminum, and I mixed up a shade of pinkish gray from various TMM colors and painted the tires.
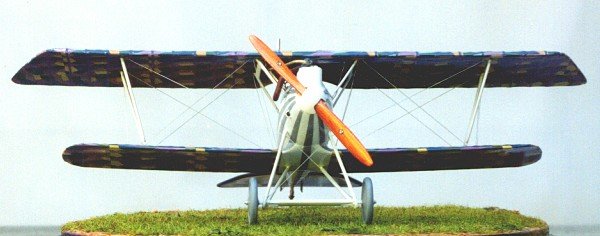
Then came the rigging, which was surprisingly easy. I used invisible thread painted with TMM Chrome. I started the thread from the bottom wing and inserted the end into the appropriate hole in the upper wing, then dabbed a little CA. Once I was sure it would hold, I clamped small hemostats to the thread to provide good tension on the line, and let them hang. I then dabbed CA on the underside of the bottom wing, and once it had dried clipped the the thread as close as possible to the wing. Using this method, any small bumps and glue marks remain relatively hidden under the bottom wing. Once I got the hang of it, the work proceeded very quickly and I was able to rig up the plane in under 2 hours. I used a similar system to rig up the control cables.
I now turned my attention to the
final item, the propeller. I sprayed it with a can of TMM Desert Sand and
let it dry thoroughly. I tried using Pitt pastel pencils to draw the wood
grain, but the points were too hard and kept scratching the paint, so I scraped
some pastel powder off each pencil with a sharp blade. I then dipped a
damp brush into each powder and gently dragged it along the blades. It
took quite a few tries to get it right, but once I was satisfied I dipped the
brush in Future and sealed the pastel with a glossy coat. I'm happy with
the way it turned out, as it really does look like wood.
|
CONCLUSIONS |
This is a great little kit indeed. It's beautifully molded, almost all the parts fit like a glove, and it has the little extras I'd normally have to buy separately (like the PE and vinyl masks) are thrown in, so it's an excellent value for the money. It's a great introduction to biplanes, almost falling together. I enjoyed building it immensely, and look forward to building many more. It even cured my AMS!
|
REFERENCES |
Scale Aviation Modeller
International's Volume 3, Issue 5
Spandau
Images (I)
Spandau
Images (II)
Mercedes
Engine Images (I)
Mercedes
Engine Images (II)
World War I Modeling Page
Copyright ModelingMadness.com
If you would like your product reviewed fairly and quickly, please contact the editor or see other details in the Note to Contributors.
Back to Reviews Page 2016