
Roden 1/72 Pfalz D.III/D.IIIa
|
KIT # |
003/015 |
|
PRICE: |
$8.98 |
|
DECALS: |
See Review |
|
REVIEW: |
Kyle Bodily |
|
NOTES: |
All injected plastic kits |
PFALZ PFEVER
|
HISTORY |
Like a famous philosopher once said, "I can’t get no respect". This is what Pfalz Flugzeugwerke von Speyer am Rhein could have just as easily of said during WWI. Pfalz built very good machines and never received the credit it was due. In fact at one time, Pfalz Aircraft constituted a full 25% of all front line fighters in service. The only real strike against Pfalz was Bavaria; Pfalz was a Bavarian company and not a Prussian one.
Most of the German High Command was Prussian. By the outbreak of WWI most of the German States were unified under Prussia, except for the somewhat autonomous kingdom of Bavaria. So we have the High Command in Prussia and the Royal Bavarian Army under the King of Bavaria with its own Headquarters and Staff, to say the least there was friction between the two. This made its way through the whole system. To the point that a Bavarian had a hard time getting appointed to a position of responsibility especially in units that were considered Prussian as in the case of Hauptmann Eduard Ritter von Schleich "The Black Knight " (see page # 162 of "German Knights of the air 1914-1918").
 The idea that things made in or from Bavaria were less than
those from Prussia seems to have effected the Pfalz Company also. Pfalz A/C
never seemed to find favor with many German pilots. However reports from the
front sight excellent maneuverability with very fast dive and pull out. The
Pfalz, in fact could not out turn the Albatros. However the margin between out
turning the Pfalz and catastrophic failure was a slim one. An item of note here
was the Albatros’s weak wing, it was prone to crack or even BREAK OFF in
combat! Even Baron Manfred von Richthofen (the Red Baron) stopped flying the
Albatros after he experienced a cracked wing during a heated a dogfight. He was
lucky enough to land the aircraft and flew the Halberstadt D.II for a time. In
fact the weak wing would come back to haunt Albatros, after completion of the
last D.Va, Albatros would never build for service one of its own designs. They
were ordered instead to build the design of their arch rival, Anthony Fokker’s
excellent D.VII.
The idea that things made in or from Bavaria were less than
those from Prussia seems to have effected the Pfalz Company also. Pfalz A/C
never seemed to find favor with many German pilots. However reports from the
front sight excellent maneuverability with very fast dive and pull out. The
Pfalz, in fact could not out turn the Albatros. However the margin between out
turning the Pfalz and catastrophic failure was a slim one. An item of note here
was the Albatros’s weak wing, it was prone to crack or even BREAK OFF in
combat! Even Baron Manfred von Richthofen (the Red Baron) stopped flying the
Albatros after he experienced a cracked wing during a heated a dogfight. He was
lucky enough to land the aircraft and flew the Halberstadt D.II for a time. In
fact the weak wing would come back to haunt Albatros, after completion of the
last D.Va, Albatros would never build for service one of its own designs. They
were ordered instead to build the design of their arch rival, Anthony Fokker’s
excellent D.VII.
At the time, the preferred German attack was made from above and in mass. After you positioned yourself you dove on the enemy guns blazing and escaped without getting entangled in a dogfight. The Pfalz was perfectly suited for this kind of tactic. The aircraft was strong and fast, you could put it in a very steep dive and hard pullout without fear of catastrophic failure.
A fitting complement was made in Jane’s All the Worlds Aircraft 1919, and can be read in the reprints of this publication (JANE’S Fighting Aircraft of World War I "page # 180"). In this publication it’s stated "It answers to the controls, much better than does the Albatros D.5, but tends to turn to the left in flight. It is not tiring to fly, and is normally easy to land." It is important to note at this time, aircraft did not have trim tabs so they often wandered when power was applied or reduced.
|
THE KIT |
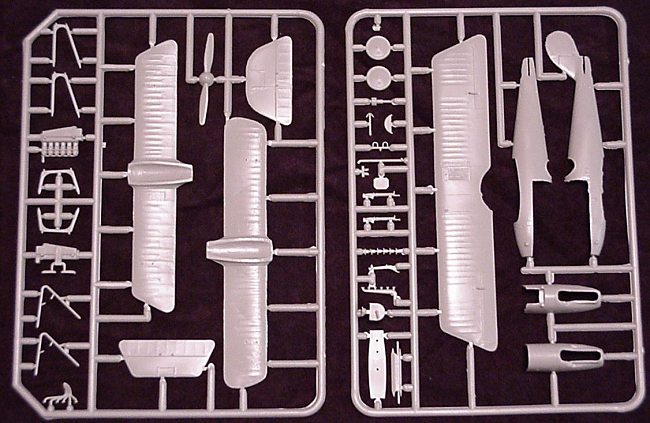
When I decided to do this build I looked at the two kits that were on the market. The first was the MAC Pfalz D.III and D.IIIa. The other was the RODEN Pfalz D.III and D.IIIa. I have heard a lot of good about both so I compared them.
The MAC kit is molded well with little flash and comes with P/E parts. The instructions are adequate; they don’t have much information in the way of overall painting or rigging. On closer look most of the P/E will have to be replaced with stretched sprue, and the wings, struts and landing gear spreader will have to be worked with. The wings and the struts are also too thick, the landing gear spreader is incorrect and the engine is poorly molded. However there is some pretty good cockpit detail.
 Now for the RODEN kit. The kit has a lot of flash around the
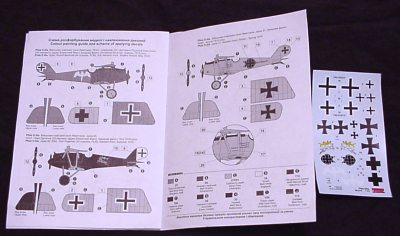
parts and will take some cleanup. The instructions are quite nicely done with
lots of drawings and a rigging diagram. Decal options for three A/C (D.IIIa) and
four A/C (D.III). You also get all the parts to make ether the D.III or D.IIIa
no matter which kit you get. This is important if you build Karl Degelow’s
mount, because he flew a Pfalz D.IIIa EARLY that retained the pointed lower wing
of the D.III. On closer look the wings and struts are very thin and the wings
have excellent under camber detail. The engine is excellent and would lend
itself to an open cowling diorama to fully display its detail. The lower wings
for the D.IIIa (the rounded tip ones) have some rough spots on the upper leading
edges, it is as if the mold rusted and was cleaned, thus leaving small bumps in
the finished product. The RODEN’s fuselage is in three parts that could give
some problems as opposed to the MAC’s two-part fuselage.
Now for the RODEN kit. The kit has a lot of flash around the
parts and will take some cleanup. The instructions are quite nicely done with
lots of drawings and a rigging diagram. Decal options for three A/C (D.IIIa) and
four A/C (D.III). You also get all the parts to make ether the D.III or D.IIIa
no matter which kit you get. This is important if you build Karl Degelow’s
mount, because he flew a Pfalz D.IIIa EARLY that retained the pointed lower wing
of the D.III. On closer look the wings and struts are very thin and the wings
have excellent under camber detail. The engine is excellent and would lend
itself to an open cowling diorama to fully display its detail. The lower wings
for the D.IIIa (the rounded tip ones) have some rough spots on the upper leading
edges, it is as if the mold rusted and was cleaned, thus leaving small bumps in
the finished product. The RODEN’s fuselage is in three parts that could give
some problems as opposed to the MAC’s two-part fuselage.
All in all they both have their advantages and disadvantages. However I think that the MAC offering would build better for the less experienced and the RODEN would be the kit for the more advanced modeler who is not afraid of flash and does not mind working with the more thin and delicate parts.
Lastly is price, the MAC offering lists for $17.98 and the Roden lists for $8.98. This is important if you are going to build one or many. If you want to build one, then it is a toss up. If you, like myself, don’t have a wealthy benefactor and want to build multiple kits then the Roden offerings are what you want.
|
CONSTRUCTION |
 |
 |
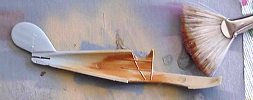 |
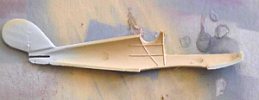
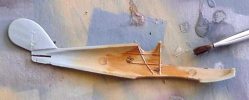
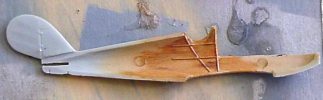
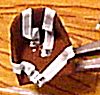
I started by washing the parts with soap and water, then removing all the parts from the trees, cleaning up the flash and sanded any seams smooth. Be careful as you cut the parts from the trees because they are very fine and will break easily if you get careless. After test fitting as many parts as I could at this stage, I painted the interior and engine. Most of the German WWI A/C had all wood fuselages, except for Fokker who preferred tube steel construction. To simulate this I paint all the parts that were wood a very light tan, then with oil paints that I thin with linseed oil, tap on a very light amount of paint in V shaped patterns or in diagonals. (See the above and below images) Now you just streak it with a stiff bristle brush. I use three colors, raw umber, burnt sienna and yellow ochre and blend and layer as I like, you may want to try this on some scrap Styrene or an old model. At the very least let the parts dry over night before you handle them, oils take a little while to dry or cure. On the other hand there is some evidence that Pfalz painted its aircraft interiors light blue or light gray. So if you don’t want to do the wood, you may want to opt for the painted interior.
 |
 |
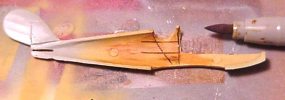 |
The engines went together quite nicely and look great, one of the strengths of these RODEN and TOKO kits are the engines.
 Well let’s put the fuselages together and see if we can find
some problems. I found that the cockpit fit was good and with a little work you
could build an excellent interior, I just added seatbelts made from strips of
aluminum foil that I painted off white.
Well let’s put the fuselages together and see if we can find
some problems. I found that the cockpit fit was good and with a little work you
could build an excellent interior, I just added seatbelts made from strips of
aluminum foil that I painted off white.
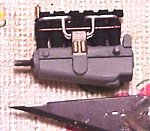 The engine has four centering pins that are the engine mounts
and these fit in the upper cowling of the fuselage. This cowling is then glued
to the fuselage to make a D.III or a D.IIIa. These pins take a little fitting to
hold the engine. Also I found that the two bumps on the carburetor needed to be
removed so the engine would fit properly. Other wise the engine went in great. I
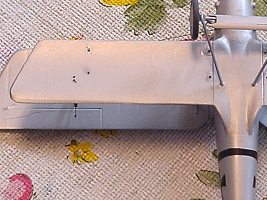
fit the wings and glued them to the fuselage assembly and used a little green
putty to blend this joint.
The engine has four centering pins that are the engine mounts
and these fit in the upper cowling of the fuselage. This cowling is then glued
to the fuselage to make a D.III or a D.IIIa. These pins take a little fitting to
hold the engine. Also I found that the two bumps on the carburetor needed to be
removed so the engine would fit properly. Other wise the engine went in great. I
fit the wings and glued them to the fuselage assembly and used a little green
putty to blend this joint.
The hardest thing that you will need to do is open up the slot in the rear fuselage for the horizontal stabilizer. The slot needs to be widened and in the case of the D.IIIa lengthened to accommodate the larger stabilizer.
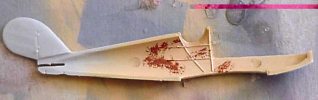
Now a little bit of putty, then some sanding and we start to make all the rigging holes. I use 2lbs fishing line that I color black or dark gray. I find that this is the fastest and strongest way to rig. I also don’t paint the fishing line as the paint has a tendency to get scraped off so I use markers of the waterproof variety. I try to drill holes that are just about the same size as the thread I will use. If more than one thread will go through the same hole, I just increase the size of the hole accordingly.
Lastly I scribed all the access panels that may have been damaged during the smoothing process, or make new details from paper, aluminum foil or something.
After painting I applied all except the under wing decals. I save them until last so they don’t get in the way while I rig. Final assembly and rigging went well. I find it amazing how rigging makes the kit stronger and even more ridged, I guess that is why they rigged the real ones.
 |
 |
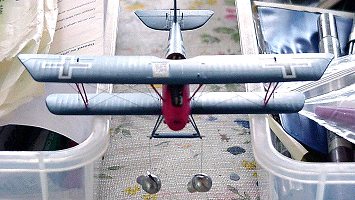 |
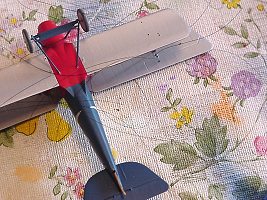
As you can see from the pictures, I super glue the rigging to the upper wing and thread it through the bottom wing. I use fishing weights (the clamp on variety) to tension the lines and use a drop of glue to fix the line in place. After a second you can cut and make the line flush with the wing. Now a little touch up paint and the under wing decals and viola, you have an aesthetically pleasing configuration of rigging lines.
Although the kit came with the parts, I decided to make the water pipes that go from the radiator to the engine out of brass wire. I bent them with old pliers then painted them silver and glued them in place with super glue. The kits water pipes were made out of injection molded plastic and looked a bit thick to me.
|
PAINT & MARKINGS |
I decided to build the personal aircraft of three of the more famous Pfalz Drivers. All won the coveted Pour le Merite (Blue Max). (Not to be confused with a certain Nitro Funny Car, Ed)
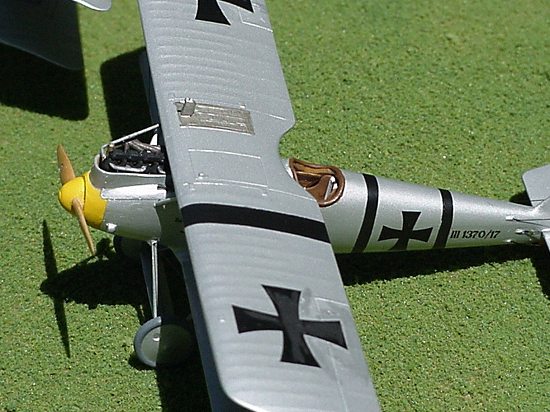 First is Leutnent der Reserve Werner Voss (48 victories), who
flew Pfalz D.III 1370/17 as Stafflfuhrer of Jasta 10 from the end of July 1917
to his death in September 1917. This aircraft has a very interesting history, as
it was not only Voss’s personal A/C but was captured in December 1917 and
evaluated by the British. At the time of its capture the nose and struts were
painted yellow and the tail was painted green. Voss was killed while fighting
SE5s of No. 56 Squadron in his Fokker Dr.I (Dr.I 103/17) on 23 September 1917.
One of the first to learn the hard way that while the Dr.I could out turn all
other aircraft, it was slow and could not run from an enemy, not even in a dive.
First is Leutnent der Reserve Werner Voss (48 victories), who
flew Pfalz D.III 1370/17 as Stafflfuhrer of Jasta 10 from the end of July 1917
to his death in September 1917. This aircraft has a very interesting history, as
it was not only Voss’s personal A/C but was captured in December 1917 and
evaluated by the British. At the time of its capture the nose and struts were
painted yellow and the tail was painted green. Voss was killed while fighting
SE5s of No. 56 Squadron in his Fokker Dr.I (Dr.I 103/17) on 23 September 1917.
One of the first to learn the hard way that while the Dr.I could out turn all
other aircraft, it was slow and could not run from an enemy, not even in a dive.
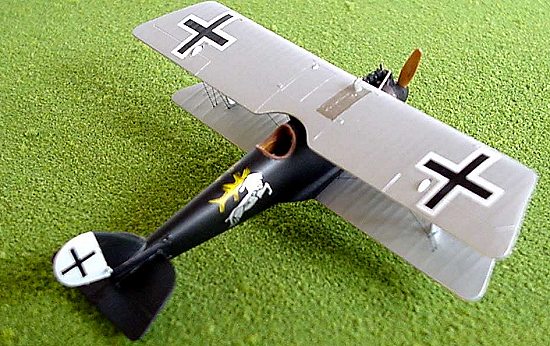
Second is Leutnent Carl Degelow (30 victories), who flew a black Pfalz with his distinctive leaping silver stag insignia. After WWI he fought against the communists in the Post-war revolution that swept over Germany. When WWII broke out he joined the Luftwaffa as a Major and survived that war. He died in Hamburg Germany on 9 November 1970.
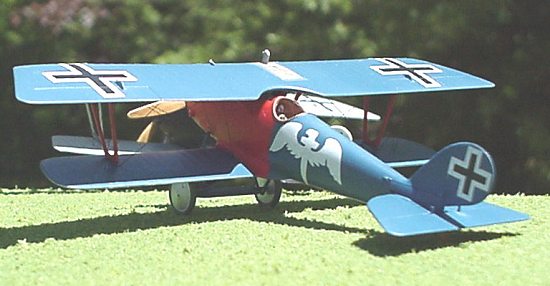
 Third is Hauptmann Rudolf Berthold (44 victories), who flew a
brightly colored Blue and Red Pfalz that was painted to look like a Prussian
dress uniform. Berthold liked Pfalz aircraft and flew Pfalz aircraft from the
E.IV to the D.IIIa. He survived the war and also fought in the post-war
revolution. Rioters in Harburg on the Elbe killed him on 15 March 1920. It is
said that after a beating he was strangled with the ribbon from his Pour le
Merite (Blue Max). On his head stone is the inscription "Honored by his
enemies-slain by his German brethren."
Third is Hauptmann Rudolf Berthold (44 victories), who flew a
brightly colored Blue and Red Pfalz that was painted to look like a Prussian
dress uniform. Berthold liked Pfalz aircraft and flew Pfalz aircraft from the
E.IV to the D.IIIa. He survived the war and also fought in the post-war
revolution. Rioters in Harburg on the Elbe killed him on 15 March 1920. It is
said that after a beating he was strangled with the ribbon from his Pour le
Merite (Blue Max). On his head stone is the inscription "Honored by his
enemies-slain by his German brethren."
The kits supplied all the decals that I used. The only thing that had to be made was the work numbers for Werner Voss’s aircraft and I made them by modifying the decals provided by the kit.
|
CONCLUSIONS |
 I started out building four kits, three Roden and one MAC.
However I lost interest in the MAC kit and finished the three Roden kits. Who
knows, maybe some time later I will finish the MAC kit. They are both good kits
I just liked the Roden kits better. You may prefer the MAC offering.
I started out building four kits, three Roden and one MAC.
However I lost interest in the MAC kit and finished the three Roden kits. Who
knows, maybe some time later I will finish the MAC kit. They are both good kits
I just liked the Roden kits better. You may prefer the MAC offering.
The build went much easier than I had thought. I think if you want a new challenge, then one of these kits just may be for you. If you have built any of the DML WWII offerings then you won’t have any problems with these kits. The only new tricks that you will need to learn are.
If you test fit all your parts, the kit is considerably less of a challenge especially the assembly of the upper wing. If you study the rigging diagram and carefully plan your rigging, it to will go smoothly. It took me approximately 30 min. per plane to rig.
I found that the horizontal stabilizer was the hardest part of the whole assembly process. I wish that Roden had taken its cue from the Eduard Albatros D.V in 1:72 scale. The horizontal stabilizer on this kit fits around the fuselage. This would accommodate the different tail sizes of the Pfalz and required less work for the builder.
|
REFERENCES |
Copyright ModelingMadness.com. All rights reserved. No reproduction in part or in whole without express permission.
If you would like your product reviewed fairly and fairly quickly, please contact the editor or see other details in the Note to Contributors.
Back to Reviews Page 2016