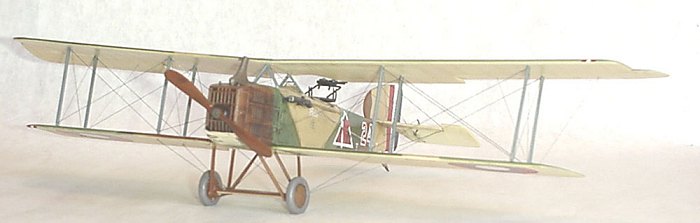
Hi-Tech 1/48 Breguet 14 A2
|
KIT # |
HT 022 |
|
PRICE: |
$39.98 ($33.96 from Squadron) |
|
DECALS: |
One aircraft |
|
REVIEWER: |
|
|
NOTES: |
Short run Multimedia kit |
|
HISTORY |
After the SPAD and the Nieuport fighters, the best known French aircraft would have to be the Breguet 14 bombers and high speed reconnaissance aircraft. The Br 14 started out as the AV 1 and AV 2 experimental aircraft. The AV 2 was to become the venerable Breguet 14 and the AV 1 was dropped.
The Breguet 14 came in two main types the A2 and B2. The French aircraft classification of the latter part of World War I was, A stands for reconnaissance, B for bomber, C for fighter and so on. The number following the letter stood for the number of crewmembers the aircraft was designed for. So B2 is a two seat bomber, the A2 is a two seat reconnaissance aircraft.
Of note was the Breguet 14 B1. This aircraft was designed to bomb Berlin. It could carry 180kg of bombs and stay in the air for SEVEN hours. Even at this, its range was too marginal for such a dangerous trip and the raid was not carried out.
The Breguet 14 B2 could fly at 195-203 km/h with 335 kg of bombs for up to four hours, depending on the engine it had. The Breguet 14 A2, the aircraft that this kit is based on, could fly at 184-195 km/h with a 300kg payload for 2.75 hours.
 When the United States of America entered the First World War, American
strategists believed that a strong bomber force could shorten or even end the
war. So the order went out for bombers. Since the U.S. did not have an
acceptable indigenously built bomber they looked around and settled on the
D.H.4 with the U.S. built Liberty engine. To make a long story short the
numbers and quality could not be achieved. So the U.S. bought French built
A.R.1 and A.R.2 bombers and later replaced them with Salmson 2 A2 and the
Breguet 14s.
When the United States of America entered the First World War, American
strategists believed that a strong bomber force could shorten or even end the
war. So the order went out for bombers. Since the U.S. did not have an
acceptable indigenously built bomber they looked around and settled on the
D.H.4 with the U.S. built Liberty engine. To make a long story short the
numbers and quality could not be achieved. So the U.S. bought French built
A.R.1 and A.R.2 bombers and later replaced them with Salmson 2 A2 and the
Breguet 14s.
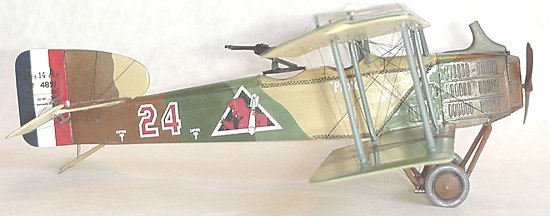
The French initially promised 1500 aircraft but only delivered 290 by 11 November 1918. The first A.E.F. order was for 376 aircraft of these 100 were to be E2s, two seat trainers, 229 were to be A2s, two seat reconnaissance aircraft and 47 were to be B2s, two seat bombers. The first A.E.F. unit to get the new bombers was the 96th Aero Squadron. The 96th Aero began training in December 1917 and became operational in March of 1918. Because of the inexperience of the American pilots and the fact that they were put up against battle hardened pilots of the Imperial German air service, the 96th Aero had high loss rates. In one five day period the 96th lost 16 men and 14 aircraft the highest loss rate of any unit in the A.E.F. The 96th Aero saw the greatest amount of combat for any Breguet 14 unit. The next unit to see the most combat was the 9th Night reconnaissance squadron.
Pilots liked the Br 14, it was fast and maneuverable, could carry large bomb loads with excellent defensive armament and absorb a lot of damage. The Gorrel Report states that, “no stronger ship has probably ever been subjected to harder active service and given such excellent results.” It was widely held among the A.E.F. pilots that the Breguet 14 was the best two seater of the First World War. No fewer than 24 countries operated this aircraft including such countries as Finland, Turkey, Thailand and Brazil.
|
THE KIT |
Please visit the Preview for a look in the box.
The kit comes with enough parts to build either an A2 or B2 variant, however the kit comes with decals to build only one A.E.F. Breguet 14 A2. Blue Rider Decals makes a decal sheet that has decals for a French Breguet 14 B2. So if you can find yourself one of these sheets you can build a B2. The 96th aero flew both A2 and B2 variants, so you could build an A.E.F. Breguet 14 B2 by finding some numbers that would match those used on one of the B2s.
|
CONSTRUCTION |
I started in the usual fashion,
with the cockpit, I did have to narrow it about 3mm to make it fit into the
fuselage. The next one of these kits I build, I will know this before I
start, so I won’t have as much grief. Oh well, what doesn’t kill you only
makes you stronger. While the instructions are not the best, if you follow
them you won’t have too many problems. It is quite straight forward and is
very similar to the early Eduard bombers like the Albatros C.III and Hannover
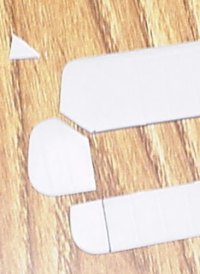
Cl.IIIa. Other then the cockpit the only other problem was to convert the
non-balanced aileron to balanced ones. To do this I cut the non-balanced
aileron off and modified the wing to accept the new tip for the aileron. This
entails cutting a little triangle of the wing tip off after you cut the
aileron off (see pics). The new aileron that is included in the kit is too
short to work and if you follow the instructions the ribs on the aileron won’t
line up with the ribs on the wing. So after some measuring I found that the
best fix for me would be to use only the tip of the balanced aileron and glue
this to the old non-balanced aileron. This worked out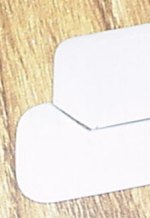 well and looks right.
The Breguets were of very modern construction. The internal structure of these aircraft was mostly duralumin construction so the internal frames of this model were painted gray. I painted the inside of the fuselage radome tan to simulate the fabric covering. I think that the gray internal frame and the radome tan of the outer covering makes for a convincing looking cockpit.
The instrument panel was painted and is a nice photo etched piece. The only bad thing here was that the instrument panel does not come with film instrument faces, and you will have to find something to back the panel with because it has holes where the instrument faces would be. I just backed the panel with some clear plastic sheet and glued instrument faces from other 1/48th scale instrument panel decals to the back of this to make a convincing instrument panel.
 The kit took little filler
putty because while the parts don’t have alignment pins, they fit together
quite well. I did however drill and pin the wings to the fuselage using brass
rod. I love brass rod, this stuff is just about indispensable and I find that
I use it quite often to strengthen joints that may need it. As you can see I
like to build my kits on line drawings that I photocopy from other reference
material. This helps me get everything all squared up and aligned. This is
one of my more technical steps.
The kit took little filler
putty because while the parts don’t have alignment pins, they fit together
quite well. I did however drill and pin the wings to the fuselage using brass
rod. I love brass rod, this stuff is just about indispensable and I find that
I use it quite often to strengthen joints that may need it. As you can see I
like to build my kits on line drawings that I photocopy from other reference
material. This helps me get everything all squared up and aligned. This is
one of my more technical steps.
I put the upper wings together, set the dihedral and let it dry, and strengthened the joint with a strip of scrap photo etch metal. This seemed to work well.
As is my habit I mounted the upper wing by gluing the interplain struts then set the stagger and let this dry. More often then not the cabane struts will give you trouble and this kit didn’t let me down. I had to cut and adjust the A-frame cabanes quite a bit to make them work
You will also have to build a mount for the rhino horn exhaust pipe out of card stock and a brace for the tailskid along with mounts for the front seat. Most of this I built out of stretched sprue. I built the mount for Vickers gun as well as the twin Lewis guns out of brass rod stock for added strength.
In short the only problems that took a little time to fix were the fit of the cockpit, (only because I had it assembled at the time of discovery), and the balanced ailerons. I was quite pleased with the fit of the rest of the kit.
|
CAMOUFLAGE & MARKINGS |
 While the French
camouflage was standardized to four or five colors the actual pattern could
vary quite a bit so it is important to study the aircraft you are building to
see what Breguet 14 camouflage pattern to use.
While the French
camouflage was standardized to four or five colors the actual pattern could
vary quite a bit so it is important to study the aircraft you are building to
see what Breguet 14 camouflage pattern to use.
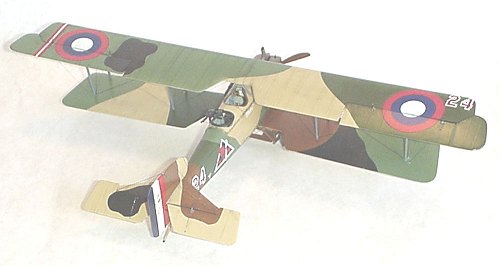
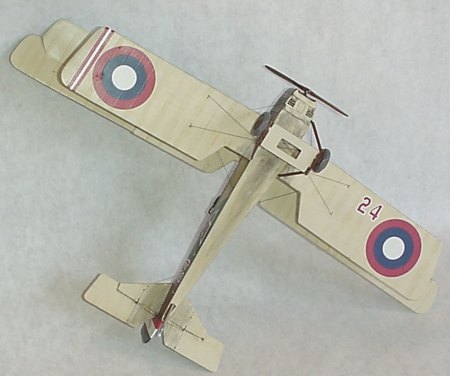
The paint scheme on this kit is the standard French G-4 pattern or the early Michelin-built pattern. I used all Model Masters Paints to paint this kit and masked off the different colors with the blue, low tack, masking tape.
I put on a semi-gloss coat of clear lacquer and decaled it, I find that the decals adhere better if you have a coat of lacquer for them to bond to. After the decals have thoroughly dried, I weathered it with water-based paint. This allows you to use alcohol to remove paint if you over do it with out hurting the thinner based main paint scheme underneath.
After all had dried I mounted the top wing. The top wing mounted without a hitch, a big plus as far as I’m concerned. I rigged the kit using a combination of through the wing and through the strut techniques. Using super glue and fishing line. After a day to cure I mounted the under carriage and rigged it also.
|
CONCLUSIONS |
 In short I really liked
this kit. I know of only two other 1/48th scale kits of the
Breguet 14, the old Aurora injection molded kit and a vac kit of unknown
manufacture. In 1/72nd scale the only ones that you can find are
the Pegasus injection molded kit and the Czech Masters resin kit. It is
important to note that this is the second Breguet 14 offered by HiTech, a few
years back they came out with a Breguet 14 B2. I guess that is why the kit
has all the parts to build a B2 along with the new A2 parts. One good thing
about this kit is the fact that with a little imagination you could build all
of the Breguet 14 variances.
In short I really liked
this kit. I know of only two other 1/48th scale kits of the
Breguet 14, the old Aurora injection molded kit and a vac kit of unknown
manufacture. In 1/72nd scale the only ones that you can find are
the Pegasus injection molded kit and the Czech Masters resin kit. It is
important to note that this is the second Breguet 14 offered by HiTech, a few
years back they came out with a Breguet 14 B2. I guess that is why the kit
has all the parts to build a B2 along with the new A2 parts. One good thing
about this kit is the fact that with a little imagination you could build all
of the Breguet 14 variances.
It you’ve not built a multi-media kit, this may be the one you for to cut your teeth on. The parts all fit well and the little extra work that is expected with a limited run kit is kept to a minimum. The finished kit is large, with a wing span of 12.75 inches and length of 7.25 inches. I assure you it does look impressive next to my other 1/48th scale WWI kits.
The report card
A= The best, easiest and most accurate
F= The worst, most difficult and inaccurate.
Accuracy B+
Fit B Quite good for a multi-media kit.
Ease of construction B- The cockpit needs to be worked to fit and the ailerons.
Aircraft options D You only get one aircraft option.
Decal quality A Accurate and adhere very well, good quality.
Instructions C You will need other references for rigging besides the instructions.
All things considered, it is not for the beginner but a good intermediate kit. If you’re looking for your first short-run multi-media kit, I would highly recommend this kit.
|
REFERENCES |
French Aircraft of the First World War by Dr. James Davilla and Arthur M. Soltan, Flying Machines Press
This is arguably the best publication on French aircraft used or designed during the First World War and well worth the price.
You can find this kit and many others at www.squadron.com
If you would like your product reviewed fairly and fairly quickly, please contact the editor or see other details in the Note to Contributors.