Pegasus 1/72Albatros D.III (Oef) series 53, 153, 253
|
KIT # |
1027 |
|
PRICE: |
£10.99 |
|
DECALS: |
See review |
|
REVIEWER: |
Kyle Bodily |
|
NOTES: |
|
HISTORY |
 After
its success on the Western Front the Austro-Hungarian Empire decided to start
building the Albatros D.II and D.III under licensed contract. Oesterreichiche
Flugzeugfabrik A.G. or Oeffag for short began production of the new Albatros
Fighters in spring 1917. The first production batch was of the D.II
configuration or series 53. The original order was for twenty aircraft, however
only sixteen serial numbers 53.01 to 53.16 were completed before the
strengthened D.III wing was completed and Oeffag started to produce the D.III or
series 53.2. All following aircraft would be of the D.III configuration.
After
its success on the Western Front the Austro-Hungarian Empire decided to start
building the Albatros D.II and D.III under licensed contract. Oesterreichiche
Flugzeugfabrik A.G. or Oeffag for short began production of the new Albatros
Fighters in spring 1917. The first production batch was of the D.II
configuration or series 53. The original order was for twenty aircraft, however
only sixteen serial numbers 53.01 to 53.16 were completed before the
strengthened D.III wing was completed and Oeffag started to produce the D.III or
series 53.2. All following aircraft would be of the D.III configuration.
The reason that they didn’t start out building the D.III was the fact that the Germans were having problems with the narrow cord lower wings. They were weak and had a tendency to break or even come off in combat. This problem plagued the German and OAW built aircraft and marred their service record.
 Oeffag
felt that they could build a better wing and in this they did. In fact the
argument can be made that they built a better Albatros, even better then the
original German built versions. The series 53 and 53.2 all had the 185hp
Austro-Daimler engine.
Oeffag
felt that they could build a better wing and in this they did. In fact the
argument can be made that they built a better Albatros, even better then the
original German built versions. The series 53 and 53.2 all had the 185hp
Austro-Daimler engine.
The next type to come off the assembly line was the 200hp series 153. Because of the excellent redesign of the airframe the aircraft needed little modification to accept the new more powerful engine. This modification bumped up the max airspeed from 112 mph in the series 53/53.2 to 117 mph in the series 153.
The 253 had the 225 hp Austro-Daimler that pushed its maximum speed up to 125 mph. So we have a fighter that is not as fast as a Spad or SE5 but is easily more maneuverable than both and an aircraft that, while is not as maneuverable as a Sopwith Camel, can easily outrun one. With qualities like this it is easy to see why it was liked by the pilots that flew them.
The story of the Oeffag Albatros D.III series 253 did not end with the Armistices. Poland purchased 38 of these fighters after the war. The Polish Air Service was very impressed with the Series253 and sent a letter to Oesterreichiche Flugzeugfabrik A.G. praising their “Exceptional, diligent and thorough work” done on the type.
|
THE KIT |
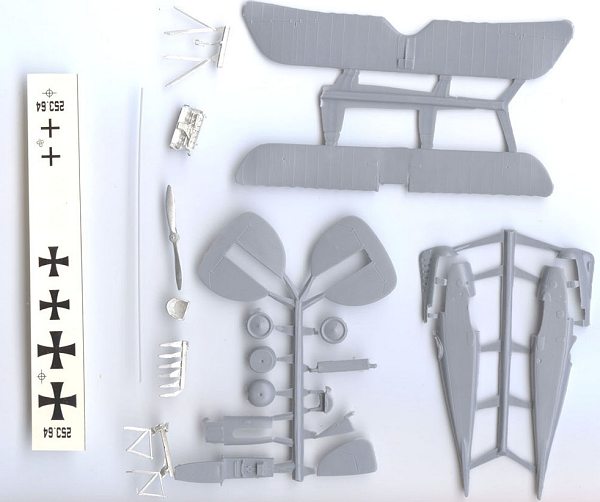
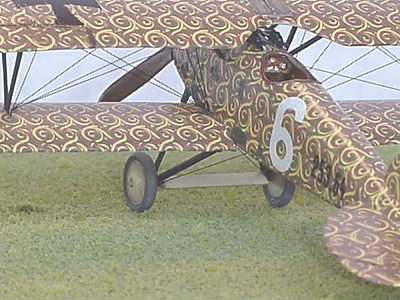
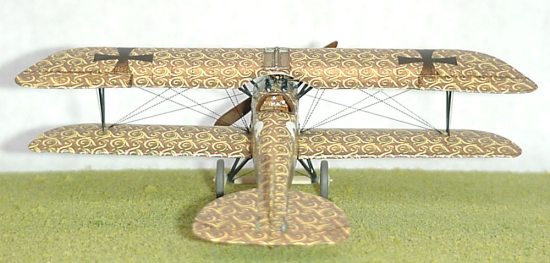
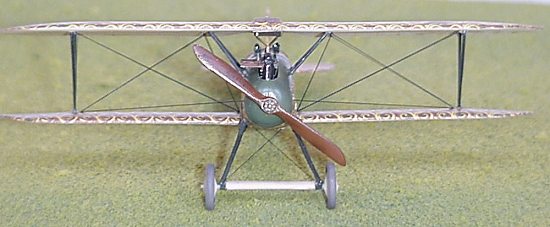
This is a very nice kit. It contains eighteen injection-molded parts, fourteen cast metal parts, one piece of plastic rod and decals for one aircraft of the series 253.
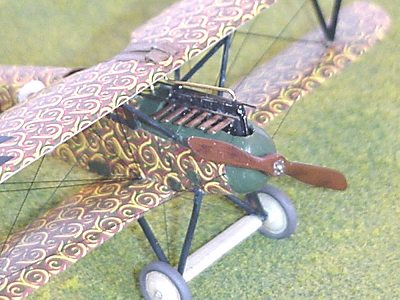
The plastic is the standard Pegasus gray with a little flash and thick molding gates. The parts look nice and the wings have washout. The panel lines and details are nicely reproduced with either raised or engraved lines where appropriate. The cockpit consists of a floor, seat, control column and instrument panel. While adequate, the modeler may want to do some detailing here.
 The
metal parts are also good and the Austro-Daimler engine is nicely reproduced
here. They will take some cleanup, but nothing more than any other cast metal
parts would.
The
metal parts are also good and the Austro-Daimler engine is nicely reproduced
here. They will take some cleanup, but nothing more than any other cast metal
parts would.
The instructions are adequate. One side shows an exploded drawing of the kit and on the other side you get construction notes. On the back of the box you get nice three view drawings. If you have these enlarged to scale you can build the model on them. This allows you to make sure that all the parts are lined up properly.
If you have ever worked with or seen a Pegasus kit, they’re all roughly similar in layout. They are limited run kits however, and when it comes to limited runs they are amongst the simplest to construct. In many ways you will always know what you are in for when you build a Pegasus kit and can prepare your self. I’ve found that they are easier to build then the stories make them out to be. Also it is better to prepare for a difficult build and find that it was not that bad then to think you are in for a cake walk and find it’s over your head.
|
CONSTRUCTION |
This kit is strait forward. Like all
Albatros fighters I painted the insides of the fuselage, instrument panel and
cockpit floor wood. I then use oil paints of varying shades of brown tan and
yellow to simulate the wood grain. The cockpit went together well. However the
cockpit floor is too narrow to center in the fuselage. I glued some pieces of
card stock to the 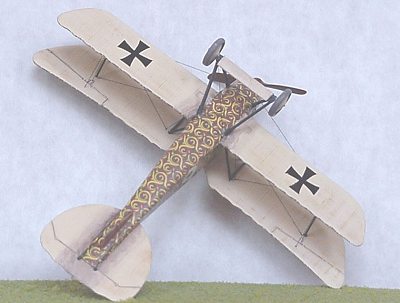 sides of the
fuselage and mounted the floor to this. I put on the forward cowling and placed
the engine in the nose of the model and added card stock to allow the engine to
sit at the correct height.
sides of the
fuselage and mounted the floor to this. I put on the forward cowling and placed
the engine in the nose of the model and added card stock to allow the engine to
sit at the correct height.
I cleaned up all the flash and after masking off the cockpit and engine I prepared the rest of the kit to receive a light coat of Radome Tan to facilitate the decals. I find this to be a good neutral color to apply decals on.
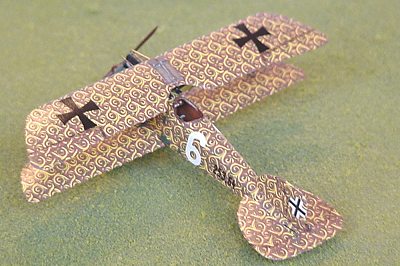
The Blue Rider Sworl decals are quite nice and went on well. The other decals were the ones supplied with the kit. Pegasus decals are very very thin so don’t try to slide them off to soon because they will break up, and don’t use decal solvents because they adhere just fine.
The aircraft that I wanted to build had the Schwarslose machine guns mounted on top of the fuselage and the kit only had the option of buried MGs. I built them from scratch using the drawing on page 523 of Austro-Hungarian Army Aircraft of World War One. This book is almost indispensable if you really want to study A-H aircraft. I built the blast tubes from piano wire and mounted them on top of the fuselage.
The one snag with this kit was the cabane struts needed to be a bit longer. Well Roden to the rescue. I had built their Albatros D.I earlier and saved the left over inter plane struts and pulled them out of the spares box and trimmed them to fit and was done. The rest of the kit went together without further incident. The secret here is test fit, test fit, test fit then test fit again. If you follow this admonition you will have a much easier go of it on matter what you’re building.
|
CAMOUFLAGE & MARKINGS |
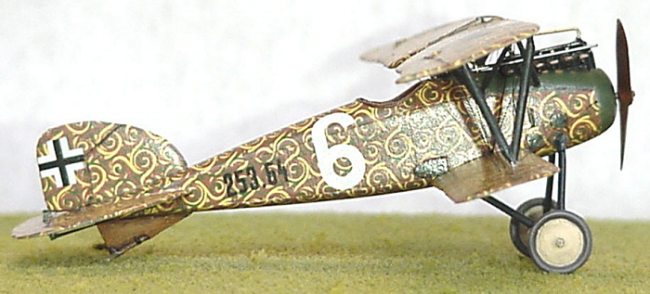
 This aircraft represents one that was flown by Offizierstellvertreter Friedrich
Hefty (5 confirmed and 4 unconfirmed victories). He was the third most highly
decorated NCO in the LFT (Luftfahrtruppen or aviation troops). He was one of
the first people to use a parachute in combat when his Albatros 253.71 burst
into flames from a punctured fuel tank.
This aircraft represents one that was flown by Offizierstellvertreter Friedrich
Hefty (5 confirmed and 4 unconfirmed victories). He was the third most highly
decorated NCO in the LFT (Luftfahrtruppen or aviation troops). He was one of
the first people to use a parachute in combat when his Albatros 253.71 burst
into flames from a punctured fuel tank.
After the war he fought for Hungary against the invading Romanians, Serbians and Czechs and was imprisoned by the short-lived Communist government. He also flew for several airlines including Air France.
In WWII he flew as a Lieutenant in the Royal Hungarian Air Force. After his release from a POW camp in Germany he returned home to Hungary. Not happy with the post war Communist government he immigrated to the United States and lived in Detroit, Michigan. He was very active in aviation up until his death on 20 January 1965
|
CONCLUSIONS |
 This was
not a real hard kit but not the easiest either. I would recommend it to anyone
with average skills. The decals are not that difficult and would save you hours
and hours of painting to reproduce. I cut the borders off the decal and placed
the parts to be decaled on the back of the decal sheet and traced the parts. I
cut them out just a bit larger than the outline, you can always trim the decals
but it is very hard to make them bigger after you cut them. This is when you
need to use decal softening solvents and a lot of patience. You may want to
practice on something first and get the hang of how the decals will react. Just
take your time and you will be very happy with the results.
This was
not a real hard kit but not the easiest either. I would recommend it to anyone
with average skills. The decals are not that difficult and would save you hours
and hours of painting to reproduce. I cut the borders off the decal and placed
the parts to be decaled on the back of the decal sheet and traced the parts. I
cut them out just a bit larger than the outline, you can always trim the decals
but it is very hard to make them bigger after you cut them. This is when you
need to use decal softening solvents and a lot of patience. You may want to
practice on something first and get the hang of how the decals will react. Just
take your time and you will be very happy with the results.
The report card
A= The best, easiest and most accurate
F= The worst, most difficult and inaccurate.
Accuracy B It scales well, wings are a tad thick
Fit B The problems with the cockpit floor, cabane struts and flash
Ease of construction B see the above
Aircraft options C+ Parts for all three aircraft series 53.2,153 and 253, one decal option
Decal quality B+ Thin, accurate and adhere without solvents or setting solution
Instructions C- More complete instructions would make the build easier
You have to admit that it looks good and will catch the eye of just about anyone. My daughter says that the pattern on the aircraft ”looks like Grandma’s carpet”, well something for everyone right, that’s what this hobby is all about.
|
REFERENCES |
Austro-Hungarian Army Aircraft of World War One, by Peter M. Grosz, George Haddow and Peter Schiemer
Air Aces of the Austro-Hungarian Empire 1914-1918 by the late Dr. Martin O’Conner
Austro-Hungarian Aces of World War 1 by Christopher Chant
Osprey Aircraft of the Aces #46
Albatros Fighters in action, Squadron/signal publications No.46
Albatros (OEF) D.III: Albatros Publications No.19
If you would like your product reviewed fairly and quickly, please contact me or see other details in the Note to Contributors.