
Trumpeter 1/35 SA-2 Guideline with launcher
| KIT #: | 00206 |
| PRICE: | SGD$19.00 |
| DECALS: | One option |
| REVIEWER: | Ewart Yong |
| NOTES: | Built OOB |
| HISTORY |
 None that I care to find
out about, since I primarily built this kit as a deviation from my usual
aircraft subjects to contain growing symptoms of AMS.
None that I care to find
out about, since I primarily built this kit as a deviation from my usual
aircraft subjects to contain growing symptoms of AMS.
| THE KIT |
The kit comes in a sturdy top opening box with a not-too-great box art. Sprues are packed in two separate bags, one for the missile and the other for the launcher. Parts are very crisply molded and detail seems well represented. These are molded in light gray and dark green for the missile and launcher respectively. There is a very comprehensive decal sheet included for the missile with lots of stencils. The instruction sheet is clear with no ambiguities with painting callouts referencing Gunze paints. I must say I was truly impressed with the initial inspection of the parts. For a look at what comes in the box, please visit the preview.
| CONSTRUCTION |
Let me begin this section
by qualifying that I am not an armor modeler. When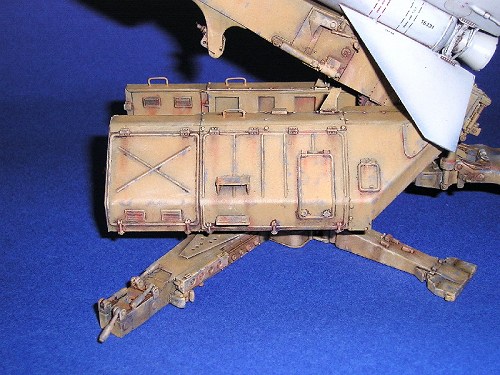 I bought this kit, the price and the unusual subject (to me at least, I
usually model aircraft in 1/48 scale) coupled by the fact that it was the
last kit on the shelves made me snap it up immediately.
I bought this kit, the price and the unusual subject (to me at least, I
usually model aircraft in 1/48 scale) coupled by the fact that it was the
last kit on the shelves made me snap it up immediately.
Construction was very straightforward. I started with the missile and finished it in two evenings while glued to the TV. There was no filling required and I only needed to lightly sand down the seam lines of the two halves for the missile and booster section once the glue had set.
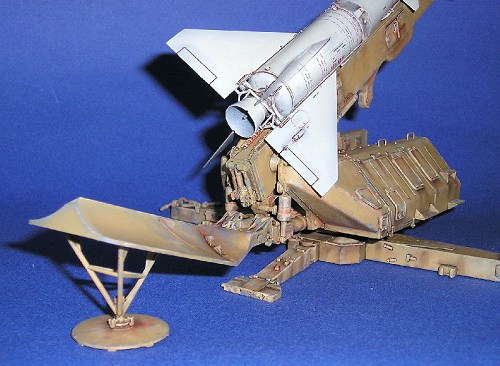
I proceeded to assemble the launcher next. This also went on without much incident except for some parts where the instruction stated that no glue was required and some really small parts which thankfully were not lost to the carpet monster. I could not really figure out how the ‘do not glue’ portions were relevant, since the only moving section was the elevating launcher rails. Minor filling was required on certain portions though. By another couple of evenings, I had six sub assemblies; the launcher rail, the base, the two control modules (?), the deflector plate and the little thingy connecting the two control modules.
| COLORS & MARKINGS |
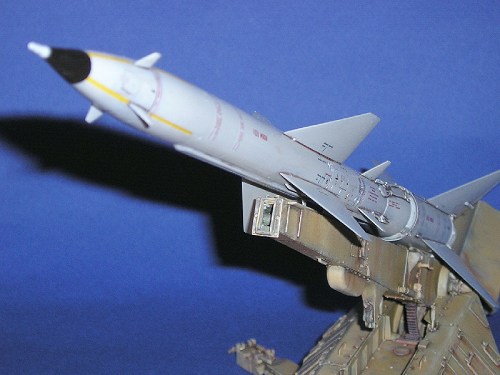
 I started painting by pre
shading the missile with Testors flat black on appropriate panel lines and
recesses. Once dried, I applied two light coats of Humbrol gloss light
aircraft gray on the missile. Thankfully, the entire missile was one
colour so the only problem I had during painting was how to hold the darn
thing. I solved this by painting the missile in two sessions, tackling the
missile itself and the booster in separate sessions. Thus, I had a very
convenient handle when I was tacking each section of the missile assembly.
I brush painted the nose black and detonator (?) sliver to add some tonal
variation to an otherwise boring scheme. The decals were then applied.
The application of the numerous stencils was the most time-consuming part
of this project and I took another two evenings to complete this process.
The decals reacted very well to Aeromaster Set and Sol and Trumpeter must
be congratulated for supplying such a comprehensive decal sheet. Once the
decals had set, I used my usual black/brown water-colour and kitchen
cleaner cocktail to accentuate details. Surprisingly, some photos of this
missile especially in desert service show that it is quite weathered. I
always thought that the munitions portion of most weapons systems like
these would be in relatively pristine condition. Once done, a coat of
semi-gloss varnish was sprayed on the missile.
I started painting by pre
shading the missile with Testors flat black on appropriate panel lines and
recesses. Once dried, I applied two light coats of Humbrol gloss light
aircraft gray on the missile. Thankfully, the entire missile was one
colour so the only problem I had during painting was how to hold the darn
thing. I solved this by painting the missile in two sessions, tackling the
missile itself and the booster in separate sessions. Thus, I had a very
convenient handle when I was tacking each section of the missile assembly.
I brush painted the nose black and detonator (?) sliver to add some tonal
variation to an otherwise boring scheme. The decals were then applied.
The application of the numerous stencils was the most time-consuming part
of this project and I took another two evenings to complete this process.
The decals reacted very well to Aeromaster Set and Sol and Trumpeter must
be congratulated for supplying such a comprehensive decal sheet. Once the
decals had set, I used my usual black/brown water-colour and kitchen
cleaner cocktail to accentuate details. Surprisingly, some photos of this
missile especially in desert service show that it is quite weathered. I
always thought that the munitions portion of most weapons systems like
these would be in relatively pristine condition. Once done, a coat of
semi-gloss varnish was sprayed on the missile.
 I turned my attention to
the launcher next. Since it is molded in dark green and I wanted the
Syrian version in the desert sand scheme, I primed all the subassemblies
with white automotive lacquer from a spray can. Pre shading with black on
the appropriate places was done again. The final colour was Tamiya desert
sand enamel applied lightly so that the pre shading would show. Several
coats of Testors Glosscote were then sprayed before my usual wash was
applied to weather and accentuate details. Paint chipping was done using
neutral gray on certain areas. The sub-assemblies were then sprayed with a
coat of Testors Dullcote from a can. The base coat lightened with about 30
percent white was then dry brushed on the raised areas to highlight the
beautiful detail. Dark brown pastel chalk powder was then applied to
simulate rust stains on some areas before the sub-assemblies were finally
sealed with another application of Dullcote from the spray can.
I turned my attention to
the launcher next. Since it is molded in dark green and I wanted the
Syrian version in the desert sand scheme, I primed all the subassemblies
with white automotive lacquer from a spray can. Pre shading with black on
the appropriate places was done again. The final colour was Tamiya desert
sand enamel applied lightly so that the pre shading would show. Several
coats of Testors Glosscote were then sprayed before my usual wash was
applied to weather and accentuate details. Paint chipping was done using
neutral gray on certain areas. The sub-assemblies were then sprayed with a
coat of Testors Dullcote from a can. The base coat lightened with about 30
percent white was then dry brushed on the raised areas to highlight the
beautiful detail. Dark brown pastel chalk powder was then applied to
simulate rust stains on some areas before the sub-assemblies were finally
sealed with another application of Dullcote from the spray can.
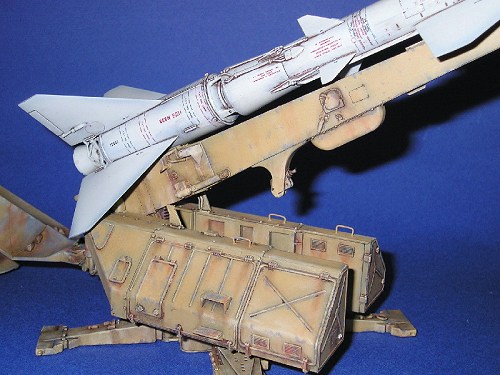
All the various launcher sub-assemblies were then glued together after ascertaining the correct elevation of the missile. I decided not to make the launcher arm movable and determined the final elevation based on my available display shelf height.
| CONCLUSIONS |
 This was a really
enjoyable project with which took only several evenings of assembly and two
weekends of painting and decaling. It would have been nice if Trumpeter
had included a figure or two with the kit to give a feeling of size. Like
I said, I am no armor modeler and there may be several glitches which you
dedicated armor fans may spot. Do feel free to point them out to me, who
knows I might even build another armor model…
This was a really
enjoyable project with which took only several evenings of assembly and two
weekends of painting and decaling. It would have been nice if Trumpeter
had included a figure or two with the kit to give a feeling of size. Like
I said, I am no armor modeler and there may be several glitches which you
dedicated armor fans may spot. Do feel free to point them out to me, who
knows I might even build another armor model…
| REFERENCES |
Several websites using “SA-2 Guideline” in the search field.
December 2004
If you would like your product reviewed fairly and fairly quickly, please contact the editor or see other details in the Note to Contributors.