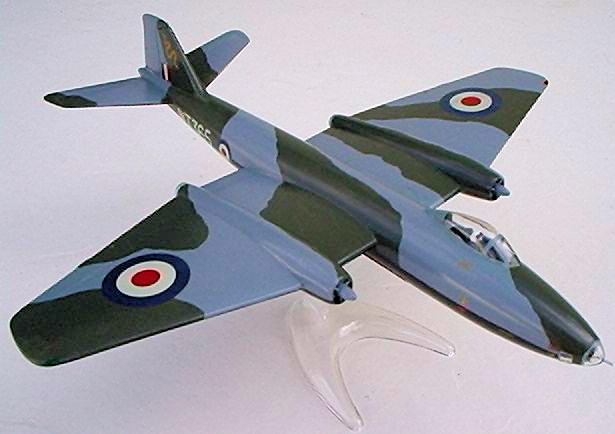
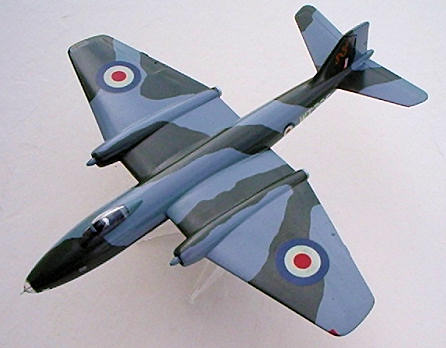
Eastern Express/Frog 1/72 Canberra B((I)8
| KIT #: | 72265/F.203 |
| PRICE: | $20.00 |
| DECALS: | Two options |
| REVIEWER: | David Womby |
| NOTES: | Frog Molding |
| HISTORY |
The Canberra, like the Hunter, is one of the great British
post-WW2 success stories.
The initial versions were medium bombers but in 1954 the
first B(I)8 was flown. This version was the first to have the fighter style
canopy and was designed as a night interdictor for use in the European theatre.
As well as RAF use as the B(I)8, the B(I)12 and
B(I)58 export versions served with the air forces of South Africa, New Zealand,
India, Peru and Venezuela.
The full story of the Canberra can be found here:
| THE KIT |
 Frog were the first to issue a 1/72 Canberra when they
issued a very basic PR3 back in the 50s.
I think the next 1/72 issued was Airfix's B(I)6 and,
if I recall correctly, the Frog F.203 kit of the B(I)8/12 came out soon after
that.
Over the years it has been sold by Novo, Revell Germany
(with nice decals for RAF 3 squadron, Chematic and those unnamed Russian issues
with nasty surprises like mustard yellow plastic!
Frog were the first to issue a 1/72 Canberra when they
issued a very basic PR3 back in the 50s.
I think the next 1/72 issued was Airfix's B(I)6 and,
if I recall correctly, the Frog F.203 kit of the B(I)8/12 came out soon after
that.
Over the years it has been sold by Novo, Revell Germany
(with nice decals for RAF 3 squadron, Chematic and those unnamed Russian issues
with nasty surprises like mustard yellow plastic!
The only parts options were a choice
of bomb bay doors – with or without the 4 cannon belly mounted gun pack - and
the different antennae needed to model the B(I)12 .
You also have a choice to fit or omit the tip tanks.
There are no parts for the underwing pylons that were fitted to this mark of Canberra (one pylon each side). You will have to steal them from the Airfix B(I)6 or scratchbuild them if you want to model an aircraft with an underwing weapons load. I am not sure but I think this mark of Canberra could mount bombs, SNEB pods or AS30 missiles underwing.
The undercarriage can be assembled
raised or lowered and a nice set of closed doors is provided that fit well.
I build all my aircraft in flight but noticed the
nose wheels do not have the mudguards that some Canberras had – I do not know if
that is an omission by Frog or if the real B(I)8/12 had those deleted.
The mainwheel wells are not boxed in but that would
be easy for a modeller to do.
The m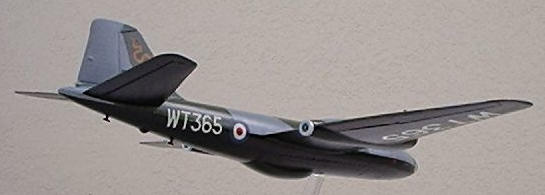 ainwheel doors for the lowered undercarriage
are nicely made and are unusual in that they have the sculpted inner shape so
the undercarriage leg is recessed a bit into the door.
All the wheel hubs look good but there's no tyre
tread.
I would bet this would be a bad tail sitter if built
'wheels down'.
ainwheel doors for the lowered undercarriage
are nicely made and are unusual in that they have the sculpted inner shape so
the undercarriage leg is recessed a bit into the door.
All the wheel hubs look good but there's no tyre
tread.
I would bet this would be a bad tail sitter if built
'wheels down'.
The original Frog kit came with decals for a camouflaged RAF B(I)8 of 88 squadron with the early scheme that had black undersides and an all over silver SAAF B(I)12. My Eastern Express boxing had very attractive decals for a later RAF machine from 16 squadron with High Speed Silver undersides and a sharkmouth. The scheme is accurate and quite appealing but the serial given - XM260 – is totally fictitious! If you want to model this sharkmouth scheme, may I suggest serials XM264 or XM277?
| CONSTRUCTION |
I built this quickly as I am trying to avoid AMS and it was an easy kit.
As with any older kit, I did a lot of test fitting and so was prepared to deal with some of the issues before I had glue on the parts!!! The fit was actually pretty good for the kit's vintage and the seams needed little filling. However, this moulding lacked real locating pins for the fuselage so I glued strips of sprue along the edges to provide ensure alignment and to reinforce the joins -especially the long upper fuselage joint.
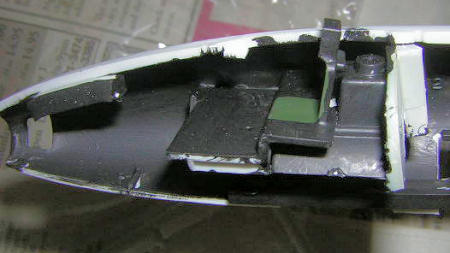 I added a some bulkheads to the
cockpit to make things a bit less see through but nothing else as
very little would be visible when the fuselage was
closed up.
I painted the interior black except for the seat
cushion which I painted green.
As my aircraft are built 'in flight', the pilot
was given a basic paint job including a white bone dome.
I added a some bulkheads to the
cockpit to make things a bit less see through but nothing else as
very little would be visible when the fuselage was
closed up.
I painted the interior black except for the seat
cushion which I painted green.
As my aircraft are built 'in flight', the pilot
was given a basic paint job including a white bone dome.
The wing to fuselage joins were very sloppy. I ended up using strips of 10 thou plastic card glued in the joints as shims to get wing dihedrals looking right and to fill the gaps in the wing roots. The lower wing root joins took 3 shims of 10 thou!
There was a moderate amount of puttying needed on all the joints, fuselage, wings and tailplanes. I used my usual – Bondo automotive spot and glazing putty.
 Neither bomb bay fitted well.
They both seemed a tiny bit too wide and left a
ridge along the hinge line.
However, looking at walkaround pics, I saw there was
a small flange or strake that ran along this hinge line so I left that join
showing as it conveys an impression of
that flange on the real aircraft (and because I am a
lazy modeller). The leading edges of the bay doors stand a bit proud of the kit
fuselage too but I left it that way.
Neither bomb bay fitted well.
They both seemed a tiny bit too wide and left a
ridge along the hinge line.
However, looking at walkaround pics, I saw there was
a small flange or strake that ran along this hinge line so I left that join
showing as it conveys an impression of
that flange on the real aircraft (and because I am a
lazy modeller). The leading edges of the bay doors stand a bit proud of the kit
fuselage too but I left it that way.
I wanted to fit my model with the belly gun pack. The cannon troughs were there but just small depressions so I opened them up a bit with a rat tailed file but they probably would benefit from a better reaming out than I could give. When the gun pack was fitted, only the front half of the bomb bay opened. I scribed the extra join across the bomb bay doors ahead of the gun pack as the kit did not have this.
The engine intakes were a pretty good
fit after the fronts of the nacelles were sanded flat and needed only a little
putty work to fair them in.
Unfortunately, they are moulded as solid and are
very shallow.
I decided I couldn't do anything about that, so I just made
do with a black wash in there when I finished painting.
However, I do pre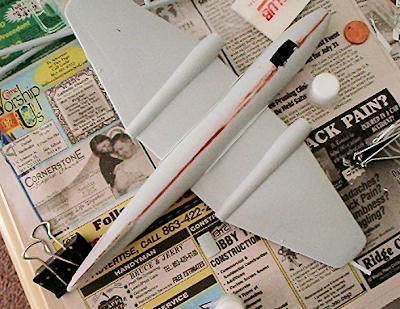 fer them this way rather than the
Airfix B(I)6 kit which leaves hard to remove joints inside the intake lip.
fer them this way rather than the
Airfix B(I)6 kit which leaves hard to remove joints inside the intake lip.
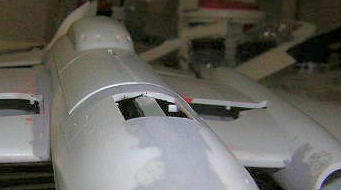
The clear parts are thick and a bit distorting. Apart from the canopy and nose dome, there are three windows in the fuselage. There is one each side of the nose which are fitted from the outside. The third is a small window for the navigator (?) just ahead and below the canopy. This should be fitted from inside but I omitted it and filled the gap with white glue after painting was completed. My canopy had a small chunk missing on the lower starboard edge but I managed to fill it passably with white glue. The canopy, nose glazing and glazing each side of the nose all fitted well.
I omitted the wing tip tanks as my research indicated they were often not carried by RAF Germany Canberra interdictors.
The kit did not include a stand but I opened up the slot in the bomb bay anyway and used a spare Airfix stand. How I wish manufacturers would provide pilots and stands in their kits these days!!!!
| COLORS & MARKINGS |
Paul Bradley kindly gave me an old set
of markings from the original Frog F.203 issue and I decided I wanted to build
the 88 squadron machine.
The B(I)8 in RAF service was a night interdictor
deployed with RAF Germany.
The standard upper scheme of Dark Sea Grey and Dark
Green was applied but the lower surfaces were black.
I also believe from photos that this scheme did NOT
have wraparound leading edges – a horrible British idea where the camo carries
on to the first 4 inches or so of the lower leading edges.
I find that so annoying to paint!!!!
So even if they did have wraparound edges on this
scheme, mine doesn't have them
I primed the kit using Testors rattle can primer grey. This was pretty close match to RAF Dark Sea Grey. I must say that the Canberra looked pretty cool in an all over grey scheme! Anyway, I brush painted the green on using ModelMaster Acryl 4849 RAF Dark Green. This paint brushed well and one coat provided all the coverage I needed.
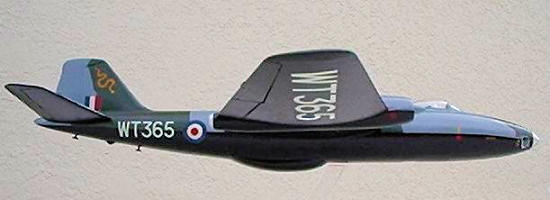 The demarcation line between the black
undersides and the upper colours needed careful study.
It is not horizontal but, from what I can tell
looking at photos, runs slightly downwards from the mid point of the tail cone
to the rear edge of the wings and then from the leading edge of the wings
downward to the mid point of the nose glazing EXCEPT that just below the canopy,
the demarcation line angles down a little steeper and so ends just a bit lower
than the mid point of the nose glazing.
It is hard to see from some angles but there a few
photos that show this clearly in the superb website 'A Tribute to the English
Electric Canberra' created by Les Bywaters.
The clearest picture I could find of the demarcation
line was this one:
http://www.bywat.co.uk/wt328big.html
The demarcation line between the black
undersides and the upper colours needed careful study.
It is not horizontal but, from what I can tell
looking at photos, runs slightly downwards from the mid point of the tail cone
to the rear edge of the wings and then from the leading edge of the wings
downward to the mid point of the nose glazing EXCEPT that just below the canopy,
the demarcation line angles down a little steeper and so ends just a bit lower
than the mid point of the nose glazing.
It is hard to see from some angles but there a few
photos that show this clearly in the superb website 'A Tribute to the English
Electric Canberra' created by Les Bywaters.
The clearest picture I could find of the demarcation
line was this one:
http://www.bywat.co.uk/wt328big.html
Unfortunately, my brush painting was
not too successful this time – the black undersides paint went on a little thick
(I knew it and should have stopped and thinned it a bit) and showed a few brush
marks.
I used ModelMaster Acryl 4768 Flat Black and it had worked
very well for me for details and interiors on the last half dozen or so planes I
have brush painted.
I'll need to watch out for it thickening in the
bottles over time.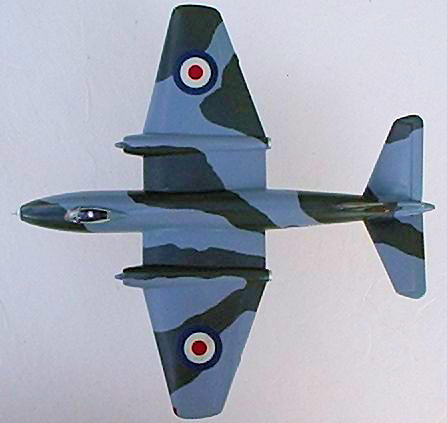
The exhausts were painted silver and attached. They are a bit thick and would look better drilled out or replaced with something with thinner lips. As the final touch, the small window in the port fuselage below the canopy was filled with some white glue. It didn't dry totally clear. I think this is because of humidity in the air. It needed two applications of white glue as the first sat too recessed into the fuselage. The second layer made the window more flush with the fuselage skin.
The old Frog decals are about 30 years old. They responded well to two days in the Florida sun to fade most of the yellowing away although they still have a slight tinge to them and I probably should have left them in the sun for another day or two. The white is also a bit translucent. The first roundel I applied split into three pieces! With some cursing and careful manoeuvring it ended up looking not too bad. So, I brushed a coat Future onto the remaining decals before applying them. Not enough! One of the underwing serials cracked up badly at one end and needed some touch up when dried. I applied a second coat of Future to the rest of the decals before applying and had no further breakages. Once applied, the whole model got another brushing with Future.
I didn't do any weathering. Typically the Canberras of RAF Germany look pretty clean in pics from the early 60s although I probably should put on smoke stains from the starter cartridges!
| CONCLUSIONS |
Another fairly relaxed nostalgia build. There's apparently a new 1/72 Canberra B(I)8 on it's way from Airfix that will doubtless be superior to this one but, if you want an easy build that's basically accurate, this old kit is fun and really looks the part.
| REFERENCES |
http://www.bywat.co.uk/ - Les Bywaters' excellent website.
October 2008
Copyright ModelingMadness.com
If you would like your product reviewed fairly and fairly quickly, please contact the editor or see other details in the Note to Contributors.
Back to the Review Index Page 2020