Trumpeter 1/32 A-1H Skyraider
| KIT #: | 02253 |
| PRICE: | $90.00 or so |
| DECALS: | Two options |
| REVIEWER: | Donald Zhou |
| NOTES: | Advantages: Well detailed, plenty of weapons and Big. Disadvantages: Some shape discrepancies, Trumpeter infamous mind fart, and contains two toilet bombs but no marking for “Paper Tiger II”. P.S. Brengun 1/32 Paper Tiger II markings used |
| HISTORY |
So much were said about the Able Dog that it is really redundant to say anything else here. Just check out Mr. Tom Cleaver’s review of the Zukei Mura kit to get a good history on this bird. However, there is one bird that deserves a special mention.
VA-25 Paper Tiger II
The story of Paper Tiger II started way back in 1965. In October of that year, with the six millionth pound of ordinance dropped by the Skyraider coming up, the good folks at VA-25 thought they have to do something to celebrate. Several nights before, a captain found an old toilet in the trash heap….It was slated to be dumped overboard since it was damaged. The crew and crew chiefs decided to repurpose it for something special.
 Over several nights, the crew chiefs rigged
up a mounting frame around the toilet, added a “fuse”, and then
collected a tail fin from a 100lbs bomb and shacked it onto the special
“bomb” now called “Sani-flush”.
Over several nights, the crew chiefs rigged
up a mounting frame around the toilet, added a “fuse”, and then
collected a tail fin from a 100lbs bomb and shacked it onto the special
“bomb” now called “Sani-flush”.
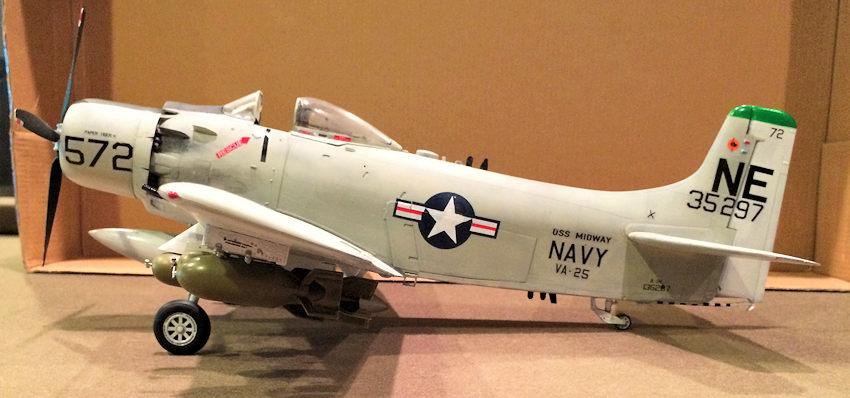
The next day, this bomb was specially mounted onto a Skyraider “572”, which was about to fly off for a mission. They crew did it especially in the hanger and quietly so as few people will notice what they were doing. The plane itself will be flown by CRMD “Bill” Stoddard and was specially named “Paper Tiger II” for this one occasion. As it was taxied on its way to the catapult, several men hung around the right wing to hide the “special payload” away from prying eyes, especially the air boss. The Air Boss though, eventually did found out. Just as the catapult was ready to activate, he spotted it. “What is that F_____ Thing on 572’s……..” That was as far as he got before the Cat activated and sent Paper Tiger II on its way.
As the plane approached the target area, the crew contacted the FAC and reported off its payload. To say the FAC was surprised by its payload was to say the least. He had to come by to take a closer look at “Sani-flush”.
So he got close and took a look around and yep, there it was, that toilet under the wing.
The special package was dropped in a shallow dive and as everyone there remembered, it whistled all the way down…Even though despite the fact the crew did everything, including grafting a tail fin on to it, when dropped the thing still flew straight back up and almost took the right horizontal stabilizer right off! Still, there was plenty of jokes flying around when the mission was completed, including not so subtle hint about giving the VC some STD’s during that mission!
However, the sad news was CMRD Stoddard did not make it. Several months later, while flying a mission in the Mekong, he was shot down by a SAM. He was declared MIA at first but that was changed to KIA later, one of the many lives lost in that mud hole of a conflict that destroyed America’s innocence and scared a generation of young men for life.
| THE KIT |
Go to the preview of the
early A-1 for a good description of this kit. Yes, that is the A-1D kit
but the A-1H kit is the exact same thing except the belly fuselage portion.
In this case, it has the correct bolted on belly armor. The rest of the A-1H
parts are already in the original A-1D and the instructio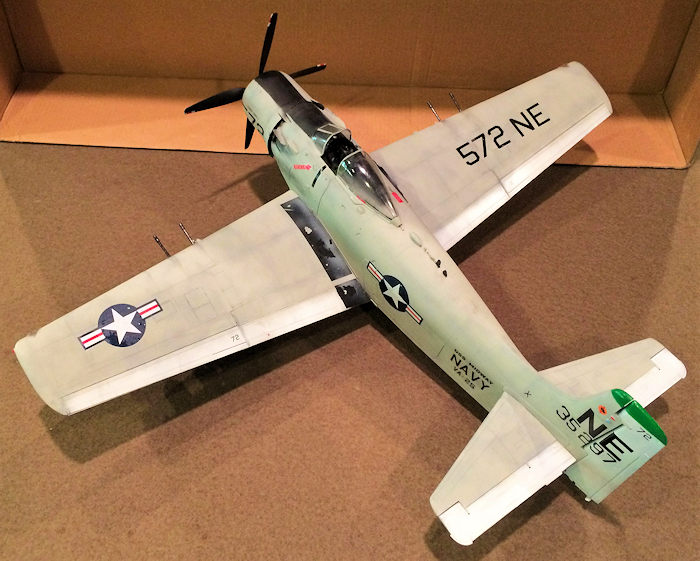 ns are exactly the
same! So everything else apply.
ns are exactly the
same! So everything else apply.
There are two markings for the kit. One is the Papoose 412, one of the A-1H that participated in shooting down of a MIG-17. That bird is already described in detail by Mr. Clever himself and yes, the reason why this marking was included in every single other A-1 kit is pretty obvious….What with that big hornet on the tail….The other is an Air Force “Sandy” bird in the standard SE Asia three tone camo markings. I’m not interested in any of those. The one I want is Paper Tiger II off of VA-25 (the only other squadron that shot down a MIG-17) which…due to another one of those infamous Trumpeter mind farts, was not in the kit….Even though not one, but two of the famous “Sani-flushes” are in the kit! Sigh, trawling through the web, I found out a British company Brengun makes the marking for Paper Tiger II for various scales (1/48, 1/72 and now 1/32) and include their own resin Sani-flush too…..It was expensive due to the exchange rate and I need to spend at least $50 for them to deliver it across the pond so I had to order a Star Wars “Plo-Kun” Jedi Starfighter off of them! Which made the price quite insane! Ohh well, after thinking of offloading the Jedi Starfighter on eBay, I thought better of it and kept it. One of these days, after my son grows to the correct age, I might get him started on this hobby and that kit is actually a really good starter since it is already colored and a snap fit kit with just the right amount of parts to keep him occupied without getting him bored.
| CONSTRUCTION |
See my review of the
A-1D kit for the general construction tips. This is because the
construction again, is the same as the A-1D kit. The only exception this
time around is that I unfolded the wings, and anything that was opened
(cowls, speed brakes etc) ar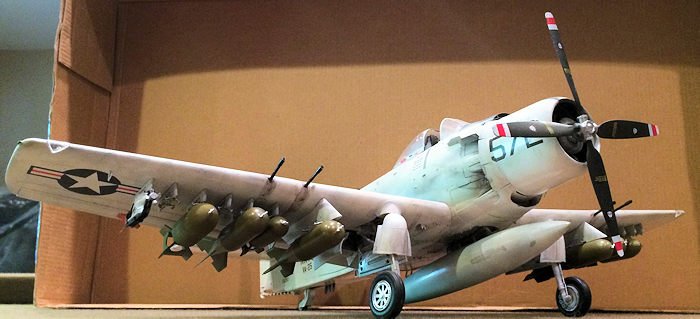 e closed. So the construction tips here deals
mainly with those.
e closed. So the construction tips here deals
mainly with those.
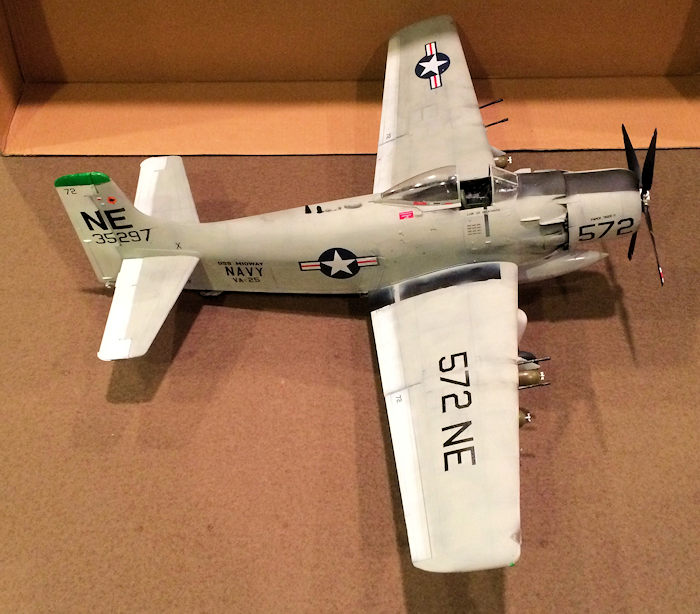
Construction started with the wings. I did the top first by adding plastic strips to strengthen the joint from the bottom, then ran superglue through the seams for a nice tough joint. The 20mm gun breech was added so as to have a “holder” for the barrels, which will not be added until final construction. The ammo loading hatches are closed up before the bottom wings are joined and then the assembly is added to the bottom central fuselage. All control surfaces was left off since they are white top and bottom.
Cockpit and fuselage assembly was pretty straightforward. The cockpit color this time around is light ghost grey with the seat being green zinc chromate. A good wash bring everything out. Just be aware that there are two coamings. Read the instruction carefully for the correct one. Seat belts are not added since I will crew this bird with a figure eventually.
Engine this time around was haphazard built and painted due to the fact it will mostly be hidden deep inside its closed cowling. Just becareful of all the little flaps that are located in front of the cowl. Read the instructions carefully on what is where due to the fact it is not all that clear in this case. After that was done, the fuselage is then mated to the wings. Time to hit the paint shop!
| COLORS & MARKINGS |
After a good Tamiya flat black wash, the model was painted with insignia white first, this include all the separate control surfaces. Then the white was blasted to the bottom of the plane, including the landing gears and doors.
A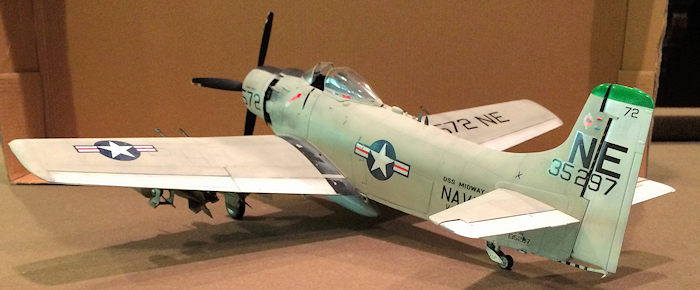 fter that was done, the model was taped off and
the top side was painted with light gull grey. The model was also heavily
weathered since there was no Skyraider that is clean per say. It was only
after everything was nearly done that I took a look at photo of the original
bird and realized that Paper Tiger II was actually a pretty clean looking!
Seemed the crew chiefs cleaned the bird up as best as they could before its
special mission. The only two really bad dirty spots are the exhaust areas.
Sighing, I had to go back and blasts more light gull grey to the top of the
fuselage to clean the bird up a bit and tone down the dirt around the
exhaust areas to get that clean look for the bird.
fter that was done, the model was taped off and
the top side was painted with light gull grey. The model was also heavily
weathered since there was no Skyraider that is clean per say. It was only
after everything was nearly done that I took a look at photo of the original
bird and realized that Paper Tiger II was actually a pretty clean looking!
Seemed the crew chiefs cleaned the bird up as best as they could before its
special mission. The only two really bad dirty spots are the exhaust areas.
Sighing, I had to go back and blasts more light gull grey to the top of the
fuselage to clean the bird up a bit and tone down the dirt around the
exhaust areas to get that clean look for the bird.
Decals can now be started. I had to use the few stencils and the national insignias from the kit. These went on without any problems except the black walkway decals. I didn’t put it down well enough and it came off even after a coating of Mr. Marks Softer and I ripped the left one to bits with my fingers….Sigh, teaches you to be impatient! This means I had to tape it off and blasts some flat black onto it…Which end up looking better than the decals except some of the black made their way onto the fuselage! This means I have to apply some light gull grey again…Grrr….. It’s also at this point that I added the black anti-glare shield on the nose. The rest of the kit decals went on without any problems. The Brengun decals were another story…Again, when is thin being too thin? These decals are even thinner than the Trumpeter one will roll on you without a second glance! I goofed on the left tail code. The 7 got rolled up and got cut up during the unrolling procedure and I had to go and eyeball it with a paint brush. You can’t tell it at first glance but carefull examination, and you can easily spot where I goofed….With the major construction done, the rest can now be assembled.
| FINAL CONSTRUCTION |
 Final construction started with the wheels. These
are already sprayed white and I had to cajole the vinyl tires on. They
seemed to be tighter than the A-1D tires. The tail gear is then assembled
and slotted into place. Next, are all the little wing pylons. Judging from
the pics, they only have one instructions on the pylons so I just judged the
best one from the decal sheet and apply them on. I did remove one of the
pins from the sway braces since the bombs comes from all over the place. The
antennas are then added before going to the special package.
Final construction started with the wheels. These
are already sprayed white and I had to cajole the vinyl tires on. They
seemed to be tighter than the A-1D tires. The tail gear is then assembled
and slotted into place. Next, are all the little wing pylons. Judging from
the pics, they only have one instructions on the pylons so I just judged the
best one from the decal sheet and apply them on. I did remove one of the
pins from the sway braces since the bombs comes from all over the place. The
antennas are then added before going to the special package.
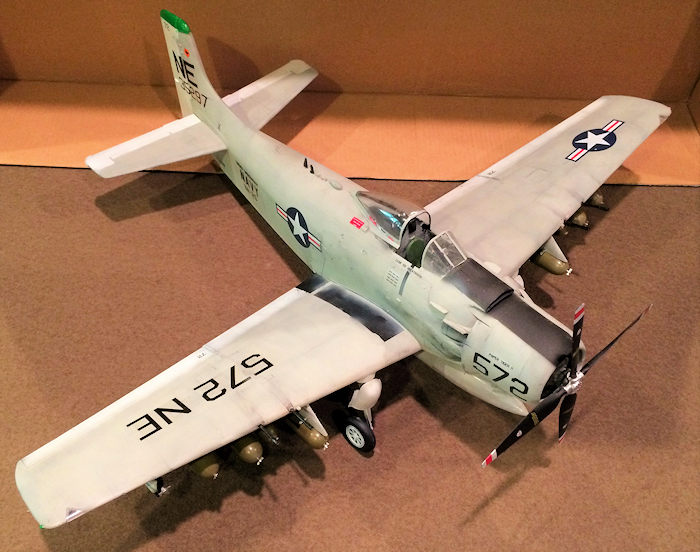
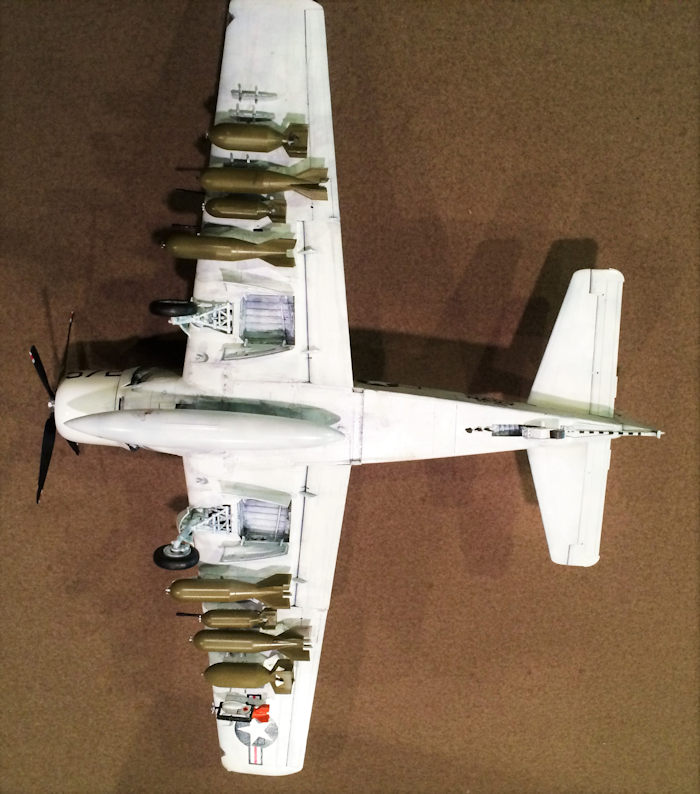
The special package of course is Mrs. Sani-Flush herself. Trumpeter gave you two of them and Brengun also have a very nice resin version with a much more detailed photo-etch brass brace. However, judging from the size, Brengun one is way too big. Seating a 1/32 figure on it, you can tell it is the equivalent of 3.5 feet in length! That is way too big. Looking at the photos, it seems Brengun just took the photo dimensions and went from there. Unfortunately, most of the photos on the toilet was shot from an angle and from the bottom, this plus the exposure “stretched” the special package a bit, making it seemed larger than the actual thing. The Trumpeter one is much closer to the actual size. However, the detail isn’t nearly as close to resin and the frame isn’t close to being detailed. However, I’m just too lazy to cut up the Brengun frame to the correct size and so just used the Trumpeter’s parts. One thing Brengun did correctly, which Trumpeter missed was that there are some markings on the toilet itself and the Brengun decals just fit the Trumpeter’s toilet. One thing both forgot was the tail fin. Looking carefully at the photos, Sani-flush did have what it looked like a 100lbs bomb tail fin grafted onto it to stabilize it more during the drop. I cut off the tail off of a 100lbs bomb from the kit, painted day-glow Orange and grafted onto the tail before putting it on the correct pylon.
 Now, the bombload. Previously, other manufactures
took liberty with all sorts of bomb loadout for their Paper Tiger II kit.
Some even carried rockets and missiles that was not in the original loadout.
Judging the photos and from interviews with the crews, Paper Tiger II
carried an all-out “bombed out” bomb load. Because during this time, there
was a bomb shortage, all the Mk. 80 “slick” series was reserved for the fast
mover jets. Skyraiders were just content dropping excess WW II leftover
bombs. Due to once again, exposure by the camera and the angle, many thought
the inner pylons carried a submunition dispenser when it is in fact, a
500lbs bomb. The photo “stretched” the bomb’s dimensions. The bomb load was
the same across both wings with 500lbs bomb with a cruciform fins on the
inner pylons. Then the next pylon carried a 250lbs bomb with cruciform fins,
and then two more 500lbs bombs with cruciform fins. The last pylon on the
right wing of course, carried the special package. Now, I have four of the
correct 500 pounders with the correct cruciform fins, two from my F-86 kit,
two from my F-84 kits, but still needed two more and two 250 lbs too. Until
I get the correct aftermarket ones, I was forced to use the kit bombs as
substitute. These were all sprayed with Olive Drab with silver fuses and
then added sequentially to their pylons. It was only after all the bombs
were added that I discovered the yellow ring around the nose was forgotten!
Ohh well, will add them eventually these days…I hope…The last bits were the
underwing pitot tube and the canopy, which was posed open so I can add the
pilot figure later, posed to look like as if the plane was sitting on the
cat just moments before launch.
Now, the bombload. Previously, other manufactures
took liberty with all sorts of bomb loadout for their Paper Tiger II kit.
Some even carried rockets and missiles that was not in the original loadout.
Judging the photos and from interviews with the crews, Paper Tiger II
carried an all-out “bombed out” bomb load. Because during this time, there
was a bomb shortage, all the Mk. 80 “slick” series was reserved for the fast
mover jets. Skyraiders were just content dropping excess WW II leftover
bombs. Due to once again, exposure by the camera and the angle, many thought
the inner pylons carried a submunition dispenser when it is in fact, a
500lbs bomb. The photo “stretched” the bomb’s dimensions. The bomb load was
the same across both wings with 500lbs bomb with a cruciform fins on the
inner pylons. Then the next pylon carried a 250lbs bomb with cruciform fins,
and then two more 500lbs bombs with cruciform fins. The last pylon on the
right wing of course, carried the special package. Now, I have four of the
correct 500 pounders with the correct cruciform fins, two from my F-86 kit,
two from my F-84 kits, but still needed two more and two 250 lbs too. Until
I get the correct aftermarket ones, I was forced to use the kit bombs as
substitute. These were all sprayed with Olive Drab with silver fuses and
then added sequentially to their pylons. It was only after all the bombs
were added that I discovered the yellow ring around the nose was forgotten!
Ohh well, will add them eventually these days…I hope…The last bits were the
underwing pitot tube and the canopy, which was posed open so I can add the
pilot figure later, posed to look like as if the plane was sitting on the
cat just moments before launch.
| CONCLUSIONS |
 Once again, we have a
winner….Took me two long years of on and off to do this because I got so side
tracked with other builds including that damned 1/16th scale King Tiger that I’m
hoping to finish one of these days…If AFV Club can god damn send me the inner
hull ammo rack correction sets! Anyways, I always wanted Paper Tiger II and its
very unique special package. It took awhile and was quite the hit in the pocket
books but in the end, it was worth it as people may not notice, but eventually,
they went, “Is that what I think it is on that plane’s wing”? Always bring a
smile to my face! Now, anyone wanna try and build that Skyraider from the “dambusters”
that carried and dropped a kitchen sink during the Korean War?
Once again, we have a
winner….Took me two long years of on and off to do this because I got so side
tracked with other builds including that damned 1/16th scale King Tiger that I’m
hoping to finish one of these days…If AFV Club can god damn send me the inner
hull ammo rack correction sets! Anyways, I always wanted Paper Tiger II and its
very unique special package. It took awhile and was quite the hit in the pocket
books but in the end, it was worth it as people may not notice, but eventually,
they went, “Is that what I think it is on that plane’s wing”? Always bring a
smile to my face! Now, anyone wanna try and build that Skyraider from the “dambusters”
that carried and dropped a kitchen sink during the Korean War?
6 October 2016
Copyright ModelingMadness.com
If you would like your product reviewed fairly and fairly quickly, please contact the editor or see other details in the Note to Contributors.