Hasegawa 1/48 A-4M Skyhawk
| KIT #: | 07233 |
| PRICE: | $40.95 MSRP |
| DECALS: | Two options |
| REVIEWER: | Dan Lee |
| NOTES: |
Superscale Sheet 48-824, Squadron A-4M Canopy, Hasegawa Weapons
Sets and parts of Aires A-4M Cockpit Set used |
| HISTORY |
The A-4
Skyhawk is one of the great jet aircraft of the Cold War.
It began as
The A-4M
Skyhawk was the last new major model of the Skyhawk.
Designed for the USMC during the Vietnam War, it
incorporated a lot of the modifications based on lessons learned including a
more powerful engine, advanced avionics and enlarged cockpit.
It was operational with the USMC from 1971 till 1994.
Other nations flew variants of the A-4M including
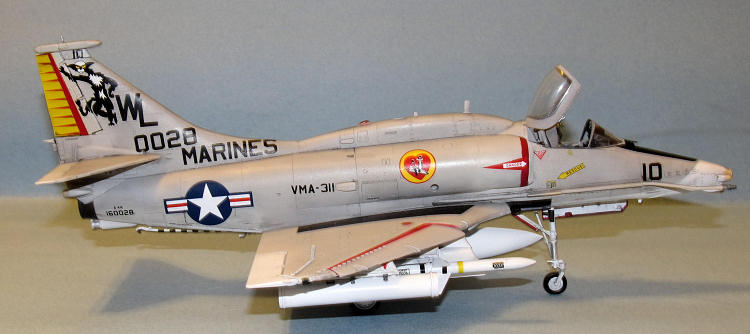
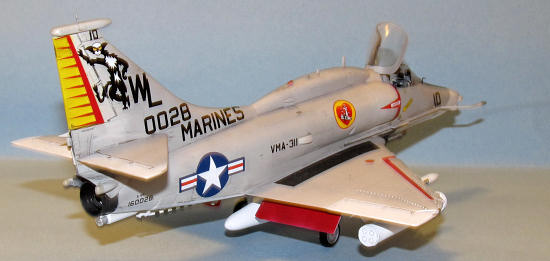
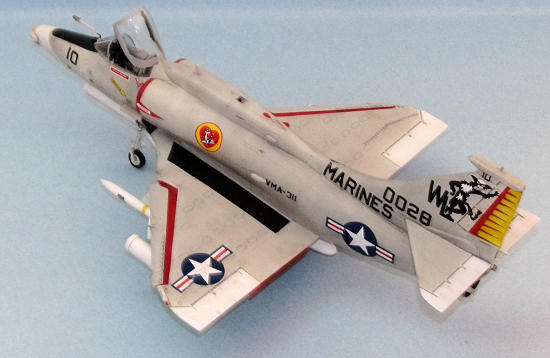 VMA-311
“Tomcats”
VMA-311
“Tomcats”
VMA-311 was
originally a training squadron during WW2.
As the war in the Pacific progressed, it was soon
organized into a front line squadron (VMF-311) as part of Marine Air Group 31
and was equipped with the F4U
Corsair.
Unlike many notable USMC squadrons, it did not have many
aces (only two) as its main role was providing close air support.
The Tomcat’s had a significant contribution to the war
effort in helping develop the close air support doctrine that would play a
significant role in the fierce battles of
In 1949,
VMF-311 was one of the first USMC jet squadrons, flying the F9F Panther.
They were sent off to
Ted
Williams was called up to active duty near the end of the 1951 baseball season
and was rather livid at being an inactive reservist being recalled to duty while
active duty reservists were being held back, but he served without uttering a
word in public. In what one might consider an odd quirk of fate, he flew as
wingman to the soon to be famous John Glenn.
Despite his “right stuff”, John Glenn earned the
nickname “Magnet Ass” for his uncanny ability to attract flak as his plane was
often hit by flak and on two occasions he returned his Panther back to base with
more than 250 bullet/fragment holes.
In 1957,
VMF-311 was re-designated VMA-311 and soon earned the nickname Tomcats.
In 1958, VMA-311 was assigned to fly the A4D Skyhawk and
flew various versions including the A-4M till 1988 when VMA-311 transitioned to
the AV-8B Harrier which it still flies today.
Info from Wiki.
| THE KIT |
Hasegawa pretty much owns the A-4 series in 1/48 scale. Nice detail and clean parts. For a much better write up of what you expect in the box, see Scott’s preview of the similar A-4N kit.
Only real issue I have is that the cockpit console Hasegawa provides is inaccurate.
| CONSTRUCTION |
 As with most
aircraft models, it began with the cockpit.
Hasegawa provides an okay cockpit with the inaccurate
console and the ejection seat is lacking in detail which is why I preferred to
use an aftermarket cockpit.
I had good experiences with the Cutting Edge A-4E
cockpit but that line is no longer available so I bought the Aires A-4M cockpit.
The space inside the Skyhawk’s nose is rather limited
and highlights one of the drawbacks to the Aires resin cockpit tub is that it
has no nose wheel well (unlike the Hase part) which I did not realize this until
I had hacked out the plastic sidewalls.
To say that I was unhappy about it was an
understatement.
I set the kit aside for a couple of days as I figured out what
possible solution I could do.
I abandoned the resin tub, kept the resin seat, console
and sidewall and jammed this mishmash of parts together.
It was not a very good fit... in fact it was awful.
As with most
aircraft models, it began with the cockpit.
Hasegawa provides an okay cockpit with the inaccurate
console and the ejection seat is lacking in detail which is why I preferred to
use an aftermarket cockpit.
I had good experiences with the Cutting Edge A-4E
cockpit but that line is no longer available so I bought the Aires A-4M cockpit.
The space inside the Skyhawk’s nose is rather limited
and highlights one of the drawbacks to the Aires resin cockpit tub is that it
has no nose wheel well (unlike the Hase part) which I did not realize this until
I had hacked out the plastic sidewalls.
To say that I was unhappy about it was an
understatement.
I set the kit aside for a couple of days as I figured out what
possible solution I could do.
I abandoned the resin tub, kept the resin seat, console
and sidewall and jammed this mishmash of parts together.
It was not a very good fit... in fact it was awful.
It took a
lot of patient work sanding and filling to get the fuselage.
I even had to remove part of the nose.
On top of that, the resin console was too high on the
Hasegawa tub (something that I didn’t notice while test fitting!) so I ended up
using a bit of Vallejo plastic putty to fill very obvious gaps.
At this point, I realized that the Hasegawa canopy
wasn’t going to fit and ended up ordering the Squadron vacuform A-4M canopy.
 One thing I
learned building models is patience and it takes a lot of patience to clean up a
vacuform canopy.
It’s easy to remove the part from the sheet but it is another to
split the canopy parts and remove the excess.
I split the parts by running a knife with a fresh #11
blade along to split till I get a groove and then slowly and gently cut with
scissors (the groove prevents the parts from bending and causing the piece to
crack or split.)
For the excess material, I found that gently running sandpaper
along the edges till the excess material can be gently pulled away works best at
keeping its shape even though it takes a rather long time.
Once all the parts were cleaned, they were masked using
Tamiya tape in preparation for painting.
One thing I
learned building models is patience and it takes a lot of patience to clean up a
vacuform canopy.
It’s easy to remove the part from the sheet but it is another to
split the canopy parts and remove the excess.
I split the parts by running a knife with a fresh #11
blade along to split till I get a groove and then slowly and gently cut with
scissors (the groove prevents the parts from bending and causing the piece to
crack or split.)
For the excess material, I found that gently running sandpaper
along the edges till the excess material can be gently pulled away works best at
keeping its shape even though it takes a rather long time.
Once all the parts were cleaned, they were masked using
Tamiya tape in preparation for painting.
The rest of
the plane went together and no real issues filling/sanding including the rather
troublesome forward join where the wing and fuselage meet at the nose wheel
well.
Since this model seemed to be an embodiment of Murphy’s Law, it seemed
only fitting when I lost the starboard Radar Warning Receiver located by the
exhaust.
I could not find this piece for two weeks till I found it sitting on top
of the microwave (?) as I was cleaning.
Unlike my previous Skyhawk, I closed up the air brakes.
I added most of the antennas and landing gear (I normally don’t do that) as it would make painting easier.
| COLORS & MARKINGS |
First the
cockpit interior was painted using Xtracrylix Dark Gull Gray.
The consoles were hand painted flat black and the
details were picked out using a 00 brush using silver and white paint.
A couple of the details were painted red.
Once that was dry, the cockpit was stuffed with Kleenex
and masked.
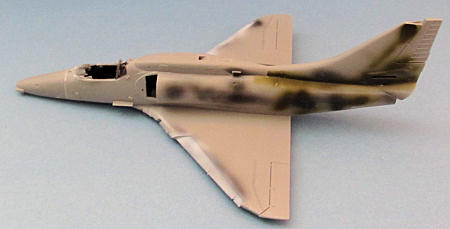
The exterior was preshaded dark gray and then the underside and
including the rudder and flaps were sprayed Tamiya Flat White a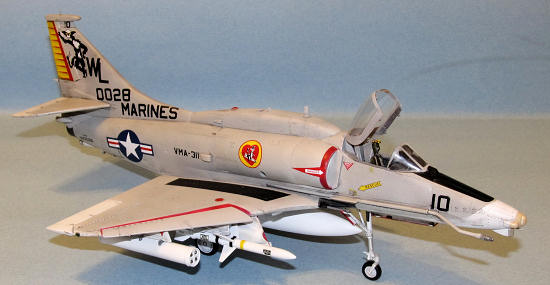 nd
when dry, the demarcation lines masked off and the topside was sprayed with two
thin coats Gunze Light Gull Gray to let the post shade subtly show through.
nd
when dry, the demarcation lines masked off and the topside was sprayed with two
thin coats Gunze Light Gull Gray to let the post shade subtly show through.
I painted the canopy parts at the same time (makes things easier.)
Next, I had
to mask off the tail to paint it yellow, the intakes to paint on the insignia
red and parts of the nose for Radome Tan.
Just a word of advice, do a good job of masking the
yellow and red as they are difficult colors to cover up if you have an oops
moment (I did not have one, but in the past I have.)
Once dry, I
sprayed on thin coat of Tamiya clear gloss to make a nice surface for the
decals.
I used the Superscale 48-824 sheet for the markings as I like the
colorful 70s era markings.
For the most part I used MicroSet and for the really
stubborn decals (especially the red decals for tail) I used Solvaset.
The decals worked out except a couple of tail feathers
are not 100% lined up.
A
watercolor wash of burnt sienna and raw umber was used to get the details to
show up.
I made the underside and undercarriage slightly dirtier but not that
dirty.
The excess wash and decal solution were removed and a final coat of
Xtracrylix Satin Clear was sprayed on.
| FINAL CONSTRUCTION |
The edges
of the landing gear doors (painted at the same time as the plane) were colored
red using a red Sharpie marker.
It works, but I found the felt tip gets worn away pretty
quick.
Another touch was using aluminum foil (glued on with Micro Foil glue)
for the oleo strut.
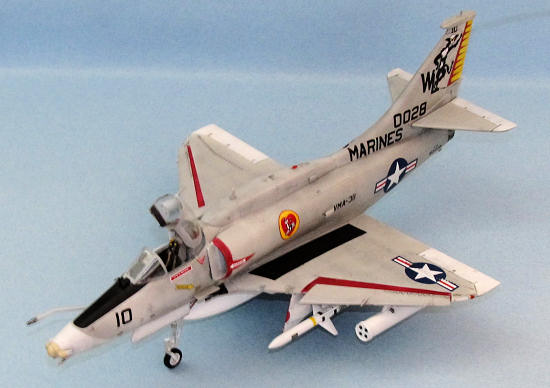 All the
miscellaneous parts (previously painted) except the canopy and weapons were
added including the wheels, exhaust, drop tank and the doors.
All the
miscellaneous parts (previously painted) except the canopy and weapons were
added including the wheels, exhaust, drop tank and the doors.
Hasegawa
does not provide any weapons (except the internal guns) so I rummaged through my
various parts boxes to find something.
I had some Mk 82s and Mk 83s, but no MERs.
I was almost ready to keep the plane clean (which my
lazy side would appreciate) till I found a photo of an A-4M carrying Shrike ARMs
and Zuni rocket pods as part of an “Iron Hand” (suppression of enemy air
defenses) mission.
Voila, I had my loadout for this model as I have both
weapons handy thanks to my (sigh) past purchases of Hasegawa weapons sets.
The missiles and pods were painted, decaled and glued in
place.
The last
steps were attaching the Aires PE for the HUD and canopy and then gluing the
canopy in place.
I needed more hold than Elmers white glue could give so I (very
very carefully) used Tamiya Extra Thin glue to attach the clear parts to the
fuselage.
| CONCLUSIONS |
The
Hasegawa A-4M is an excellent kit to build.
It’s not something I would recommend for a beginner, but
if you have some experience these kits are worth a look.
If you want an accurate console, better cockpit details
and bang seat you will have to go the aftermarket route.
If you want to save some of your sanity (and money) then
I suggest just getting an aftermarket bang seat.
July 2011
If you would like your product reviewed fairly and fairly quickly, please contact the editor or see other details in the Note to Contributors.